Hasegawa 1/48 Ki-43-I 'Oscar'
| KIT #: | 9080 |
| PRICE: | $5.00 from a vendor |
| DECALS: | Two options |
| REVIEWER: | Scott Van Aken |
| NOTES: |
| HISTORY |
The Ki-43 Hayabusa was the Japanese Army Air Forces' equivalent of the Navy's A6M Zero. It as the first fighter with retractable landing gear in the service and was built with maneuverability and range as its main requirements. Its armament was pathetic with twin 7.7mm machine guns and it had almost no armor protection for either the pilot or fuel systems. Against an inferior enemy, like the Chinese, the plane was a terror. Against a better equipped adversary, it didn't fare quite as well.
 The initial aircraft were in squadron service when the Pacific
war broke out and they were quickly sent to Southeast Asia where they
participated in the fight against the Allies in Burma and southern China. They
were also found in the Dutch East Indies and New Guinea. While they were quite
successful against Allied aircraft and their inexperienced pilots, by mid 1943
when better planes were available for the Allies, the Ki-43 began to show its
deficiencies.
The initial aircraft were in squadron service when the Pacific
war broke out and they were quickly sent to Southeast Asia where they
participated in the fight against the Allies in Burma and southern China. They
were also found in the Dutch East Indies and New Guinea. While they were quite
successful against Allied aircraft and their inexperienced pilots, by mid 1943
when better planes were available for the Allies, the Ki-43 began to show its
deficiencies.
However, many JAAF aces flew the Ki-43 and it was modified throughout the war, though it never was able to reach parity with Allied types. It was decided to code name these planes in the 1942/43 time period as most Allied pilots didn't know what Japanese planes were called. Interestingly, all these planes were given 'hill-billy' US names like Zeke, Claude, Topsy, Pete and so forth. Never a Tom. or John, or David. The Ki-43 was code named Oscar, though throughout the war, like most Japanese fighters, it was simply referred to as a Zero!
| THE KIT |
Not a new release, but one that has been around for a while, it is currently the best Oscar in 1/48 and quite popular with JAAF modelers thanks to the many interesting schemes in which it can be painted.
 The first thing you see is that the wing tips are separate. This is to allow the
later model Ki-43s with their longer wings to be done using one sprue for the
wings. This means that the tips of the ailerons will have to be filled and
sanded as the tips cut through them. I would seem to me that offering separate
ailerons would have eliminated this need, but Hasegawa chose this method.
The first thing you see is that the wing tips are separate. This is to allow the
later model Ki-43s with their longer wings to be done using one sprue for the
wings. This means that the tips of the ailerons will have to be filled and
sanded as the tips cut through them. I would seem to me that offering separate
ailerons would have eliminated this need, but Hasegawa chose this method.
Like most modern Hasegawa 1/48 kits, the detailing is just superb. Though there are aftermarket sets for the kit, it really isn't needed. Unlike the Ki-84, you don't have a lot of separate knobs and buttons in the cockpit. I recall that there were as many as 15-20 parts to the Frank cockpit and this one only has 9 and that includes the sidewalls.
Thankfully, the only 'plug ins' are the prop and the tail wheel. This makes for a much sturdier construction. The aft part of the prop spinner is an interesting construct as it comes in two parts, trapping the prop between them. The forward part is a separate piece. This should help with painting if you have a two color spinner.
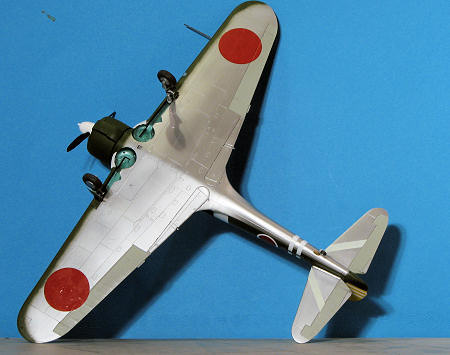
The tires are already flattened and not bulged. You also get a pair of drop tanks should you wish them. The canopy can be displayed open, which is quite nice. Also separate are the underfuselage 'butterfly' maneuvering flaps. These slid back to increase the area of the wing and therefore increase maneuverability. However, I must mention that looking at several dozen images of Oscars on the ground, I did not once see these deployed.
 Instructions are typically
excellent and give Gunze Paint matches. There are decals for two aircraft. To
the surprise of no one who models Japanese planes, there are markings for Tateo
Kato of the 64th Sentai in Burma during spring of 1942. This aircraft has lots
of white arrows and stripes on it. You get the markings as single or two-piece
striping except for the tail arrow. I guess you can paint the white part if you
choose. The other plane is for 1 sentai commander Maj. Kinshiro Takeda, in late
1942. Both planes are in Nakajima green upper with Kato's plane having a
green-grey underside and Takeda's in unpainted aluminum. Neither have the yellow
IFF wing bands, but Takeda's has a yellow rudder and elevators. It only shows
the yellow on the top of the elevators. Perhaps an Oscar enthusiast can give
more information on this. I would also think that the control surfaces on the
underside of Takeda's plane would be in the grey green color as well.
Instructions are typically
excellent and give Gunze Paint matches. There are decals for two aircraft. To
the surprise of no one who models Japanese planes, there are markings for Tateo
Kato of the 64th Sentai in Burma during spring of 1942. This aircraft has lots
of white arrows and stripes on it. You get the markings as single or two-piece
striping except for the tail arrow. I guess you can paint the white part if you
choose. The other plane is for 1 sentai commander Maj. Kinshiro Takeda, in late
1942. Both planes are in Nakajima green upper with Kato's plane having a
green-grey underside and Takeda's in unpainted aluminum. Neither have the yellow
IFF wing bands, but Takeda's has a yellow rudder and elevators. It only shows
the yellow on the top of the elevators. Perhaps an Oscar enthusiast can give
more information on this. I would also think that the control surfaces on the
underside of Takeda's plane would be in the grey green color as well.
| CONSTRUCTION |
As mentioned, this kit was bought in a zip lock bag. The previous owner had removed all of the parts from the sprues (except the clear bits) and even numbered several of them with a felt tip pen. While this may read 'disaster in the making' for some, those of us who have built a lot of kits won't have any trouble assembling this one, especially as the Ki-43 is not a parts intensive aircraft.
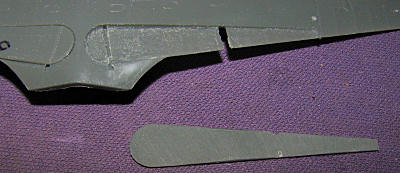 The real
benefit to me was that all the bits were already cleaned up without nary a sprue
stub. Perfect for me as it meant I could simply start gluing parts. But first, I
had to do something about those flaps. Now, one can either sand everything down,
or grind away the additional plastic to get the flaps to fit into the recesses.
I did both. The flaps themselves were sanded quite thin and I used a motor tool
to grind away at the inside of the flap well. It isn't totally flush as you can
see from the left side of the image, but it is close enough.
The real
benefit to me was that all the bits were already cleaned up without nary a sprue
stub. Perfect for me as it meant I could simply start gluing parts. But first, I
had to do something about those flaps. Now, one can either sand everything down,
or grind away the additional plastic to get the flaps to fit into the recesses.
I did both. The flaps themselves were sanded quite thin and I used a motor tool
to grind away at the inside of the flap well. It isn't totally flush as you can
see from the left side of the image, but it is close enough.
Next, the interior parts were glued together and the cockpit side walls were cemented to the interior of the fuselage. This is because most of it will be painted Nakajima Interior green and always best to have that stuff assembled first. I used a nearly gone bottle of Aeromaster acrylic for this. The shade is more of a yellow green than a straight green and looks good. The various black boxes and other bits were then brush painted. Some detail work was done, then a black wash to break up the monotony of things and the instrument panel decals were put on. These fit perfectly. I only wish the previous owner had left some of the parts on the sprues as painting these bits prior to assembly would have been nice
 Anyway, while that was drying, the fuselage halves were glued
together, trapping the plastic bit that holds on the tail wheel strut. When dry,
the seams were sanded and held up to the light to check for areas that needed
some filler. One other thing about seams is sometimes they are very fine. After
sanding and wiping down the part with a cloth, you'll see small lines where the
sanding dust has collected. These and other seams are filled using super glue as
it doesn't shrink and can be easily scribed through without cracking.
Anyway, while that was drying, the fuselage halves were glued
together, trapping the plastic bit that holds on the tail wheel strut. When dry,
the seams were sanded and held up to the light to check for areas that needed
some filler. One other thing about seams is sometimes they are very fine. After
sanding and wiping down the part with a cloth, you'll see small lines where the
sanding dust has collected. These and other seams are filled using super glue as
it doesn't shrink and can be easily scribed through without cracking.
Back at the interior, Eduard #48-281 JAAF seat belts were used and attached to the seat. The Japanese rarely used a full harness and mostly just the belt as it was felt a shoulder belt impeded their ability to look around. The IJN did use a single shoulder belt like you have in your car as that kept their teeth out of the gun sight during an arrested landing. With that added on and painted, the floor section was stuck into place from the underside. Fit is superb.
Next, the wing was glued in place. This kit has a very good fitting wing and only a gap at the lower rear marred what would have been a seamless installation. That was filled with several applications of thick super glue and sanded down. The tail planes were then pressed into place (it is a very tight fit) and later had a small amount of glue applied just to be sure. At this stage, painting seemed to be a good idea.
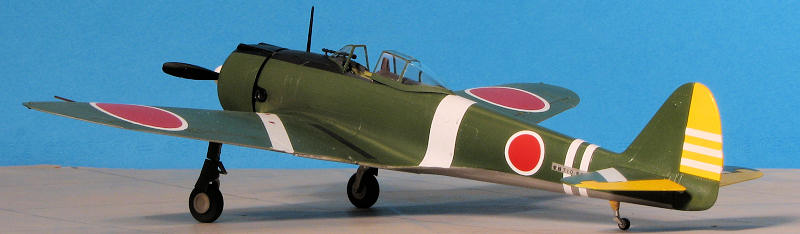
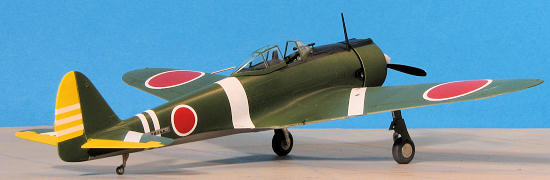
| COLORS & MARKINGS |
 I wanted to use aftermarket markings for this one, but -I Hayabusas are not
super popular for some reason. I finally picked an option on
Aeromaster 48-316, IJAAF Falcons
Part I. It is for Maj Kinshiro Takeda's 1st Hiko-Sentai plane when based in
Hanoi during October 1942. It is the same set of markings that is offered by the
kit decals, but I prefer the less thick Aeromaster ones. Besides, on this sheet,
the white is white. First thing is to paint the underside aluminum. This I did
with Alclad II, which was sprayed onto the bare plastic and bare filler. Then
the lower control surfaces had the surrounding area masked off and were painted
grey-green, a standard for Japanese control surfaces, using Aeromaster Acrylics.
With that done, the rudder, upper surface elevator and spinner were painted
white using Boyd's Gloss White. The rudder and upper elevators were then painted
yellow using something I already had mixed for another project. Enamel, I think.
Later this was masked off as was the underside of the fuselage and the upper
surfaces and entire engine cowling were painted Aeromaster Nakajima Army Green
from their defunct acrylic line. This was also painted on the outer landing gear
doors.
I wanted to use aftermarket markings for this one, but -I Hayabusas are not
super popular for some reason. I finally picked an option on
Aeromaster 48-316, IJAAF Falcons
Part I. It is for Maj Kinshiro Takeda's 1st Hiko-Sentai plane when based in
Hanoi during October 1942. It is the same set of markings that is offered by the
kit decals, but I prefer the less thick Aeromaster ones. Besides, on this sheet,
the white is white. First thing is to paint the underside aluminum. This I did
with Alclad II, which was sprayed onto the bare plastic and bare filler. Then
the lower control surfaces had the surrounding area masked off and were painted
grey-green, a standard for Japanese control surfaces, using Aeromaster Acrylics.
With that done, the rudder, upper surface elevator and spinner were painted
white using Boyd's Gloss White. The rudder and upper elevators were then painted
yellow using something I already had mixed for another project. Enamel, I think.
Later this was masked off as was the underside of the fuselage and the upper
surfaces and entire engine cowling were painted Aeromaster Nakajima Army Green
from their defunct acrylic line. This was also painted on the outer landing gear
doors.
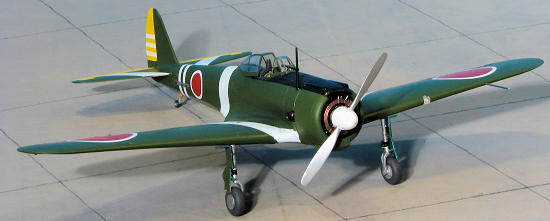
A brief stint at the work bench where the tail wheel was plugged in and the main landing gear was glued into place.
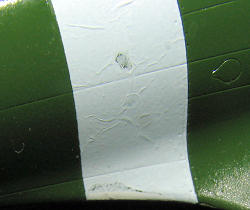 When one
considers that the Aeromaster decals were not fitted for the Hasegawa kit (which
hadn't been released when the sheet was developed), the markings fit rather
well. The fuselage bands tended to be a bit too long, which is fine as they can
be trimmed. Wing stripes were just about the right size with the tail stripes
being a tad too long. I did learn NOT to use Mr Decal Softener on these as they
sort of ate through the fuselage bands in spots. I used spare white decal paper
to patch these areas as best I could.
When one
considers that the Aeromaster decals were not fitted for the Hasegawa kit (which
hadn't been released when the sheet was developed), the markings fit rather
well. The fuselage bands tended to be a bit too long, which is fine as they can
be trimmed. Wing stripes were just about the right size with the tail stripes
being a tad too long. I did learn NOT to use Mr Decal Softener on these as they
sort of ate through the fuselage bands in spots. I used spare white decal paper
to patch these areas as best I could.
The rest of the decals went on without too much trauma. The Aeromaster instructions show white horizontal stab bands on the underside, but do not provide them on the sheet. For this I used the kit decals (as I did for stencils and a few other markings), though they are not as wide as the ones provided by Aeromaster. After much fussing with most of the decals, I gave up in frustration as it seemed like every attempt to improve things only made them slightly worse. These things happen. A coat of clear semi-matte using Polly Scale's clear was applied and it was on to seeing what else I could screw up.
| FINAL CONSTRUCTION |
Final bits were rather extensive. The exhaust were glued on as
was the completed engine. Then the cowling was cemented in place. Getting the
engine to line up square in the opening did not go well so I did best I could
and hoped few would notice. The windscreen was attached with clear paint and I
glued on the radio mast. Once all that
 dried, I flipped things over and attached
the assembled three piece wheels. These have a flat spot on them so it is a good
idea to be sure that is properly aligned. Then the two piece gear doors were
glued on. Then the canopy section was glued in the open position. There are no
canopy rails for this and the canopy is actually a bit too narrow to be posed
open, hence the rather poor fit. The prop was pushed in place and I used some
pastels for exhaust. Something didn't look right and it was then that I noticed
there was no pitot tube. Searching the remnants of the box turned up nothing so
I took a normal straight pin, cut off the head and filed the end flat. It was
then glued in place. It works. For the landing light, I used an MV #25 lens. It
and the cover are held in place with clear, gloss paint.
dried, I flipped things over and attached
the assembled three piece wheels. These have a flat spot on them so it is a good
idea to be sure that is properly aligned. Then the two piece gear doors were
glued on. Then the canopy section was glued in the open position. There are no
canopy rails for this and the canopy is actually a bit too narrow to be posed
open, hence the rather poor fit. The prop was pushed in place and I used some
pastels for exhaust. Something didn't look right and it was then that I noticed
there was no pitot tube. Searching the remnants of the box turned up nothing so
I took a normal straight pin, cut off the head and filed the end flat. It was
then glued in place. It works. For the landing light, I used an MV #25 lens. It
and the cover are held in place with clear, gloss paint.
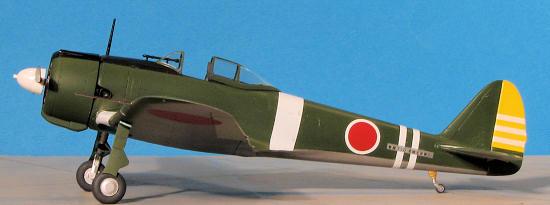
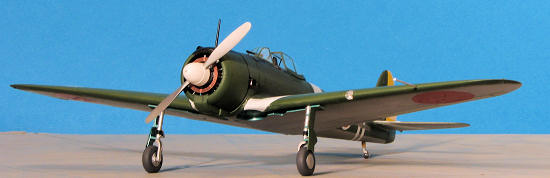
| CONCLUSIONS |
This is the fifth 1/48 Oscar I've built over the years. One Otaki, one Fine Molds, and now three Hasegawa. I find it to be a superb build and aside from the darn extended combat flaps, is a great kit. I do highly recommend it.
| REFERENCES |
January 2011
Thanks to my innate inability to pass up a cheap kit.
If you would like your product reviewed fairly and quickly , please contact me or see other details in the Note to Contributors.