Hasegawa 1/72 Ki-43-II Hayabusa
| KIT #: | 51630 (SP130) |
| PRICE: | 1200 yen in 1994 |
| DECALS: | Four options |
| REVIEWER: | Scott Van Aken |
| NOTES: | Aeromaster decals. 1994 Limited Edition |
| HISTORY |
The Ki-43 was the most widely used Army fighter, and equipped 30th sentai FR,(flight regiment) and 12th chutais IS,(independent squadrons). The first unit equipped with the Ki 43-I was the 59th FR at Hankow Airfield, during June–August 1941. Operational sorties over Hengyang on 29. October 1941. The second unit to re-equip with the new Aircraft was the 64th FR, from August to November 1941.[
 The first version, Ki-43-I, entered service in 1941, the
Ki-43-II in December 1942, the Ki-43-II-Kai
in June 1943, and the Ki-43-IIIa in summer 1944. The aircraft fought in China,
Burma, the Malay Peninsula, New Guinea, the Philippines, South Pacific islands
and the Japanese home islands.
The first version, Ki-43-I, entered service in 1941, the
Ki-43-II in December 1942, the Ki-43-II-Kai
in June 1943, and the Ki-43-IIIa in summer 1944. The aircraft fought in China,
Burma, the Malay Peninsula, New Guinea, the Philippines, South Pacific islands
and the Japanese home islands.
Like the Zero, the Ki-43 initially enjoyed air superiority in the skies of Malaya, Netherlands East Indies, Burma and New Guinea. This was partly due to the better performance of the Oscar and partly due to the relatively small numbers of combat-ready Allied fighters, mostly the Curtiss P-36 Hawk, Curtiss P-40, Brewster Buffalo, Hawker Hurricane and Curtiss-Wright CW-21 in Asia and the Pacific during the first months of the war. As the war progressed, however, the fighter suffered from the same weaknesses as the Ki-27 "Nate" and the A6M Zero; light armor and less-than-effective self-sealing fuel tanks, which caused high casualties in combat. Its armament of two machine guns also proved inadequate against the more heavily armored Allied aircraft. As newer Allied aircraft were introduced, such as the Republic P-47 Thunderbolt, Lockheed P-38 Lightning, North American P-51 Mustang, Vought F4U Corsair, Grumman F6F Hellcat and late-model Supermarine Spitfire/Seafire, the Japanese were forced into a defensive war and most aircraft were flown by inexperienced pilots. However, even near the end, the Oscar's excellent maneuverability could still gain advantage over rash Allied pilots. From October to December 1944, 17 Ki-43s were shot down in air combat; their pilots claimed seven C-47s, five B-24 Liberators, two Spitfires, two Beaufighters, two Mosquitoes, two F4U Corsairs, two B-29 Superfortresses, one F6F Hellcat, one P-38, and one B-25. Like most Japanese combat types, many Hayabusas were at the end expended in kamikaze raids.
 The Ki-43 also served in an air defense role over Formosa,
Okinawa and the Japanese home islands. Some examples were supplied to the
pro-Japanese regimes of Thailand, Manchukuo and Wang Jingwei Government as well.
The Thai units sometimes fought against the USAAF in southern China.
The Ki-43 also served in an air defense role over Formosa,
Okinawa and the Japanese home islands. Some examples were supplied to the
pro-Japanese regimes of Thailand, Manchukuo and Wang Jingwei Government as well.
The Thai units sometimes fought against the USAAF in southern China.
Hayabusas were well liked in the JAAF because of the pleasant flight characteristics and excellent maneuverability, and almost all JAAF fighter aces claimed victories with Hayabusa in some part of their career. At the end of the war, most Hayabusa units received Ki-84 Hayate "Frank" fighters, but some units flew the Hayabusa to the end of the war. The top-scoring Hayabusa pilot was Sergeant Satoshi Anabuki with 39 confirmed victories, almost all scored with the Ki-43.
After the war, some captured examples served in limited numbers in the French Air Force in Indochina against Viet Minh rebels.
| THE KIT |
Hasegawa's 1/72 Ki-43 was originally released in 1987 and while you'd think that a kit of that time frame would have engraved panel lines, that is not the case with this one, the surface detailing be petite raised lines.
The kit itself is pretty basic as befits a 1/72 single engine prop WWII fighter. There is a slab floor onto which a rear bulkhed section, a seat pan and control stick are fitted. An instrument panel with a decal for instruments is included. There is no interior sidewall detail.
For the front of the aircraft there is an engine face through
which a prop shaft is fitted. There is a plug
 section in the back of the engine
face to keep the shaft in place. Wings already have holes drilled in the
underside for the two drop tanks so if you don't want the tanks, you'll have to
fill them. Wings are a single lower piece with the rather shallow main gear
wells molded in place and two upper sections.
section in the back of the engine
face to keep the shaft in place. Wings already have holes drilled in the
underside for the two drop tanks so if you don't want the tanks, you'll have to
fill them. Wings are a single lower piece with the rather shallow main gear
wells molded in place and two upper sections.
The kit can only be built gear down as the main gear doors are a single piece, adding a bit of a challenge for masking the wing leading edge ID band if your option has that. Single struts have ejector pin marks on them as do the inside of the gear doors. The outer portion of the wheels have sink areas on them. The tail gear and gun sight are molded onto one fuselage half.
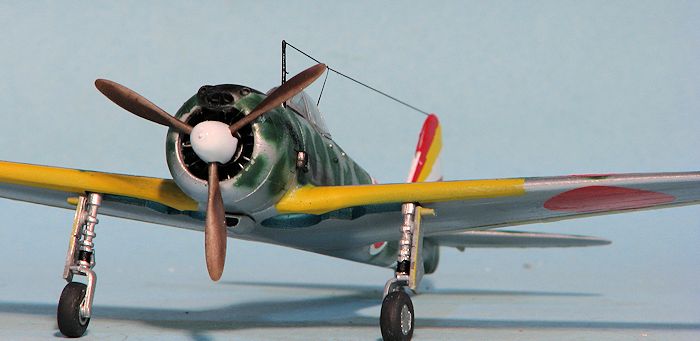
The forward cowl and upper section are a single piece. You have two types of exhaust that can be fitted so check references to see which is used. A radio mast along with two different designs of head rest are also included. Pitot tube is molded with an upper wing section. This is all capped with a one-piece canopy. The only part not used is the radiator that fits in front of the engine as used on the -I.
 Instructions
are the fold out type used by Hasegawa back then and paint references are Gunze.
The standard kit decals are included so you can use the decals for the wing
leading edge ID bands and the instrument panel. These markings offer the box art
plane with the 50th Sentai and a similarly markde plane with the 59th Sentai. I
have not shown this sheet. However, the draw for this kit is a set of Aeromaster
decals. These provide markings for four planes. Realize that all Japanese Ki-43s
left the factory unpainted and the painting was done in the field as required.
All the planes have a black anti-glare panel. Though not shown in the
instructions, the fabric control surfaces would have been in grey-green dope.
All the props are primer brown.
Instructions
are the fold out type used by Hasegawa back then and paint references are Gunze.
The standard kit decals are included so you can use the decals for the wing
leading edge ID bands and the instrument panel. These markings offer the box art
plane with the 50th Sentai and a similarly markde plane with the 59th Sentai. I
have not shown this sheet. However, the draw for this kit is a set of Aeromaster
decals. These provide markings for four planes. Realize that all Japanese Ki-43s
left the factory unpainted and the painting was done in the field as required.
All the planes have a black anti-glare panel. Though not shown in the
instructions, the fabric control surfaces would have been in grey-green dope.
All the props are primer brown.
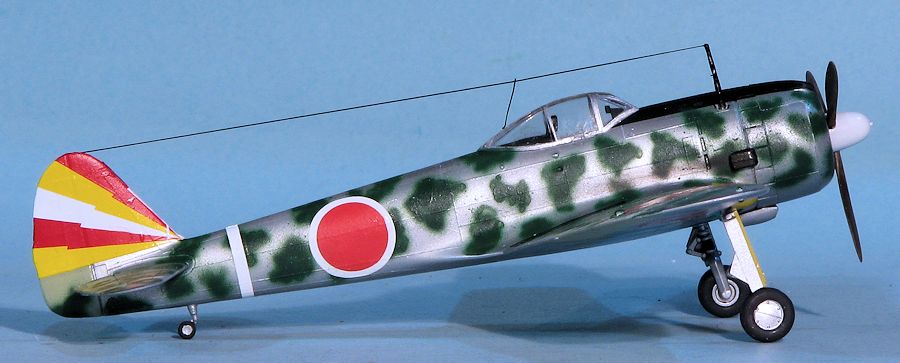
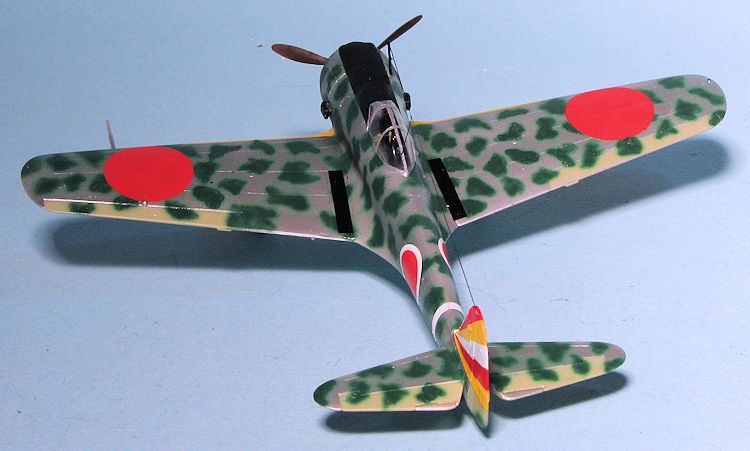
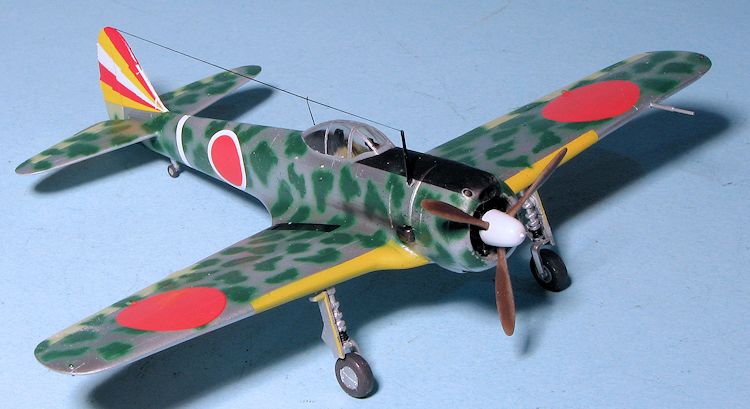
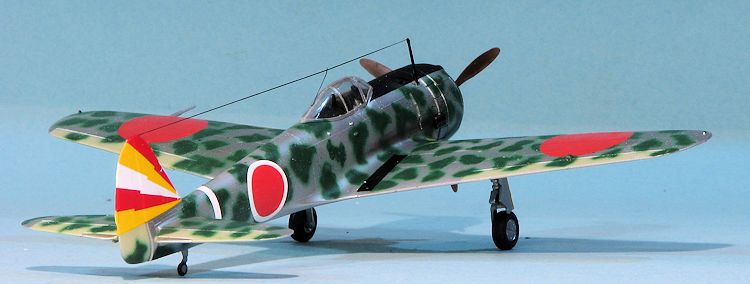
The first option is with HQ, 25th Air Regiment with a white boardered blue stripe on the fin and the large #15. This would have had a mottled finish. Second is a totally unpainted plane with a #725 on the fuselage and the red arrow of the 2nd Hikotai, a training unit in Seoul, Korea. With a more evenly done mottling job, and a three colored tail is the regimental commander's plane of the 11th Air Combat Regiment in the Dutch East Indies. The final option is one painted dark blue on the upper surfaces and the red/yellow fin markings of the 20th Sentai based on Formosa. The nicely printed decal sheet was done by Microscale and includes inner wing walk markings.
| CONSTRUCTION |
 stash so I took the opportunity to pull it out,
wipe off the dust, pop open the shrink wrap and get underway.
stash so I took the opportunity to pull it out,
wipe off the dust, pop open the shrink wrap and get underway. | COLORS & MARKINGS |
All of the options on the small Aeromaster sheet will need to
be painted bare metal as that is how the planes came from the factory. I first
sprayed the airframe with Tamiya Grey extra-fine primer. Noting no
 horrendous
glitches, I then sprayed on a coat of Alclad II aluminum. When dry, I broke out
the masking tape to mask around the control surfaces, which where then painted
with Tamiya IJAAF grey-green, the standard shade for fabric control surfaces. I
also masked the nose for the black anti-glare panel. Yet more masking was needed
for the metal elevator trim tabs and the yellow wing ID stripes.
horrendous
glitches, I then sprayed on a coat of Alclad II aluminum. When dry, I broke out
the masking tape to mask around the control surfaces, which where then painted
with Tamiya IJAAF grey-green, the standard shade for fabric control surfaces. I
also masked the nose for the black anti-glare panel. Yet more masking was needed
for the metal elevator trim tabs and the yellow wing ID stripes.
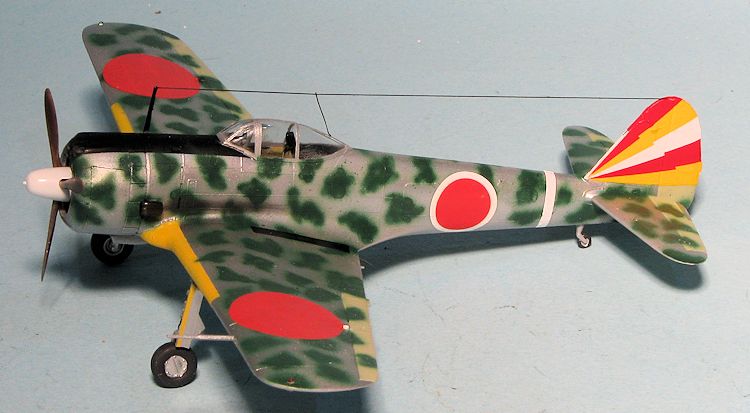
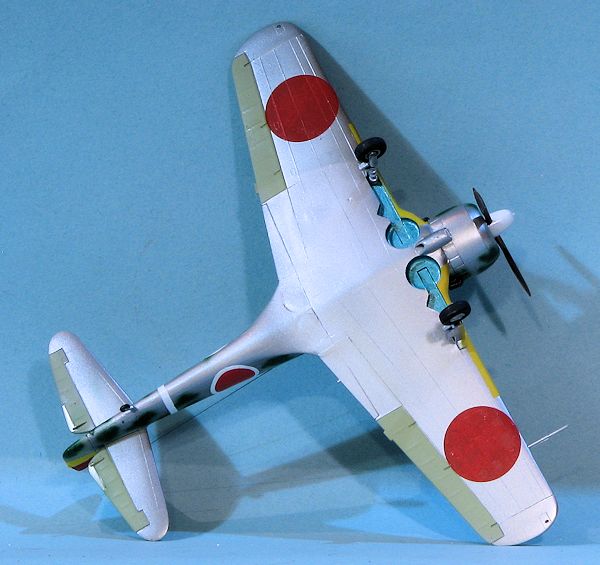
Once that was done, I painted the wheel wells with Aotake, using an old bottle of Aeromaster acrylic. I'm not sure this area was so painted, but went with it anyway. The main gear legs were then installed and it was time to do the upper surface painting. I chose the 11th Air Combat Regiment commander's plane as was flown in the Dutch East Indies in 1942 and at Rabaul in 1943. This option has a lot of dense, dark green patches which are rather negated by the colorful tail. Despite being 21 years old, the decals did not fall apart though they did need several applications of setting solution to snuggle down. I did, however, find the Aeromaster red insignia to be somewhat transparent, as were the kit offerings. I doubled up on the ones on the upper surface. Naturally, the tail markings ones gave me fits.
With all the markings in place, there were a few pieces left to attach. These were the wheels, the gear doors, the exhaust, radio mast and the prop with spinner. A bit of exhaust stain with Tamiya pastels, a radio wire with EZ line and that was pretty much it.
| CONCLUSIONS |
 I fully
realize this isn't one of the latest wonder kits. It is old technology and
lacking in the sort of detail we often expect from a new tool kit. Yet it goes
together with minimal drama, is not at all fiddly (for the most part), and when
done, looks very nice. Not only that, but it wasn't expensive, making it a
natural. It also fills a void in my collection, which was the reason I chose to
build it. Not bad for about a week's work. Recommended to those who aren't
squeamish about raised panel lines or minimal cockpit detail.
I fully
realize this isn't one of the latest wonder kits. It is old technology and
lacking in the sort of detail we often expect from a new tool kit. Yet it goes
together with minimal drama, is not at all fiddly (for the most part), and when
done, looks very nice. Not only that, but it wasn't expensive, making it a
natural. It also fills a void in my collection, which was the reason I chose to
build it. Not bad for about a week's work. Recommended to those who aren't
squeamish about raised panel lines or minimal cockpit detail.
| REFERENCES |
https://en.wikipedia.org/wiki/Nakajima_Ki-43
October 2015 Thanks to If you would like your product reviewed fairly and
fairly quickly, please
contact
the editor or see other details in the
Note to
Contributors.