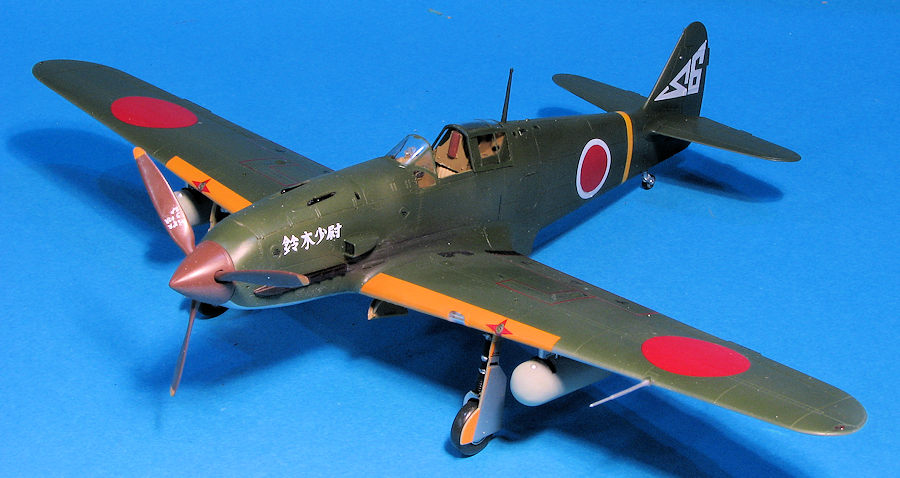
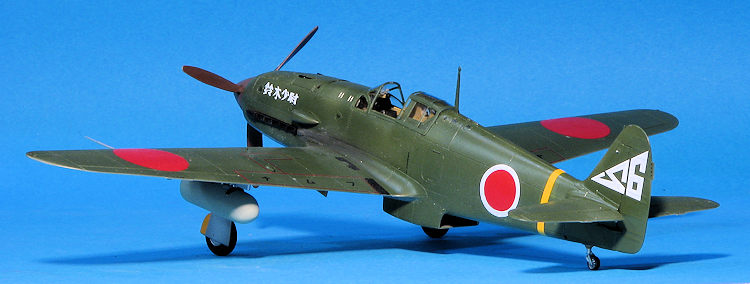
Tamiya 1/48 Ki-61-Id 'Hien'
| KIT #: | 61115 |
| PRICE: | 3000 yen SRP (mine was 2500 yen) |
| DECALS: | Two options |
| REVIEWER: | Scott Van Aken |
| NOTES: | New tool (2016) |
| HISTORY |
The first prototype of the San-shiki-Sentohki ichi gata ("Type 3 Fighter, Model 1", the official IJAAF designation) first flew in December 1941 at Kagamigahara Airfield. Although test pilots were enthusiastic about its self-sealing fuel tanks, upgraded armament, and good dive performance, the wing loading of 146.3 kg/m² (30 lb/ft²) at an all-up weight of 2,950 kg (6,500 lb) was viewed with scepticism by many of the senior officers of the Koku Hombu, who still believed in the light, highly manoeuvrable, lightly armed fighter epitomised by the then new Nakajima Ki-43-I-Hei which had a wing loading of 92.6 kg/m² (19 lb/ft²) (and even that was considered borderline compared to the earlier Ki-27).
To address these concerns, Kawasaki staged a fly-off between two Ki-61 prototypes and the Nakajima Ki-43-I, a pre-production Nakajima Ki-44-I, a Lavochkin-Gorbunov-Goudkov LaGG-3 (flown to Manchuria by a defector), a Messerschmitt Bf 109E-3, and a captured Curtiss P-40E Warhawk. The Ki-61 proved the fastest of all the aircraft and was inferior only to the Ki-43 in manoeuvrability.
The Ki-61 was the last of the fighters powered by the
DB-601 or its foreign derivatives, and it was soon overshadowed by fighters with
more powerful engines. By the time it first flew in December 1941, one year
after the Macchi C.202's first flight and three years after the first Bf 109E,
the engine was already underpowered compared to th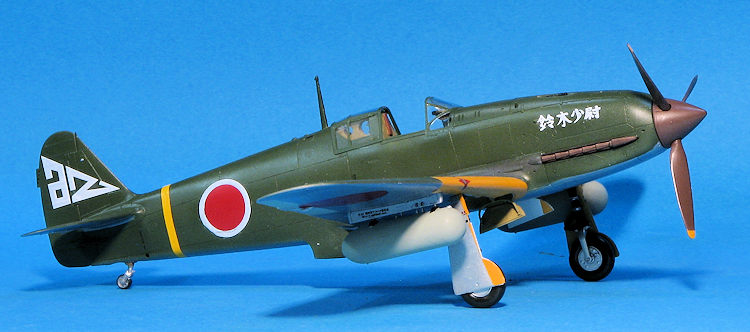 e new 1,120 kW (1,500 hp)
inline or 1,491 kW (2,000 hp) radial engines being developed (and already
nearing the mass-production stage) to power the next generation of combat
aircraft such as the Republic P-47 Thunderbolt. Moreover, the inline Ha-40
engine proved to be an unreliable powerplant.
e new 1,120 kW (1,500 hp)
inline or 1,491 kW (2,000 hp) radial engines being developed (and already
nearing the mass-production stage) to power the next generation of combat
aircraft such as the Republic P-47 Thunderbolt. Moreover, the inline Ha-40
engine proved to be an unreliable powerplant.
The DB-601 engine required precise and sophisticated manufacturing; the Ha-40 was lighter by roughly 30 kg (70 lb) and required even higher manufacturing standards. Reaching these standards proved difficult for Japanese manufacturers, an issue further complicated by the variable quality of materials, fuel, and the lubricants needed to run a sensitive, high-performance engine. The Japanese equivalent of the more powerful DB-605 engine was the Ha-140, which was fitted onto the Type 3 to produce the Ki-61-II high-altitude interceptor.
Ki-61-I-Tei Fighter variant (this kit) had two Japanese 20 mm Ho-5 cannon in the wings and two synchronized 12.7 mm (.50 in) Ho-103 machine guns above the engine. The Tamiya history states that the cannon were located in the nose requiring a 20cm lengthening of the forward fuselage.
| THE KIT |
The kit consists of three grey sprues and two clear. The smaller of the grey sprues contains the engine parts, which may lead Tamiya to do a boxing without it. Two clear sprues are also a bit odd, but one of those is a full left side fuselage. Tamiya seems to have a fondness for doing things like this and thanks to the interior detailing provided, one could easily build a 'see through' version to show off the interior and engine detail.
 The cockpit is superbly detailed with a full set of
controls as well as the gun ammo cans and what looks like an oil tank that fits
behind the instrument panel. A plate with the breeches of the nose guns fits
atop the ammo bins. There are two head rest options, one without the armor
plating. A pilot figure is also included as is a decal for the seat belt.
Apparently the IJAAF did not use a shoulder harness. Note that the interior
colors are listed as a panzer tan as are the gear wells and inside of the gear
doors. I have seen period color photos of Ki-61s where the gear wells and at
least the inner doors were unpainted. The kit includes a rather complete engine
so that those using the clear fuselage will have something to see. This also
includes the engine mounts. It is not super detailed, but enough for most of us.
The upper engine cowling is listed as not glued on. For those who don't want the
engine, you at least have to use the block as a mounting point for the prop.
Exhaust are a separate piece and mounted from the outside.
The cockpit is superbly detailed with a full set of
controls as well as the gun ammo cans and what looks like an oil tank that fits
behind the instrument panel. A plate with the breeches of the nose guns fits
atop the ammo bins. There are two head rest options, one without the armor
plating. A pilot figure is also included as is a decal for the seat belt.
Apparently the IJAAF did not use a shoulder harness. Note that the interior
colors are listed as a panzer tan as are the gear wells and inside of the gear
doors. I have seen period color photos of Ki-61s where the gear wells and at
least the inner doors were unpainted. The kit includes a rather complete engine
so that those using the clear fuselage will have something to see. This also
includes the engine mounts. It is not super detailed, but enough for most of us.
The upper engine cowling is listed as not glued on. For those who don't want the
engine, you at least have to use the block as a mounting point for the prop.
Exhaust are a separate piece and mounted from the outside.
There are two different interior pieces that fit behind the pilot. One is for having the canopy open and the other closed. There are also separate interior wall pieces for each option. Tamiya provides a separate windscreen and for the closed position, the canopy and rear quarter windows are a single pice. Note that the interior fit in the fuselage after it has been closed.
Wings are a single lower piece with separate upper
sections. Aside from the gun openings and the landing lights, this is a pretty
basic construct. No lowered flaps with this one. Tailplanes are a single piece
on 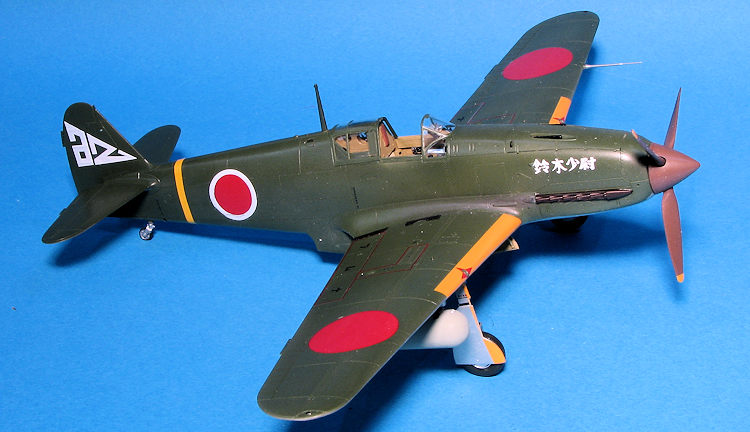 each side and the rudder is separate piece. The Tony has the engine radiator
and oil cooler in the same construct that you get both a front and a rear piece.
The air intake grille is made up of eight pieces. The coolant door is molded in
the up position. For things under wings, you basically have drop tanks and their
racks. The holes for these are already opened up in the lower wing. To top
things off, Tamiya provides a set of canopy masks. I think this is a great idea
and would like to see other kit makers pick up on this.
each side and the rudder is separate piece. The Tony has the engine radiator
and oil cooler in the same construct that you get both a front and a rear piece.
The air intake grille is made up of eight pieces. The coolant door is molded in
the up position. For things under wings, you basically have drop tanks and their
racks. The holes for these are already opened up in the lower wing. To top
things off, Tamiya provides a set of canopy masks. I think this is a great idea
and would like to see other kit makers pick up on this.
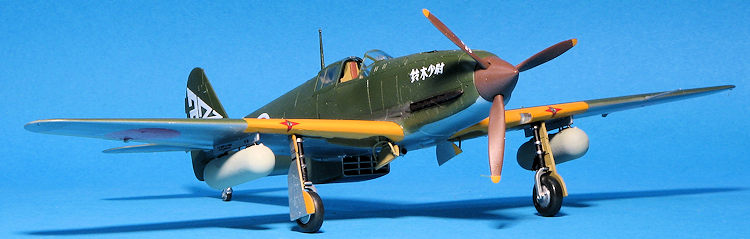
The Tamiya instruction sheet is superbly done and uses Tamiya paint references. There are detail drawings where needed and the instructions also show the removal of sprue attachment points, something I've not seen in any other instruction sheets. Two markings options are provided. One is the box art plane of Shunzo Takashima based at Chofu in May 1945. The second is a mostly unpainted metal plane with a red tail section as flown by Teruhiko Kobayashi from Chofu in February 1945. Both planes are with the 244th Sentai and you will need to paint the tail section as well as the nose anti-glare panel. The decal sheet includes a seat belt and the yellow wing ID markings.
| CONSTRUCTION |
I have to tell you that when I started this kit I expected quite a bit from it. I started by prepainting all the interior bits, gear wells and inside of the gear doors with dark yellow, the standard Kawasaki primer. I did find some color WWII photos that showed this shade on the inner gear doors and also some with what looked like unpainted metal so your choice. Tamiya calls for the dark yellow. Various smaller bits were also painted this shade. I also prepainted a lot of the other parts and when these bits were finally removed from the sprues, they were cleaned up and repainted either prior to during installation.
Building the interior takes more time that you might
think, but the fit here, and everywhere else is superb. The interior also
includes the oil tank behind the instrument panel, ammo bins and the rear
section of the nose machine guns. Decals are provided for the instruments and
they fit perfectly. Here is a photo of the interior before all the floor mounted
bits and the seat h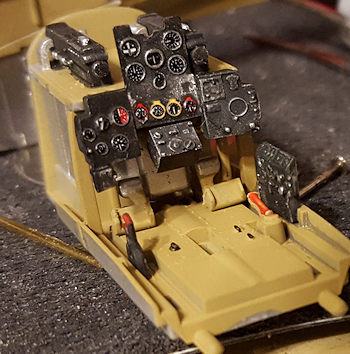 ave been
installed. Eventually the interior is complete. This is supposed to be installed
from the bottom after the fuselage halves have been joined, but I found it
doesn't make any difference so the choice is yours.
ave been
installed. Eventually the interior is complete. This is supposed to be installed
from the bottom after the fuselage halves have been joined, but I found it
doesn't make any difference so the choice is yours.
The kit comes with a fairly well done engine. It is not super detailed like you find in the Bronco P-40 or Zvezda 109s, but it nice and you can add wires and stuff to it if you wish and if you are using the clear fuselage half. This is several colors and looks pretty nice when done. You have to have at least the block installed as it contains the prop shaft. There are also engine bearers that fit onto the fuselage half. In addition, there are various controls and a few boxes that fit onto the fuselage halves so those were attached. The engine and cockpit were installed and the fuselage halves closed. Tamiya uses slots and tabs instead of pins and sockets to hold the fuselage halves and I have to say I think this is a much better way of doing things. Did I mention that fit is excellent?
With that drying and the hairline seams I always seem to get were being filled and dealt with on the fuselage, I built up the wings. These have both fore and aft as well as tip to tip reinforcements in them so prevent any issues with warpage on the long wings. Because it is Tamiya, these do not present any issues with sink areas. I had the usual hairline seams to deal with and then installed the lower center section. This piece includes the ducting for the radiator/oil cooler assembly. When all that was dry, it was inserted. Fit is filler free.
Behind the pilot is the rear brace and canopy
actuating mechanism. There are two of these, one for open and one for the closed
canopy. I chose the open option, which has a small cut out to allow the
placement of the canopy section. To go along with this, while building up the
interior, there are open and closed optional pieces that fit on the inner
fuselage up near sills. Be sure to install these prior to installing anything in
the interior or it will be difficult to get them in place. During this time I
also installed the cooler/radiator faces and the tail gear insert. As you can
see by the photo, you will be able to see engine bits, but once the upper
cowling is on this will all disappear. Of course, you can leave the upper
cowling unglued so again, you have a choice.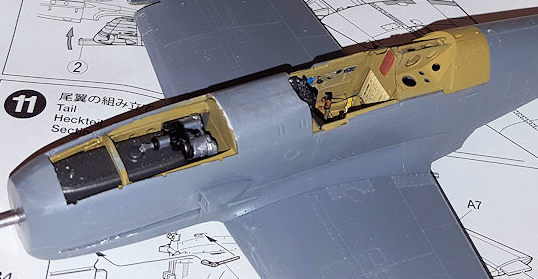 Another cool design feature is the the upper fuselage spine is a separate, very
thin insert. Pretty much eliminates any seam issues.
Another cool design feature is the the upper fuselage spine is a separate, very
thin insert. Pretty much eliminates any seam issues.
At the back, the rudder, actuating pieces and tailplanes were installed. I like that the hinge sections are molded on the fin itself. Not only looks much nicer, but is prototypical. Next I masked the clear bits using the 'cut your own' masks that Tamiya provides. A bit more work than those pre-cut, but a bit better than cutting tape on the parts themselves. The wind screen and rear quarter windows were then glued in place and the cockpit opening covered with tape. I thought about using the additional closed canopy piece, but it simply does not fit as the rear quarter window piece is narrower to allow the canopy to slide over it.
| COLORS & MARKINGS |
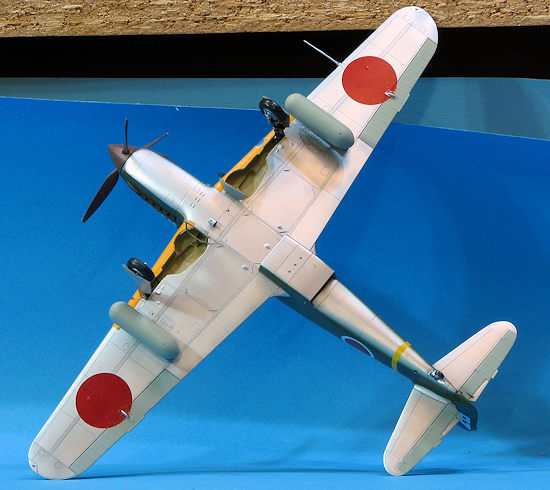
I did not want to use the kit markings, though they are very nice. The issue, however, is a dearth of proper 'long nose' Ki-61-I decals. I have two Aeromaster sheets that have these planes, but one is another 244th Sentai plane and the other two are from the 55th Sentai and I already did my 'Ki-61-III' conversion in those markings. However, I also have an old Aeromaster 'Special Attack' decal set that has two proper -tei planes in it though the drawings show the earlier plane. This aircraft is Kawasaki Army Green on the upper surface, for which I used ColourCoats paint, while the underside is unpainted metal, for which Alclad II got the call. The control surfaces were painted with green-grey, which is a primer. The Tamiya instructions call for these to be aluminum paint, but I'm not sure that is correct.
 Once the paint was applied, I painted and installed
the landing gear in preparation for decals. I did not use a gloss coat on this
as the green was semi-gloss anyway. For all the standard markings, I used the
kit decals. This includes the wing ID stripes. The Aeromaster sheet only
supplies unique markings and insignia anyway. Of the three similarly painted
options I chose the one from the 56th Shimbu-tai as it had some personal
inscriptions on the nose and prop blade. There are actually quite a few data
markings including those on the fuel tanks and on the racks. I should mention
that the warning markings on the wings are in red. It would perhaps be more
normal for them to be in yellow on a dark surface, but I used them anyway.
Before you think that some of them "...look like decals...", well, in reality
they were. You don't think all that tiny stuff was painted on do you?
Once the paint was applied, I painted and installed
the landing gear in preparation for decals. I did not use a gloss coat on this
as the green was semi-gloss anyway. For all the standard markings, I used the
kit decals. This includes the wing ID stripes. The Aeromaster sheet only
supplies unique markings and insignia anyway. Of the three similarly painted
options I chose the one from the 56th Shimbu-tai as it had some personal
inscriptions on the nose and prop blade. There are actually quite a few data
markings including those on the fuel tanks and on the racks. I should mention
that the warning markings on the wings are in red. It would perhaps be more
normal for them to be in yellow on a dark surface, but I used them anyway.
Before you think that some of them "...look like decals...", well, in reality
they were. You don't think all that tiny stuff was painted on do you?
With all that in place, the aircraft was given a coat of semi-matte clear to seal in the decals. The final bits were then added which included the gear doors, pitot tube, antenna mast gun barrels and the prop. I press fit the wing pylons in place and then glued on the drop tanks. I've seen commentary that these were painted orange or green-grey or left unpainted. I chose green-grey. The masking was removed from the clear bits and the canopy section glued in the open position. Note that this has to be glued full open or there will be a clear notch visible behind it that isn't there on the real plane.
| CONCLUSIONS |
 This one has to
get my vote for best engineered kit ever. The fit is exemplary and it is only my
glacial construction pace that kept it from being finished well before this.
There were a few left over bits I could not identify so not sure if this means
an early version would be in the works or not, but it would be silly not to do
so. This does not mean toss your Hasegawa kits, as those still build into very
nice replicas, it is just that this one raises the bar to a level that will be
difficult to eclipse.
This one has to
get my vote for best engineered kit ever. The fit is exemplary and it is only my
glacial construction pace that kept it from being finished well before this.
There were a few left over bits I could not identify so not sure if this means
an early version would be in the works or not, but it would be silly not to do
so. This does not mean toss your Hasegawa kits, as those still build into very
nice replicas, it is just that this one raises the bar to a level that will be
difficult to eclipse.
| REFERENCES |
https://en.wikipedia.org/wiki/Kawasaki_Ki-61
27 January 2017 Copyright ModelingMadness.com If you would like your product reviewed fairly and
fairly quickly, please
contact
the editor
or see other details in the
Note to
Contributors.