| KIT #: | 14130 |
| PRICE: | 1600 yen from HLJ (about $21.00) |
| DECALS: | Seven options |
| REVIEWER: | Scott Van Aken |
| NOTES: | New mold kit. Two kits per box |
Sweet 1/144 A6M2-N "Shortland"
| KIT #: | 14130 |
| PRICE: | 1600 yen from HLJ (about $21.00) |
| DECALS: | Seven options |
| REVIEWER: | Scott Van Aken |
| NOTES: | New mold kit. Two kits per box |
| HISTORY |
The aircraft was deployed in 1942, referred to as the
"Suisen 2" ("Hydro fighter type 2"), and was only utilized in defensive actions
in the Aleutians and Solomon Islands operations. Such seaplanes were effective
in harassing American PT boats at night, and they were very difficult to detect,
even with primitive radar. Close misses killed officers and crews of boats such
as PT 105. They could also drop flares to illuminate the PTs which were
vulnerable to destroyer gunfire, and depended on cover of darkness. Since the
boats left a phosphoresce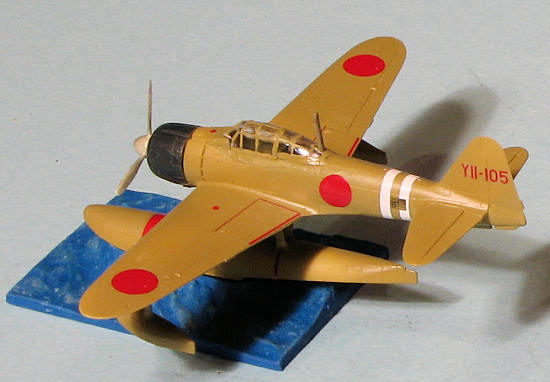 nt wake which was visible from the air, they would
leave their engines in idle to minimize this. It was primarily for this reason
that John F. Kennedy's PT 109 was caught off guard in idle and rammed by the
destroyer Amagiri, unable to maneuver out of the way in time.
nt wake which was visible from the air, they would
leave their engines in idle to minimize this. It was primarily for this reason
that John F. Kennedy's PT 109 was caught off guard in idle and rammed by the
destroyer Amagiri, unable to maneuver out of the way in time.
The seaplane also served as an interceptor for protecting fueling depots in Balikpapan and Avon Bases (Dutch East Indies) and reinforced the Shumushu base (North Kuriles) in the same period. Such fighters served aboard seaplane carriers Kamikawa Maru in the Solomons and Kuriles areas and aboard Japanese raiders Hokoku Maru and Aikoku Maru in Indian Ocean raids. In the Aleutian Campaign this fighter engaged with Lockheed P-38 Lightning fighters and Boeing B-17 Flying Fortress bombers. The aircraft was used for interceptor, fighter-bomber, and short reconnaissance support for amphibious landings, among other uses.
Later in the conflict the Otsu Air Group utilized the A6M2-N as an interceptor alongside Kawanishi N1K1 Kyofu ("Rex") aircraft based in Biwa lake in the Honshū area.
The last A6M2-N in military service was a single example recovered by the French forces in Indochina after the end of World War II. It crashed shortly after being overhauled.
The large float and wing pontoons of the A6M2-N degraded its performance by about 20%, enough that the A6M2-N was not usually a match for even the first generation of Allied fighters.
| THE KIT |
Once again, our friends at Sweet have done another fine twin pack kit. This time, it is the Nakajima A6M2-N 'Rufe'. This is the standard boxing and has a nice aerial photo of the seaplane ramp at the Shortland Islands on the back of the box. This shows a variety of aircraft including the 'Rufe'.
Molded in a cream colored plastic, the detail level is
what we have come to expect from Sweet. The interior is pretty much just a seat
with the antenna behind it. A fair representation of the motor is provided to
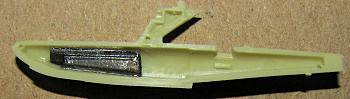
place in the o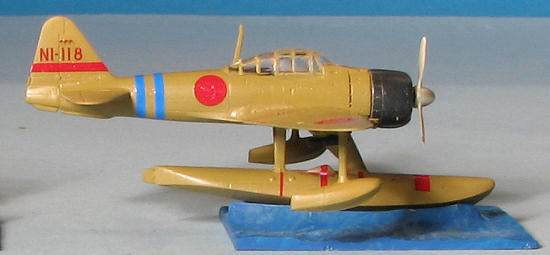 ne piece cowling. The wing is a single piece with gun inserts.
Each wing tip float is two pieces. The main float is two large sections with the
rear bracing. One needs to put some weight in the forward portion of the float,
though no amount is specified. To put under the wings are a pair of bombs. These
already have the holes drilled for them in the lower wing so one will need to
fill those if not using the bombs.
ne piece cowling. The wing is a single piece with gun inserts.
Each wing tip float is two pieces. The main float is two large sections with the
rear bracing. One needs to put some weight in the forward portion of the float,
though no amount is specified. To put under the wings are a pair of bombs. These
already have the holes drilled for them in the lower wing so one will need to
fill those if not using the bombs.
There are two ways to display the finished model. One is to build up the seven piece beaching trolley. The other is to use the small section of water that is provided with the kit.
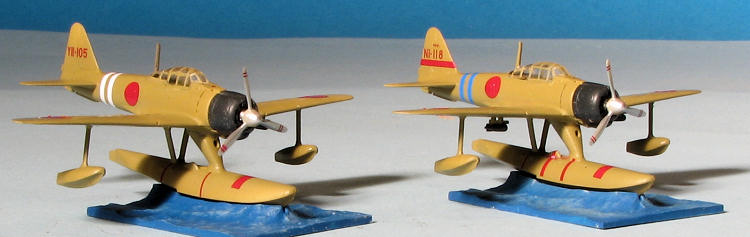
There are seven markings options in this one (actually more as you have a bunch of individual numbers you can use). Two of them, from the 802nd Flying Group are in the gren over grey scheme and have different tail numbers.
The rest are all in the greyish color. The W coded plane is from the 14th Flying Group based on Shortland. The one with two white fuselage bands is from the Kamikawa Maru Fighter Squadron, also based on Shortland. The grey schemes are all from mid-late 1942 to early 1943. The next two grey schemes with the red fin band are from the 802nd Flying Group also at the Shortlands while the last one is from the Yokohama Flying Group while briefly based on Tulagi. Sweet's decals are printed by Cartograf and provide all the markings you need, including the wing ID stripes.
| CONSTRUCTION |
With so few parts, one would think that these kits would pretty much fly together. Well, yes and no. With little more in the cockpit than a seat, one can first start by gluing together some bits. This means the wing tip floats and the fuselage halves. Once the halves were together, the seat was glued in place and the interior painted using Colorcoats' Mitsubishi Interior Green (yes, I know it is a Nakajima build, but that was the only Japanese interior green I had). Then the area surrounding the cockpit as well as a few other bits were painted matte black. This includes the radio mast.
 For
the main float, I cut up some weight and put it into the forward section.
Probably used too much but better too much than too little. The float halves
were then assembled. Back at the wing, there are teeny, tiny inserts to be put
into the lower leading edge for the cannon openings. These will be a bit too
large and sit proud of the surface, I sanded them down. I also lost one as they
are truly tiny. For those keeping
track, they are 1.5mm in the
long side. I ended up filling the slot with super glue and later drilling a #77
hole in it. The wings were then attached to the f
For
the main float, I cut up some weight and put it into the forward section.
Probably used too much but better too much than too little. The float halves
were then assembled. Back at the wing, there are teeny, tiny inserts to be put
into the lower leading edge for the cannon openings. These will be a bit too
large and sit proud of the surface, I sanded them down. I also lost one as they
are truly tiny. For those keeping
track, they are 1.5mm in the
long side. I ended up filling the slot with super glue and later drilling a #77
hole in it. The wings were then attached to the f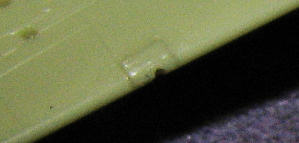 uselage. These are a very tight
fit. Naturally, the seams needed a bit of work, but nothing really major. The
rear wing/fuselage join being the worst. The radio mast was then attached and
the tailplanes glued into place. Finally, the floats had the brace piece glued
on and they were then glued to the lower fuselage. There is a small triangular
piece that fits on the right side of the float just aft of the main brace. I
forgot to glue it in place prior to gluing the float and it was a real trial to
get it in place. The small section that includes the exhaust was glued in at
this time. I also cemented the cowling halves together then took care of the
seam.
uselage. These are a very tight
fit. Naturally, the seams needed a bit of work, but nothing really major. The
rear wing/fuselage join being the worst. The radio mast was then attached and
the tailplanes glued into place. Finally, the floats had the brace piece glued
on and they were then glued to the lower fuselage. There is a small triangular
piece that fits on the right side of the float just aft of the main brace. I
forgot to glue it in place prior to gluing the float and it was a real trial to
get it in place. The small section that includes the exhaust was glued in at
this time. I also cemented the cowling halves together then took care of the
seam.
| COLORS & MARKINGS |
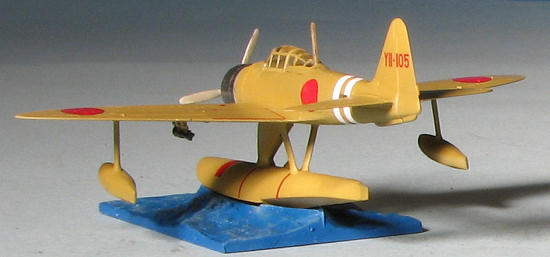 After
masking the cockpit opening on the two kits, I painted it Nakajima Ameiro
overall. I also assembled and painted the handling trolley using black. The two
water bases were painted with Vallejo Medium Blue and then dry brushed with
VallejoSky Grey. Engines were painted aluminum and props Chrome using Alclad II.
The cowlings were painted Mitsubishi Blue Black using Color Coats, the same
paint used for the overall color.
After
masking the cockpit opening on the two kits, I painted it Nakajima Ameiro
overall. I also assembled and painted the handling trolley using black. The two
water bases were painted with Vallejo Medium Blue and then dry brushed with
VallejoSky Grey. Engines were painted aluminum and props Chrome using Alclad II.
The cowlings were painted Mitsubishi Blue Black using Color Coats, the same
paint used for the overall color.
With that done, I attached the decals. The kit decals offer a ton of options and so I picked two that looked nice and started to apply the markings. Some of these are really small. I used Mr. Mark Softer as a setting solution and got mixed results with it. You do need to use something as the decals will not conform to the engraved lines and will silver without it. I used Solvaset on some that bubbled pretty badly and that seems to be a better choice. Microsol was totally ineffective. I found the prop warning stripes to be particularly difficult to attach.
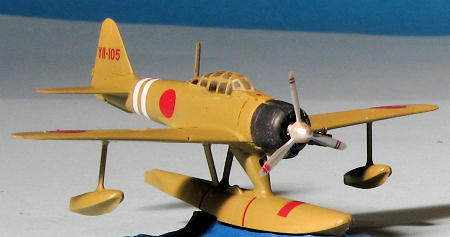
| FINAL CONSTRUCTION |
 For
this step, the engines with prop shaft were glued in place, followed by the
cowling. Due to the tiny panes, I thought it would be best to brush on the
canopy frames. Well, that was a bit of a disaster as I had a terrible time
getting the lines to be straight and thin. I ended up scraping off paint to try
to help things and that only clouded the plastic. I also found that installing
the canopy would cause it to crack at the very back where it went over the radio
mast. The mast is too thick and needs to be sanded down. I also broke the mast.
On the underside, the bomb racks with bombs were installed after painting the
bombs black. One wing did not have the mounting holes drilled out very deeply so
I left the rack off that side. I have seen photos where these planes only had
one so that is my excuse and I am sticking with it.
For
this step, the engines with prop shaft were glued in place, followed by the
cowling. Due to the tiny panes, I thought it would be best to brush on the
canopy frames. Well, that was a bit of a disaster as I had a terrible time
getting the lines to be straight and thin. I ended up scraping off paint to try
to help things and that only clouded the plastic. I also found that installing
the canopy would cause it to crack at the very back where it went over the radio
mast. The mast is too thick and needs to be sanded down. I also broke the mast.
On the underside, the bomb racks with bombs were installed after painting the
bombs black. One wing did not have the mounting holes drilled out very deeply so
I left the rack off that side. I have seen photos where these planes only had
one so that is my excuse and I am sticking with it.
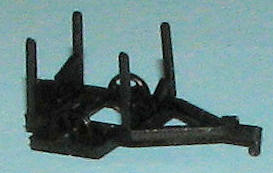 Despite
having put weight in the front of the float, it was not enough as when I put one
plane on the beaching trolley, it immediately tail sat. The trolley, however,
does fit quite snugly and cementing the model on it will not be needed. The
water base is much more stable and so I ended up gluing both to these bases. The
last step was to push the props into place. No attempt was made to rig the radio
wire.
Despite
having put weight in the front of the float, it was not enough as when I put one
plane on the beaching trolley, it immediately tail sat. The trolley, however,
does fit quite snugly and cementing the model on it will not be needed. The
water base is much more stable and so I ended up gluing both to these bases. The
last step was to push the props into place. No attempt was made to rig the radio
wire.
| CONCLUSIONS |
 Those who
have built Sweet kits know how nice they are. Those who have not and like 1/144
need to give one of their kits a try. They look to be very simple and in many
ways they are. They are also nicely detailed. One has to temper this with the
knowledge that many of the parts are very small as are many of the decals.
Masking canopies like this are probably the biggest challenge that that alone
kept these kits unfinished for well over three weeks while I waffled on how I
was going to pull it off. Nonetheless, the kits are superb when you get them
done and Sweet provides a ton of markings options, a good thing as aftermarket
does not and probably will not exist for this particular kit.
Those who
have built Sweet kits know how nice they are. Those who have not and like 1/144
need to give one of their kits a try. They look to be very simple and in many
ways they are. They are also nicely detailed. One has to temper this with the
knowledge that many of the parts are very small as are many of the decals.
Masking canopies like this are probably the biggest challenge that that alone
kept these kits unfinished for well over three weeks while I waffled on how I
was going to pull it off. Nonetheless, the kits are superb when you get them
done and Sweet provides a ton of markings options, a good thing as aftermarket
does not and probably will not exist for this particular kit.
Bottom line is that these are great kits and while they may seem a bit pricey, you are getting the quality that you pay for.
| REFERENCES |
http://en.wikipedia.org/wiki/A6M2-N_Rufe
March 2012
My thanks to Hobby Link Japan for the review kit. You can get yours at this link.
Thanks to If you would like your product reviewed fairly and fairly quickly, please contact the editor or see other details in the Note to Contributors.