| KIT #: | 00362 |
| PRICE: | $18.00 when new |
| DECALS: | Two options |
| REVIEWER: | Scott Van Aken |
| NOTES: | 2002 release |
| HISTORY |
The A6M's history mirrored that of the Empire of Japan in World War
II. When it was introduced, the Zero was the best carrier-based fighter in
the world and it was greatly feared by Allied pilots. The IJNAS also
frequently used the type as a land-based
 fighter. A combination of excellent
maneuverability and very long range made it one of the finest fighters of
its era. In early combat operations, the Zero gained a legendary reputation,
outclassing its contemporaries. Later, design weaknesses and the increasing
scarcity of more powerful aircraft engines meant that the Zero became less
effective against newer fighters. By 1942, new tactics and techniques
enabled Allied pilots to engage the Zero on more equal terms. By 1943,
American and British manufacturers were producing fighters with greater
firepower, armor, and speed, and approaching the Zero's maneuverability. The
Mitsubishi A6M was outdated by 1944, but remained in production. During the
final years of the War in the Pacific, the Zero was utilized in kamikaze
operations.
fighter. A combination of excellent
maneuverability and very long range made it one of the finest fighters of
its era. In early combat operations, the Zero gained a legendary reputation,
outclassing its contemporaries. Later, design weaknesses and the increasing
scarcity of more powerful aircraft engines meant that the Zero became less
effective against newer fighters. By 1942, new tactics and techniques
enabled Allied pilots to engage the Zero on more equal terms. By 1943,
American and British manufacturers were producing fighters with greater
firepower, armor, and speed, and approaching the Zero's maneuverability. The
Mitsubishi A6M was outdated by 1944, but remained in production. During the
final years of the War in the Pacific, the Zero was utilized in kamikaze
operations.
The A6M2b Model 21 was the most produced early variant of the A6M and saw
action in all the early war battles with the Allies.
| THE KIT |
Probably because Hasegawa wore out the molds on the old Zero kit, they decided a few decades back, that perhaps it would be a good idea to go the 'multiple variants' route and do the entire series of A6Ms. Thanks to much of the airframe being the same, this was an easy to do endeavor. Basically, just the cowling and the wings are changed from version to version. As the Zero is probably the most sold model kit in the world, Hasegawa has done very well in this area and special boxings seem to sell out with great regularity.
 This particular boxing is
for a very colorful plane from the 261st Flying Group. Though the unit, formed
in mid 1943, primarily flew the A6M5, there were a number of earlier versions
assigned, as much to replace losses as anything. The unit fought at Pelileu and
later in the Borneo theater, guarding the refineries at Palembang.
This particular boxing is
for a very colorful plane from the 261st Flying Group. Though the unit, formed
in mid 1943, primarily flew the A6M5, there were a number of earlier versions
assigned, as much to replace losses as anything. The unit fought at Pelileu and
later in the Borneo theater, guarding the refineries at Palembang.
Typical of Hasegawa, the cockpit is a bit sparse, using a decal for the instrument panel. Fortunately, there are aftermarket sets to help. The one piece canopy is very clear. Inserts are used for the lower cowling and upper forward fuselage. The two piece engine is very nicely done and looks the part once in the cowling. The only optional bit is the belly tank, something not always carried on defensive missions, though it would be appropriate for longer patrols.
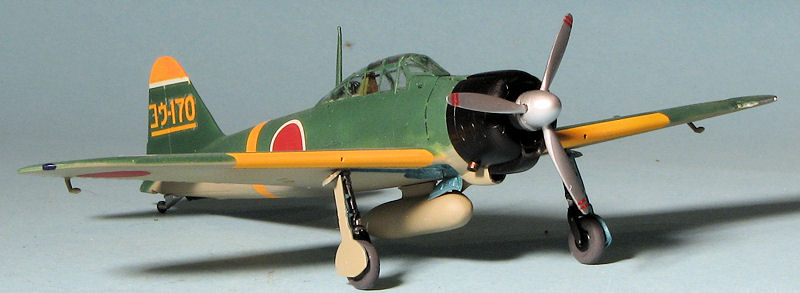
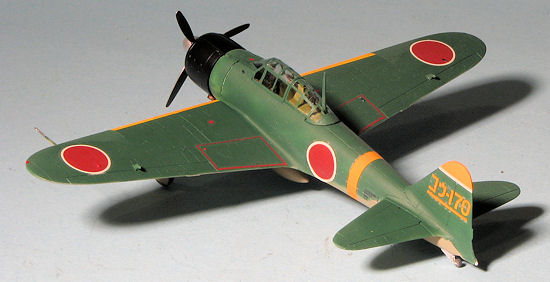
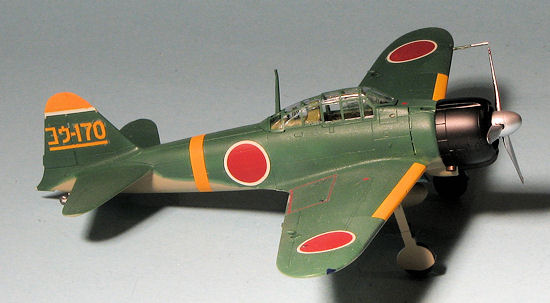
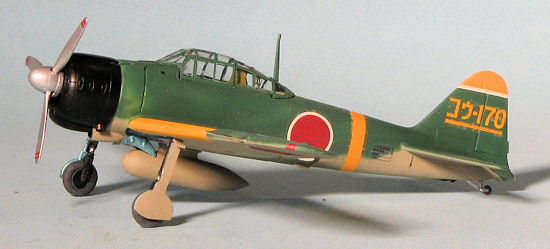
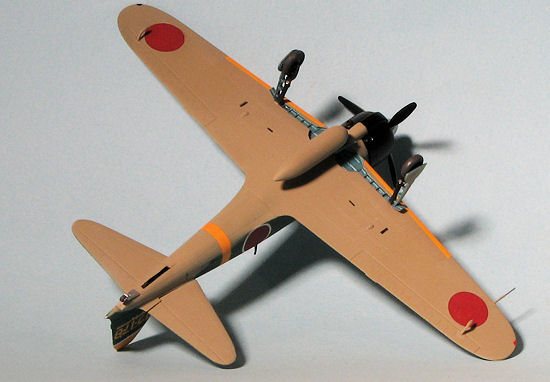
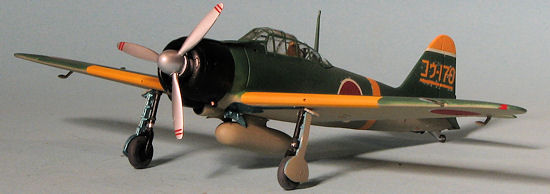
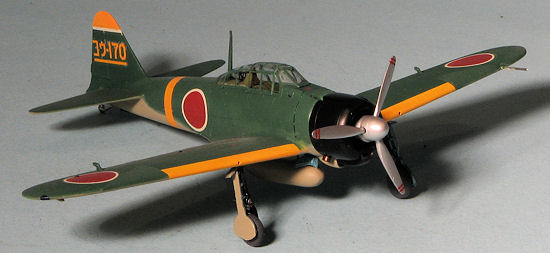
Instructions are Hasegawa's usual fare with Gunze paint references. The two planes on the decal sheet are the box art plane from the 261st Flying Group in what appears to be a two tone upper green with grey undersides. I think this two shaded appearance is little more than faded paint and patches. I've seen the original photo from which this scheme comes and you can tell that sections are darker than others. It is quite possible that this is due to piecing together bits from other planes and repainting badly worn sections. The other is also in green and grey and from the Kohnoike Flying Group, a training unit based in Japan and often used for air defense. Hence the fuselage banding in trainer orange. Decals are well printed and of the 'old' style with white that is off-white. One would probably be well to paint the banding.
| CONSTRUCTION |
For this build I decided to use an etched brass set for the cockpit. This is an older Eduard set (Zoom set SS 104) that is not in color and while actually designed for the Academy A6M5, Zero cockpits remained pretty much the same through the production run. I did leave off the bomb panel as the A6M2 did not have this capability. Surprisingly, the parts fit the Hasegawa kit without too much trauma, though the bit behind the seat is a not the same shape as the photo etch piece. As is often the case when using p.e., it extended the build time by about a week or so. The Hasegawa interior is totally devoid of sidewall detail, so the few pieces added there looked rather out of place. I guess it is a benefit that the canopy is a bit on the thick side so not all that much will be seen of the sidewalls.
 Meanwhile, I assembled the upper and lower wings as well as the engine. The
fit of the engine halves is OK, but nothing outstanding. I also assembled the
drop tank as I was building three A6M2s and wanted them to be similarly
equipped. I screwed up and installed the aileron hinges before realizing that
these would interfere with the banding on one of the two options so that pretty
well meant that I was going to use the second of the two.
Meanwhile, I assembled the upper and lower wings as well as the engine. The
fit of the engine halves is OK, but nothing outstanding. I also assembled the
drop tank as I was building three A6M2s and wanted them to be similarly
equipped. I screwed up and installed the aileron hinges before realizing that
these would interfere with the banding on one of the two options so that pretty
well meant that I was going to use the second of the two.
I also took this time to clean up and paint the landing gear and engine cowling with Tamiya X-18 black. Before painting the gear, I removed the extant oleo scissors and replaced them with the photo etch ones. During this process I snapped the wheel fork from one gear, but fortunately was able to repair it without any real problems. I painted the interior bits using Colorcoats Mitsubishi Interior Green. With the interior done, it was glued in place. Hasegawa does not provide a gunsight, something of an omission.
I then glued the fuselage halves together and glued on the wings. There is a considerable gap on either side of the fuselage at the upper wing/fuselage join. These were filled with a combination of super glue and Tamiya filler. The tailplanes were then attached. I masked the canopy (a bit of a tedious job when it comes to Zeros) and after painting the radio mast with the outside color, that and the canopy were glued in place.
| COLORS & MARKINGS |
 First bit of painting was the wing leading edges. I first sprayed on some
white then used Xtracolor RLM 04 for the yellow as it is a deep yellow that is
more appropriate for Japanese planes. When that all was dry, it was masked. I
used a bit of artistic license on the underside colors. Though the upper surface
was painted with a later war color, I felt that perhaps the underside had been
left in the colors of the aircraft when it was built. This meant Ameiro instead
of Light Grey. Perhaps I am wrong on this and the entire airframe had been
repainted, but no one can really tell from whatever photos are extant for this
aircraft. Nonetheless, the underside as well as the outer gear doors were
painted using Colorcoat's Ameiro. As mentioned in an earlier review, this paint
seems to take a while to dry, even with lacquer thinner so it was given 24 hours
plus before handling it. I then painted the upper surface with Colorcoat's
Mitsubishi Navy Dark Green, doing it freehand to try to simulate the work that
would have been done locally.
First bit of painting was the wing leading edges. I first sprayed on some
white then used Xtracolor RLM 04 for the yellow as it is a deep yellow that is
more appropriate for Japanese planes. When that all was dry, it was masked. I
used a bit of artistic license on the underside colors. Though the upper surface
was painted with a later war color, I felt that perhaps the underside had been
left in the colors of the aircraft when it was built. This meant Ameiro instead
of Light Grey. Perhaps I am wrong on this and the entire airframe had been
repainted, but no one can really tell from whatever photos are extant for this
aircraft. Nonetheless, the underside as well as the outer gear doors were
painted using Colorcoat's Ameiro. As mentioned in an earlier review, this paint
seems to take a while to dry, even with lacquer thinner so it was given 24 hours
plus before handling it. I then painted the upper surface with Colorcoat's
Mitsubishi Navy Dark Green, doing it freehand to try to simulate the work that
would have been done locally.
| FINAL CONSTRUCTION |
When all that had dried, I glued on the main landing
gear, followed by the wheels and gear doors. The kit was given a gloss clear
coat in preparation for decals. I had no other markings besides those in the kit
for this one and since I had installed the aileron hinges already, it meant I
really could not do the box art version which left the Kohnioke Flying Group
option. First markings were
 the flap warning and the upper hinomarus. It was
then that I realized that the yellow ID badge was too long and would need to be
shorted. Once the markings had dried, I carefully sprayed out the excess length
on both the upper and lower sides.
the flap warning and the upper hinomarus. It was
then that I realized that the yellow ID badge was too long and would need to be
shorted. Once the markings had dried, I carefully sprayed out the excess length
on both the upper and lower sides.
I also found out that the decals were quite brittle. This was brought to light when I tried to get the tail markings to go over the tip of the fin. Instead of laying over, even with setting solution, they splintered. This gave me no option but to mix some orange and yellow to match the color and paint the broken areas. This seemed to work pretty well so that glitch was avoided. Once all the markings were in place, the kit was given a coat of clear matte.
I also glued on engine, the inner gear doors, and the
pitot tube. I had etched inner door retraction struts, but they were far too
 large so I left them off. The ailerons also needed those balances. These were no
easier to attach than the ones on the Tamiya kit as they are butt fit and there
is no indication on the kit where these are to be fit. The prop was glued
together and after the cowling was glued on, this was pushed in place. The last
piece to be attached was the tailhook.
large so I left them off. The ailerons also needed those balances. These were no
easier to attach than the ones on the Tamiya kit as they are butt fit and there
is no indication on the kit where these are to be fit. The prop was glued
together and after the cowling was glued on, this was pushed in place. The last
piece to be attached was the tailhook.
This only left the myriad of final touch up painting for things like the formation lights, the tail wheel assy, end of the pitot, nose guns and so on. I should mention that on all A6Ms, the very tip of the tail was unpainted as this area was often used to push the plane into position on the deck using a small tractor.
| CONCLUSIONS |
The Hasegawa A6M series has been a staple of small scale Zero fans for decades. The external detail is still excellent, but it has a pretty lame interior. The Eduard set goes quite a ways to helping to add that detail, despite not being designed for this kit. However, even with the additions it is not up to the Tamiya kit in this area. Still, it makes into a very nice model and is not to be overlooked.
| REFERENCES |
http://en.wikipedia.org/wiki/Mitsubishi_A6M2
October 2012
Thanks to me for this one.
If you would like your product reviewed fairly and fairly quickly, please contact the editor or see other details in the Note to Contributors.