| KIT #: | ? |
| PRICE: | AUD $39.00 back about 8 years ago |
| DECALS: | One option |
| REVIEWER: | Scott Van Aken |
| NOTES: | Resin with metal parts and vac canopy |
| HISTORY |
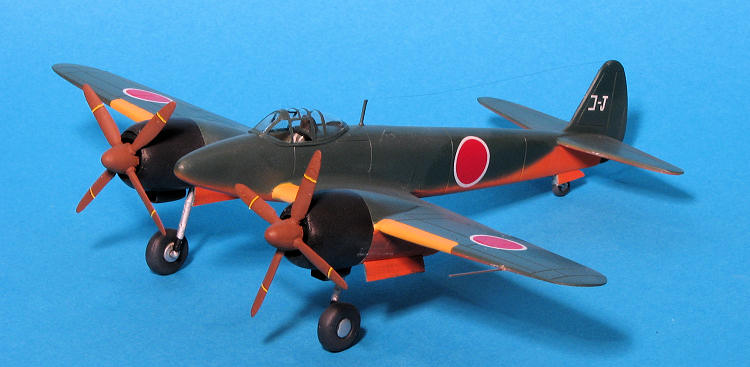
During the spring of 1943, the JNAF issued an 18-Shi
specification for a single-seat twin-engine interceptor capable of reaching a
top speed of 666 km/h (414 mph) at 6,000 m (19,690 ft). Nakajima submitted a
proposal based on the earlier J1N1 Gekko
three-seat night fighter, although this new aircraft – designated J5N1 – was
slightly smaller. The layout of the J5N was similar to the J1N, a low set wing
on which were mounted the two engines, these being 1,484 kW (1,990 hp) Nakajima
Homare 21 18-cylinder air-cooled radial engines, with a long fuselage ending in
a conventional tail arrangement. For maximum utilization of the power from
 the
twin engines, large four-blade propellers were fitted, and these also featured
large spinners – as fitted to the J1N. The main wheels retracted rearwards into
the engine nacelles, and the tailwheel was fixed. The cockpit was set above the
wing, and featured a starboard-opening canopy. The nose was streamlined to offer
the pilot an excellent forward view during landing, take-off and taxiing.
the
twin engines, large four-blade propellers were fitted, and these also featured
large spinners – as fitted to the J1N. The main wheels retracted rearwards into
the engine nacelles, and the tailwheel was fixed. The cockpit was set above the
wing, and featured a starboard-opening canopy. The nose was streamlined to offer
the pilot an excellent forward view during landing, take-off and taxiing.
The armament of the J5N was impressive, and consisted of two 30 mm and two 20 mm cannon, and provision was made for a centreline 250 kg (550 lb) bomb. The J5N was designed to combat the heavily-armed US fighters in the Pacific Theatre at that time, and, thus, the armament would have done severe damage to these aircraft. To concentrate the firepower, the four cannons were mounted in the nose of the J5N.
Impressed with the design, the JNAF authorized the development of the J5N1, assigned the name Tenrai ("Heavenly Thunder"), and six prototypes were requested to be built. The first prototype – lacking its armament – made its first flight July 13, 1944, and was something of a disappointment. The top speed attained was only 597 km/h (371 mph) – far below the specified 666 km/h (414 mph) of the requirement. Despite the other five prototypes flying as well, with numerous enhancements, the aircraft never achieved its design speed, and the project was abandoned soon after.
| THE KIT |
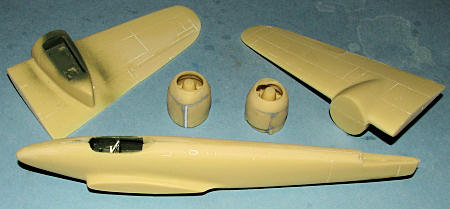
A+V resins is one of a number of smaller Czech resin kit makers that produce
interesting planes that would otherwise not see the light of day. The moldings
are in a tan resin and have fairly good surface detail. It isn't so thin that it
will disappear under paint and not the trenches one sometimes finds. There is a
considerable amount of flash and roughness on the edges of the parts, but it is
 all within the standard range for resin kits.
There is some evidence of pinholes in a few of the parts, but no more than a dozen or so which is really quite good. Many of the smaller parts are embedded in resin 'wafers', again, a normal way to produce these bits. There is a single transparency that has no framework definition, a rather negative design feature, if you ask me, as masking this beastie will not be easy. There is also a generic etched metal fret more suitable for Luftwaffe kits as well as a basic decal sheet of roundels and code letters (not shown). Metal parts are provided for the main landing gear, control stick and pitot tube. They are of mediocre quality with quite a few pits in them that will be difficult to fill. However, they are welcome in that they will be able to hold up the weight of the kit.
All of these parts come in the compartmentalized bags that we have come to expect from Czech produced resin kits. On my example, the heavy parts (fuselage and wings) had broken free from the bag and were loose in the box. Also loose in the box were the metal landing gear and pitot tube.
Instructions are quite basic, but adequate. It includes a nice three view drawing, an exploded parts assembly section and a separate sheet with color diagrams. An interesting feature is that the kit includes separate ailerons, but not separate rudder or elevators. Most unusual.
| CONSTRUCTION |
A&V resins has a reputation for offering a rather basic kit in which 'fit' is not a normal part of the building process. This one proved to be no different from what was expected.
 First step was to
clean up as many of the parts as I could. Many of the small bits were imbedded
in a resin 'wafer', the sure sign of a standard garage kit. After cleaning up
most of the bits (and I have to say that I didn't open up a ton of pinholes, for
that I am grateful), I started building. The kit comes with separate ailerons.
These are different lengths and widths. Fortunately, the aileron openings in the
wing are also different lengths so I was able to match things up. However, the
ailerons are very much too thick and stick out past the wing trailing edge too
far. Once
First step was to
clean up as many of the parts as I could. Many of the small bits were imbedded
in a resin 'wafer', the sure sign of a standard garage kit. After cleaning up
most of the bits (and I have to say that I didn't open up a ton of pinholes, for
that I am grateful), I started building. The kit comes with separate ailerons.
These are different lengths and widths. Fortunately, the aileron openings in the
wing are also different lengths so I was able to match things up. However, the
ailerons are very much too thick and stick out past the wing trailing edge too
far. Once 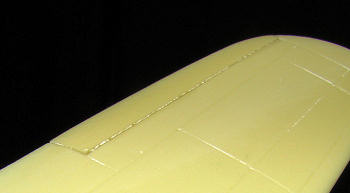 gluing them in place, out
came the coarse sanding stick for some quality sanding. After about ten minutes
on each one, they had been reduced to a size that matched the wing. Again, I was
pleased with finding no mass of pinholes after all that sanding.
gluing them in place, out
came the coarse sanding stick for some quality sanding. After about ten minutes
on each one, they had been reduced to a size that matched the wing. Again, I was
pleased with finding no mass of pinholes after all that sanding.
I then built up the cockpit. A seat, rudder pedals, instrument
panel and control stick all fit on a slab floor. There is no painting
information on the interior and no mounting points in the fuselage so one is on
one's own in this regard. The metal control stick is so poorly molded that
it looks like two of them glued side by side. This was all painted with a green
I had mixed up and looked fairly nice. I did have to carve at
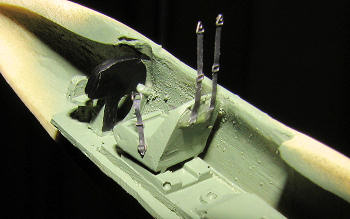 the instrument panel to get it to
fit. The kit provides an acetate instrument sheet, but frankly, without a
photoetched panel, it is kind of a waste. I did manage to get the interior in
fairly straight and then added the seat harness. The etched set looks exactly
like what one would get with a Bf-109 as the belts are the same and one gets a
DF loop antenna and Morane under wing antenna as well. At least it fit. The
belts were painted white.
the instrument panel to get it to
fit. The kit provides an acetate instrument sheet, but frankly, without a
photoetched panel, it is kind of a waste. I did manage to get the interior in
fairly straight and then added the seat harness. The etched set looks exactly
like what one would get with a Bf-109 as the belts are the same and one gets a
DF loop antenna and Morane under wing antenna as well. At least it fit. The
belts were painted white.
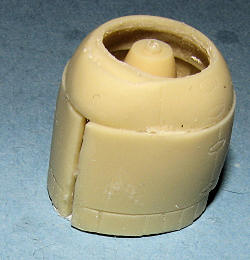 While this was
drying I glued the engines into the cowlings and the cowling halves together
followed by the cowling fronts. The fit is atrocious. Much grinding was needed
just to get the engines in there and they are not straight. I did the best I
could and slathered the parts with filler once I filled a gap with plastic card
and added more superglue to the joins. Once all that was dry, I started on the
filling and sanding. Happily, no massive air pockets appeared so though the fit
stinks, the casting are technically superb.
While this was
drying I glued the engines into the cowlings and the cowling halves together
followed by the cowling fronts. The fit is atrocious. Much grinding was needed
just to get the engines in there and they are not straight. I did the best I
could and slathered the parts with filler once I filled a gap with plastic card
and added more superglue to the joins. Once all that was dry, I started on the
filling and sanding. Happily, no massive air pockets appeared so though the fit
stinks, the casting are technically superb.
Construction then turned to the fuselage halves. These are not quite the same thickness as one side's cannon openings are closer to the centerline of the fuselage as the other. The panel lines also don't quite match up if one lines up the nose and tail. I also found the tail part on one half to be very thick and much sanding was needed to get it to the same thickness of the other. I've not yet test fit the tail planes but won't be surprised if they don't fit as well. Again, much super glue to try to close the gaps. Once dry, I broke out the coarse sanding stick and went to work on the seams, followed by some more super glue and more sanding. There is a blanking plate that fits behind the cockpit and that was later glued in place.
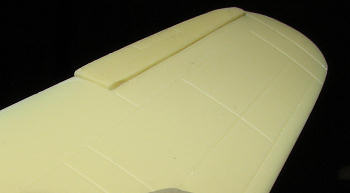
 With that
complete, I felt I'd accomplished something and so sat back and contemplated the
next step. This was, of course, attaching the horizontal stabs and then the fin.
It almost goes without saying that the stab fit wasn't the best, requiring the
usual sanding and such. The fin was also a butt join and the rudder was
considerably longer than it should have been. Once the rest of the fin had the
join filled and smoothed, I took a sanding stick and
With that
complete, I felt I'd accomplished something and so sat back and contemplated the
next step. This was, of course, attaching the horizontal stabs and then the fin.
It almost goes without saying that the stab fit wasn't the best, requiring the
usual sanding and such. The fin was also a butt join and the rudder was
considerably longer than it should have been. Once the rest of the fin had the
join filled and smoothed, I took a sanding stick and
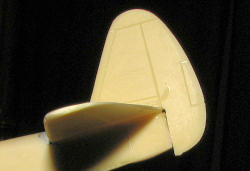 reprofiled
the bottom of the rudder to shorten it. Though others may do these kits by
installing the wings first, I find it easier to do the tail section before the
wings. This method seems easiest for me to line up the wings at a later stage.
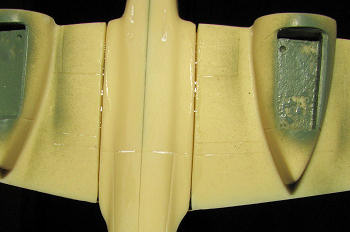
Back at the engine nacelles, I installed the exhaust sections. These were not
only too long for the slots, but far too thick. Once they were trimmed and glued
in place, I sanded down the tops of them as that was the easiest way to take
care of the situation. As much as I wanted to install them on the wings at this
point, I had to consider that there was no keyway for alignment and though the
wings have some dihedral in them, the engines are vertically aligned with the
ground according to the drawings that came with the kit.
reprofiled
the bottom of the rudder to shorten it. Though others may do these kits by
installing the wings first, I find it easier to do the tail section before the
wings. This method seems easiest for me to line up the wings at a later stage.
Back at the engine nacelles, I installed the exhaust sections. These were not
only too long for the slots, but far too thick. Once they were trimmed and glued
in place, I sanded down the tops of them as that was the easiest way to take
care of the situation. As much as I wanted to install them on the wings at this
point, I had to consider that there was no keyway for alignment and though the
wings have some dihedral in them, the engines are vertically aligned with the
ground according to the drawings that came with the kit.
 With the tail planes in place and
sanded down, it was time for the wings. As you might expect, the butt join
leaves a lot to be desired. In this case, I decided to line up the upper wings
and any glitches and gaps would be on the bottom. Though there is very little
dihedral in the wings, the gap on the underside is rather cavernous. I filled
most of it with super glue and used filler over that to take care of the
inevitable small depressions.
With the tail planes in place and
sanded down, it was time for the wings. As you might expect, the butt join
leaves a lot to be desired. In this case, I decided to line up the upper wings
and any glitches and gaps would be on the bottom. Though there is very little
dihedral in the wings, the gap on the underside is rather cavernous. I filled
most of it with super glue and used filler over that to take care of the
inevitable small depressions.
With the wings smoothed out, I attached the exhaust cowl flap section to each engine cowling after trimming about 20% of it as it was too long. Then they were sanded down to match the rest of the cowling and of course, bye bye went all the detail. The engines were then attached to the nacelles and an orgy of filling and sanding began which lasted several days. With that done, the headrest was installed and it was time to mask this beast and get some paint on it.
| COLORS & MARKINGS |
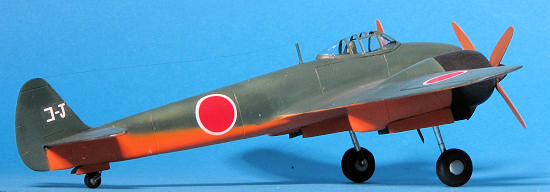
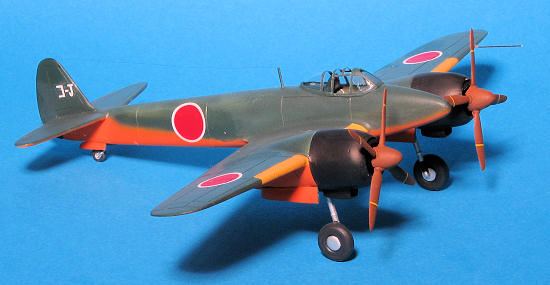
With tissue crammed into the cockpit, I painted the underside
in McLaren Orange, using a pre-mixed lacquer paint I got from Model Car World
that was the wrong shade for the car. This paint went on quite well without any
problems. Looking over the
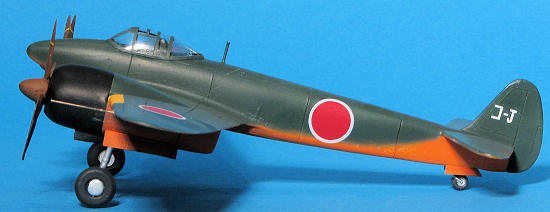 monochrome painting instructions, I realized I should
have painted the engine nacelles black first. That was done using Mr.Color
lacquers, and the nacelles masked. Next, I did the leading edges of the wing in
White from the Testor's Colors By Boyd line. A nice coat of Model Master
Insignia Yellow followed. For the upper color, I used White Ensign Colourcoats
Nakajima Navy Green. All of the paints that needed thinning were thinned with
lacquer thinner. The props were painted right out of the bottle with some old
Aeromaster acrylic that I had. I went back over the orange to take care of
overspray.
monochrome painting instructions, I realized I should
have painted the engine nacelles black first. That was done using Mr.Color
lacquers, and the nacelles masked. Next, I did the leading edges of the wing in
White from the Testor's Colors By Boyd line. A nice coat of Model Master
Insignia Yellow followed. For the upper color, I used White Ensign Colourcoats
Nakajima Navy Green. All of the paints that needed thinning were thinned with
lacquer thinner. The props were painted right out of the bottle with some old
Aeromaster acrylic that I had. I went back over the orange to take care of
overspray.
When that was done, I very carefully removed the masking, though still ran into some trouble with it pulling up paint. This seems to be a never ending problem with me and resin kits. There must be something I'm not doing right in preparation, but I don't know what it is. Every square millimeter ends up getting sanded so it isn't oils. Even when I wipe down the airframe with thinner I still get a few small problem areas. Perhaps the Tamiya tape is too sticky, but then I put the tape on my hands or forehead to gather body oils and reduce the stick. Still has a tendency to pull up paint. This has been going on for years and remains a mystery.
| FINAL CONSTRUCTION |
With the airframe painted, the landing gear were assembled.
The metal gear struts are easily cleaned of the seam and to be honest, are not
that particularly well molded. They are almost generic in how they look. They
are too long and so I had to cut off a
 considerable amount. I also drilled out
the holes in the wheel wells to accept them. Before installing the gear, the
wells were painted with Aotake from Xtracolor. Probably not the right color, but
prove it!
considerable amount. I also drilled out
the holes in the wheel wells to accept them. Before installing the gear, the
wells were painted with Aotake from Xtracolor. Probably not the right color, but
prove it!
I then glued the wheels to the gear and then the gear into the holes, making sure they jutted forward a bit. The tail wheel hole was opened up and that was installed after painting. Then I butt glued the gear doors in place. These are a tad too long, but not enough to worry about. The tail wheels doors are the wrong shape, but again, I left them as is.
After the doors had been glued on, the landing gear still looked too long. I then put on a prop to check take-off ground clearance and I could easily have removed about 50% more from the strut, but it isn't as bad as it seems. At least it was finally on its gear.
Next was the canopy. This is totally devoid of detail and is
only an outline shape. Worse, it is very thin on the top and there was no spare.
I carefully applied masking tape and cut it to resemble the frame lines as shown
in the three view. Not perfect, but acceptable to me. I then used Vallejo Game
Varnish clear gloss pain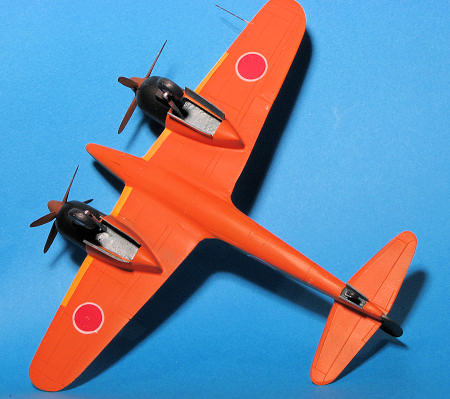 t to attach the canopy. It required my taping it in
place while the varnish dried otherwise the canopy would pop up out of position.
Once dry, I used post it notes to mask around the canopy and sprayed it upper
fuselage color. There is a cast metal pitot tube, but it is grossly oversized so
I snipped off the thinner part and used it for the antenna mast. A section of
.020 bronze wire was cut for the pitot and glued in place.
t to attach the canopy. It required my taping it in
place while the varnish dried otherwise the canopy would pop up out of position.
Once dry, I used post it notes to mask around the canopy and sprayed it upper
fuselage color. There is a cast metal pitot tube, but it is grossly oversized so
I snipped off the thinner part and used it for the antenna mast. A section of
.020 bronze wire was cut for the pitot and glued in place.
The kit decals consist of a sheet of roundels and one with the tail codes. Not very intensive. The markings took an age to come away from the backing sheet, and they had a great tendency to silver, especially the tail markings. Several applications of Solvaset were applied to try to reduce that. Interestingly, it caused the markings to crack when they were over panel lines. First time I've seen that phenomenon.
An application of clear matte was sprayed on to seal the markings. A bit of the usual touchup painting was needed as well. Some yellow stripes to the props and they were attached using clear paint. A hair was used for the radio antenna and though I'd sanded away all the detail on the cowlings getting them to fit, I put some exhaust stains where the exhaust should have been.
| CONCLUSIONS |
 As you can
surmise by now, this is a kit that many would not have finished. The fit was
poor, and much additional work had to be done to bring it up to medium
standards. No contest airplane except in the display-only area, but it was one
that provided me with quite some pleasure during the construction as I did have
to think my way around some of the issues it presented. Not the masterpiece that
others could have produced, but an interesting build nonetheless and something
that is rarely seen elsewhere.
As you can
surmise by now, this is a kit that many would not have finished. The fit was
poor, and much additional work had to be done to bring it up to medium
standards. No contest airplane except in the display-only area, but it was one
that provided me with quite some pleasure during the construction as I did have
to think my way around some of the issues it presented. Not the masterpiece that
others could have produced, but an interesting build nonetheless and something
that is rarely seen elsewhere.
| REFERENCES |
January 2010
Copyright ModelingMadness.com. All rights reserved. No reproduction in part or in whole without express permission from the editor. If you would like your product reviewed fairly and quickly, please
contact the editor or see other details in the
Note to
Contributors.