Kopro 1/72 N1K2-Ja Shiden-Kai
| KIT #: | 74157 |
| PRICE: | 260 Koruna (about $13 USD) from www.hobbyshop.cz |
| DECALS: | Two options |
| REVIEWER: | Scott Van Aken |
| NOTES: | New tool kit |
| HISTORY |
The
Kawanishi N1K Kyōfū (強風 "strong wind", Allied reporting
name "Rex") was an Imperial Japanese Navy floatplane fighter. The
Kawanishi N1K-J
Shiden (紫電 "Violet Lightning") was an Imperial
Japanese Navy Air Service land-based version of the N1K. Assigned the Allied
codename "George", the N1K-J was considered by both its pilots and
opponents to be one of the finest land-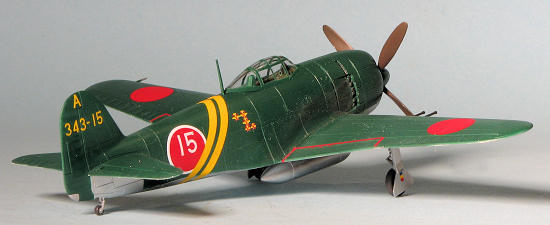 based fighters flown by the Japanese
during World War II.
based fighters flown by the Japanese
during World War II.
The N1K possessed a heavy armament and, unusual for a Japanese fighter, could absorb considerable battle damage. The N1K-J evenly matched the F6F Hellcat and was a better match than the A6M Zero for such aircraft as the F4U Corsair and P-51 Mustang. Despite such capability, it was produced too late and in insufficient numbers to affect the outcome of the war.
The N1K1 entered service in early 1944 and proved highly effective against American fighters. The Kawanishi was among the few Japanese fighters that could stand up to the best enemy types, including Hellcats and Corsairs. In the hands of aces, the Shiden could even outfly its American opponents. In February 1945, Lieutenant Kaneyoshi Muto, flying a N1K2-J as part of a group of at least ten expert Japanese fighters, faced seven U.S. Navy Hellcats of VF-82 in the sky over Japan. His group shot down four Hellcats with no loss to themselves. After the action, reporters fabricated a story in which Muto was the sole airman facing 12 enemy aircraft.
 They were, however, mechanically unreliable. The engine was difficult to
maintain and, like the complicated undercarriage, plagued by frequent failures.
N1K1-J aircraft were used very effectively over Formosa, the Philippines and
later, Okinawa. Before production was switched to the improved N1K2-J, 1,007
aircraft were produced, including prototypes.
They were, however, mechanically unreliable. The engine was difficult to
maintain and, like the complicated undercarriage, plagued by frequent failures.
N1K1-J aircraft were used very effectively over Formosa, the Philippines and
later, Okinawa. Before production was switched to the improved N1K2-J, 1,007
aircraft were produced, including prototypes.
Problems resulted in very few N1K2-J aircraft being produced, but the Shiden-Kai proved to be one of the best "dogfighters" fielded by either side. Along with high speed, the fighters were very agile with a roll rate of 82°/sec at 386 km/h (240 mph). Their weaponry comprising four 20 mm cannons in the wings was highly effective. As a bomber interceptor, the N1K2-J was less successful, hampered by a poor rate of climb and reduced engine performance at high altitude.
Surprisingly, four aircraft are still extant. Three in the US and one, pulled from the waters of the Bungo Straight and not restored, is in Japan. This latter airframe was one used by the 343 Kokutai, the elite unit of aces.
| THE KIT |
The kit has the level of detailing you would expect from Revell or Hasegawa with crisply molded lines and alignment pins that actually mate up the surfaces correctly. I test fit the fuselage and wing pieces and was delighted with the way they went together. The detailing in the cockpit is first rate with the rudder pedals molded to a detailed floor to which you add the seat and rear bulkhead. the instrument panel has a decal sheet that fits over it, and while I am not sure it should be white, it will look the part.
The Shiden-kai did not have a lot of bits you can
stick under it and this is basically left down to a drop tank. The holes for the
tank mount are already formed so if you wish to skip the tank you will need to
fill the holes. Interestingly, these mou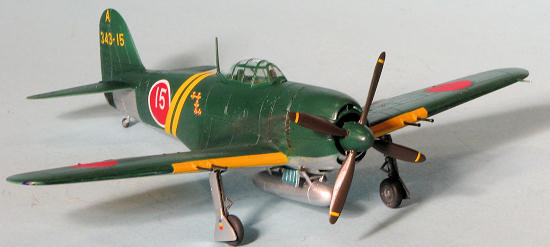 nting holes do not go all the way
through the lower wing, but are backed by little 'cups'. Not something I have
seen very often. The engine face is well detailed and I like that the prop is a
single piece. The only possible pesky ejector pin marks are on the inside of the
main gear doors. However, these may well be covered by the landing gear struts
once the kit is built. Another nice option is providing both a one-piece and
multi-piece canopy. I am not sure if the canopy itself will be thin enough to
slide over the rear section if you wish to display it open as the plastic is a
bit thick, but one will see.
nting holes do not go all the way
through the lower wing, but are backed by little 'cups'. Not something I have
seen very often. The engine face is well detailed and I like that the prop is a
single piece. The only possible pesky ejector pin marks are on the inside of the
main gear doors. However, these may well be covered by the landing gear struts
once the kit is built. Another nice option is providing both a one-piece and
multi-piece canopy. I am not sure if the canopy itself will be thin enough to
slide over the rear section if you wish to display it open as the plastic is a
bit thick, but one will see.
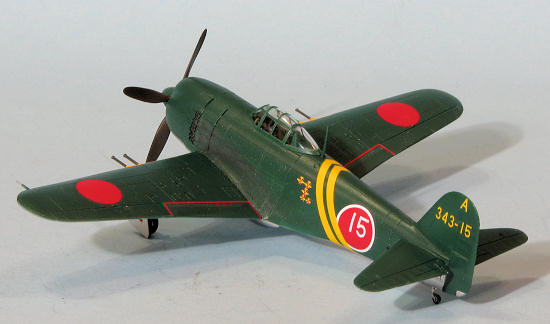
Instructions are well drawn with eleven construction steps. Paint information is via Humbrol, Agama and FS 595 references. The decal sheet is superb and provides markings for two aircraft from the 343 Hikoki. IOne is the box art plane with an impressive victory tally while the other has the number 15 painted or chalked in to the fuselage Hinomaru. For those who may want different markings, Kopro and others make alternate decals. The kit sheet includes a full set of stencil decals and insignia for one aircraft.
| CONSTRUCTION |
 Apparently Kawanishi IJNAF planes had real primer used on their aircraft
rather than the clear blue-green coating used on many other late war planes
and in this case the instructions call for FS 34102 green. Instead, I used
some Nakajima Army Green that I already had mixed up and used that for the
cockpit. It is a bit darker and
I think that looks a bit better. Thanks to the suggestions of the decal
sheet, I ended up painting the inside of the gear doors and gear wells with
Aotake.
Apparently Kawanishi IJNAF planes had real primer used on their aircraft
rather than the clear blue-green coating used on many other late war planes
and in this case the instructions call for FS 34102 green. Instead, I used
some Nakajima Army Green that I already had mixed up and used that for the
cockpit. It is a bit darker and
I think that looks a bit better. Thanks to the suggestions of the decal
sheet, I ended up painting the inside of the gear doors and gear wells with
Aotake.| COLORS & MARKINGS |
First, the underside was painted with Tru-Color
Aluminum. As usual, it left a superb finish and as usual, it needs to be
undercoated to provide optimum stick. I masked off the Aluminum with very low
tack tape and painted the upper surfaces with Colour Coats Kawanishi Green. With
that dry, I masked off the leading edge of the wings where the yellow ID bands
would be painted. I used Tru-Color White for the undercoat and then some Colour
Coats RLM 04 for the yellow. The wheel wells were brush
 painted with Aotake as
that is what the painting guide showed. I had to mask the yellow a bit to take
care of a few glitches including forgetting to glue on the radio mast before
painting. The lower control surfaces were brush painted with Aeromaster IJN Grey
acrylic as these were not painted aluminum but usually left in primer.
painted with Aotake as
that is what the painting guide showed. I had to mask the yellow a bit to take
care of a few glitches including forgetting to glue on the radio mast before
painting. The lower control surfaces were brush painted with Aeromaster IJN Grey
acrylic as these were not painted aluminum but usually left in primer.
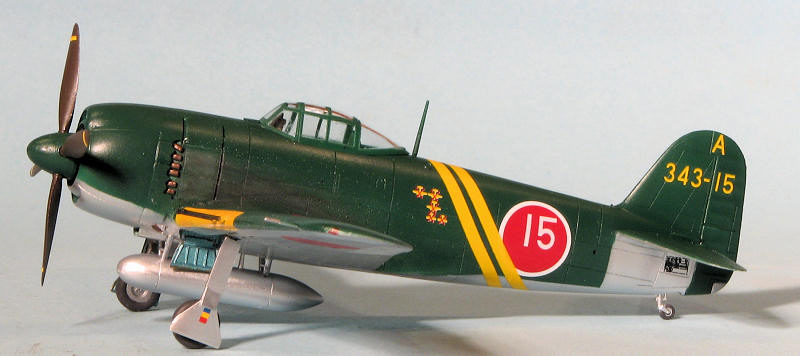
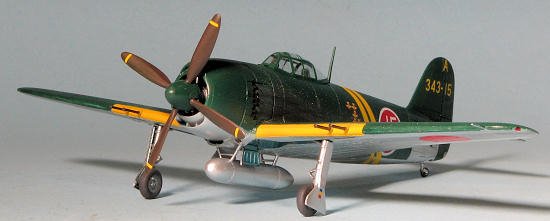
Back at the bench I glued in the landing gear and retraction struts. Backwards, of course, but I realized my error in time to pull them out of the still tacky glue and get them attached properly. Why I do things like this I will never know. Meanwhile, the prop had been painted Japanese primer brown using some old Aeromaster acrylics and the spinner with backing plate done with the Kawanishi green. The prop assembly was then attached and unlike most of my kits, it spins quite well, thank you.
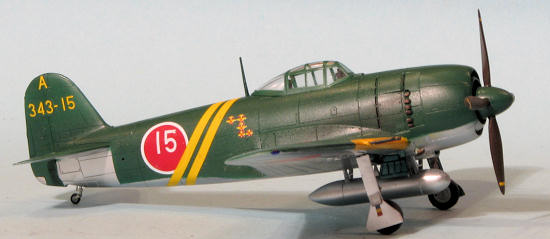
Then on to the decals. I decided to use the markings from the kit with the number 15 in the roundel. The common markings were first applied in case I made a goof. These decals are very thin and quite opaque with the hinomarus being backed up by white to prevent color darkening against the green. Microsol was used to help them snuggle down with no worries. You are provided with both red and yellow flap warning markings and I used the red ones as I though they would be more likely to be used. After the usual couple of days, the markings were nearly all in place and I gave the model a coat of semi-matte clear to seal in the markings.
| FINAL CONSTRUCTION |
This consisted of some touch up painting and application of pastels for exhaust. I used a Sharpie for the red and blue position lights. The main gear door and their required decals were then attached. You may want to trim on the upper part of the main gear doors as they do not fit on their attachment pegs as they should. I did not and the doors sit a bit low.
| CONCLUSIONS |
Even though it is not a new tool kit, the assembly is pretty standard and other than the gap at the lower wing/fuselage join, there are no actual issues that need any big time filler. Due to the difficulty that many might have finding the Aoshima kit, I can easily recommend the Kopro version. One thing for sure, the decals are much better in this one.
| REFERENCES |
 http://en.wikipedia.org/wiki/Kawanishi_N1K2-J
July 2012
Thanks to www.hobbyshop.cz for the review kit. You can buy yours from the link.
If you would like your product reviewed fairly and fairly quickly, please contact the editor or see other details in the Note to Contributors.