
| KIT #: | 60780 |
| PRICE: | 1,120 yen (about $14.50) from Hobby Link Japan |
| DECALS: | Three options |
| REVIEWER: | Scott Van Aken |
| NOTES: |
| HISTORY |
 Japan went to war with what many consider to be the
finest fighter and the the best trained pilots in the Pacific. The A6M2b
equipped all of Japan's carrier fighter groups and in the hands of highly
trained pilots, many of whom were veterans of combat in China, proceeded to
clear the air of their opponents. This all came at a price. The planes, while
very maneuverable and with great range did so without the benefit of armor
protection for the pilot and fuel systems. Since the training regimen was so
long and strict, Japan was unable to replace aircrew losses and their aircraft
industry was unable to match the pace of its major foe, the United States.
Japan went to war with what many consider to be the
finest fighter and the the best trained pilots in the Pacific. The A6M2b
equipped all of Japan's carrier fighter groups and in the hands of highly
trained pilots, many of whom were veterans of combat in China, proceeded to
clear the air of their opponents. This all came at a price. The planes, while
very maneuverable and with great range did so without the benefit of armor
protection for the pilot and fuel systems. Since the training regimen was so
long and strict, Japan was unable to replace aircrew losses and their aircraft
industry was unable to match the pace of its major foe, the United States.
But in the early years, the A6M was pretty much the king of the skies, and while the aircraft was steadily improved over the years, many of these early models served as home defense aircraft, advanced trainers or were still used in areas leap-frogged by US forces during the island campaigns.
| THE KIT |
This is the first I have seen of Tamiya's 1/72 Zero line and I have to say it is quite well done. One expects much from Tamiya and this one certainly seems to fulfill that expectation. There are two major sprues with Tamiya's finely engraved detailing and quite a few small parts. Another tiny sprue holds the cowling, there is a nice clear sprue and a pair of poly inserts.
Tamiya
is one of those companies that does not provide a parts layout, but I did notice
that there are some redundant parts in the box, including a different instrument
panel and a few other interior bits. The two sprues presented are an A and D
sprue with the clear bits being the B sprue. All of the sprues are separately
bagged including the
cowling,
which is part of the D sprue.
D
sprue with the clear bits being the B sprue. All of the sprues are separately
bagged including the
cowling,
which is part of the D sprue.
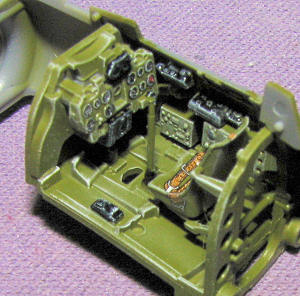
The detail in the cockpit is worthy of a 1/32 kit with a goodly number of small boxes. While there is also a decal for the main instrument panel, you will need to break out the 10/0 brush for the others. There are the usual inserts for the lower intake, just like Hasegawa. The only option is for an open or closed canopy. The kit provides two of them, one for those who wish to model the aircraft with the canopy closed and the other with a separate sliding canopy section. A drop tank is also included. Engine detail is nicely done for this scale as well.
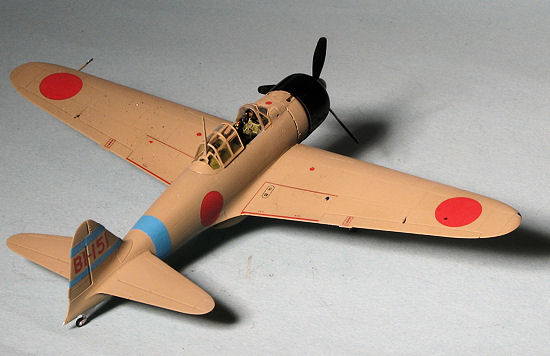
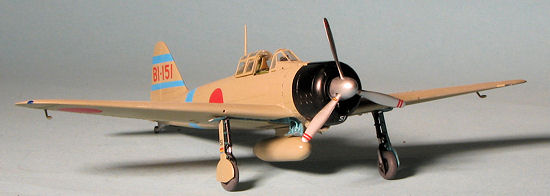
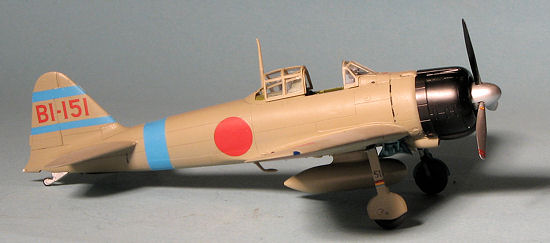
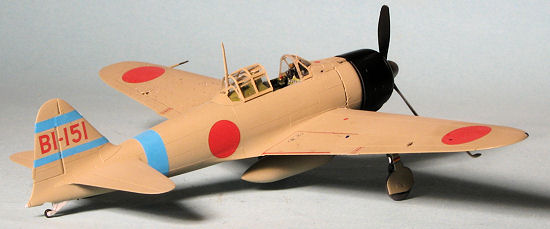
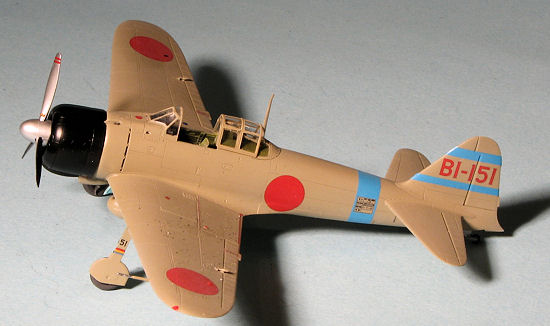
Markings are for three planes that participated at Pearl Harbor. Oddly, the box art plane is not one of them. From the Akagi is the aircraft of Lt. Saburo Shindo, coded AI-102. With a BI-151 code from the Soryu is the plane of Lt. Fusata Iida. Finally, from the Zuikaku is the plane of Lt. Masao Sato. This one is coded EII-197. The decals are superbly done and provide all the markings you will need to do one of the three options, including the fuselage bands. I also like that Tamiya includes a seat harness decal. Typically, Tamiya has you mix paints, including the one for Aotake. I also found it odd that Tamiya still thinks these planes were green-grey instead of the browner Ame-iro, a shade that has been known for many years. It is up to you to decide how to handle that. An excellent set of Japanese WWII colors is provided by Colourcoats and others.
| CONSTRUCTION |
 It has been quite a while since I last built a Tamiya
kit so I was looking forward to this one. I started out pretty much following
the instructions on this one and first started assembling interior
subassemblies. I do this so that I can glue some of the bits together and then
paint them. I have to say that I was very much impressed by the amount of detail
provided for the cockpit. There were a considerable number of boxes and bits to
attach to the inside of the fuselage; as much as with a 1/48 kit. I painted all
of the interior bits with Colorcoats Mitsubishi Interior Green with the areas
It has been quite a while since I last built a Tamiya
kit so I was looking forward to this one. I started out pretty much following
the instructions on this one and first started assembling interior
subassemblies. I do this so that I can glue some of the bits together and then
paint them. I have to say that I was very much impressed by the amount of detail
provided for the cockpit. There were a considerable number of boxes and bits to
attach to the inside of the fuselage; as much as with a 1/48 kit. I painted all
of the interior bits with Colorcoats Mitsubishi Interior Green with the areas
 behind the cockpit proper being
painted Aotake, again, using Colorcoats. I then picked out bits with Tamiya X-18
black and XF-16 aluminum as directed by the instructions. The canopy release
knob was painted red using Humbrol. There are decals for many of the instrument
panel decals and one for the seat harness. These were installed and I used Mr
Mark Softer as the setting solution. I like that the belt decal included the
overlapped attachment areas. I then glued the interior sections together and
though not called out be the instructions, glued the interior to the right side
wall. Instructions would have you wait until the fuselage halves are together
and then insert the interior from the underside, but test fitting showed this to
be a very tight fit, so I deviated from the instructions. I should mention that
I also dry-brushed everything with white just to add some interest.
behind the cockpit proper being
painted Aotake, again, using Colorcoats. I then picked out bits with Tamiya X-18
black and XF-16 aluminum as directed by the instructions. The canopy release
knob was painted red using Humbrol. There are decals for many of the instrument
panel decals and one for the seat harness. These were installed and I used Mr
Mark Softer as the setting solution. I like that the belt decal included the
overlapped attachment areas. I then glued the interior sections together and
though not called out be the instructions, glued the interior to the right side
wall. Instructions would have you wait until the fuselage halves are together
and then insert the interior from the underside, but test fitting showed this to
be a very tight fit, so I deviated from the instructions. I should mention that
I also dry-brushed everything with white just to add some interest.
Meanwhile, I glued the upper and lower wing sections
together after painting various places with Aotake. I used a brush for this as
it seems to give as good a finish as air brushing and I knew that in the wheels
wells I would need to do touch-up any way. Wings fit quite well. I then added
the left side console to the interior and glued the fuselage halves together
along with installing the upper cowling piece that contains the guns. A brief
note here on sprue attachment points. Several of these on the wings and fuselage
attach on the mating surfaces.
 This keeps any issues with having chunks cut out
of the part when removing or cleaning the part, but adds to it the issues that I
often have of a bit of over-sanding when removing these attachment stubs.
Despite my care, I did that on this kit and this only means a gap at these
locales that needs filling. I used superglue for all the filler in these areas.
This keeps any issues with having chunks cut out
of the part when removing or cleaning the part, but adds to it the issues that I
often have of a bit of over-sanding when removing these attachment stubs.
Despite my care, I did that on this kit and this only means a gap at these
locales that needs filling. I used superglue for all the filler in these areas.
After painting the engine, this was then assembled. Be sure to keep everything properly aligned. The wings were then attached. Fit is very good though one side did have a bit of a gap on the upper root and there is a small step at the rear wing/fuselage join. I had forgotten to install the guns so did this at this time. It was not an easy task so I recommend not forgetting and gluing those in before attaching the cockpit. I then masked and installed the windscreen section. The sliding canopy and aft section were masked and painted separately. I roughly masked off the closed canopy piece and put that in place for painting.
| COLORS & MARKINGS |
This one is going to be a simple paint. Overall Ameiro. I used Colorcoats enamels for this. The paint takes quite a while to be able to be handled; pretty much 24 hours and sometimes more. Meanwhile, I painted the black bits using Tamiya X-18.
 When it was dry, I glued in the main gear and tail
gear. The temporary canopy section was removed and the radio mast glued in
place. Fitting the aft canopy section was a bit of a chore as the hole for the
mast is too small and so that had to be opened up. Even then, it did not want to
seat in the alignment hole in the fuselage until that was opened up more. I then
attached the aileron mass balances and the little upper hinges. Both of these
were a major pain. The mass balances are somewhat large, but have no slot in
which they fit. They butt join to the underside of the outer aileron and are
VERY easy to knock off. The aileron hinges on the top are tiny and extremely
difficult to clean off the sprue stub and equally difficult to install properly.
These were later brush painted once the model was pretty much done.
When it was dry, I glued in the main gear and tail
gear. The temporary canopy section was removed and the radio mast glued in
place. Fitting the aft canopy section was a bit of a chore as the hole for the
mast is too small and so that had to be opened up. Even then, it did not want to
seat in the alignment hole in the fuselage until that was opened up more. I then
attached the aileron mass balances and the little upper hinges. Both of these
were a major pain. The mass balances are somewhat large, but have no slot in
which they fit. They butt join to the underside of the outer aileron and are
VERY easy to knock off. The aileron hinges on the top are tiny and extremely
difficult to clean off the sprue stub and equally difficult to install properly.
These were later brush painted once the model was pretty much done.
With the plane on its gear, it was time for markings. First, an overall gloss clear coat to prevent silvering. All three kit options are nice, but I already had one with yellow tail stripes and a 1/48 version with white so it was the Soryu place that was chosen. As usual, I applied all the common markings first before going on to the others.
| FINAL CONSTRUCTION |
With the decals in place (and they all reacted well to
Mr. Mark Softer), I went to attach the wheels and gear doors. I had a major DUH
moment when I glued on the main gear in that I installed them backwards. They
were not going to remove themselves easily so I had little choice but to snap
them off. Before reinstalling them, I glued on the small outer gear doors. As
luck would have it, I
 applied a bit too much cement and the doors fell into the
excess cement, ruining the paint on that area. This only added to the litany of
minor disasters that was unfolding on the underside of the wings.
applied a bit too much cement and the doors fell into the
excess cement, ruining the paint on that area. This only added to the litany of
minor disasters that was unfolding on the underside of the wings.
The main gear needed to be attached with super glue as you might expect. The inner gear doors were then glued on. It seems the instructions show them on the wrong sides as the 'bent' parts need to be to the rear to clear the drop tank. The small gear retraction struts also did not fit as well as I would have hoped as the little forks need to be against the small plates on the inside of the gear doors. I then took the opportunity to give the kit a coat of clear flat to seal in the decals and get rid of the gloss.
With the gear in place, the drop tank was glued on. I then attached the engine/cowlflap assemby followed by the cowling. The next step was to remove the masking from the clear bits. The separate canopy only really fits well in the open position if all the way open so it was attached using clear paint. A bit of detail painting, a touch of exhaust stain, the prop pushed on and it was done.
| CONCLUSIONS |
 This is by
far the best 1/72 A6M2 on the market. The build is a bit on the fiddly slide due
to all the small parts, but barring stupidity such as shown by your reviewer,
will be a relatively trouble free build. About the only thing one could wish
would be folding wing tips, but that is not a big deal to most of us. The bottom
line is that if you like the early Zero, then this is the kit you need to get.
This is by
far the best 1/72 A6M2 on the market. The build is a bit on the fiddly slide due
to all the small parts, but barring stupidity such as shown by your reviewer,
will be a relatively trouble free build. About the only thing one could wish
would be folding wing tips, but that is not a big deal to most of us. The bottom
line is that if you like the early Zero, then this is the kit you need to get.
October 2012
Thanks to Hobby Link Japan for the review kit. You can get yours at the link to the left.
If you would like your product reviewed fairly and fairly quickly, please contact the editor or see other details in the Note to Contributors.