
|
KIT # |
60768 |
|
PRICE: |
$15.00 MSRP |
|
DECALS: |
Four aircraft |
|
REVIEWER: |
|
|
NOTES: |
|
|
BACKGROUND |
For a look at what's in the box and a brief history of the type,
visit the preview.
|
CONSTRUCTION |
As with most kits, this one starts with the interior. All of the
parts that are to be painted the same color were glued together, though I did
keep the instrument panel piece separate to make it easier to apply the decal.
The interior parts and the inner fuselage walls were painted in a green color. I
initially used RAF interior green, but it looked too light so I misted over some
USMC dark green to the shade I liked. With the Shiden having been built by
several companies, there was no set standard interior color on this aircraft.
With no extant relics of the early George available (at least that I know of),
whatever you feel is the best color will do.
Now that the wings were attached, I could install the horizontal stabilizers.
These fit quite well. So far, this has been a nearly filler free kit with only a
tiny bit used on the fuselage. While all of that was drying, the drop tanks was
glued together and sanded smooth. Then the gun gondolas were glued onto the
lower wing. The barrels will be added after decaling is complete to prevent any
accidental breakage. The tail wheel was slotted in place and the canopy attached
after the DF loop antenna was painted and glued in place. The canopy was masked
in preparation for painting. Turning to the front of the
aircraft, the cowl flaps were glued to the cowling and the inside painted flat
black as recommended by the instructions. Then the exhaust stack panel was press
fit. These exhaust bits are very thin and quite fragile so be careful. With the
exhaust panel in place, the cowling was tacked on and stuffed with tissue.
Finally, the fuselage antenna was glued in place and it was time to start adding
paint. CAMOUFLAGE
MORE GLUING
With a painted airframe, it was time to look at adding more parts. First off,
the oil cooler was glued onto the lower fuselage. I left this off for the
initial painting as it just got in the way. I also drilled out the openings as
it just didn't look right otherwise. The wheel wells were brush painted aluminum
and this turned up one area of the kit that really doesn't sit well with me.
Ejector pin marks. Not only do the wheel wells have rather prominent ones that
are near impossible to remove, but they are also present on the insides of the
landing gear doors and on the main landing gear themselves. It is completely at
odds with the super engineering of the rest of the kit. Sure, the gear doors and
the landing gear can be filled and sanded, but they shouldn't have to be. There
is no real cure for the roof of the wheel well other than an insert of some
sort.
 With the cockpit
painted, some of the smaller items were picked out in black, and a couple of
shades of dark brown as recommended in the instructions. The instrument panel
was painted a dark grey instead of black so that the black decals would show up.
The fuselage halves were then glued together while the rest of the paint dried.
Upon completion of that, the interior was slotted in from the underside and the
lower wing was attached. It is imperative that you get this part to line up
well, and the use of a 'hot' liquid cement will assure you of this.
With the cockpit
painted, some of the smaller items were picked out in black, and a couple of
shades of dark brown as recommended in the instructions. The instrument panel
was painted a dark grey instead of black so that the black decals would show up.
The fuselage halves were then glued together while the rest of the paint dried.
Upon completion of that, the interior was slotted in from the underside and the
lower wing was attached. It is imperative that you get this part to line up
well, and the use of a 'hot' liquid cement will assure you of this.
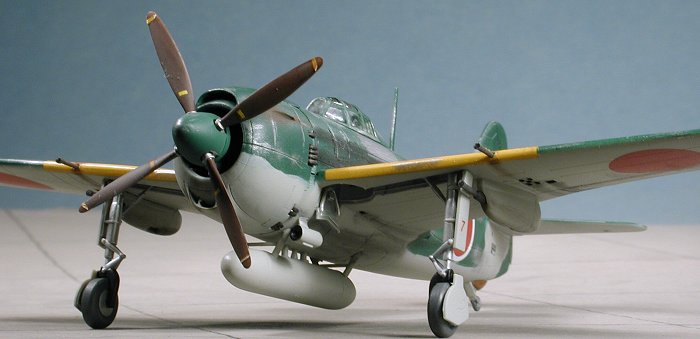
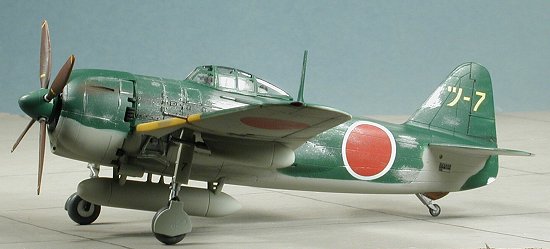
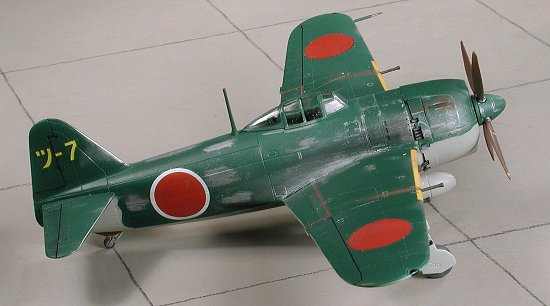
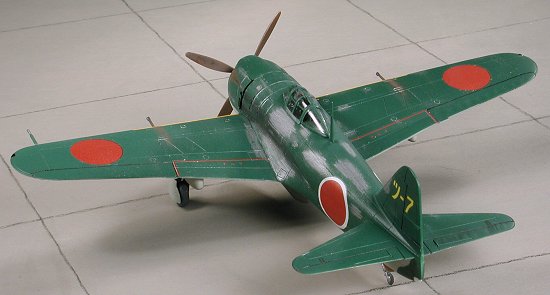 Georges were all painted dark green upper surfaces with light grey lower
surfaces. That being the case, I hunted up some IJN light grey (actually
Nakajima light grey, but who can tell), and sprayed that on. It is part of the
Aeromaster line, but unlike many other colors, the Japanese colors seemed to
only be in acrylics. Once the lower light grey had dried, much masking was done
and the upper surface of Kawanishi Navy Green was sprayed on. Unlike the box
art, I masked the colors. In 1/72, this tends to look better (at least to me)
than free-hand painting. Much to my dismay, a bit of the upper green came away
on the tape during the second go around. I left it alone for the time being. An
idea was forming in my head regarding that section for later.
Georges were all painted dark green upper surfaces with light grey lower
surfaces. That being the case, I hunted up some IJN light grey (actually
Nakajima light grey, but who can tell), and sprayed that on. It is part of the
Aeromaster line, but unlike many other colors, the Japanese colors seemed to
only be in acrylics. Once the lower light grey had dried, much masking was done
and the upper surface of Kawanishi Navy Green was sprayed on. Unlike the box
art, I masked the colors. In 1/72, this tends to look better (at least to me)
than free-hand painting. Much to my dismay, a bit of the upper green came away
on the tape during the second go around. I left it alone for the time being. An
idea was forming in my head regarding that section for later.
 The landing gear and inside of the doors was painted aluminum with the lower
section of the landing gear painted black. The gear was then assembled.
Including the wheels and gear doors, there are 7 parts to each side; easily the
most fiddly construct of the kit. The engine was then painted flat black with a
blue-grey crankcase. The instructions state the crankcase should be light blue,
but it just didn't look right, hence the blue grey. This area was then
drybrushed with aluminum. The prop assembly is three parts; a prop, the backing
and the spinner. The prop was painted a brown primer color with an
aluminum hub while the backing and spinner were done in Kawanishi Navy Green.
The prop was then glued to the backing and the spinner pressed on. It is a very
tight fit. These last two sub assemblies along with the gun barrels and pitot
tube were set aside until the very end.
The landing gear and inside of the doors was painted aluminum with the lower
section of the landing gear painted black. The gear was then assembled.
Including the wheels and gear doors, there are 7 parts to each side; easily the
most fiddly construct of the kit. The engine was then painted flat black with a
blue-grey crankcase. The instructions state the crankcase should be light blue,
but it just didn't look right, hence the blue grey. This area was then
drybrushed with aluminum. The prop assembly is three parts; a prop, the backing
and the spinner. The prop was painted a brown primer color with an
aluminum hub while the backing and spinner were done in Kawanishi Navy Green.
The prop was then glued to the backing and the spinner pressed on. It is a very
tight fit. These last two sub assemblies along with the gun barrels and pitot
tube were set aside until the very end.
|
DECALS |
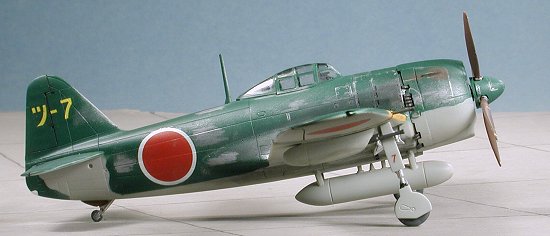
 Aftermarket decals for the 1/72 N1K1-Ja are basically non-existent. This
means Tamiya decals or nothing. I was rather hesitant about using them as my
track record with Tamiya decals is spotty to say the least. With no real choice,
I started with the yellow wing leading edge bands. This area is pretty straight
and I'd thought about painting them on, but figured the decals may actually
work. Well, much to my delight, I had little trouble with the decals. The ones
on the tail and the wing walk area ones silvered rather badly, but once fully
dry, a touch of Champ setting solution took care of it. I was pretty psyched
about not having a decaling disaster after using the Champ. Not sure why it
worked this time, but I won't complain. I used the markings for the box art
plane from the Tsukuba fighter group. With the decals on and completely dry, the
model was wiped with a moist rag to remove any decal glue residue.
Aftermarket decals for the 1/72 N1K1-Ja are basically non-existent. This
means Tamiya decals or nothing. I was rather hesitant about using them as my
track record with Tamiya decals is spotty to say the least. With no real choice,
I started with the yellow wing leading edge bands. This area is pretty straight
and I'd thought about painting them on, but figured the decals may actually
work. Well, much to my delight, I had little trouble with the decals. The ones
on the tail and the wing walk area ones silvered rather badly, but once fully
dry, a touch of Champ setting solution took care of it. I was pretty psyched
about not having a decaling disaster after using the Champ. Not sure why it
worked this time, but I won't complain. I used the markings for the box art
plane from the Tsukuba fighter group. With the decals on and completely dry, the
model was wiped with a moist rag to remove any decal glue residue.
|
FINAL BITS |
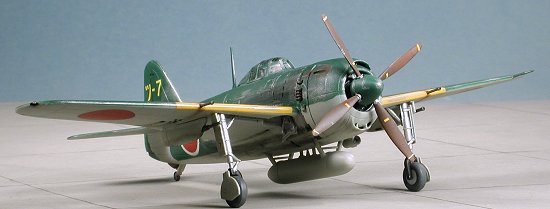
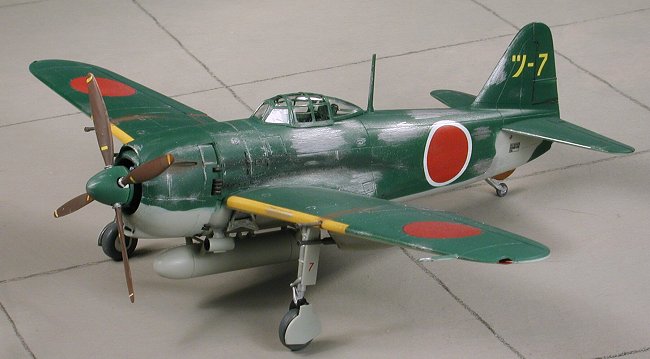
 Now that the decals were on nice and tight, I decided to try some rather
unusual weathering. Most of these late war aircraft seemed to get rather
ratty-looking in a big hurry. What I did was to take some SnJ buffing compound
and apply it to various areas of the plane. I used Microbrushes and toothpicks
to apply the powder. I'm not really sure if I like the effect or not. Perhaps it
would have been better to paint the plane aluminum and then pick off the paint.
In order to salvage something from it, I used a silver pencil to give some of
the edges more definition. It seemed to help, but I obviously need to do more
work in this area. Anyway, it is done and there is no turning back.
Now that the decals were on nice and tight, I decided to try some rather
unusual weathering. Most of these late war aircraft seemed to get rather
ratty-looking in a big hurry. What I did was to take some SnJ buffing compound
and apply it to various areas of the plane. I used Microbrushes and toothpicks
to apply the powder. I'm not really sure if I like the effect or not. Perhaps it
would have been better to paint the plane aluminum and then pick off the paint.
In order to salvage something from it, I used a silver pencil to give some of
the edges more definition. It seemed to help, but I obviously need to do more
work in this area. Anyway, it is done and there is no turning back.
The aircraft was then sprayed with a clear matte to seal it all in. A bit more painting was done in terms of formation lights, the masking taken off the canopy, the guns installed and some pastel exhaust stains added. I didn't rig the radio antenna as I wasn't sure if it was a long wire or not. VHF sets usually don't need the long wire and are just run up inside the antenna mast.
|
CONCLUSIONS |
Despite the ejector pin deal, this is a very nice kit. It surely beats the Aoshima and the MPM versions though it more expensive than either. For me, this was a pretty quick build, taking about a week and a week in which I was unable to work on the kit for several days. It is one that I can recommend to just about all skill levels.
March 2002
Review kit courtesy of my kit collection.
Copyright ModelingMadness.com. All rights reserved. No reproduction in part or in whole without express permission from the editor.
If you would like your product reviewed fairly and fairly quickly, please contact the editor or see other details in the Note to Contributors.
Back to Reviews Page 2016