Revell 1/72 J1N1-S 'Irving'
|
KIT # |
H-105 |
|
PRICE: |
$? |
|
DECALS: |
One aircraft |
|
REVIEWER: |
|
|
NOTES: |
|
|
HISTORY |
As a result of experience gained from months of fighting in China, the Japanese Navy realized it needed a long range fighter. This was because the Chinese inconveniently kept its fighter bases outside the range of current naval fighters. Rather than call on the Army for assistance, the Navy put forward specifications for a twin-engine aircraft with extended range. These specs were inspired by the French Potez 63, a twin-engine fighter about to enter French service.
Nakajima was chosen for this job and a low winged, twin-engine monoplane fighter was designed. To overcome the effects of engine torque, the engines were handed so that the props rotated in opposite directions. Part of the then-heavy armament were a pair of remotely controlled barbettes in the aft fuselage. These were wisely dispensed of in production aircraft.
 The resulting aircraft was delivered to the Navy for tests and a
number of faults were found with the hydraulics, the opposite rotating props,
the barbettes and overall handling. Fowler flaps were installed to improve
performance while a major rework was done on the hydraulics. Though the plane
was almost as maneuverable as the A6M2 it was inferior in all respects except
for range.
The resulting aircraft was delivered to the Navy for tests and a
number of faults were found with the hydraulics, the opposite rotating props,
the barbettes and overall handling. Fowler flaps were installed to improve
performance while a major rework was done on the hydraulics. Though the plane
was almost as maneuverable as the A6M2 it was inferior in all respects except
for range.
Because of that range, it was decided to develop the plane as a reconnaissance platform. As a result a major weight savings program was initiated. Part of increasing reliability was to take out the handed engines and put in two normal Sakae 21s. The recce version was designated J1N1-C, finally accepted in 1942, and low levels of production initiated.
Several aircraft were armed with a turret-mounted 20mm cannon, but saw limited usage. In early 1943, the commander of the 251st Kokutai based in Rabaul suggested mounting two oblique 20mm cannon pointing upward at a 30 degree angle in the observers compartment. This area was gutted for the cannon installation and two additional cannon were mounted pointing downward. On its first mission it was successful in shooting down two B-24s of the 380th BW. In fact, the 380th did not realize that its planes had been shot down by a night fighter, thinking they'd been hit by flak or lost on the return trip. It wasn't until several months later after many more aircraft had come up missing that the use of the modified J1N1-Cs had been discovered.
 Based on this success, Nakajima was requested to build a
dedicated night fighter, this being the J1N1-S. Prior to this several J1N1-Ckai
variants were converted. Because the lower cannon were not as effective as the
upper ones, they were removed on late production J1N1-Sa aircraft. These later
aircraft had air intercept radar installed. Some also had a small searchlight in
the nose and some had extra cannon. Production of the J1N series ended in
December of 1944 with nearly 500 airframes completed. Most were expended in
Kamikaze attacks prior to the war's end.
Based on this success, Nakajima was requested to build a
dedicated night fighter, this being the J1N1-S. Prior to this several J1N1-Ckai
variants were converted. Because the lower cannon were not as effective as the
upper ones, they were removed on late production J1N1-Sa aircraft. These later
aircraft had air intercept radar installed. Some also had a small searchlight in
the nose and some had extra cannon. Production of the J1N series ended in
December of 1944 with nearly 500 airframes completed. Most were expended in
Kamikaze attacks prior to the war's end.
|
THE KIT |
Revell's kit of the J1N1-S is a trip back to the 60's. However, that does not mean that it is a bad kit. Detailing, though in the most part of the raised panel line variety, was quite good and subdued for kits of that period. The cockpit section was meant to be crewed so consisted of only a floor, seats and control sticks. The seats are of the generic variety and meant to hold the crew figures. The wheel wells are open and devoid of detail. There are two sets of 20mm cannon to be installed in the fuselage, one pointing up and the other set down as in early production Gekkos. There is a removable fuselage section so you can display the cannon. Like the rest of the kit, this gun bay is totally devoid of any detailing other than the cannon.
 Instructions on the
kit are also typical of the time with several exploded construction diagrams.
Color requirements are given in generic terms. The decals are for a single
aircraft of the Yokosuka Naval Air Group. They were well printed and stuck to
the kit quite well. Probably the biggest glitch for the kit is the requirement
to paint the plane black. As research has now shown, the aircraft was painted an
overall black-green color. However, back when I built this kit, that information
was not widely known so I stuck with the kit recommendations.
Instructions on the
kit are also typical of the time with several exploded construction diagrams.
Color requirements are given in generic terms. The decals are for a single
aircraft of the Yokosuka Naval Air Group. They were well printed and stuck to
the kit quite well. Probably the biggest glitch for the kit is the requirement
to paint the plane black. As research has now shown, the aircraft was painted an
overall black-green color. However, back when I built this kit, that information
was not widely known so I stuck with the kit recommendations.
|
CONSTRUCTION |
Construction of the kit is very straight-forward. There were no major glitches at all during construction. Once the small amount of flash was removed and a few ejector pin marks sanded off the landing gear, building went quickly. The greatest areas of concern were the fit of the canopy and the rear portion of the wing fuselage join. Holes for the underwing fuel tanks are already opened on the kit, so if you want your Gekko without the tanks, you'll have to fill the holes.
Careful sanding took care of the canopy and filler handled the wing area. I also needed to do some filling on the nacelles where they joined the wing and on the rear fuselage area where I managed to gouge the fuselage when cutting them off the sprue. I did paint the wheel well areas and inside of the gear doors with Aotake. The engines are nicely done generic 14 cylinder two row radials. The cowlings do not have to be glued in place in order for you to display the engines and the props press fit into place nicely. In order to facilitate painting, the engines were not installed until after the painting was complete, though the cowls were tacked into place with white glue.
|
PAINT & DECALS |
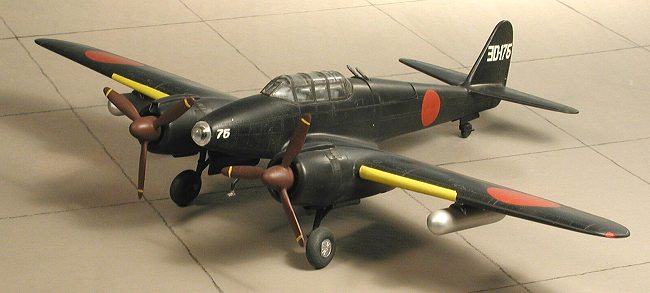
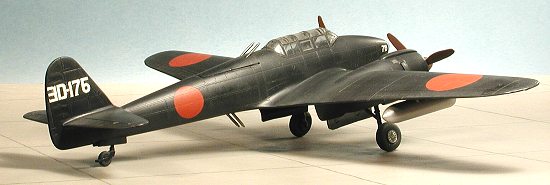
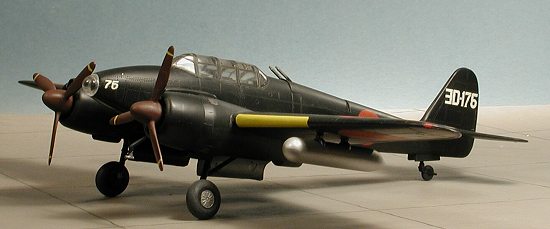
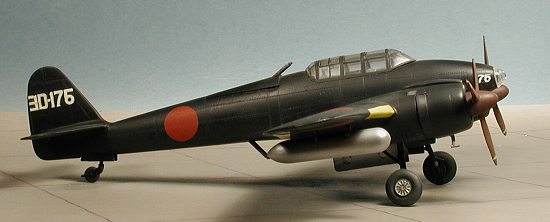
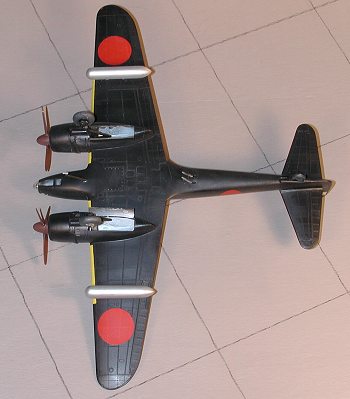
With a rather complete airframe, I first painted the leading edges white, then yellow. When dry, they were masked and the rest of the plane painted a near flat black. Then the kit was returned to the work bench to have the landing gear and doors put on. The gear was painted black and the wheels silver. During this time, the props were painted a brown color and the underwing fuel tanks aluminum using Testors Metalizer. The kit was returned to the paint shop for a coat of gloss Future.
There were and still are no aftermarket decals for the J1N1 as it is a plane that has few markings of interest. Basically what you have is unit tail codes and perhaps some kill markings and that is about all. The Revell decals fit quite well and succumbed to Microscale solvents without silvering, a real concern when doing black aircraft! With that done, the kit was sprayed with a matte clear to seal in the decals.
|
CONSTRUCTION CONTINUES |
Very little was left to do with this kit. Basically, the masking was removed from the canopy, the fuel tanks glued in place and the long undernose pitot glued in place. I also attached the nose and under nose transparency at this time. The props were pressed onto the shafts after the engines were glued in and the cowlings attached. Wing tip lights were painted green and red, though I have now learned enough to know that the Japanese often used blue in place of green. The exhaust were painted a burned metal color, the guns gunmetal, and the prop blades had thin yellow stripes painted on them. I didn't do any antenna wires though it is something I routinely do to a model nowadays.
|
CONCLUSIONS |
In the intervening decade or so since this kit was built, it has gone through
several moves, making it unscathed through all of them. However, the landing
gear have become slightly bowed during the time it was shut up in boxes with
much weight on it. It has now been completely overshadowed by the much newer and
much, much more expensive Fujimi Gekkos. However, it is a kit that I can
recommend to you should you run across one at a reasonable price. For some time
these Revell kits were quite expensive as they were the only injected J1N1
around and very infrequently reissued, however Fujimi spoiled that by issuing
their three variants. We also know at this time that these planes were painted
dark green and not black, but it still looks cool.
It is a simple kit with few frills. It lacks some of the sophistication of
today's models, but because of that it is pretty easy to build and has a level
of external detailing that is not exaggerated and is well done. I can recommend
it if you have the time and the interest. September 2001 Review kit courtesy of me and my wallet! Copyright ModelingMadness.com. All rights reserved.
No reproduction in part or in whole without express permission from the
editor. If you would like your product reviewed fairly and fairly quickly, please
contact the editor or see other details in the Note to
Contributors. Back to Reviews Page
2023