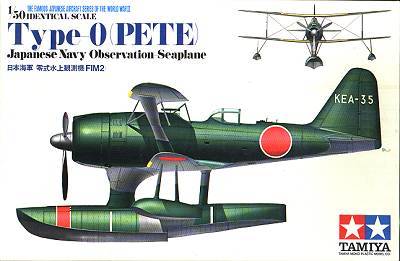
Tamiya 1/50 F1M2 'Pete'
Kit Number: MA 111
Price: 300 yen
Decals: sufficient to do almost any 'Pete'.
Date of Reveiw: 19 January 1998
Review and photos by: Scott Van Aken

The F1M 'Pete' was built to the requirement of a 10-Shi observation seaplane issued in 1934. It was intended to replace the Nakajima E8N 'Dave' then in service. The F1M was designed to be the most aerodynamically clean biplane of its type, with minimal bracing and struts. The new F1M1 had poor directional stability, especially on the water. Modification of the tailplane and a new Zuisei 13 engine resulted in the F1M2 that was ordered into production as the Type O Observation plane model 11.
It entered service in 1941 and participated in almost every major campaign of the Pacific war. It was used in all roles from gunnery observation to rescue to light bomber and even as a fighter, scoring several kills. Its high maneuverability made it a difficult target. By the time production stopped in March 1944, over 700 F1M2s had been built.
Tamiya's kit of the Pete is to 1/50 scale. An oddity, you might say,
but when this kit initially appeared in the very early 1970s, Tamiya was
starting to produce a number of kits to this scale, including the D3A Val,
J2M Jack, Ki-84 Frank, and very rare see-through C6N Myrt. The panel
lines are mostly engraved (except for the wings) and there are thousands
of very scale looking rivets. Included are a very comprehensive decal sheet
and clear transparencies. Each tree was in its o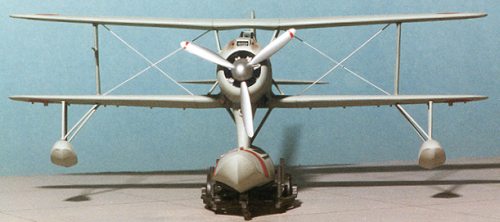 wn bag, ensuring no scratching
of the parts. I wish all current kit makers did this! The instructions
are in Japanese (of course) but are easy to follow, especially as the Pete
doesn't have a zillion parts as do many of today's kits. The plastic
is quite hard and and comes in dark green and black.
wn bag, ensuring no scratching
of the parts. I wish all current kit makers did this! The instructions
are in Japanese (of course) but are easy to follow, especially as the Pete
doesn't have a zillion parts as do many of today's kits. The plastic
is quite hard and and comes in dark green and black.
Construction is very straightforward. There is an interior, but while
complete, is not up to today's standards. 25 years ago, there was little
that was as good as what Tamiya provided. There was no flash and the
parts built quite well. I used almost no putty on this kit and only
a few areas needed any reshaping or careful work. One was the lower
wing fuselage join that needed a bit of scraping to get a fine join. Since
the instrument panels had large circles for the instruments, I used Reheat
instrument decals to add some life to it. The interior was painted
what my idea was of Mitsubishi interior green and the fuselage joined around
it. All the attachment lugs are quite large and very positive. The
engine is just a representation and came with all the cylinder heads separate.
What a chore. After proper painting, it looks like an engine.
The main float was filled with lots of weight in the front to keep
it from tail sitting, a problem with float planes. The floats then
glued together and when dry, attached to the
 underside of the fuselage. I
needed a touch of putty in the back for a smooth join.
underside of the fuselage. I
needed a touch of putty in the back for a smooth join.
After the lower wings, engine cowling and wingtip floats were added, the wing and interplane struts were glued in and the upper wing attached (but not glued) to get the struts properly aligned. Once that was done, the upper wing was removed and the transparencies were attached. This is the worst part of the kit as the transparencies do not conform to the fuselage curve. Rather, they are designed for a flat surface. It required a bunch of reshaping to get them to fit and the rear one was particularly troublesome. I finally glued it in place, puttied the bad parts and then sanded out as much of the scratches as possible. Naturally, I got glue on the inside of the rear transparency:( After that little debacle, I drilled holes in the wings (at the appropriate angle) for the rigging.
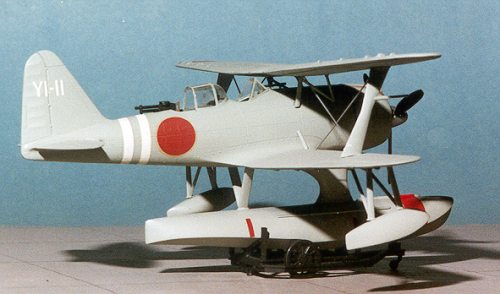
Once that was done, it was masked with tape and Micro-mask. The kit was painted in overall light grey using Tamiya acrylic thinned with Future to give a semi-gloss finish. When dry, another coat of Future was applied and it was on to the decals. These decals are as old as the kit and while a tiny bit brittle putting them on, worked very well, responding to all the setting solutions I had. The kit hinomarus were discarded (a bit too red) and a set from IPMS Spruce Goose from 1983 were used instead. The coding is from a seaplane tender, the Kamikawa Maru, in early 1942. The kit was then sprayed with a semi-gloss and when dry the masking taken off. Then it was time for the final step, the rigging. The upper wing was glued in place and the aircraft rigged using fine brass wire. The wire was held in place with Elmer's glue and painted aluminum. The kit was then placed on the beaching dolly that was provided in the kit.
A very enjoyable kit. Despite its age, it looks great in the case next to more modern kits. This kit was re-released a few years ago and if you have one, go ahead and build it. You will be surprised at the kit and delighted with the finished product.
Editor's note, June 2000. I have just
finished reading some more on the Pete and can add this historical information
regarding the kit. It is an early Pete in that it has a three piece windscreen,
however, when Mitsubishi changed to a six pane windscreen (like the one on the
A6M), it added an intake to the top of the cowling (which this kit has).
While I'm certainly not going to go back and sand
 off the cowl scoop (a case of modelerus
lazyus), to do an accurate early Pete, apparently this scoop needs removed.
This doesn't mean that this combination did not exist as at least two such
aircraft have been documented. It just means that it wasn't the norm and those
modelers who want a modicum of accuracy need to be aware of this.
off the cowl scoop (a case of modelerus
lazyus), to do an accurate early Pete, apparently this scoop needs removed.
This doesn't mean that this combination did not exist as at least two such
aircraft have been documented. It just means that it wasn't the norm and those
modelers who want a modicum of accuracy need to be aware of this.
While we are at it, the two canopies are too tall and the aft one is the wrong shape in that it needs to be quite a bit lower. There is also a need to build up somewhat the fuselage under the forward parts of the rear transparency. Needless to say, that area is all wrong when you look at a view of the real aircraft. I also think the tail is too pointed and needs a larger curve in the top of it. However, I didn't realize any of this until I read Asahi Journal Vol 4/2. Maybe I was better off in the bliss of ignorance!!!
Copyright ModelingMadness.com. All rights reserved. No reproduction in part or in whole without express permission.