|
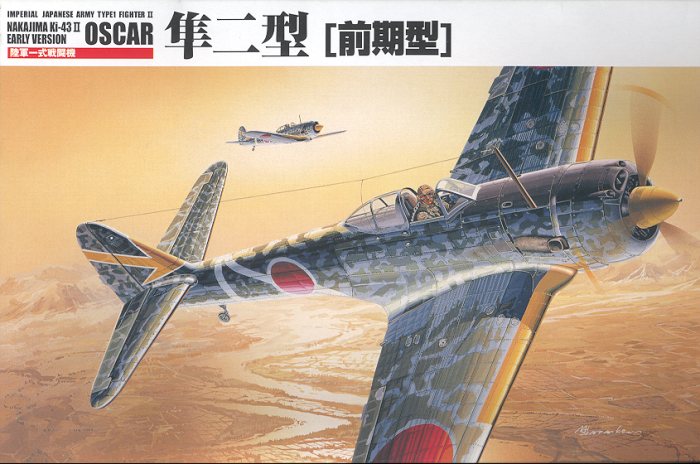
KIT: |
Fine Molds 1/48 Ki-43-II |
|
KIT # |
FB-2 |
|
PRICE: |
¥2400 (about $22.50) |
|
DECALS: |
For one of 8 (!) aircraft |
|
REVIEW & |
|
|
NOTES: |
|
|
HISTORY |
The Ki-43 Hayabusa, code named 'Oscar' was the Japanese Army Air Force's 'Zero'. Though a different aircraft built by a different company to the Mitsubishi aircraft, it was the JAAF's first modern monoplane fighter with retractable landing gear. The aircraft served mostly in China and New Guinea as well as in the Burma/Malaya theater of operations. Since the Allied pilots of the time equated any Japanese monoplane fighter as a 'Zero', it is understandable that those who had combat with the Ki-43 would report them as 'Zeros' despite there not being an A6M within a thousand or more miles!
The aircraft that I chose to model was that of the ace Shigeo Nango. His final score was 15 aircraft. The question of scores concerning many Japanese aces is one that is difficult to determine. There are several factors surrounding this. First of all, it was not policy to award individual kills to a pilot as was done in by western forces. It was deemed more important to have a successful group than to have a high-scoring ace. Also, often the victim ended up in the ocean or jungle where it was difficult to find the remains of an aircraft so that the kill could be confirmed. As a result, unless the pilot himself was meticulous about keeping a diary, the tally was difficult to confirm.
Shigeo Nango first entered combat in June 1943 with a move of his unit (the 59th Sentai) to New Guinea. It was there that he played a major role in Japanese air operations for the next six months. Often, Nango, who was a junior officer, was tasked to lead all four sentais into battle. The main reason for this was that he was the most experienced pilot in the area, the other sentai commanders having been lost in combat with Allied aircraft. Just as he was to be recalled to Japan he was lost during a sortie in January 1944. Like most Japanese aces lost in action he was posthumously promoted two grades to Lt. Colonel.
|
THE KIT |
 For a detailed explanation of what is in the kit, I'll direct
you to Tom
Cleaver's preview to see pictures of the sprues and stuff. Suffice to add
that the kit really does not have that many parts. It is quite reminiscent of
older Hasegawa kits in that the cockpit detail is very good, but not made up of
the 20-25 pieces that today's Hasegawa kits have. The instruction sheet is truly
excellent giving a good description of each of the eight schemes as some
historical background on the pilots who flew the plane in question. In a
separate booklet, there is also a great history of the Ki-43 including operating
bases, technical information on the aircraft and armament as well as stories
from pilots. Inside this is a catalogue of all the Fine Molds kits. I had no
idea that there were so many things produced by this company. Unfortunately, all
of it is in Japanese!!
For a detailed explanation of what is in the kit, I'll direct
you to Tom
Cleaver's preview to see pictures of the sprues and stuff. Suffice to add
that the kit really does not have that many parts. It is quite reminiscent of
older Hasegawa kits in that the cockpit detail is very good, but not made up of
the 20-25 pieces that today's Hasegawa kits have. The instruction sheet is truly
excellent giving a good description of each of the eight schemes as some
historical background on the pilots who flew the plane in question. In a
separate booklet, there is also a great history of the Ki-43 including operating
bases, technical information on the aircraft and armament as well as stories
from pilots. Inside this is a catalogue of all the Fine Molds kits. I had no
idea that there were so many things produced by this company. Unfortunately, all
of it is in Japanese!!
There are two versions of the 'early version' of the Ki-43-II. You cannot do a late version as the requires different exhaust and that is not included. The difference in parts is the oil cooler/intake and crankcase housing at the front of the engine. In step 2 where you glue this part on the engine, it says which decal scheme is for which housing. The decal instructions (which make up half of the 10 page instruction booklet), are quite well done showing a profile for each aircraft and upper surface information where appropriate. Interestingly enough, four of the eight schemes are from units in Burma in 1943. Paints are undoubtedly in Gunze numbers, though many will probably use other paints instead.
For those wondering if you can do either the earlier -I or later -II Kai from this kit, no you can't. The -I has a two bladed prop, longer span wings and very different cowling. The -II Kai has individual ejector exhaust stubs vice the collector exhaust of the kit. Sorry!
|
CONSTRUCTION |
To no one's surprise, construction begins with the cockpit. The cockpit consists of a floor, back bulkhead, seat bottom, instrument panel, control column and flap handle. The instructions would have you paint this all Aotake, but research and other conversations has led me to believe that this is not the case. When the designer of the aircraft suggests that the interior color was a darkish green, then that is what I'll use. In this case, I used RAF interior green as it looked close to the color that was suggested. Frankly, the cockpit opening is very small and little will be seen when it is done, so no need to go overboard on this.
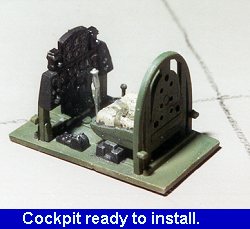 Anyway, after it was
painted green, the instrument panel and some of the boxes on the floor and
fuselage sidewall were painted flat black. Then some bits were picked out with
red and aluminum as suggested. The seat cushion was painted sail color with
khaki belts. When dry, the whole thing was drybrushed with steel and then given
a wash with dirty thinner.
Anyway, after it was
painted green, the instrument panel and some of the boxes on the floor and
fuselage sidewall were painted flat black. Then some bits were picked out with
red and aluminum as suggested. The seat cushion was painted sail color with
khaki belts. When dry, the whole thing was drybrushed with steel and then given
a wash with dirty thinner.
While all this was drying, I assembled the wings and fuselage. While test fitting the parts, I discovered that the alignment pins were more of a hindrance than a help so they were cut off. The holes for the underwing drop tanks were not opened as I chose not to use them. They don't help the look of the plane at all! Don't forget to install the exhaust before gluing the halves together. You have to cut out the opening and smooth it out before gluing in the exhaust.
Once the fuselage was dry, a few seams were filled and then sanded smooth. Then the interior was inserted from the bottom. It fit quite well and was then glued in place and left to dry. The next thing glued on were the tail planes. The fit here was a taste of things to come. They did not match up with the roots too well. The roots are thicker and longer than the tailplanes. The only way to take care of this was to smooth out the join area as best as I could and to sand back on the front of the root to have it match the tailplane.
 Next was installation of the
wing. Dry fitting showed that the fit here is not that great either. What I did
was to glue one wing root and then let it dry. Then the other wing root
was glued and held in place with a piece of tape to dry. It is hoped that when
all is done, that the dihedral will be the same.
Next was installation of the
wing. Dry fitting showed that the fit here is not that great either. What I did
was to glue one wing root and then let it dry. Then the other wing root
was glued and held in place with a piece of tape to dry. It is hoped that when
all is done, that the dihedral will be the same.
At this time, the base engine, which had been painted steel and washed with dirty thinner, was installed in the fuselage. Then the front of the cowling was glued in. The cowl front doesn't match the sides too well and some sanding will be needed. The upper cowling was also glued in place. This piece is also a dodgy fit as it is too small side to side. Much filler will be needed here. This assembly was then set aside to dry and await its destiny with putty.
Now that the airframe was basically together, it was time to see what needed what before getting ready to paint. I was quite fortunate in that the wing dried with equal dihedral. This did not eliminate the need for filler at the front and rear of the wing, and a couple of sessions was needed to clean things up. Same for the upper cowling insert.
Once that was done, the lower oil cooler was installed as was the head rest and the cowl flaps. The cockpit and the engine was then stuffed with tissue and it was off for the first application of paint.
|
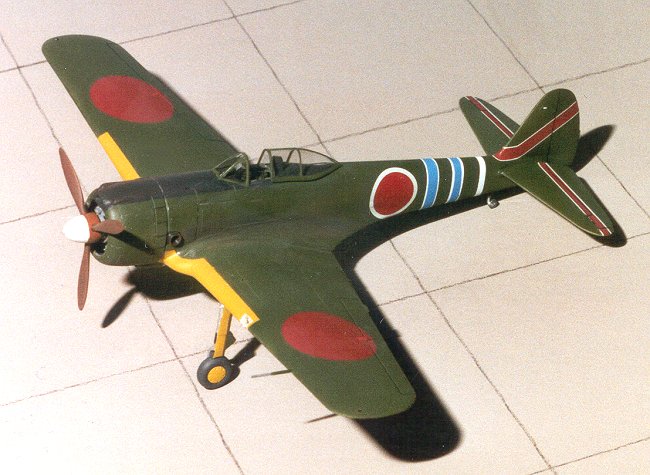
PAINT |
 Most everything I have read about the Oscar around this time frame was that the
underside of it was in bare metal, with the control surfaces in a light grey
dope. This being the case, the airframe was painted with gloss Voodoo grey in
preparation for the aluminum Metallizer. Then the airframe was painted with the
aluminum. After it had dried, the underside aluminum parts were masked. At this
time the underside of the control surfaces were painted with Japanese Army
Grey-green from Tamiya. Then the yellow IFF leading edge strips were painted
using Aeromaster ID yellow. Finally, the anti-glare area on the top of the
fuselage was painted Mitsubishi Cowling Blue-black.
Most everything I have read about the Oscar around this time frame was that the
underside of it was in bare metal, with the control surfaces in a light grey
dope. This being the case, the airframe was painted with gloss Voodoo grey in
preparation for the aluminum Metallizer. Then the airframe was painted with the
aluminum. After it had dried, the underside aluminum parts were masked. At this
time the underside of the control surfaces were painted with Japanese Army
Grey-green from Tamiya. Then the yellow IFF leading edge strips were painted
using Aeromaster ID yellow. Finally, the anti-glare area on the top of the
fuselage was painted Mitsubishi Cowling Blue-black.
When a day or
so had passed so the paint could thoroughly cure, the anti-glare panel and
yellow wing strips were masked off and the rest of the airframe was painted
Nakajima Army Green using Aeromaster paints again. All the masking was then
removed when the paint had dried so I could check for glitches. Naturally, I
found a few. For instance, the underfuselage yellow leading edge strip was too
broad. This was then masked and painted. I then found out that the upper green
was carried 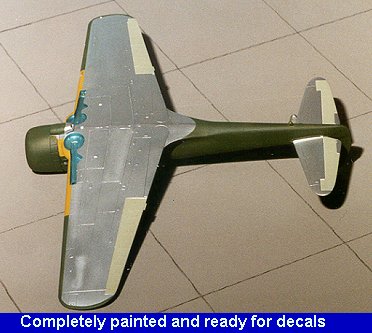 under the wing like on Italian aircraft of the time. This meant more
masking and that portion was painted with uppersurface green. The gear doors
were also painted green and yellow. The wheel hubs were also painted yellow. Now
I had a pretty well completely painted aircraft. The next step was to do some
detail painting. This meant painting the gunsight black, the wheels with tire
black, and the covers on the landing gear struts black. The boot around the tail
wheel strut was painted leather with the wheel itself painted tire black. The
canopy parts were also masked with Tamiya tape and painted Nakajima Army Green.
under the wing like on Italian aircraft of the time. This meant more
masking and that portion was painted with uppersurface green. The gear doors
were also painted green and yellow. The wheel hubs were also painted yellow. Now
I had a pretty well completely painted aircraft. The next step was to do some
detail painting. This meant painting the gunsight black, the wheels with tire
black, and the covers on the landing gear struts black. The boot around the tail
wheel strut was painted leather with the wheel itself painted tire black. The
canopy parts were also masked with Tamiya tape and painted Nakajima Army Green.
|
CONSTRUCTION CONTINUES |
Now it was time to do some more work on it before getting ready to do the decaling. This meant getting it on its wheels. The struts had the oleo scissors glued in place. The instructions don't say which end is up so I just took a guess. I then glued the wheels on the struts and when dry, the struts were glued to the wheel wells. The holes were too small and had to be slightly enlarged. BTW, before installing the struts, the wells and inner gear doors were painted with Aeromaster's Aotake blue. It is a bit strong a color, but otherwise looks nice. The gear doors were also added at this time and the entire airframe was sprayed with a clear gloss acrylic in preparation for the decals.
|
DECALS |
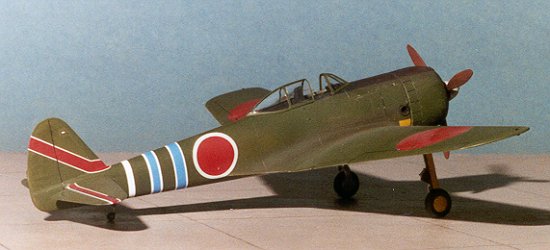
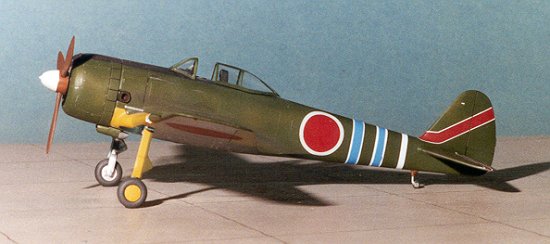
 I wanted to do the aircraft of Lt.Col Shigeo Nango, who flew in the New Guinea
theater of operations.
There are photographs of this particular aircraft, but there is some confusion
as to the color of the aft fuselage bands. The Aeromaster decal sheet 'Eagles of
the Rising Sun' has these as red as do several earlier profiles. More recent
references, including the kit decal placement guide, show these as blue. However
the kit decals still only offer red stripes! This is not easy to duplicate as
the stripes are outlined in white. However, it is blue that I decided to use for
my kit. Not given in either decal sheet is the white outlined red stripe that is
found on the top of the horizontal stabilizers.
I wanted to do the aircraft of Lt.Col Shigeo Nango, who flew in the New Guinea
theater of operations.
There are photographs of this particular aircraft, but there is some confusion
as to the color of the aft fuselage bands. The Aeromaster decal sheet 'Eagles of
the Rising Sun' has these as red as do several earlier profiles. More recent
references, including the kit decal placement guide, show these as blue. However
the kit decals still only offer red stripes! This is not easy to duplicate as
the stripes are outlined in white. However, it is blue that I decided to use for
my kit. Not given in either decal sheet is the white outlined red stripe that is
found on the top of the horizontal stabilizers.
Most of the
markings decals came from the kit. The Aeromaster sheet does not have Hinomarus
included and unfortunately, their sheet of Hinomarus is out of production and
impossible to find. This, in my opinion, is bad planning on Aeromaster's part.
The insignia for a sheet of this type should be included. What I used from the
Aeromaster sheet are the white fuselage bands. Aeromaster provided the white
bands separate from the red stripes. This allowed me to cut new blue stripes
using the Aeromaster red ones as a pattern. I was then able to use the kit
supplied red stripes with white boarders 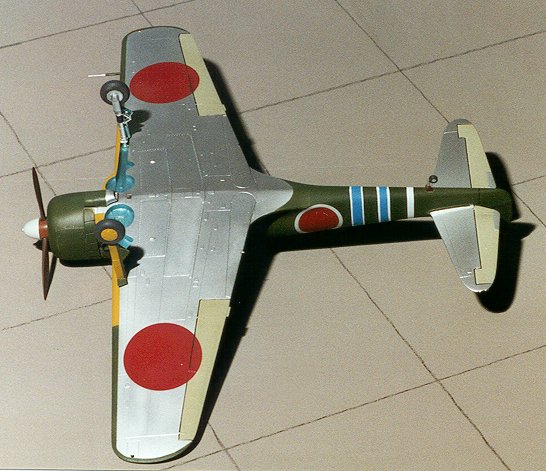 on the tailplanes. I used both
Microscale and Solvaset setting solutions on the decals and they worked well.
The blue was from a Scalemaster solid decal sheet. This sheet was so old that
the decal disintegrated upon application of water. I used Microscale Decal Film
to coat the Scalemaster sheet. It worked quite well.
on the tailplanes. I used both
Microscale and Solvaset setting solutions on the decals and they worked well.
The blue was from a Scalemaster solid decal sheet. This sheet was so old that
the decal disintegrated upon application of water. I used Microscale Decal Film
to coat the Scalemaster sheet. It worked quite well.
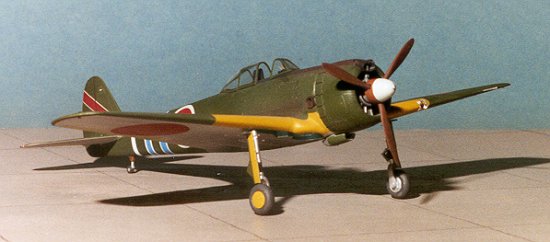
Once the decals had dried they were given a coat of matte clear acrylic to seal them in and to flatten the overall finish. Then it was on to the few final touches. That consisted of attaching the clear bits, which I did with non-fogging superglue, adding the formation lights, gear doors and finally, the prop. Nango's Ki-43 didn't have a radio, so there was no need to do any antenna wire or even attach the post (Yay!). Finally, a bit of paint chipping was done with a silver pencil and staining was added with pastels.
I didn't do any panel
line accenting on this kit at all. Frankly, I'm not sure if this is really
needed or not. There are times that I do it and times that I don't. I do realize
that it is an artsy affectation and that it does add some drama to the aircraft,
but I also realize that it is much more non-prototypical than just leaving the
scheme unmodified. Though this camo scheme would have lent itself very well to
panel line accentuation, I chose not to do it.
|
CONCLUSIONS |
This kit really was a delight to put together. While it looks like a Hasegawa kit, it falls a bit short of that when it comes to general parts fit. However, by removing the alignment pins, the buildability of the kit improves quite a bit. The kit decals that I used were very good, even the white, though you can see that there is more bleed-through of the kit's roundel than the Aeromaster stripes.
Another plus in its favor is that there are several variations of this kit available and the fact that the price has dropped by well over half of the initial production run. I can heartily recommend this kit to all but beginners.
|
REFERENCES |
Japanese Aircraft
of the Pacific War by Rene J Francillon, Putnam, 1979
Eagles of the Rising Sun, Aeromaster sheet SP48-04, 1995
September, 2000
Review kit courtesy of me and my wallet!
If you would like your product reviewed fairly and quickly by a site that has over 1,100 visits a day, please contact me or see other details in the Note to Contributors.