| KIT #: | 8033 |
| PRICE: | $20.25 MSRP |
| DECALS: | One option |
| REVIEWER: | Scott Van Aken |
| NOTES: | Semi-snap kit |
| HISTORY |
The Fieseler Fi-103, more commonly called the V-1, was the
world's first operational cruise missile. It was a very crude vehicle, but was
also most effective in what it was designed to do. It was basically an
aerodynamic bomb powered by a pulse jet. The pulse jet
 is a very simple engine
that requires a minimum speed to operate. Once that minimum speed has been
reached, fuel is injected into a chamber in spurts (thus the pulse part of the
pulse-jet) and then lit, the controlled burning of that fuel provides thrust. It
also gives the missile a very distinctive motor-boat sound while in flight.
is a very simple engine
that requires a minimum speed to operate. Once that minimum speed has been
reached, fuel is injected into a chamber in spurts (thus the pulse part of the
pulse-jet) and then lit, the controlled burning of that fuel provides thrust. It
also gives the missile a very distinctive motor-boat sound while in flight.
Guidance is provided by a gyro and a mechanical devise that determines how far the missile goes before the fuel is shut off and the missile falls from the sky. The number of rotations of a small propeller on the nose of the missile is much of what determines how far the missile travels and this can be preset prior to launch.
Several thousand V-1s were launched during late 1944 and into 1945, most of them aimed at Britain or at Dutch ports. After the war, a number of them were captured and tested by the Allies. In the US, Ford reverse engineered the type and it went into service as the JB-2 Loon. The only way to tell the difference between a German and American version is that the US version has a more vertical forward engine pylon that slopes away towards the rear.
| THE KIT |
Pegasus Hobbies out of the UK has been producing a growing range of aircraft models, mostly in 1/48, that are just a step or two away from snap kits. These have few parts, those that are there are large and as such, make for pretty quick builds so that we can concentrate on the fun part of these kits; applying paint and markings.
 Their V-1 is, to my knowledge, the first of their 1/18 scale kits.
The fuselage itself (without the engine) measures out to 16 inches and this is not thin, fragile
plastic. The moldings are quite well done with the surfaces having a slightly
pebbly finish that seems to be rather common in modern kits. The alignment pins
and sockets are huge, meaning no worries on not getting the bits together. Not
only that, but they create an excellent fit that matches up the panel lines.
This does bring with it the specter of some sunken areas in the part's exterior,
but so far, nothing really horrid has shown itself.
Their V-1 is, to my knowledge, the first of their 1/18 scale kits.
The fuselage itself (without the engine) measures out to 16 inches and this is not thin, fragile
plastic. The moldings are quite well done with the surfaces having a slightly
pebbly finish that seems to be rather common in modern kits. The alignment pins
and sockets are huge, meaning no worries on not getting the bits together. Not
only that, but they create an excellent fit that matches up the panel lines.
This does bring with it the specter of some sunken areas in the part's exterior,
but so far, nothing really horrid has shown itself.
With a dozen parts, construction will go quite quickly, making this a real weekend edition. No handling dolly is provided and from the rapidity of construction, it seems to me that this one may well be designed for quality play value, regardless of one's age! Nonetheless, it does appear to be pretty accurate in shape.
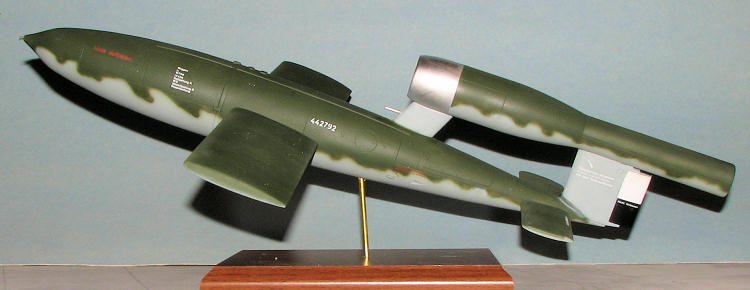
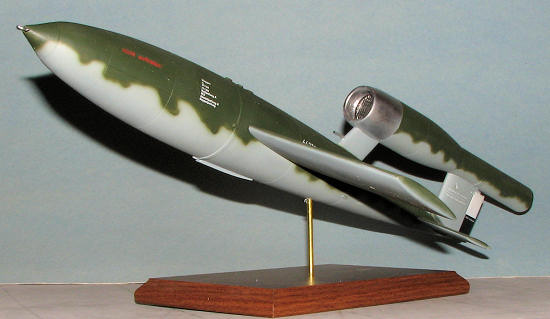
Instructions are three well drawn building steps, though with this one, they really are not needed. A nicely printed decal sheet is included with the usual data markings. Despite the box top's threat regarding having stickers inside, there were none. Just a very nicely printed sheet of standard, waterslide decals. According to the painting and markings guide, this one is to be painted in RLM 71 over RLM 65, though if you look at references, you'll be able to find some that are not so straight-forward.
| CONSTRUCTION |
This is one kit where I don't have to say "construction started with the cockpit". However, I did determine that I should build this one in subassemblies and that got me into a teeny bit of trouble later on.
Step one was the glue the wing halves together. The alignment pins on
this kit are huge and pretty much spot on, though some may wish to remove them
to take away any possible alignment problems. Once the wings were together with
glue oozing out of the seams, they were set aside to dry. My attention was then
turned to the fuselage. For this, the small prop was placed in the nose and
halves glued together. This was a rather long process as the fuselage is not
small. Third thing was th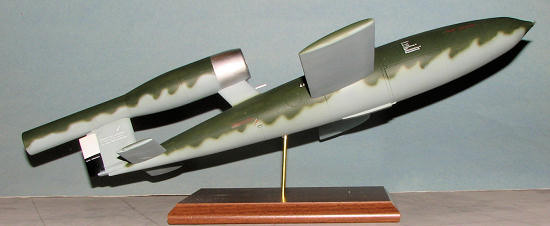 e
engine and I cemented the intake grille in place before gluing the halves
together.
e
engine and I cemented the intake grille in place before gluing the halves
together.
This third step could have gotten me into trouble as one is supposed to trap the engine halves around the forward pylon on the fuselage. However, doing this makes it more difficult to get to the inevitable seams that will be on both pieces. I have to admit that I did not read the instructions and just blindly started gluing what I thought were some pretty straight forward pieces. Fortunately, all was not lost.
So I then went back to the wings, sanded the rear of them flat as on the real bomb, cleaned up the seams and applied filler. There is a large seam on the top of the wings where the two halves meet. Since the mounting holes and the shape of the inner wing mandate that one has to go on the right and the other the left, just turning them around was not an option. Frankly, Pegasus Hobbies should have put the seam on the bottom. The wings are featureless slabs of plywood so no worry about panel lines aside from the tips.
Back at the fuselage and engine, those were both given the filler treatment as well. Once all that was taken care of, the large tabs atop the fuselage pylon were cut away and the engine glued in place. It was a tight fit, but all turned out well.
| COLORS & MARKINGS |
At this point, painting seemed like a good idea. for this, I used
Agama enamel paints for the camouflage. These paints mix very well and I used
their own thinner. For the underside, I used RLM 76 instead of the suggested RLM
65. Either were used so it isn't much of a stretch. The wings and tailplanes
were painted separately for ease of handling as much as anything else. I then
put on a coat of RLM 71 to the upper surfaces. These were both preliminary coats
and I knew I'd be going back over them and probably
 several
times. In the reference I found a photo of one with a rudder that was split into
white and black sections. Using Testors gloss white I painted the rudder. When
dry, it was masked and the lower section was painted with Gunze Mr. Color gloss
black lacquer. During this time, I also painted the forward section of the
engine nacelle using Alclad II Airframe Aluminum. All three of these areas were
masked.
several
times. In the reference I found a photo of one with a rudder that was split into
white and black sections. Using Testors gloss white I painted the rudder. When
dry, it was masked and the lower section was painted with Gunze Mr. Color gloss
black lacquer. During this time, I also painted the forward section of the
engine nacelle using Alclad II Airframe Aluminum. All three of these areas were
masked.
Then I did a lot of back and forth painting with the RLM 71 and RLM 76 until the pattern I wanted was achieved. I could have done a simple straight line, but liked the 'heavy seas' look of several of the schemes I saw in the reference. Actually, the airframe was ready to go in two days, but painting for me is not a one time slam it out sort of thing and it took over a week to get things done well.
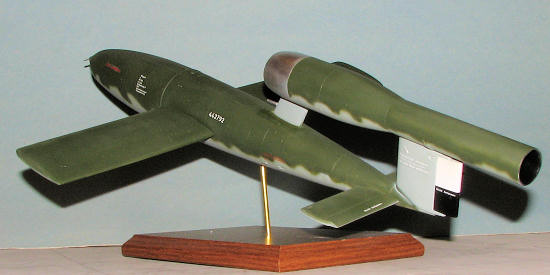
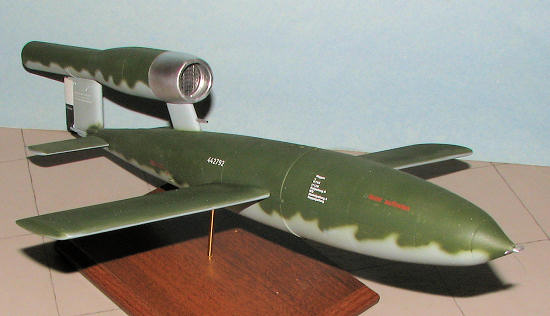
The decal sheet supplied the markings and once the airframe had been gloss coated, they were applied. The placement guide is not perfect and doesn't mention that many of these are on both sides. I also had markings left over. The decals themselves went on well, but I had problem with silvering, even after using Microsol and Gunze Mr. Mark Softener. Thanks to the large scale, they are easy to read.
| FINAL CONSTRUCTION |
 With
the decals on and the excess glue/softener removed, the wings were installed.
These are an incredibly tight fit, requiring some grunt to get them in place.
Equally tight was the fit of the horizontal stabs. These are also keyed to
prevent them being put in the wrong place. Glue is NOT necessary, but using it
will probably provide a slightly closer fit as it melts the surrounding plastic.
With
the decals on and the excess glue/softener removed, the wings were installed.
These are an incredibly tight fit, requiring some grunt to get them in place.
Equally tight was the fit of the horizontal stabs. These are also keyed to
prevent them being put in the wrong place. Glue is NOT necessary, but using it
will probably provide a slightly closer fit as it melts the surrounding plastic.
At this stage, the airframe was given a coat of matte clear and the masking taken off the rudder and the engine intake.
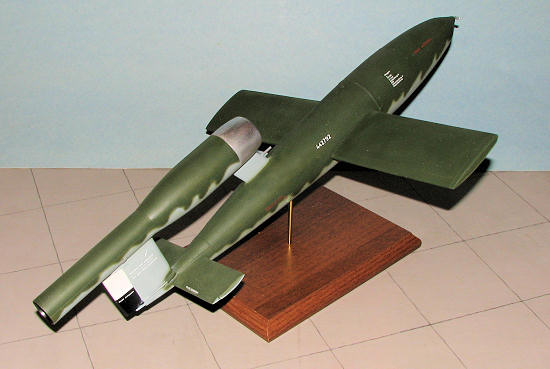
It was time to figure how to display it. I like simple because it is easy and I'm cheap. For this a 6 inch section of 1/8 inch brass rod was used. I drilled a hole in an old trophy plaque for a base and another in the V-1. Super glue was applied to the V-1 attachment first and the rod inserted at a bit of an angle. Then it was installed into the base and as the French say 'Voila'.
| CONCLUSIONS |
 This
kit satisfies several needs. One is that it is simple. One is that it is
accurate. One is that it is big and so has possible play value. As it is a bomb,
no heebie-jeebies about 'things with swastikas', and if you want to be
inaccurate, you can pretend it is a Loon and put US markings on it. Regardless
of your reasons, you owe yourself a break and the chance to build something that
is both easy and big. Photo shows it with the 1/72 JB-2 Loon.
This
kit satisfies several needs. One is that it is simple. One is that it is
accurate. One is that it is big and so has possible play value. As it is a bomb,
no heebie-jeebies about 'things with swastikas', and if you want to be
inaccurate, you can pretend it is a Loon and put US markings on it. Regardless
of your reasons, you owe yourself a break and the chance to build something that
is both easy and big. Photo shows it with the 1/72 JB-2 Loon.
| REFERENCES |
V-Weapons of the Third Reich. Classic Books, out of print.
November 2008
I had the bucks on credit, I liked it and I bought it. Aren't you glad I did?
Copyright ModelingMadness.com. All rights reserved.
No reproduction in part or in whole without express permission from the editor.
If you would like your product reviewed fairly and fairly quickly, please
contact
the editor or see other details in the
Note to
Contributors.