Revell 1/72 Arado E.555 Bomber
MSRP: $17.50
Decals for two versions, both fictitious as befits a 'Luftwaffe '46' kit.
Date of Review: May 1999
Review and photos by: Scott Van Aken

It is July 4, 1947. Air raid sirens have sounded the all clear. Several large sections of Manhattan have been bombed to rubble. Flying rapidly back toward Europe are 21 of the 24 Arado E.555 long range bombers of KG 1 that departed France the day before and after a 12 hour flight are now on the return road. How did this come about? Let's go back eight years to 1940. Despite the Luftwaffe's inability to defeat the RAF during the Battle of Britain, the lessons were well learned and put to good use in the desert and against Russia. The conquest of Egypt and the closing of the Suez Canal basically cut off Allied supply to Russia from other than via the treacherous Northern Route. Unfortunately for the Allies, the huge successes of the U-boat fleet not only managed to nearly starve out the British, but also were the death knell for the Russians who capitulated in mid 1943. Once Stalin committed suicide and his secret police dispensed with, the Russian people came to appreciate greater freedoms under German rule when compared to Stalin's, though it was initially a tough sell. With the United States unable to assist the beleaguered British beyond the subsistence level, and their hands full with the Japanese in the Pacific, they were, for the most part, out of the war in Europe.
The sudden death of Adolph Hitler in an aircraft crash in early 1944 changed things for the better in Germany. After a brief power struggle, Herman Goering rose to rule the country and turned over the Luftwaffe to more competent people. The jet program was brought to the forefront and work was enhanced by increased production facilities in the old State Aircraft Factories in Russia. By now, Russians as a whole were glad to help the Germans who had released them from the slavery of Stalin's Communism. This meant plentiful workers and raw materials for Germany's arms production.
With the US slowly slogging its way toward Japan, the only land battles in the Western Hemisphere were being fought in Africa along the Gold Coast and Eastern Africa. These areas are not amenable at all to large armies. Between disease and imposing geography, the German and Axis armies were easily able to hold off US and Commonwealth attacks and in fact, gained some ground in East Africa.
This sets the scenario for the E.555. With all the land battles far from decent bases, strategic bombing looking more and more like a problem. The He-177 was finally shelved and the He-277/274 was developed to take its place. While jet propulsion was becoming more commonplace it was obvious that the Ar-234 wasn't long legged enough for long distances. Several promising designs were offered. Two were chosen; both wing designs. Horton with their Ho-21 and Arado with the E.555. Both were 'Atlantik bombers' capable of carrying a payload to the US and returning, though it was planned that they would probably have to land in German-held Iceland for their return trip. The Arado aircraft was in service first. The first operational use of the aircraft on long range strike missions was July 4, 1947, and a new era of strategic bombing was underway.
A very popular subject in the last few years has been the what-if paper projects of the various German design bureaus. These are aircraft that 'may' have become operational had the Third Reich continued past 1945. These aircraft are logged under the general heading of 'Luftwaffe '46'. Interestingly, similar projects from Japan have not reached such heights of popularity. Such is the demand for these kits, that Revell of Germany has produced a number of these kits in the last few years and they have sold very well in Europe. The most recent is the Arado E.555 bomber project. What little information I found in two rather old references (see the list at end of review), talked about twin and three engine aircraft, not the six-engine beast shown here. Also lacking from my references was any drawing of the aircraft. However, since many different versions were planned, who is to say that this one would not have been one of them. It is the nice thing about these aircraft in that there are no 'experts'!!
 Revell's
kit is really beautifully done in a sort of greenish grey plastic. The kit
is well detailed with complete wheel wells, bomb bays and cockpit. As is
required of today's kits, it has finely engraved panel lines. Included are
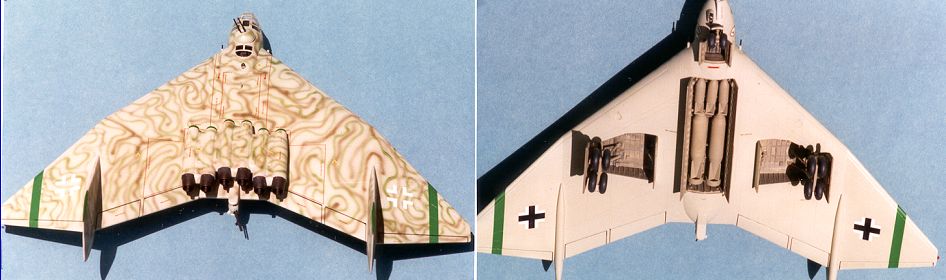
a full bomb load as well as two movable turrets. The decal sheet offers two
schemes; one for I/KG 100 in overall RLM 76 with upper surface mottling in
RLM 75, and the other for Stab/KG 200 also in RLM 76 and 75, but in a scheme
more reminiscent of that applied to the upper surface of the F-15 Eagle.
Typical of Revell Germany, the decals are quite matte with large areas of
carrier and, of course, no swastika, though it does include complete stenciling!
Revell's
kit is really beautifully done in a sort of greenish grey plastic. The kit
is well detailed with complete wheel wells, bomb bays and cockpit. As is
required of today's kits, it has finely engraved panel lines. Included are
a full bomb load as well as two movable turrets. The decal sheet offers two
schemes; one for I/KG 100 in overall RLM 76 with upper surface mottling in
RLM 75, and the other for Stab/KG 200 also in RLM 76 and 75, but in a scheme
more reminiscent of that applied to the upper surface of the F-15 Eagle.
Typical of Revell Germany, the decals are quite matte with large areas of
carrier and, of course, no swastika, though it does include complete stenciling!
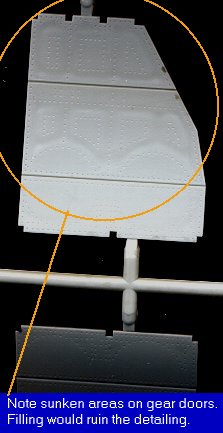
One problem with my kit that may very well be an isolated situation, is that I had a number of sink marks. They were basically on all the pieces that had a rather thick chunk of plastic on the other side. Major parts affected were the engine/pylon halves, gear door covers, interior, wheels (on the inside), and bomb bay doors. Unfortunately, only the ones on the engine/pylon halves can be filled as doing so on the other parts would ruin the detailing on them. Either that or it would take much work replacing the rivet detail!! Just something one has to live with, I guess.
Assembly begins with the cockpit. It is complete with seats, control
column, bomb sight and gunner's position. There are also rudder pedals
that fit on the lower fuselage half. These require some trimming of the side
next to the fuselage in order to fit vertically. Also needing some
trimming is the inside of the upper fuselage forward of the upper turret.
If it isn't done, the seat backs will interfere with proper placement.
Next the interior is painted. The instructions give all sorts of interesting colors like 'mouse grey', 'green-grey' and 'anthracite grey'. Basically the interior is RLM 66 and the wheel wells and bomb bay are RLM 02. Seats cushions are leather with light grey or tan belts and harnesses. A little imaginative painting, a bit of black wash and light grey highlighting gives some depth to the interior. The interior fits quite snugly and positively in the nose section. The nose gear should be glued to the underside of the interior at this time as it will be extremely difficult to place it at a later stage.
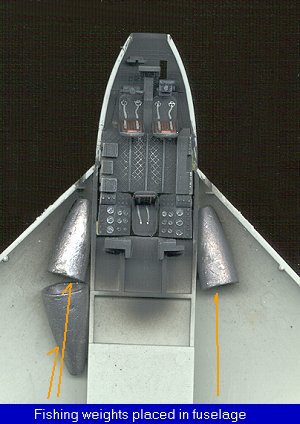
 The next
big challenge is finding where to put the weight to prevent nose sitting.
The instructions suggest placing weight as far forward in the wings as possible
and that is just what I did, using fishing weights and superglue.I also placed
some small pellets under the gunner's seat just to be sure. Then the interior
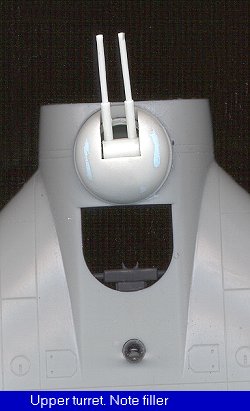
was glued in place. Turning to the upper fuselage half, the turret
was assembled and installed as was the gun sight. The instructions lead you
to believe that the sight can be installed in the stowed position, but since
the hole in the upper fuselage is predrilled, this would mean filling the
hole. The gun barrels were drilled out and the sink marks found in
the upper turret were filled. Next the rear turret was trapped between the
fuselage halves and the halves glued together.
The next
big challenge is finding where to put the weight to prevent nose sitting.
The instructions suggest placing weight as far forward in the wings as possible
and that is just what I did, using fishing weights and superglue.I also placed
some small pellets under the gunner's seat just to be sure. Then the interior
was glued in place. Turning to the upper fuselage half, the turret
was assembled and installed as was the gun sight. The instructions lead you
to believe that the sight can be installed in the stowed position, but since
the hole in the upper fuselage is predrilled, this would mean filling the
hole. The gun barrels were drilled out and the sink marks found in
the upper turret were filled. Next the rear turret was trapped between the
fuselage halves and the halves glued together.
Moving on to the engine pod. I stupidly glued the upper and lower pod halves together before installing the intakes. A BIG mistake. The engine intakes need glued in place before the upper and lower halves are glued together or you will have a terrible time getting the inner intakes installed. Trust me on this!! This piece had lots of sink marks on it as well and required more filler than any other part of the kit. The upper wing was then installed using the time honored method of gluing bits at a time. I noticed the upper front section was a bit wider than the lower so used a clamp to keep the parts aligned as the glue dried. Once all the bits were glued and clamped the joints were filled and smoothed. Don't forget to install the rear guns before you finish gluing the aft part of the wing/fuselage if you want it to rotate.
Once that is done, the transparencies were masked and installed. They fit quite well, but not perfect. The main canopy needs dry fitted several times and a bit of trimming needed to get it to fit snugly. I used non-fogging super glue to attach these parts. Next the gear doors were cut off the sprue and fit in place in the closed position. These items fit superbly. Probably the best fitting gear doors I have ever seen. If ever a kit was designed to be displayed gear up, this is it. Too bad that stands are no longer part of a model kit! Only drawback was the nose door since the nose gear sort of messes things up.
Next step was painting. I really didn't know what scheme to use. With these kits, just about anything goes. Looking through my paints, I stumbled on the idea of substituting RLM 84 (a sort of 'sky' shade) for the RLM 76 called out in the instructions. After all, late in the war this color was seen rather frequently on aircraft. The upper surfaces were then painted in a scribble pattern of RLM 82 and 83; dark and light green. Besides, it was fun to paint! After that the kit was glosscoated in preparation for decals and some final assembly. After this orgy of scribble painting, the nose rings of all six engines and the tail tips were brush painted green as befits an aircraft of GeswaderStab. Then the tail cones of the engines were painted burnt iron and simply snapped into place on the engine pod.
 Installation
of the gear was the next priority. First the wheels were painted black then
the tires painted a very dark grey. While that was drying, the main gear
was cleaned up. Naturally, I broke one of them right at the oleo. RATS! A
paper clip came to the rescue as the offending parts were drilled and the
clip segment installed. Then they, and several retraction struts were painted
RLM 02 grey. After that the oleos for all three gear were wrapped with Bare
Metal Foil and the scissor links installed. Once the nose wheels were installed,
the main gear had thier wheels installed. Next the main gear was glued into
the wheel wells. I had read where this kit has a tendency to sit on the main
gear with the nose in the air, so I put the kit on all wheels and let the
main gear dry with the weight of the aircraft on it. No problems!!
Installation
of the gear was the next priority. First the wheels were painted black then
the tires painted a very dark grey. While that was drying, the main gear
was cleaned up. Naturally, I broke one of them right at the oleo. RATS! A
paper clip came to the rescue as the offending parts were drilled and the
clip segment installed. Then they, and several retraction struts were painted
RLM 02 grey. After that the oleos for all three gear were wrapped with Bare
Metal Foil and the scissor links installed. Once the nose wheels were installed,
the main gear had thier wheels installed. Next the main gear was glued into
the wheel wells. I had read where this kit has a tendency to sit on the main
gear with the nose in the air, so I put the kit on all wheels and let the
main gear dry with the weight of the aircraft on it. No problems!!
Next was the installation of the gear doors. They separated easily from each other. The main outer doors are a two piece affair and I carefully bent mine and glued them in place. The other doors were a snap to install. I did find that the door retraction struts fit well, but were a bit too long to properly fit in the attachment areas in the wheel well. Not a big problem, but one you need to watch out for. The landing light was installed in the nose door using odorless superglue. Next the assembled and painted (RLM 02) bombs were installed.
Then I started the decaling procedure. I didn't want to use the kit markings, but really had no choice. What I did do was to substitute the Group to KG 1. I had some KG 1 Badges and simply changed the group designator to V4 as befits the aircraft of the 'Hindenburg' Group. All kit decals were used except for those previously mentioned and the swastika and a nose cross, which came from the spares box. All the decals are very matte and have quite large clear areas around them that must be trimmed. Otherwise they work quite well and react favorably to Champ setting solution. There are lots of stencil decals with this kit so decaling itself took several days. To add a bit more color, green wing stripes were added to denote the 'North Atlantic' theater of operations.
Once the decals had dried and the excess setting solution cleaned up, the kit was sprayed with clear semi-matte and it was time to add the final bits and pieces. These consisted of the nose probe, fuselage antenna, wing guns, bomb bay doors and actuating arms, and the landing lights. I found that the bomb bay door actuating arms needed to be trimmed just a touch to get everything to fit properly. The landing lights are supposed to have the bulged parts facing down or forward, depending on how you mount them. Of course, you could also leave them off.
The final result is a very interesting and unusual kit that is bound to cause attention from your friends and look interesting in your collection of 1/72 Luftwaffe kits. Highly recommended. The best fitting kit I have built in a long time.
May 1999
Copyright ModelingMadness.com. All rights reserved.