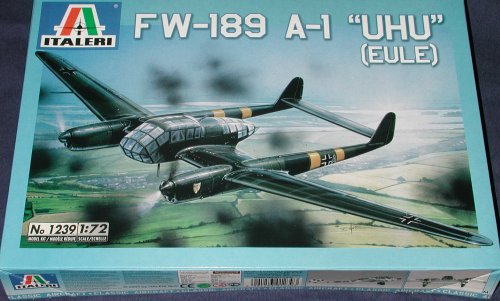
Italeri 1/72 FW-189A-1 'Uhu'
|
KIT # |
1239 |
|
PRICE: |
$21.00 MSRP |
|
DECALS: |
Three options |
|
REVIEWER: |
Scott Van Aken |
|
NOTES: |
Reboxed MPM kit (whoda thunk it?) |
|
HISTORY |
As the Luftwaffe was basically seen as an extension of the Army during
the late 1930s, the need for a tactical recce aircraft was high on the
list of 'things needed'. Although the other fighting powers quickly saw
that the usual aircraft were too slow
 and vulnerable to enemy aircraft,
the Luftwaffe employed two major types (the Fw-189 and Hs-126) with great
success in theaters where local air superiority could easily be
maintained; specifically North Africa, the Aegean, and Russia.
and vulnerable to enemy aircraft,
the Luftwaffe employed two major types (the Fw-189 and Hs-126) with great
success in theaters where local air superiority could easily be
maintained; specifically North Africa, the Aegean, and Russia.
The Fw-189 was the more modern of the two and won a 1937 competition against the Ar-198 and the unorthodox Bv-141. The Fw-189 utilized Argus As410 engines of a modest 465 hp each, but they had the benefit of being slim and therefore allowed a more forward position of the observers area thanks to the design being a twin-engined one. The 189 entered service in 1940 and production continued until Feb 1943 in Germany and early 1944 from French factories.
The type was continually upgraded with improved systems and more powerful engines during its developmental career. As with many aircraft types, it was adapted to other uses such as ground attack and night attack. Fortunately for us all at least one airframe is still extant.
|
THE KIT |
 I was a bit taken aback when I saw this on the
shelf. Thinking it was 1/48, I grabbed it. When I got it home and started
building it, it dawned on me that it was a bit small and looking at the
bold '1/72' on the box made me realize that I had let my eagerness carry
me away once again! It is nice to have a newer mold Fw-189. Though the
old Airfix kit isn't all that bad, it is 30 plus years old and even with
a replacement that is well over two and probably closer to three times
the cost of the Airfix kit today, a new mold kit is welcome.
I was a bit taken aback when I saw this on the
shelf. Thinking it was 1/48, I grabbed it. When I got it home and started
building it, it dawned on me that it was a bit small and looking at the
bold '1/72' on the box made me realize that I had let my eagerness carry
me away once again! It is nice to have a newer mold Fw-189. Though the
old Airfix kit isn't all that bad, it is 30 plus years old and even with
a replacement that is well over two and probably closer to three times
the cost of the Airfix kit today, a new mold kit is welcome.
What you get is something that is well done with
engraved panel lines, but just doesn't quite seem fully up to modern
standards. I'm suspecting that this kit was actually molded somewhere a
bit north of Italy. For instance, there are quite a few
 sink areas on the parts;
mostly around the alignment pins on the booms and all of the thicker
parts on the A sprue. There is also the need to sand all the mating edges
as the alignment receptacles have a raised area around them that needs
removed. In fact, I found that the alignment pins often misaligned the
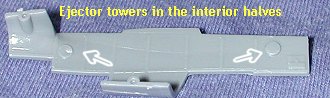
parts. Then there are the ejector pin towers. Again, the A sprue
had the biggest problem and while most of them are easily removed, some
require a little finesse.
sink areas on the parts;
mostly around the alignment pins on the booms and all of the thicker
parts on the A sprue. There is also the need to sand all the mating edges
as the alignment receptacles have a raised area around them that needs
removed. In fact, I found that the alignment pins often misaligned the
parts. Then there are the ejector pin towers. Again, the A sprue
had the biggest problem and while most of them are easily removed, some
require a little finesse.
There are no real options other than decals and
perhaps installation of the bomb racks. There is no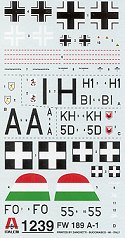 placement guide on the lower wing where they are supposed to go and no
bombs are included so I'm not sure how many people will really want to
add these items.
placement guide on the lower wing where they are supposed to go and no
bombs are included so I'm not sure how many people will really want to
add these items.
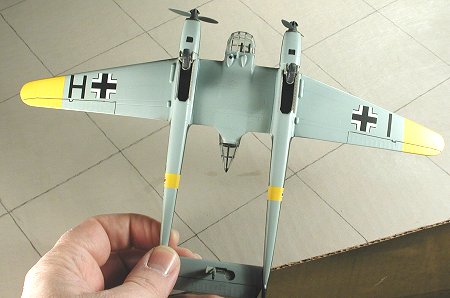
Clear parts are fairly well done with well enhanced frame lines. The also had more flash that I'd like to see and the attachment points are rather thick, making it difficult to not damage the clear bits when removing them from the sprue. The plastic itself is on the distorted side. Instructions are superb as is always the case with Italeri kits. Well drawn construction diagrams and an equally well done color and decal placement guide. All colors are referenced in generic names as well as both ModelMaster enamel and acrylic lines. Decals are well done and provide markings for four planes, all Russian Front in RLM 70/71/65 with the usual yellow fuselage bands and lower wing tips. From the Luftwaffe are aircraft from 3.(H)/Pz 12 and 11.(H)/Pz 12, differing only in codes. In a patchy white temporary camo is one from 1.(H)/31, this one without the yellow ID markings. Finally, a Hungarian 189 from 3/1 squadron, also in standard Luftwaffe camo and Russian Front ID markings.
|
CONSTRUCTION |
Being a slave to convention, I started looking for subassemblies. This included the tail booms, the wings, the horizontal stabilizer and the cockpit. Fit of all these parts is fairly good, though not perfect and I did have to use filler on the tail booms, mostly due to sink areas. While those were drying, I built up the three piece wheel wells and painted them and the interior of the boom assemblies RLM 02. I also glued together the wheel halves. Frankly, I'd have thought the wheels could have been done as a single piece, but judging from the sink mark situation, perhaps it is best that they weren't.
Turning to the interior, there are a lot of pieces
that fit in here. Many of them thick and many with sink areas and ejector
pin towers that needed cleaning up before installation. I like to glue as
much of something that will be painted the same color as
 possible, which
meant the interior was basically completely assembled. It includes
separate rudder pedals, various radio boxes, and a framework that goes
behind the pilot. There is also a mat for the aft section where the
gunner lays when using the aft gun. I found that I could not install the
forward armor plating that fits to the front of the seat as it would have
made it impossible to install the control column. One of them had to go
so it was the armor plate. Once all the bits were in the cockpit and dry,
the entire assembly was test fit into the two fuselage halves which I'd
previously glued together just to test the fit. It seems at this time,
that the aft alignment pin housings will have to be removed as they
prevent the interior from fitting properly. I also had to sand a bit at
the aft end of the interior floor so it would curve in somewhat to match
the inside of the fuselage.
possible, which
meant the interior was basically completely assembled. It includes
separate rudder pedals, various radio boxes, and a framework that goes
behind the pilot. There is also a mat for the aft section where the
gunner lays when using the aft gun. I found that I could not install the
forward armor plating that fits to the front of the seat as it would have
made it impossible to install the control column. One of them had to go
so it was the armor plate. Once all the bits were in the cockpit and dry,
the entire assembly was test fit into the two fuselage halves which I'd
previously glued together just to test the fit. It seems at this time,
that the aft alignment pin housings will have to be removed as they
prevent the interior from fitting properly. I also had to sand a bit at
the aft end of the interior floor so it would curve in somewhat to match
the inside of the fuselage.
Some detail painting was done with the interior bits
followed by a bit of sanding on the aft fuselage alignment pin housing.
Then the interior was glued into the fuselage section and clamped to be
sure that all would fit properly. Doing a lot of dry fitting will help
during this process.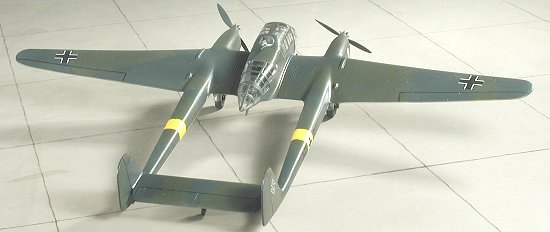
Meanwhile, back at the engine nacelles, the front parts were glued in place and it was discovered that these were a bit smaller than the surrounding nacelle. Nothing that filler and sanding won't fix! After installing these, I decided to put the airframe together. This isn't the suggested way to assemble this kit, but judging from the fit problems I'd been having, I wanted to get all the airframe bits together while they were still a bit 'loose' in case there were complications.
Well this little exercise showed that it is not your normal Italeri kit, unless Italeri kits generally don't fit worth a hoot. After gluing all the major bits together and getting them properly aligned with each other, there were gaps a plenty at the major join lines. The booms were a particularly poor fit where the outer wing sections mated up. I ended up having to use some clamps to hold the entire thing together while it dried. Most joins took two applications of filler to get things smoothed out properly, after which some of the panel lines that were lost in sanding were rescribed using a fine saw.
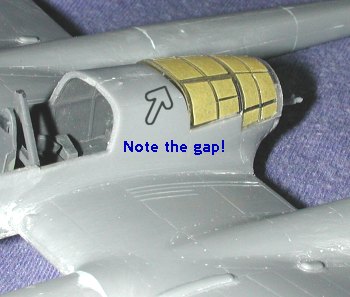 Now
that I had a pretty complete airframe, I started on the transparencies.
This wasn't the piece of cake that I'd have hoped as it seems that either
the fuselage is too narrow, or the clear bits too wide. This is
compounded by the thin plastic easily cracking. While thinking about what
to do, I glued in the aft gun mount and gun. Then I masked all the clear
parts as I'd have to do so anyway. Then I glued the upper console to the
central clear part. Moving to the aft section, I gently squeezed the
transparency and then, using super glue, attached the forward side
sections. The aft ones had regular glue applied. The result is a rather
large gap at the forward portion of this piece. Not exactly something
that is easy to fix, but I think that the best way to do this would be to
use a piece of card stock and then sand it down until it is smoothed out
all the way around.
Now
that I had a pretty complete airframe, I started on the transparencies.
This wasn't the piece of cake that I'd have hoped as it seems that either
the fuselage is too narrow, or the clear bits too wide. This is
compounded by the thin plastic easily cracking. While thinking about what
to do, I glued in the aft gun mount and gun. Then I masked all the clear
parts as I'd have to do so anyway. Then I glued the upper console to the
central clear part. Moving to the aft section, I gently squeezed the
transparency and then, using super glue, attached the forward side
sections. The aft ones had regular glue applied. The result is a rather
large gap at the forward portion of this piece. Not exactly something
that is easy to fix, but I think that the best way to do this would be to
use a piece of card stock and then sand it down until it is smoothed out
all the way around.
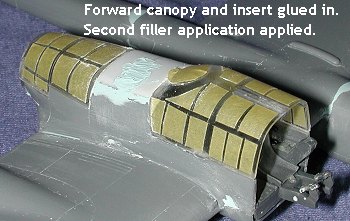 I test fit the other clear bits and other than a
touch of sanding, it doesn't seem as if these will be as big a problem. I
did discover that the inner brace behind the pilot's seat is too tall so
that was trimmed down. I then glued in the clear section forward of the
break in the same manner as the aft one. I did not glue in the upper
machine gun as I knew I'd break it during all the sanding. Getting it
installed later may be a bit of a challenge as the fit is tight. Then, I
took a piece of the thinnest plastic sheet I could find and, cutting it
into two sections so that it would fit the slightly curved forward part a
bit better, glued it in place. The edges were filled with putty and set
aside to cure.
I test fit the other clear bits and other than a
touch of sanding, it doesn't seem as if these will be as big a problem. I
did discover that the inner brace behind the pilot's seat is too tall so
that was trimmed down. I then glued in the clear section forward of the
break in the same manner as the aft one. I did not glue in the upper
machine gun as I knew I'd break it during all the sanding. Getting it
installed later may be a bit of a challenge as the fit is tight. Then, I
took a piece of the thinnest plastic sheet I could find and, cutting it
into two sections so that it would fit the slightly curved forward part a
bit better, glued it in place. The edges were filled with putty and set
aside to cure.
Once dry, I sanded the area smooth as I could. It needed a second application to take care of some glitches. During all this handling, the aft gun broke off its mounting. With that out of the way, I tried to glue the gun in through the closed up interior bits, but only succeeded in breaking the barrel! Muttering under my breath, I installed the instrument panel (into which I placed some Reheat instrument decals) and then glued in the control column (again) and finally the nose section. Fit is fairly good, but not really perfect. I'd had it with sanding on clear bits so left the slightly too big nose section as well aligned as I could.
Flipping the plane upside down, I installed the small blisters and radio mast on the underside. I then put a piece of tape over the back gun section (the gun had broken off due to all the handling), and proceeded to paint.
|
COLORS AND MARKINGS |
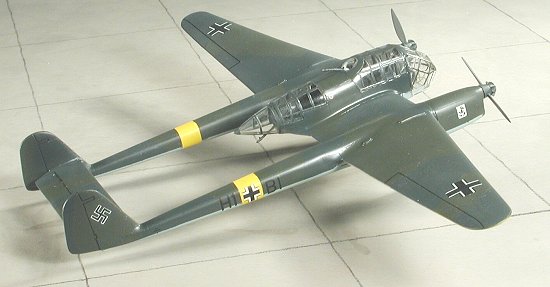
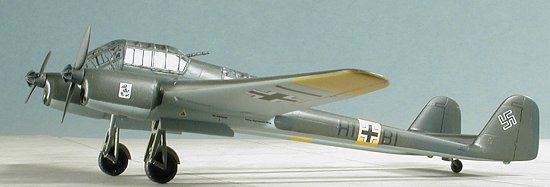 I used all Model Master enamels for the camo colors
other than the white. I first sprayed the wing tips and tail boom areas
with Floquil Reefer White. This was a basis for the RLM 04 yellow that
went on next. After those had dried, I carefully masked them and then
sprayed on RLM 65. With that dry, I then masked off the 65 areas and
sprayed the upper surface RLM 71. Then I settled down for some fun filled
time masking the splinter camo. The instructions don't tell you what the
inside of the fins are like, but they are a reverse of the outside
scheme.
I used all Model Master enamels for the camo colors
other than the white. I first sprayed the wing tips and tail boom areas
with Floquil Reefer White. This was a basis for the RLM 04 yellow that
went on next. After those had dried, I carefully masked them and then
sprayed on RLM 65. With that dry, I then masked off the 65 areas and
sprayed the upper surface RLM 71. Then I settled down for some fun filled
time masking the splinter camo. The instructions don't tell you what the
inside of the fins are like, but they are a reverse of the outside
scheme.
After several hours of masking and a few minutes of
painting (isn't it always like that?), I pulled off all the masking and
brought the kit back to the work bench. Here the landing gear were put
together and installed. The tail wheel was a breeze, but the main gear is
a rather fussy construct, I had to drill out the holes in the side of the
wheels to get the axles to fit. The dirt fender is just glued atop the
wheel. Getting all the struts and braces properly aligned was not a mean
feat. The glue attachment point for the strut is basically a butt join
with the retraction strut holding it in place and adding some strength. I
 let this whole thing solidly dry for a day before proceeding.
Then I sprayed a couple of coats of Future over it in preparation for the decals. I must not have let the paint cure or the temp in the spray area was too low as I got some of that cracking that occasionally shows up. It was only minor and since I was working on a deadline, I didn't have time to sand and repaint.
Decals are actually quite good. They are in register, come off the backing paper in quick order and react well to the weakest of setting solutions (Microsol/set). There is no swastika to appease the squeamish and so one had to be found elsewhere in the spare decal bin. There are a number of wing walk warning stripes on the sheet, but nothing at all about them in the instructions. Seems rather odd to me. With the decals on and dry, the airframe was wiped down with warm water to remove decal solvent residue and a coat of semi-gloss clear was sprayed on to seal in the decals.
|
FINAL CONSTRUCTION |
 With the plane nearly complete, the gear doors were glued in place.
Then came the onerous task of removing all the myriad little bits of
masking tape from the clear bits. Once those were off, another piece of
tape was used to remove any tape residue that was left over. I then glued
back on the rear gun and tried to mend the broken upper gun barrel as
best I could. Then the props were pushed onto the engine fronts and the
aft clear housing (which turned out to be a mite too large was glued in
place. Finally, the kit was done.
With the plane nearly complete, the gear doors were glued in place.
Then came the onerous task of removing all the myriad little bits of
masking tape from the clear bits. Once those were off, another piece of
tape was used to remove any tape residue that was left over. I then glued
back on the rear gun and tried to mend the broken upper gun barrel as
best I could. Then the props were pushed onto the engine fronts and the
aft clear housing (which turned out to be a mite too large was glued in
place. Finally, the kit was done.
|
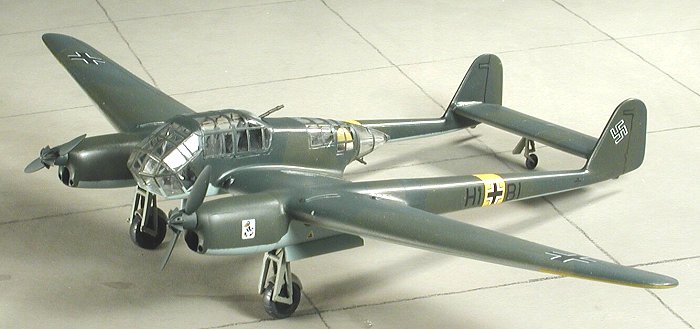
CONCLUSIONS |
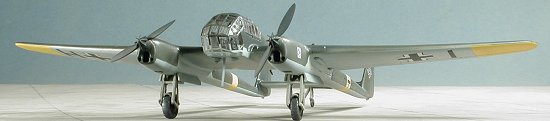
 Italeri's 189 is a major leap in detail over the
older Airfix version and perhaps, even over the Aoshima kit,
which I've seen but never built. However, that is tempered by the dodgy
fit that I experienced during construction. I later discovered that this
is a reboxed MPM kit. Now this is the first time that I've heard of that
being done, so one really has to be cautious when buying Italeri kits as
who knows what is in there. I was foxed by the side of the box stating
that the kit was made in Italy, so I can be excused somewhat. I
would have expected it to say 'Made in the Czech Republic' for the MPM
plastic. Some may also balk at the
price of the kit but that is a personal choice. Mine was paid for by my
phone company that gave me a $25 rebate for switching my long distance!
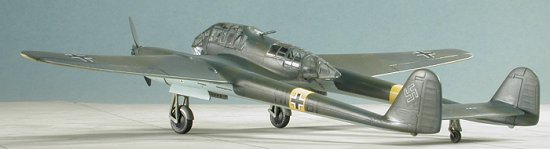
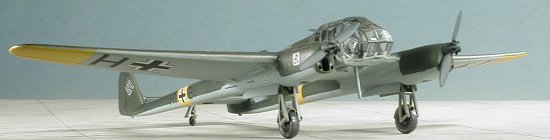
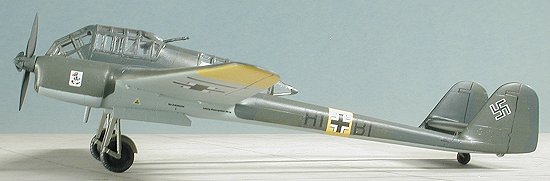
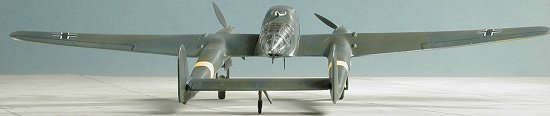
Naturally, I put it to good use. The end result is quite
pleasing and it is a striking-looking aircraft.
Italeri's 189 is a major leap in detail over the
older Airfix version and perhaps, even over the Aoshima kit,
which I've seen but never built. However, that is tempered by the dodgy
fit that I experienced during construction. I later discovered that this
is a reboxed MPM kit. Now this is the first time that I've heard of that
being done, so one really has to be cautious when buying Italeri kits as
who knows what is in there. I was foxed by the side of the box stating
that the kit was made in Italy, so I can be excused somewhat. I
would have expected it to say 'Made in the Czech Republic' for the MPM
plastic. Some may also balk at the
price of the kit but that is a personal choice. Mine was paid for by my
phone company that gave me a $25 rebate for switching my long distance!
Naturally, I put it to good use. The end result is quite
pleasing and it is a striking-looking aircraft.
February 2004
#1305 in a series
Copyright ModelingMadness.com. All rights reserved. No reproduction in part or in whole without express permission from the editor.
If you would like your product reviewed fairly and fairly quickly, please contact the editor or see other details in the Note to Contributors.