Academy 1/72 Fw-190D-9
|
KIT # |
1611 |
|
PRICE: |
$9.50 MSRP |
|
DECALS: |
Two options |
|
REVIEWER: |
|
|
NOTES: |
The ever popular 'Papegei' Staffel markings |
|
BACKGROUND |
|
CONSTRUCTION |
Construction starts with the interior... Omigawd, did I actually say that?! Actually, it did. as I glued in the seat, stick and lower instrument panel. I also glued together the drop tank and the upper/lower wings. The interior, upper instrument panel, and inside the fuselage halves was then painted RLM 66 and the drop tank and outer gear doors in RLM 76. While I was at it, I removed and cleaned up the landing gear and prop. The landing gear was done in RLM 02 along with the inner gear doors, while the prop was given a coat of RLM 70. The spinner and backing plate were done in black.
 Once done, the interior
was given a dry brush with RLM 02 and aluminum to bring out some detail.
The kit interior is fine for an out of the box kit, but could really be
brought to life with a resin or photoetched set. However, since this one is
going to be OOB, none of that was added.
Once done, the interior
was given a dry brush with RLM 02 and aluminum to bring out some detail.
The kit interior is fine for an out of the box kit, but could really be
brought to life with a resin or photoetched set. However, since this one is
going to be OOB, none of that was added.
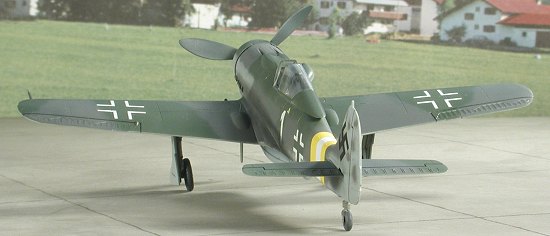
The interior was installed in the fuselage halves and they were glued together. At the same time, the wing was cemented in place. Fit really is very good with minimal filler needed. Pay attention while the glue is drying as my model slipped from its resting place while this was going on and one wing root got a small step in it as a result. After sanding and a touch of filler in a few spots, the tail planes were glued in. Now I'm not a 190D expert, but it seems to me that the shape of the outer tailplanes isn't exactly right. I seem to think that they should be more 'square' instead of slightly angled the way they are.
After getting these bits together, I glued on the upper cowl and the supercharger intake. The forward cowling was tacked in place so I could do some painting before installing the prop. The fit of the forward cowling isn't very positive so one needs to be cautious during the final gluing stage. The entire underside of the model and the sides were then painted in RLM 76 using Testors Model Master enamels.
 The wheels were painted black and when dry, masked off and then the tires
painted RLM 66. The wheels seem a bit narrow to my liking, but since my
last 190D was in 1/32, they may just seem skinny! Tail wheel and strut are
molded onto a fuselage half and a bit hefty, undoubtedly to keep it from
easily breaking off.
The wheels were painted black and when dry, masked off and then the tires
painted RLM 66. The wheels seem a bit narrow to my liking, but since my
last 190D was in 1/32, they may just seem skinny! Tail wheel and strut are
molded onto a fuselage half and a bit hefty, undoubtedly to keep it from
easily breaking off.
I cut the windscreen and canopy from the sprues. I'm doing an early 190D so the flatter canopy and skinny armor plating section are appropriate. The clear attachment points are such that it is impossible to remove them from the sprue without marring them. The armor attachment points inside the canopy are large and easy to see from the outside. More fastidious modelers will want to replace these with vac bits. I even tried sanding out the marks but to no avail. Both were then masked using Tamiya tape and the windscreen glued in place. The kit will have to be built with the canopy open as it is too tall when put in the closed position.
|
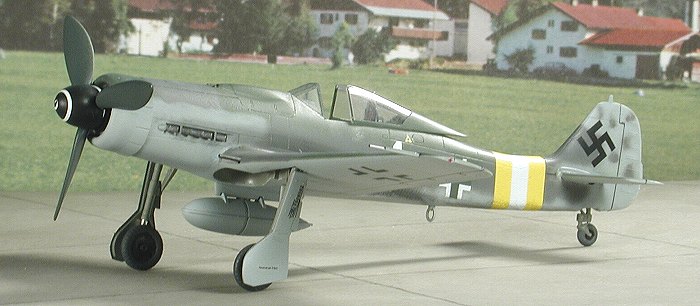
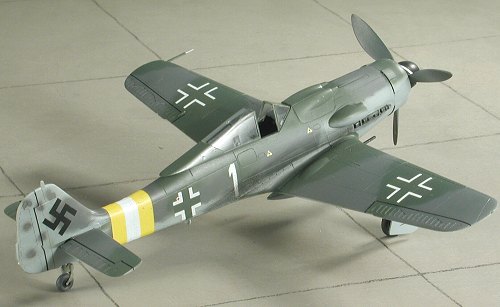
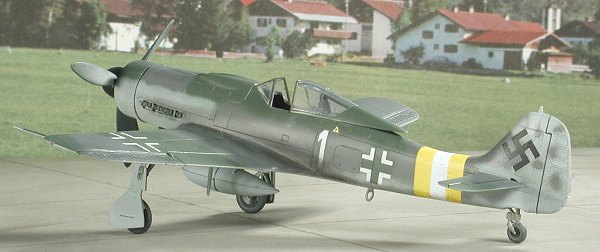
CAMOUFLAGE & MARKINGS |
 The aircraft I am modeling is a JG 2 aircraft from
Aeromaster 72-060,
Reich Defense pt VI. It is in RLM 82/75/76. As with nearly all my models, I
first sprayed the underside RLM 76 and when dry, masked off the underside
of the horizontal stabs. Next, I did the upper surface with RLM 82, also
from the Model Master enamel range. When that was dry, I did the RLM 75,
again from Modelmaster freehanded using the guide on the back of the decal
instructions. When that had dried, I masked all the upper wings/tailplanes
and went back over the areas with RLM 76.
The aircraft I am modeling is a JG 2 aircraft from
Aeromaster 72-060,
Reich Defense pt VI. It is in RLM 82/75/76. As with nearly all my models, I
first sprayed the underside RLM 76 and when dry, masked off the underside
of the horizontal stabs. Next, I did the upper surface with RLM 82, also
from the Model Master enamel range. When that was dry, I did the RLM 75,
again from Modelmaster freehanded using the guide on the back of the decal
instructions. When that had dried, I masked all the upper wings/tailplanes
and went back over the areas with RLM 76.
The side mottling is very heavy; to the point of being solid in
many places. Once the mottling was done, I gave the model a coat of Future
clear acrylic in preparation for the decals.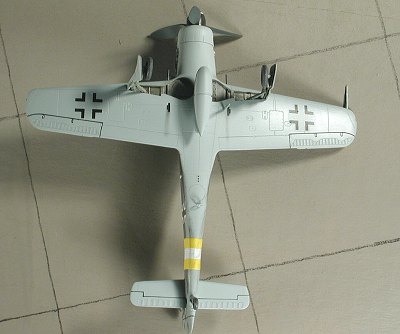
Decals are very well printed and provide the tail band. I had trouble getting this tailband to fit properly. I'm not sure if it is because the set is designed for the Hasegawa kit or just from poor engineering. I ended up using several applications of Champ on it to get the decals to snuggle down and while that did happen, I ended up with some wrinkles on the top that I never could eliminate. I might suggest to those of you who plan to build this kit and use these markings to paint the Reich Defense bands. I'll give another option on the sheet a try in the near future, but use the Hasegawa kit to see if this makes any difference or not. The rest of the decals went on without any problem. I did find that the smaller fuel and other multi-colored markings were off register.
Once the decals had dried. I applied several coats of Future/flat base mix to seal them in. Then I masked off the fuselage crosses and sprayed RLM 82 on the inside of them as shown in the decal sheet color guide. It is imperative that one use low tack tape and be very careful to prevent any decal disasters.
|
FINAL CONSTRUCTION |
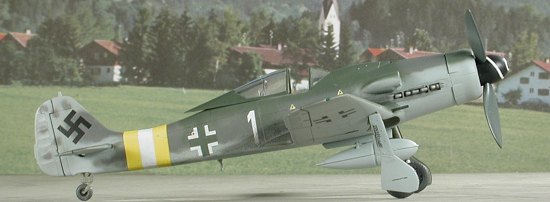
My attention then turned to the final bits. This meant the landing gear,
whose oleos were first wrapped with Bare Metal chrome foil. I found the fit
to be rather sloppy, even after the retraction struts were attached. I also
notice that I didn't put enough forward rake into the main gear. The
wheels fit well, but the 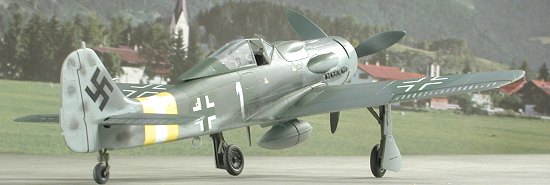 gear doors were not a very positive fit, for some
reason. I assembled the prop/spinner combo and then slipped the shaft
through the nose cowl section. There is a hold down that also is supposed
to fit into a post on the fuselage 'firewall'. It doesn't do such a great
job and I eventually had to cut this hold down to get the prop to spin.
This means that there is precious little attachment for the cowl; only a
small area on one side and the top. I used superglue, though it will mean a
weaker than normal attachment.
gear doors were not a very positive fit, for some
reason. I assembled the prop/spinner combo and then slipped the shaft
through the nose cowl section. There is a hold down that also is supposed
to fit into a post on the fuselage 'firewall'. It doesn't do such a great
job and I eventually had to cut this hold down to get the prop to spin.
This means that there is precious little attachment for the cowl; only a
small area on one side and the top. I used superglue, though it will mean a
weaker than normal attachment.
The rest of the bits to be glued were the head armor into the canopy, the drop tank and the lower radio mast. Final ones were the wing guns, which didn't want to fit in their holes at the proper angle. They are a bit inward facing. Any paint glitches were touched up and pastels were applied for exhaust. The kit was then given another coat of clear matte to seal in the pastels. A wash was given to the wheel wells and the radiator in the cowl. Finally, the canopy was glued in place and the masking taken off.
|
CONCLUSIONS |
 This kit turned into
a pretty painless build. There were no real problems with it other than the
usual ones that were self-inflicted. I did find that the fit of the canopy
could have been better, but if you leave it open, there won't be any
problems. It is a kit that I can recommend to everyone.
This kit turned into
a pretty painless build. There were no real problems with it other than the
usual ones that were self-inflicted. I did find that the fit of the canopy
could have been better, but if you leave it open, there won't be any
problems. It is a kit that I can recommend to everyone.
Such is the nature of the hobby nowadays that one will have to spend $10 on getting a nicely done, relatively new mold kit, a far cry from my youth when 49 cents or a dollar would buy a very nice and complete kit!
September 2003
#1284 in a series
If you would like your product reviewed fairly and fairly quickly, please contact me or see other details in the Note to Contributors.