| KIT #: | 84101 |
| PRICE: | $24.95 MSRP |
| DECALS: | One option |
| REVIEWER: | Scott Van Aken |
| NOTES: | Weekend Edition |
| HISTORY |
The Fw 190 D (nicknamed the Dora; or Long-Nose Dora, "Langnasen-Dora") was intended to improve on the high-altitude performance of the A-series enough to make it useful against the American heavy bombers of the era. In reality, the D series was rarely used against the heavy bomber raids, as the circumstances of the war in late 1944 meant that fighter-versus-fighter combat and ground attack missions took priority. A total of 1,805 D-9s were produced. Production started in August 1944 with the variant entering Luftwaffe service in September 1944 with III./JG 54.
 The liquid-cooled 1,750 PS (1,726 hp, 1,287 kW)
Jumo 213A could produce 2,100 PS (2,071 hp, 1,545 kW) of emergency power with MW
50 injection, improving performance to 426 mph (686 km/h) at 21,650 ft
(6,600 m). Early D-9s reached service without the MW 50 installation, but in the
meantime Junkers produced a kit to increase manifold pressure (Ladedrucksteigerungs-Rüstsatz)
that increased engine output by 150 PS to 1,900 PS, and was effective up to
5,000 m (16,400 ft) altitude. It was fitted immediately to D-9s delivered to the
units from September, or retrofitted in the field by TAM. By the end of
December, all operational Doras, 183 in total, were converted. From November
1944, a simplified methanol-water (MW 50) system (Oldenburg)
was fitted, which boosted output to 2,100 PS. By the end of 1944, 60 were
delivered with the simplified MW 50 system or were at the point of entering
service. The 115 L tank of the
Oldenburg system would hold the MW
50 booster liquid, which was single-purpose, while later systems were to be
dual-purpose, holding either MW 50 or additional fuel.
The liquid-cooled 1,750 PS (1,726 hp, 1,287 kW)
Jumo 213A could produce 2,100 PS (2,071 hp, 1,545 kW) of emergency power with MW
50 injection, improving performance to 426 mph (686 km/h) at 21,650 ft
(6,600 m). Early D-9s reached service without the MW 50 installation, but in the
meantime Junkers produced a kit to increase manifold pressure (Ladedrucksteigerungs-Rüstsatz)
that increased engine output by 150 PS to 1,900 PS, and was effective up to
5,000 m (16,400 ft) altitude. It was fitted immediately to D-9s delivered to the
units from September, or retrofitted in the field by TAM. By the end of
December, all operational Doras, 183 in total, were converted. From November
1944, a simplified methanol-water (MW 50) system (Oldenburg)
was fitted, which boosted output to 2,100 PS. By the end of 1944, 60 were
delivered with the simplified MW 50 system or were at the point of entering
service. The 115 L tank of the
Oldenburg system would hold the MW
50 booster liquid, which was single-purpose, while later systems were to be
dual-purpose, holding either MW 50 or additional fuel.
Due to the failure of multiple attempts to create an effective next-generation 190, as well as the comments of some Luftwaffe pilots, expectations of the Dora project were low. These impressions were not helped by the fact that Tank made it very clear that he intended the D-9 to be a stopgap until the Ta 152 arrived. These negative opinions existed for some time until positive pilot feedback began arriving at Focke-Wulf and the Luftwaffe command structure. Sporting excellent handling and performance characteristics, it became very clear that the D-9 was nearly the perfect response to the Luftwaffe's need for an effective medium altitude, high-speed interceptor, although its performance still fell away at altitudes above about 20,000 ft (6,100 m). When flown by capable pilots, the Fw 190D proved to be a match for P-51s and Mk. XIV Spitfires.
 While the first few Doras were fitted with the
flat-top canopy, these were later replaced with the newer rounded top "blown"
canopy first used on the A-8 model. With the canopy changes, the shoulder and
head armour plating design was also changed. Some late model Doras were also
fitted with the Ta 152 vertical stabilizer and rudder, often called "Big Tails"
by the Luftwaffe
ground crews and pilots as seen on W.Nr. 500647
Brown 4
from 7./JG 26 and W.Nr. 500645
Black 6 from JG 2).
While the first few Doras were fitted with the
flat-top canopy, these were later replaced with the newer rounded top "blown"
canopy first used on the A-8 model. With the canopy changes, the shoulder and
head armour plating design was also changed. Some late model Doras were also
fitted with the Ta 152 vertical stabilizer and rudder, often called "Big Tails"
by the Luftwaffe
ground crews and pilots as seen on W.Nr. 500647
Brown 4
from 7./JG 26 and W.Nr. 500645
Black 6 from JG 2).
As it was used in the anti-fighter role, armament in the "D" was generally lighter compared to that of the earlier aircraft—usually the outer wing cannon were dropped so that the armament consisted of two 13 mm (.51 in) MG 131 machine guns and two 20 mm MG 151/20 E wing root cannon, with all four weapons synchronized to fire through the propeller arc. While inferior to the A-series in roll rate, the "D" was superior in turn rate, climb, dive and horizontal speed. The Dora still featured the same wing as the A-8, however, and was capable of carrying outer wing cannons as well, as demonstrated by the D-11 variant, with a three-stage supercharger and four wing cannon (two MG 151s and two MK 108s).
The first Fw 190 D-9s started entering service in September 1944 with III./JG 54. It was quickly followed by many, including I./JG 26, starting 16 November to convert to the new fighter from the A-8.
| THE KIT |
 Generally, I wait for the Weekend Edition when it
comes to buying Eduard kits. True, one does not get photo etch or masks or
multiple decal options, but for the most part, you get the same kit as the
Profipak versions. One does have to be careful as I've bought weekend editions
that cannot be fully built as some of the mandatory parts were in photo etch.
With this kit, it seems that the photo etch was mostly for the cockpit, though
the lack of p.e. did come into play.
Generally, I wait for the Weekend Edition when it
comes to buying Eduard kits. True, one does not get photo etch or masks or
multiple decal options, but for the most part, you get the same kit as the
Profipak versions. One does have to be careful as I've bought weekend editions
that cannot be fully built as some of the mandatory parts were in photo etch.
With this kit, it seems that the photo etch was mostly for the cockpit, though
the lack of p.e. did come into play.
The kit itself is very nicely molded with all the surface detailing that one could ask for. One thing that surprised me as I was handling the sprues, was how thin and flexible the airframe parts were. In fact, one could easily bend the fuselage in the cockpit area, so I have to think that one needs to be quite careful of the pieces to keep from accidentally breaking them.
Apparently Eduard has listened to the complaints about not being able to build the kit with various panels closed as this one provides optional pieces to allow the builder to do just that. I have to applaud Eduard for making this change as there are those of us who don't like our models with all the panels opened, though one will have to do some surgery to have closed panels.This kit also breaks new ground by including an engine accessory unit that one can see when looking into the wheel wells. Previous 190D kit simply put in the usual blocking plate as came with the 190A.
 The kit also includes two types of
tires, smooth and radial tread as well as two different canopies, the 'flat' top
and 'blown' version. Interestingly, you are provided with two of each canopy,
each with a different part number as one is supposed to be open and another for
closed. There is no alternate head armor for the 'blown' canopy that I could
find so that very much reduces what can be built from the box if using
aftermarket decals.
The kit also includes two types of
tires, smooth and radial tread as well as two different canopies, the 'flat' top
and 'blown' version. Interestingly, you are provided with two of each canopy,
each with a different part number as one is supposed to be open and another for
closed. There is no alternate head armor for the 'blown' canopy that I could
find so that very much reduces what can be built from the box if using
aftermarket decals.
For things under wings, you have either a drop tank or a bomb. Ailerons and rudder are separate, though there is no indication that they are to be affixed in anything other than the neutral position. No separate flaps are provided but I'm not sure these were normally deployed when on the ground anyway.
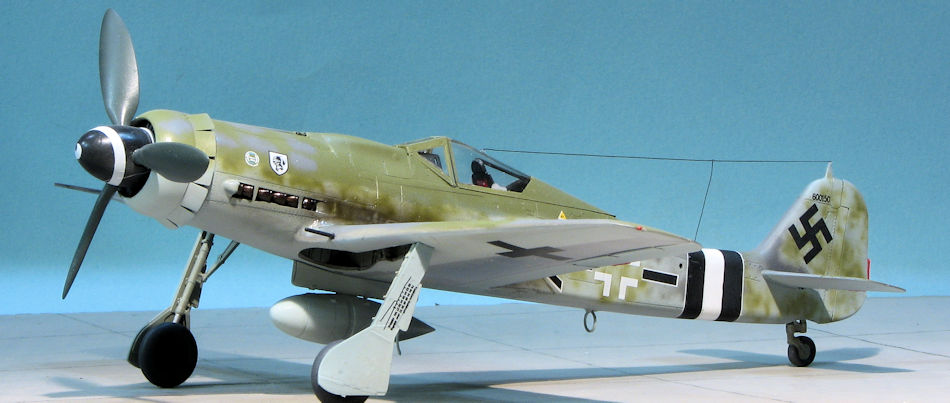
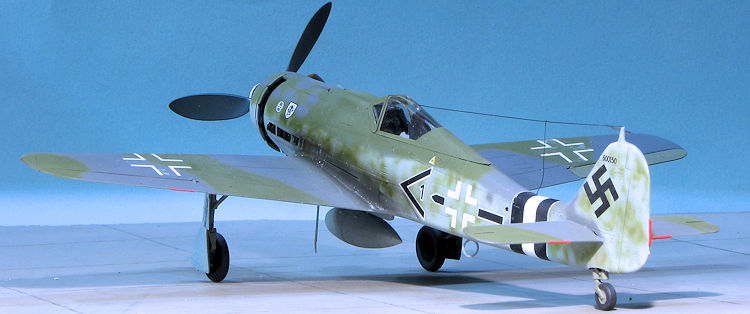
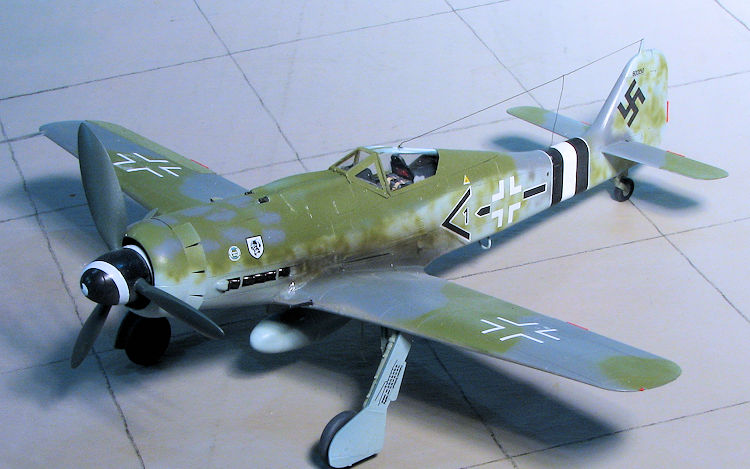
The instruction sheet is nicely done with Mr. Color paint references. A single markings option is provided, a plane from Sab/JG 4 at te end of the war in RLM 75/83/76 with large areas of the lower wing unpainted, something relatively common with planes built in the last part of the war. Decals are nicely printed with one sheet offering stencils and the other unique markings.
| CONSTRUCTION |
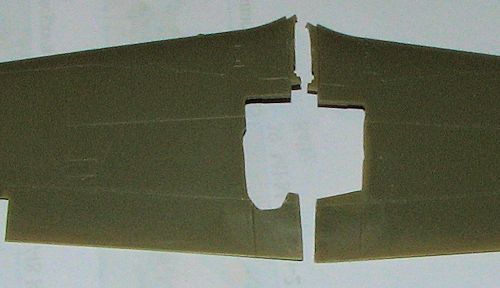 lignment
issues, as I discovered when attaching the barrels of the guns. Eduard
does provide an option to have the inner wing gun bays closed. One has
to do quite a bit of grinding to remove plastic from the bay openings,
but care and a lot of test fitting will pay off.
lignment
issues, as I discovered when attaching the barrels of the guns. Eduard
does provide an option to have the inner wing gun bays closed. One has
to do quite a bit of grinding to remove plastic from the bay openings,
but care and a lot of test fitting will pay off. 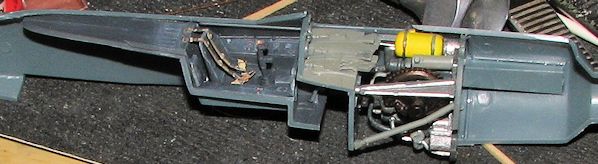 re that the bottom of each
of these bits fits flush with the side console. I should also mention
that there are small areas of flash that will need to be trimmed. I
guess that the weekend editions are done when the molds are near the end
of their life.
re that the bottom of each
of these bits fits flush with the side console. I should also mention
that there are small areas of flash that will need to be trimmed. I
guess that the weekend editions are done when the molds are near the end
of their life. 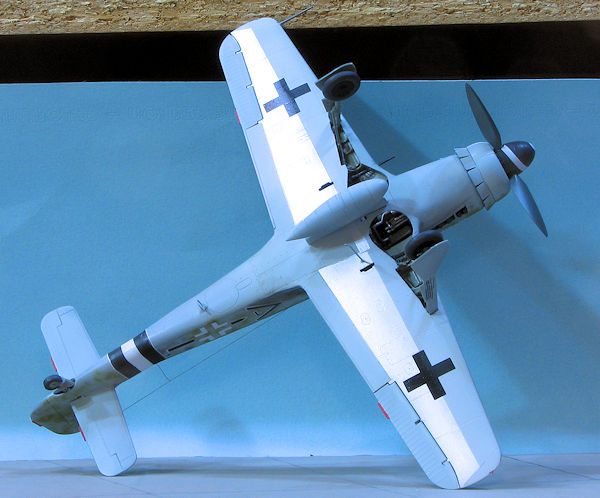 the front wing/fuselage join from
not having a step. I then filled the various gaps and went to work on
installing the wing gun covers.
the front wing/fuselage join from
not having a step. I then filled the various gaps and went to work on
installing the wing gun covers. | COLORS & MARKINGS |
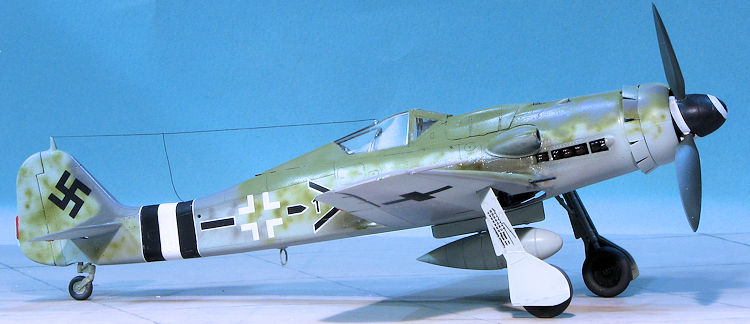
Thought I'd give the kit markings a go as they are fairly colorful and the early canopy options I had on aftermarket sheets didn't do anything for me. This plane has bare metal panels on the underside of the wing. According to the instructions, the demarcation line between the metal parts and painted parts is a fairly straight line. This line goes through other panels and it seems a bit odd that it would do so, but that is what the instructions state.
 For the metal part, I decided to give Vallejo's latest
metallics a go. These are water based acrylics and the web is agog with
commentary on it. This is premixed to spray out of the bottle once the bottle is
properly shaken up. My first attempt was a disaster as it dried all lumpy and
was definitely rough to the feel. This was despite it having an undercoat of
Tamiya extra fine primer under it. That was all sanded down and I tried again.
Second attempt wasn't bad, but the paint tended to pool and caused variations in
how the finish looked. This was then sanded down and I decided to give it a
third try. This time, I sprayed on very light coats so it was a bit time
consuming. However, it ended up looking fairly good so I kept it.
For the metal part, I decided to give Vallejo's latest
metallics a go. These are water based acrylics and the web is agog with
commentary on it. This is premixed to spray out of the bottle once the bottle is
properly shaken up. My first attempt was a disaster as it dried all lumpy and
was definitely rough to the feel. This was despite it having an undercoat of
Tamiya extra fine primer under it. That was all sanded down and I tried again.
Second attempt wasn't bad, but the paint tended to pool and caused variations in
how the finish looked. This was then sanded down and I decided to give it a
third try. This time, I sprayed on very light coats so it was a bit time
consuming. However, it ended up looking fairly good so I kept it.
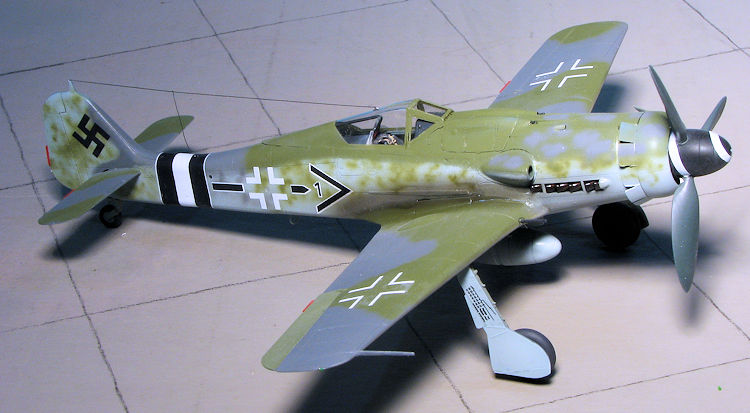
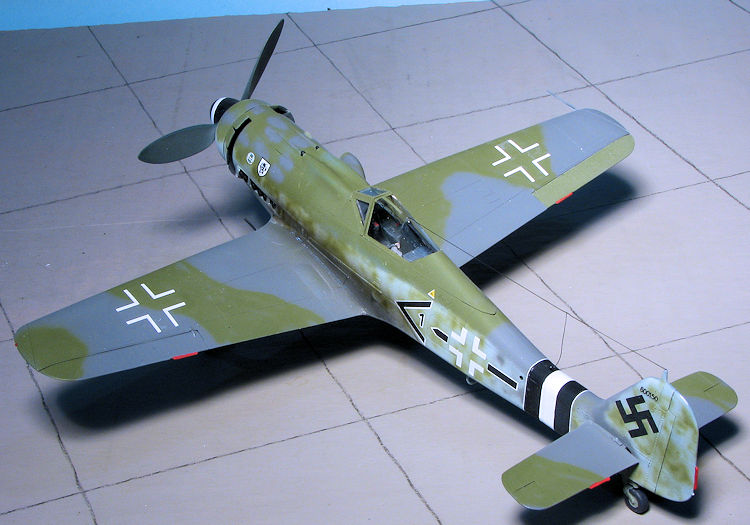
When fully dry, the metal parts were masked and the rest of the underside was sprayed RLM 76 using Model Master enamel (mainly because I had some ready to go). I then painted the upper surface with RLM 75 as recommended in the instructions, followed by RLM 83. These shades are quite close to each other and when I got around to doing the mottling on the upper forward cowling with the RLM 75, I had quite a bit of difficulty telling where I had just painted.
I then attached the main landing gear. This proved to be a
very wiggly fit so one has to pay attention to the various angles while the
cement dries. The airframe was then given a couple of gloss coats. When dry I
went to apply the decals when I realized that I'd have to paint on the Reich
Defense band. Some careful masking ensued and this feature was painted in place.
I then started applying the markings, starting with the insignia and unique
markings. Apparently Eduard expects us all to be experts at placing
 190 stencils
from memory as there is absolutely no indication as to where any of them are to
be placed. You can figure out a couple from the box art profile, but that is
about it.
190 stencils
from memory as there is absolutely no indication as to where any of them are to
be placed. You can figure out a couple from the box art profile, but that is
about it.
Finishing things up meant installing the prop, landing gear doors, wheels, lower wing antenna, pitot tube and drop tank. The thin antenna/pitot bits were badly misaligned and ended up being flat rather than round. The instructions would have you simply glue the drop tank to the rack by the area provided on a small pin. In actuality, there is no proper tank mounting at all, this probably being done in photo etch and so not included in the kit. I drilled a hole in the rack so at least there would be some attachment point for this. I did the usual touch up and then did some exhaust staining using Tamiya's 'smoke'. This was followed by removing the masking only to discover that the glue I used had crept up the plastic at the head armor. Still, I added some EZ-line for the antenna to complete what turned out to be a somewhat disappointing build.
| CONCLUSIONS |
As you can gather, this turned out to be not the best build I've every done. Eduard's penchant for using five parts when one would do makes for a kit that was, at times, frustrating. There is also the situation of missing parts as well as the complete lack of stencil placement information that really puts the dampener on things. Apparently this is now standard for Weekend Edition kits and frankly, it will keep me from plunking down my money for these in the future. It makes no sense to have a kit that relies on photo etch for a complete build and then not provide plastic alternatives for these boxings. Having said that, I don't doubt that it is the most accurate kit on the market and what draws many modelers to them. It is just too much fuss for me and I'll spend my money on Hobby Boss or someone else who does a better job of engineering and provides all that is needed in the box.
| REFERENCES |
http://en.wikipedia.org/wiki/Focke-Wulf_Fw_190
December 2015
Copyright ModelingMadness.com
Thanks to me for picking this one up.
If you would like your product reviewed fairly and fairly quickly, please contact the editor or see other details in the Note to Contributors.