Trimaster 1/48 Fw-190A-8
Kit Number: MA-6
Price: I got mine for $5.00 at a swap meet, but they retailed for over $40.00
Media: Injected plastic, etched stainless steel
Decals : at least three versions, all Luftwaffe
Date of Review: 2 May, 1996
Comments: The Fw-190 was probably the finest fighter the Luftwaffe produced during the middle stages of the war. When they first appeared, they gave the Allies fits until one landed by accident in the UK. Careful study of the aircraft enabled the Brits to build the Spit IX which then gave them parity. Had the 190 been built in the same numbers as the 109, the war may have lasted longer than it did. The Fw-190 series combined superb firepower with equally superb engine power, flight and landing characteristics. Once again politics raised its ugly head and since Messerschmitt was in favor, the Focke-Wulf fighter was not given much encouragement in the first years of production. The Fw-190 eventually led to the superior D version and the outstanding Ta-152 series of late war fighters. Unfortunately it was a typical story of too little, too late.
When I first saw the Trimaster kits advertised about ten years ago, I was shocked at the price of them. I could not believe that anyone would have the audacity to charge so much for an aircraft model. While they had an excellent choice of subject material, apparently they were asking too much as Trimaster eventually folded and its molds were bought by Dragon (DML to those of us on the left side of the Atlantic). DML did little but remove the metal bits and reproduce them in plastic, as well as drop the price to a more reasonable level. I bought this kit at a swap meet back in 1990 and thought I got a great deal. My enthusiasm was dampened quite a bit when I noticed that not only was the kit partially (and badly) built, but many of the famed metal bits (including the landing gear) were missing. Frustrated, I put the kit away.
A couple of years later, I decided to get the kit out and build it as a stand model. That way, I would not need the landing gear. I first started by looking at what had already been done. The fuselage had been started as had the interior. One of the bits missing was the instrument panel, so I scratch built one from card. I then looked at the instructions and got rid of all the parts I would not be using. At this time an inventory of what was needed was also done. I had everything I needed for a stand model as the tail wheel and strut assembly (in white metal) was there. I'll say this for Trimaster, all the metal moldings were superb with very little in the way of mold lines or pits as it typical of several other white metal parts in short run kits.
I had decided to build the kit as a "Rammkommando' aircraft of JG-300 late in the war after I saw an advertisement by Ministry of Small Aircraft Production (MSAP)decals for a conversion kit with decals for these aircraft. The decal sheet included a brass sheet with the additional cockpit and canopy armor as well as replacement panels for the underwing cannon bulges. Fortunately, the under wing resin pieces were not needed for the Trimaster kit, and I used the brass armor pieces as patterns for replacements made in styrene sheet. This way, I still have the ability to do another aircraft from the sheet!! Call me cheap.
Anyway, the Trimaster kit builds fairly well although there are a few problem areas. The first problem came when attaching the wheel well bay to the wings. There are a number of parts (cannon barrels, lower exhaust, etc) that need installed in the wheel well. These bits interfere with proper seating of the well with the lower wing, so a bit of surgery needs done to assure a good fit. The biggest problem comes with attaching the lower wing with the fuselage. The forward section of the wing does not mate well with the lower cowling in the front. Some of this fit problem is due to the wheel well insert that must be slightly shaved down. The other is the just the design of the wing near the front. You'll have to be very careful in this area and will eventually have to putty and sand to get a good fit. The last problem area was with the wheels up configuration. Unfortunately, the wheel wells are a bit shallow so the wheel will not fit all the way in. I had to sand down the unexposed part of the wheel to get the door to close flush with the wing. Of course this is not a problem with 99.9% of all the kits built, but did appear when doing a wheels up version. I made no attempt to have the tail wheel retracted and left it down. This was often done in the field anyway.
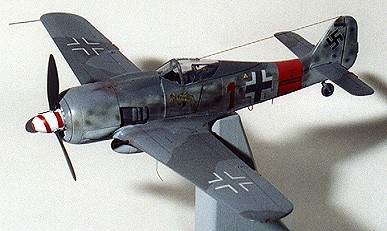
The rest of the bits and pieces fit quite well. The metal pitot tube, guns, radio antennas, and ADF loop look just great as do the superb drop tank and brace. There is a very detailed engine, but it is hidden by the fan so don't waste time detailing it. The model was painted in 74/75/76 which is standard for almost every Fw-190A ever built. Final building included fitment of the cockpit external armor, which needed the edges files at about a 45 degree angle as on the real aircraft. Prior to fitting the armor, it is a good idea to get the pieces a bit curved to fit the arc of the fuselage. This particular aircraft has a red Reich Defense band on the aft fuselage as well as a white spinner with red spiral. I was rather hesitant about actually using the MSAP decals as I had found a previous sheet to be thick and brittle. This sheet was a bit easier to use as it was not as brittle as the previous example. It still requires industrial strength Solvaset to get the decals to snuggle down to details and some required multiple applications. The sheet is very complete with all required markings. As with all my kits, I used a combination of paints, this one being a mixture of Gunze acrylic as well as Testors Model Master and Xtracolor enamels. The entire kit was then given several coats of Future floor wax to give a gloss finish over which the decals were applied. I then used a flat coat to give it a more realistic appearance. Final steps included the pastel treatment for exhaust and gun stains as well as a radio longwire from stretched sprue.
The over all result is pleasing. I made a base from cherry and painted the base in 76/75/74 with a white area left for application of the nametag. The base was given several coats of Future after completion which accounts for the difference in color tones. Due to the fitment of the droptank, the kit is not mounted on the center of gravity and is a bit nose heavy, but I'll live with it. I can only recommend the Trimaster kit to those with experience in mixed media kits and who are skilled enough to take care of the fit problems. I expect the DML kit is pretty much the same.
Copyright ModelingMadness.com. All rights reserved. No reproduction in part or in whole without express permission from the editor.