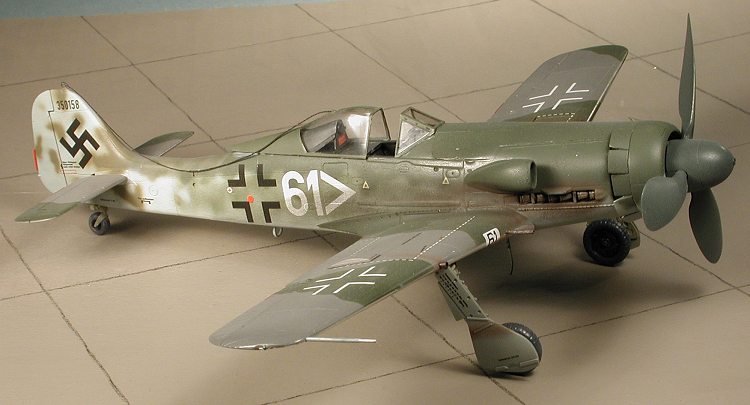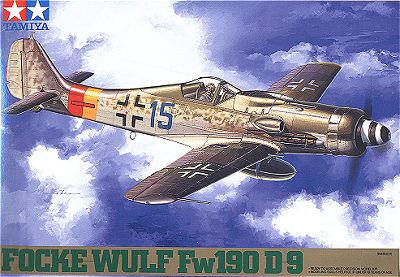
Tamiya 1/48 FW-190D-11
Kit Number: 61041
Price: $27.00
Decals: three versions: 4/JG 301 (Blue 15), Stab/JG 4, 10/JG 54 (Black 12)
Conversion: D-11 resin set by Robert Stephenson, $11.00
Date of Review: September 1998
Review and Photos by: Scott Van Aken
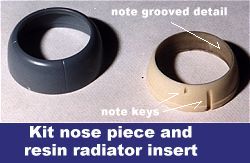
The liquid-cooled, in-line Jumo engines that powered the last versions of the FW-190, epitomized the height of this famous fighter. Developed from the Fw-190D-9, the D-11 differed mainly in engine and armament. Whereas the D-9 was powered by the Jumo 213A, the D-11 used the more powerful Jumo 213F. This resulted in a barely perceptable change in the width of the nose section and a different radiator arrangement from the D-9. On the D-9, the radiator was flush with the front of the engine cowling, whereas the D-11 radiator was a toroid or like a doughnut with the elements along the outer edges of the cowling.
The increased power also meant a larger, more oval supercharger intake and a larger paddle-bladed propeller. In addition, the D-11 had no cowl guns and instead had an extra set of 30mm cannon in the outer wing sections. The remarkable thing about the D-11 is that only 7 prototypes were built and a number of them were used in combat. Most of the references I found suggest that all D-11's were rebuilt from FW-190A-8 airframes. Only Nowarra's account differs in this respect. Actually, there is very little information available on the D-11, and that is printed below.
 V-55 werke # 170923; used to test the 213F-1 engine. 2 MG 131 13mm and 2
MG 151 20mm guns; armament like that of the FW-190D-9
V-55 werke # 170923; used to test the 213F-1 engine. 2 MG 131 13mm and 2
MG 151 20mm guns; armament like that of the FW-190D-9
V-56 werke # 170924; also used for engine tests and tests of MW 50 booster. Standard D-11 armament of 2 MG 151 20mm guns inboard and 2 MK 108 30mm cannon outboard.
V-57 werke # 170926; Standard armament.
V-58 werke # 170933. Same as with V-57.
V-59 werke # 350156. Same as with V-57. Crashed October 9 1944.
V-60 werke # 350157. Only D-11 built without armament.
V-61 werke # 350158 (possibly 220004). Same as V-57. Used by Junkers as flying test bed.
There is also some evidence of a D-11 werke # 220005 (or 220009). It is unknown which, if any, of the prototypes it might be. It was photographed with the double winkle (<<) of a senior officer; unit unknown.
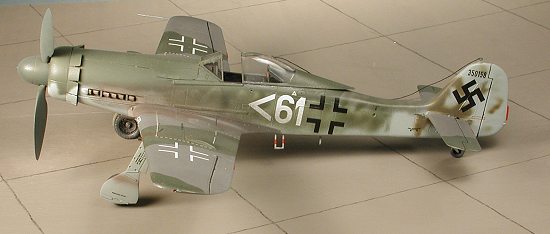
Of those listed, V-58 saw service with the JV-44 protection flight. It was coded red 4 and had the underside painted red with white stripes. In addition V-61 was flown coded <61; unit unknown.
 |
 |
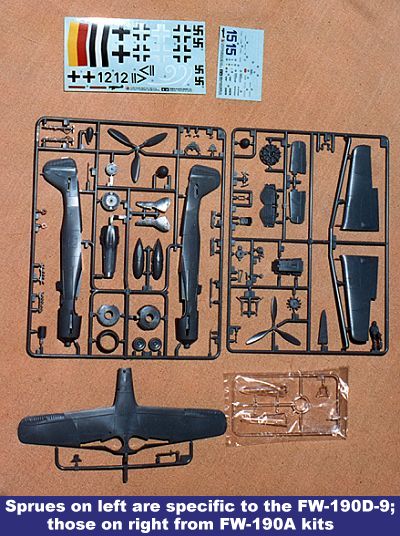
For this conversion, the excellent Tamiya Fw-190D-9 kit was used. This kit
uses a sprue from the BMW powered FW-190A and F kits so you will have some
extra parts, including an extra prop, spinner and fan blade to use on your Mongram Fw-190. As you might expect, the kit builds beautifully.
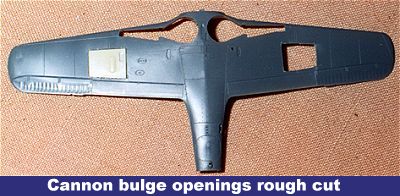 The first
thing I did on this conversion was to cut out the holes in the wing for insertion
of the new insert containing cannon bulges and ejector chutes. There was
a lot of trepidation on my part as to how this was going to work. What
I did was to place the resin insert where I wanted it on the wing, pencil
around the outline of it, and then start hacking a smaller section out of
the wing. I did this by drilling holes and then cutting the area between
the holes and smoothing it all out. By cutting out a smaller section, it
prevented the problems of having to fill an unwanted gap. To get the
resin insert to fit into the hole, the edges of the resin insert and the
hole in the wing were beveled at about a 45 degree angle. This allows the
insert to lay in the hole and any adjustment can be made to level it all
out. Once you are satisfied, superglue applied from the back holds
it in place.
The first
thing I did on this conversion was to cut out the holes in the wing for insertion
of the new insert containing cannon bulges and ejector chutes. There was
a lot of trepidation on my part as to how this was going to work. What
I did was to place the resin insert where I wanted it on the wing, pencil
around the outline of it, and then start hacking a smaller section out of
the wing. I did this by drilling holes and then cutting the area between
the holes and smoothing it all out. By cutting out a smaller section, it
prevented the problems of having to fill an unwanted gap. To get the
resin insert to fit into the hole, the edges of the resin insert and the
hole in the wing were beveled at about a 45 degree angle. This allows the
insert to lay in the hole and any adjustment can be made to level it all
out. Once you are satisfied, superglue applied from the back holds
it in place.
 Typically,
the beveled idea wasn't hit upon until the second insert so the first sank
down too far and needed more putty than I would have liked. Fortunately,
Robert engraved the inserts well enough so that very little detail was lost.
Typically,
the beveled idea wasn't hit upon until the second insert so the first sank
down too far and needed more putty than I would have liked. Fortunately,
Robert engraved the inserts well enough so that very little detail was lost.
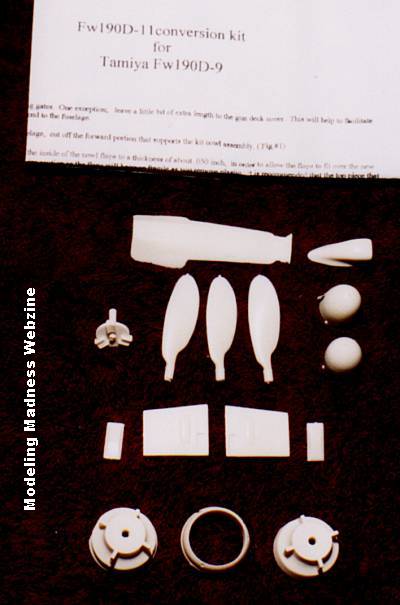
A note on Robert's resin conversion. All the pieces are very well made and bubble-free. Wish all 'garage' resin efforts were this good! While I did have some problems determining proper part nomenclature and found the instructions to be a bit confusing in parts, a few e-mails to Robert straightened out all my problems. This review will address those areas and the solutions.
 |
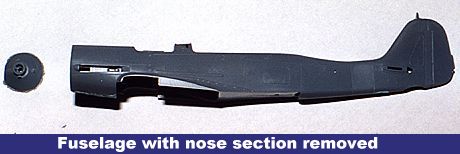 |
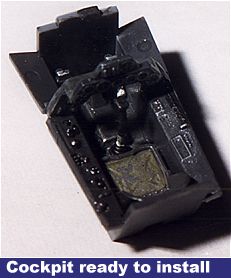
Once the wing inserts were done, the wing and wheel well was assembled in the normal fashion. Same with the cockpit which was painted RLM 66 (dark grey) and then detailed with paint and drybrushed. Next the fuselage halves were assembled and when dry, the very tip of the nose was cut off as per Robert's directions. The next steps were the most time-consuming and take up most of the conversion.
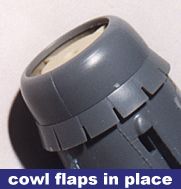
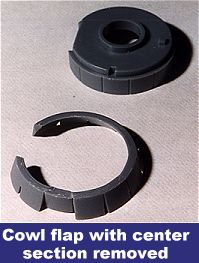 First step was to remove the kit cowl flaps from their attachment. I
used open flaps and this meant removing
everything from the piece except the flaps (see photo). This was
accomplished by removing the front attachment with a razor saw and then hollowing
out the rest.
First step was to remove the kit cowl flaps from their attachment. I
used open flaps and this meant removing
everything from the piece except the flaps (see photo). This was
accomplished by removing the front attachment with a razor saw and then hollowing
out the rest.
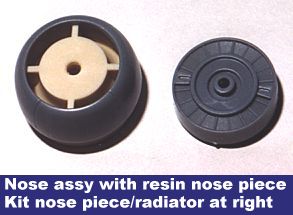
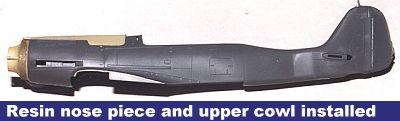 You end
up with a 'C' shaped piece. Next the resin cowl atop the engine was taped
into place and the new nose cap was attached to the front with white glue.
Then the insert was placed into the kit nose section and placed over the
nose cap. Finally
the cowl flaps were spread apart and put in place. This was to check
fit before final gluing. It was here that I noticed the resin cowl was not
a perfect fit; mostly the deeper part next to the cockpit. This required
some light sanding to fit well.
You end
up with a 'C' shaped piece. Next the resin cowl atop the engine was taped
into place and the new nose cap was attached to the front with white glue.
Then the insert was placed into the kit nose section and placed over the
nose cap. Finally
the cowl flaps were spread apart and put in place. This was to check
fit before final gluing. It was here that I noticed the resin cowl was not
a perfect fit; mostly the deeper part next to the cockpit. This required
some light sanding to fit well.
 |
 |
 |
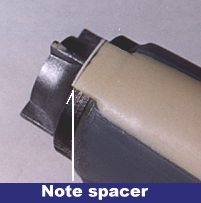 |
 Once satisfied
with the overall fit, the aft sections can be permanently secured to the
kit nose with superglue or epoxy. I chose superglue. Next time I will pick
one that does not set so fast. I also discovered that I cut a bit too much
off the front of the cowl section so attached a piece of scrap card to it
and sanded it down to match the rest.
Once satisfied
with the overall fit, the aft sections can be permanently secured to the
kit nose with superglue or epoxy. I chose superglue. Next time I will pick
one that does not set so fast. I also discovered that I cut a bit too much
off the front of the cowl section so attached a piece of scrap card to it
and sanded it down to match the rest.
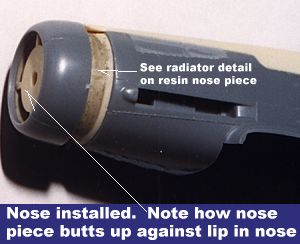
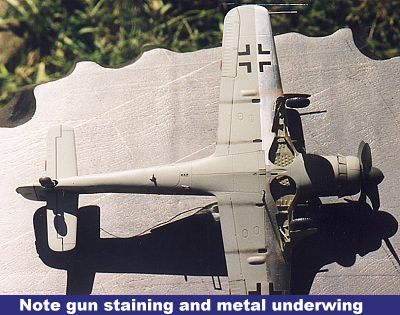
 As to
the nose piece, I was not sure what color it was supposed to be. I
figured either a primer or a metallic color of some sort so painted it and
the radiator grooves with steel. I then washed the radiator part with thin
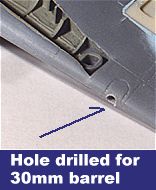
India ink. Next, the interior was installed and then the lower wing. The
outer wing gun ports were opened up with a drill twist in preparation for
the gun barrels. Fortunately,
there are blanking plates on the kit parts to show where these barrels go.
The apertures are large as the MK 108 30mm cannon had short, fat, barrels.
These are the same guns as used in the Me-262A-2, with a high muzzle velocity
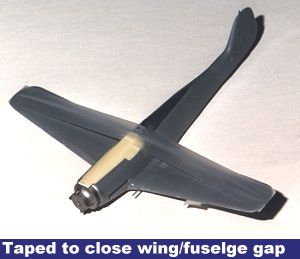
and slow rate of fire. There was a bit of a gap between the fuselage and
upper wings. This was cured by running tape from one wingtip to the
other over the fuselage while the upper wing was glued.
As to
the nose piece, I was not sure what color it was supposed to be. I
figured either a primer or a metallic color of some sort so painted it and
the radiator grooves with steel. I then washed the radiator part with thin
India ink. Next, the interior was installed and then the lower wing. The
outer wing gun ports were opened up with a drill twist in preparation for
the gun barrels. Fortunately,
there are blanking plates on the kit parts to show where these barrels go.
The apertures are large as the MK 108 30mm cannon had short, fat, barrels.
These are the same guns as used in the Me-262A-2, with a high muzzle velocity
and slow rate of fire. There was a bit of a gap between the fuselage and
upper wings. This was cured by running tape from one wingtip to the
other over the fuselage while the upper wing was glued.
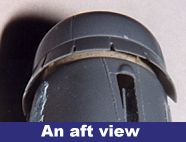
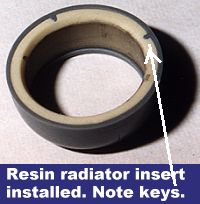
The nose radiator insert can be glued in the nose section at this time and the cowl flaps glued to the back of the assembly to ensure proper fit. It is a tight fit and doesn't need to be glued on at this time.
 |
 |
 |
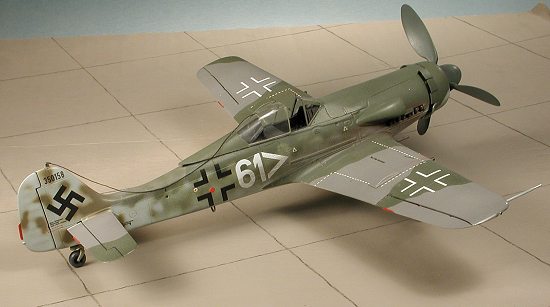
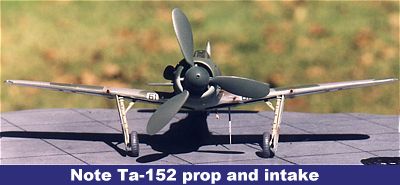
As you can see, the radiator arrangement for the Jumo 213F engine is different
from that of the earlier 213 engine used by the D-9. The propellor was
also assembled. 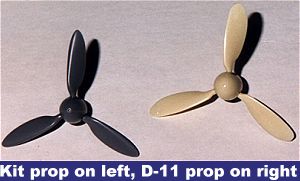 It
is a larger Ta-152 prop and makes the D-9 propellor look small by comparison.
While no engine mounted 30mm cannon was ever installed in a D-11, there is
evidence that most D-11's had a spinner with the barrel in place. The
choice is yours as both are given in the conversion kit.
It
is a larger Ta-152 prop and makes the D-9 propellor look small by comparison.
While no engine mounted 30mm cannon was ever installed in a D-11, there is
evidence that most D-11's had a spinner with the barrel in place. The
choice is yours as both are given in the conversion kit.
Next the aft cockpit blanking plate and tailplanes were glued in place.
The resin supercharger intake can be drilled out, but doing so will destroy
the intake screen detail.
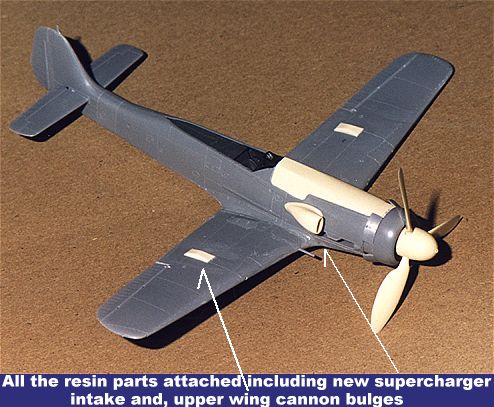 Robert mentions
in the conversion that they probably had no intake screen, but I left
mine 'stock' and glued to the right side of the engine. It fit the cut
out perfectly. Next the upper wing gun bulges were added. There is some confusion
in earlier sources as to whether these were there, but a photo (albeit rather
grainy) in the Experten decal booklet shows that at least one had it so they
were applied using superglue.
Robert mentions
in the conversion that they probably had no intake screen, but I left
mine 'stock' and glued to the right side of the engine. It fit the cut
out perfectly. Next the upper wing gun bulges were added. There is some confusion
in earlier sources as to whether these were there, but a photo (albeit rather
grainy) in the Experten decal booklet shows that at least one had it so they
were applied using superglue.
Next step was attaching the windscreen and canopy. There are a couple of choices here regarding the canopy. The kit offers a 'flat' and a 'blown' canopy. The 'blown' one is more rounded in appearance. There is no hard and fast rule on these canopy types so your choice will depend on which aircraft is being modeled. Canopy determination will also decide which headrest to use, with the 'blown' canopy having the taller headrest. Looking at available decals, one has the flat and two the blown canopy, so now is the time to decide which is being modeled. For this kit, White <61 was chosen with the tall headrest and blown canopy. 5-Minute expoxy was used for the windscreen and the canopy was attached with white glue to facilitate removal after painting.
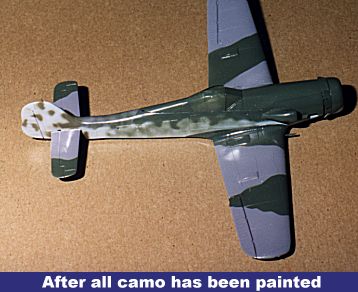 Painting began
with Xtracolor RLM 76 for the undersides and sides of the airframe. Next,
the upper wings were painted RLM 75 and when dry, masked and painted RLM
83. It has been determined in very recent years, that of RLM 82 and RLM 83,
the darker of the two is 83. My tinlet of Xtracolor was labelled RLM
82, but it is darker than the RLM 83 tinlet so that was used. Confusing,
isn't it?
Painting began
with Xtracolor RLM 76 for the undersides and sides of the airframe. Next,
the upper wings were painted RLM 75 and when dry, masked and painted RLM
83. It has been determined in very recent years, that of RLM 82 and RLM 83,
the darker of the two is 83. My tinlet of Xtracolor was labelled RLM
82, but it is darker than the RLM 83 tinlet so that was used. Confusing,
isn't it?
While those were drying, the prop and hub were both painted RLM 70, black
green. Then came the fun part. This particular aircraft also had some
RLM 81 brown-violet patches on the tail, so those small bits were sprayed.
Next the fuselage sides were given a heavy mottling of RLM 83 as was the
upper fuslelage RLM 75 section. According to the decal instructions, the
fuselage plug was a light RLM 76 or bare metal. I decided to do the plug
in 76. Normally this would be time for the Metallizer or SNJ,
however, I have
some Matte Aluminum Bare Metal Foil so it was cut into segments and applied
to the lower wing. If you have never used the matte aluminum, you need
to know that it is not as thin as the chrome, being a bit thicker than household
 aluminum foil. The result is that detail under it won't pop out so well as
with the other, thinner Bare Metal Foils. The decal drawings were used to
place the foil.
aluminum foil. The result is that detail under it won't pop out so well as
with the other, thinner Bare Metal Foils. The decal drawings were used to
place the foil.
Once the foil was done and burnished down, it was time for decals. The
Kommandeur decals are very nice and thin, similar to Propagteam decals, so
you need to be careful in placing them. All the setting solutions tried
on them worked quite well. Earlier, I mentioned that the placement
for the common markings wasn't given. In this respect, Tamiya kit decals
were used according to the placement in the kit instructions. Again,
no problems with using setting solutions. Once the decals had dried, it was
wiped down with a damp rag to get rid of any excess setting solution. the
kit was then sprayed with my favourite dulling juice; a mixture of Future
and Tamiya Flat Medium. Sounds weird, but it works quite
 well. Then
the canopy and windscreen was unmasked, the 30mm gun barrels, pitot tube,
radio antenna, step and DF antenna were installed using 5-minute epoxy. For
the 30mm gun barrels, I was going to use brass tubing, but didn't have any
the right size. Instead, Contrail plastic tubing (the smallest size)
was used and worked very well indeed after the opening was slightly enlarged
with an Xacto knife. For final assembly, the canopy was glued in the open
position and the antenna was attached.
well. Then
the canopy and windscreen was unmasked, the 30mm gun barrels, pitot tube,
radio antenna, step and DF antenna were installed using 5-minute epoxy. For
the 30mm gun barrels, I was going to use brass tubing, but didn't have any
the right size. Instead, Contrail plastic tubing (the smallest size)
was used and worked very well indeed after the opening was slightly enlarged
with an Xacto knife. For final assembly, the canopy was glued in the open
position and the antenna was attached.
A note on late FW-190 antennas. When the canopy was open, the antenna
had no mechanism to keep it taught. Therefore, it just lay limp along the
fuselage.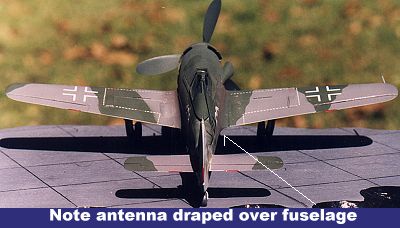 Trying
to get stretched sprue or plastic thread to lay limp was a real problem.
It wouldn't work. So I had to go back to the old tried and true
cloth sewing thread. The thread was first run through a slit in a candle
to get rid of the fuzzies and then attached with white glue to a hole drilled
in the canopy and the fin tip. It looks quite convincing.
Trying
to get stretched sprue or plastic thread to lay limp was a real problem.
It wouldn't work. So I had to go back to the old tried and true
cloth sewing thread. The thread was first run through a slit in a candle
to get rid of the fuzzies and then attached with white glue to a hole drilled
in the canopy and the fin tip. It looks quite convincing.
Once all that was done, the pastels were brought out and the engine exhaust and gun powder stains added. Fuel at this time in the war was not the best for the Germans so the aircraft engine exhaust was thick and sooty from running this sub-standard fuel.
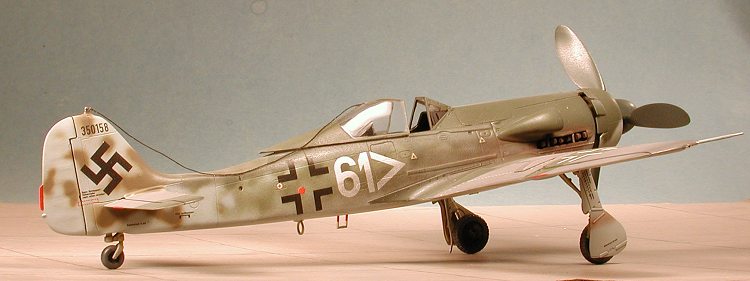
Final result is a very nice looking, late-war Fw-190D-11. Much of the success of this project is from Robert Stephenson's fine conversion kit. I highly recommend it. For more information on it, contact Robert .
 References:
'Focke-Wulf 190; a Famous German Fighter' by Heinz Nowarra, 1965
KommanDeur Decals KD 4801 and 4803, 1996
Experten Decals 48-3, 1995
'Warplanes of the Third Reich' by William Green, 1962
Monogram Closeup #10 'FW-190D' by J. Richard Smith and Eddie J. Creek, 1984
Copyright ModelingMadness.com. All rights reserved. No reproduction in part or in whole without express permission from the editor.
Back to Reviews Page 2022