Italeri 1/72 FW-190D-9
| KIT #: | 1128 |
| PRICE: | $ cheep, cheep from raffle |
| DECALS: | Two options |
| REVIEWER: | Scott Van Aken |
| NOTES: |
| HISTORY |
 The penultimate development of the
FW-190 was the Jumo 613 powered FW-190D-9. The addition of this large and
powerful in-line engine really sparked the performance over the radial
engined 'A' series. The armament in this version was reduced to two 20mm
cannon and two 13mm machine guns by removing the outer wing guns. That
improved maneuverability over some of the older versions. The aircraft
reached operational status in mid-1944 and was used for protection of
Me-262 units as well as standard fighter and fighter-bomber roles. Even
though more than 700 examples were built, not all saw combat as the lack of
fuel and trained pilots kept many on the ground in the last year of the
war. Fortunately for us all, several of these fascinating aircraft are
extant in museums.
The penultimate development of the
FW-190 was the Jumo 613 powered FW-190D-9. The addition of this large and
powerful in-line engine really sparked the performance over the radial
engined 'A' series. The armament in this version was reduced to two 20mm
cannon and two 13mm machine guns by removing the outer wing guns. That
improved maneuverability over some of the older versions. The aircraft
reached operational status in mid-1944 and was used for protection of
Me-262 units as well as standard fighter and fighter-bomber roles. Even
though more than 700 examples were built, not all saw combat as the lack of
fuel and trained pilots kept many on the ground in the last year of the
war. Fortunately for us all, several of these fascinating aircraft are
extant in museums.
| THE KIT |
When one opens the box, one is greeted by an old friend. Italeri's 190D-9 is one of their older kits, coming out at about the same time as the first Airfix and Hasegawa kits in the early 1970s. Of the three kits, the Italeri one seems to have caught the shape of the aircraft better than the other two, and was soon the one to have. Nowadays, there have been new mold kits from Airfix, Hasegawa and Academy that have managed to supplant this one in the eyes of modelers.
 The kit comes on two sprues with the
clear bits in their own bag. The parts are sill in quite good shape with no
hint of flash. The only sink areas I noticed were opposite some rather
thick alignment frames about midway down the fuselage. Ejector pin marks on
the cockpit floor, inside the seat and on the pilot figure are prominent,
but with so little of the cockpit actually visible once the kit is built,
one could blow these off without any worry.
The kit comes on two sprues with the
clear bits in their own bag. The parts are sill in quite good shape with no
hint of flash. The only sink areas I noticed were opposite some rather
thick alignment frames about midway down the fuselage. Ejector pin marks on
the cockpit floor, inside the seat and on the pilot figure are prominent,
but with so little of the cockpit actually visible once the kit is built,
one could blow these off without any worry.
Though the detailing for the panel lines is raised, it is nicely done. Other parts detailing is well done for a kit of this age. A bomb and bomb rack is included as these planes were used as fighter bombers later in the war. The only real option is the choice of a standard or 'blown' canopy as used on aircraft produced around January 1945 and retrofitted to some earlier models. The appropriate head armor is provided for whichever canopy you choose.
Instructions are well done with color callouts by Testors paints and FS 595 colors. No RLM shades are given, for some reason. Testors does a full line of RLM paints so this omission is a bit puzzling. The small decal sheet provides markings for two aircraft. Not surprisingly, no swastika is given. One is the box art aircraft, yellow 2, from 2./JG 26 during 1944 with the standard canopy. The blown canopy version is Black 12 from 1./JG 54 in 1945.
| CONSTRUCTION |
I started by gathering together the bits for the cockpit and I assembled the wings. Naturally, I broke away the gun barrels early in the wing assembly process and so once they were together and puttied, I drilled out the gun areas in anticipation of adding tubing at a later date. The interior, however, was a bit of a problem. It appears that at one time or another I used this kit as a parts donor and so it had no seat, no instrument panel and not control stick.
 Rooting around in the vast MM parts cache, I found a Cooper's
Detail set for the 190 that had a nice seat and two different sets of instrument
panels. Bingo. The sit fit very well, but the instrument panels were a bit too
wide and being separate pieces, were a bit of a challenge to install. Eventually
a lot of sanding took care of the fit issue. I never did install the control
stick as, thanks to Italeri's less than crystal clear canopy and the general
smallness of the cockpit, I doubt it will be noticed that it is not there.
Rooting around in the vast MM parts cache, I found a Cooper's
Detail set for the 190 that had a nice seat and two different sets of instrument
panels. Bingo. The sit fit very well, but the instrument panels were a bit too
wide and being separate pieces, were a bit of a challenge to install. Eventually
a lot of sanding took care of the fit issue. I never did install the control
stick as, thanks to Italeri's less than crystal clear canopy and the general
smallness of the cockpit, I doubt it will be noticed that it is not there.
Next step was to cement the fuselage halves together. This required a bit more trimming and use of super glue and accelerator to ensure a fairly good fit as some parts had to be held in place while drying. The upper gun cover is not a very good fit and is, for various reasons, a bit too narrow.
Eventually the rest of the major airframe parts were brought together and after some trimming to get some diheadral in the wings and to open up the tail plane mounting holes a bit, I had a complete airframe. The supercharger intake was opened up with various sizes of drill bits, which looks a lot better. I then glued on the forward cowling and radiator face.
| COLORS & MARKINGS |
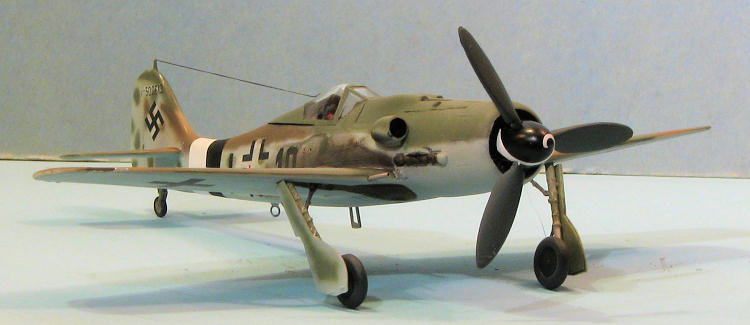
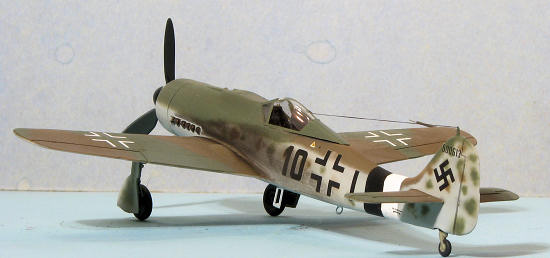
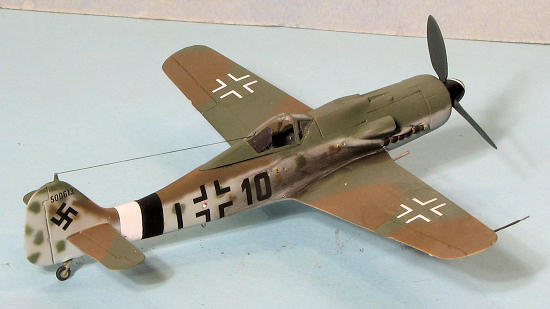
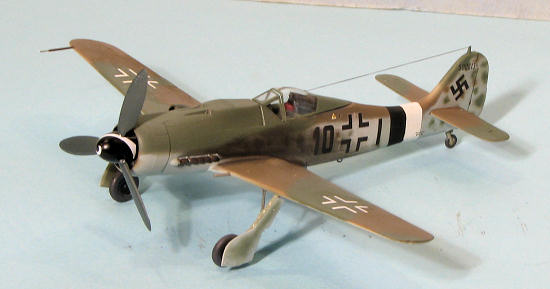
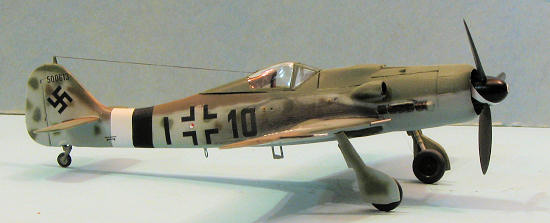
While the write-up makes things sound like it took place in a few days, the truth it that it has so far been more than a couple of weeks in work as this is one of those 'work on it when other things are drying' sort of kits. Thanks to a recent purchase of some super discounted decal sheets, I have plenty of 190D schemes to choose from. I picked Aeromaster 72-203 that has three nice schemes and selected Black 10 from JG 26 as the scheme for this one.
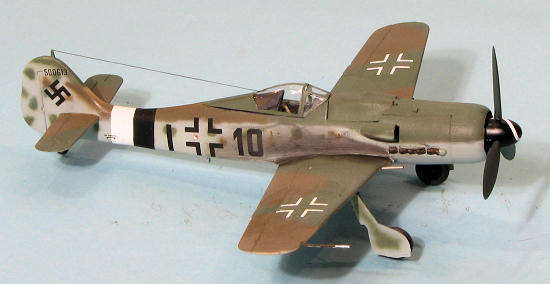 It is in late war colors of RLM 81/83 over RLM 76. The sheet
says RLM 83 is dark green while it is really light green so I pulled out the RLM
82 for this. First off, the entire airframe was painted RLM 76. Then the
underside of the tail planes were masked off and the upper surfaces were painted
RLM 81. I then thinned the RLM 82 and the remainder of the RLM 81 to water
consistency and turned down the pressure on the airbrush to about 7-10 psi. This
allowed me, thanks to the matte RLM 76, to spray the green with a nice looking
pattern.
It is in late war colors of RLM 81/83 over RLM 76. The sheet
says RLM 83 is dark green while it is really light green so I pulled out the RLM
82 for this. First off, the entire airframe was painted RLM 76. Then the
underside of the tail planes were masked off and the upper surfaces were painted
RLM 81. I then thinned the RLM 82 and the remainder of the RLM 81 to water
consistency and turned down the pressure on the airbrush to about 7-10 psi. This
allowed me, thanks to the matte RLM 76, to spray the green with a nice looking
pattern.
There is some mottling on the sides and tail, but first I had to take care of the overspray with more RLM 76, again water thin at low pressure to get good demarcation lines. An alternate to all this, as it does require more masking, is to mask the basic scheme and leave the mottling to being done freehand. There is some debate amongst folks as to the best way to do this and personally, I do my 1/72 fighters using both methods.
Anyway, after the usual mass of back and forth that is the norm for me when doing these sorts of schemes, I headed back to the build barn to do some brush stuff and add more bits.
| FINAL CONSTRUCTION |
With the camouflage pretty well done, I painted the wheel
wells RLM 02 along with the landing gear bits. Wheels were painted at this time
as well. I then glued the main and tail gear into place to get it to the stage
where I could start including decals in this
 picture. But first I had to deal
with the canopy, and finish off the interior. The clear bits were masked,
shoulder belts stuck in from an Eduard set and the head rest bits glued in
place. Italeri has you glue the head rest to the fuselage instead of having it
ride with the canopy, making it pretty much a requirement to display this with
the canopy closed. The canopy fit is poor.
picture. But first I had to deal
with the canopy, and finish off the interior. The clear bits were masked,
shoulder belts stuck in from an Eduard set and the head rest bits glued in
place. Italeri has you glue the head rest to the fuselage instead of having it
ride with the canopy, making it pretty much a requirement to display this with
the canopy closed. The canopy fit is poor.
The landing gear was glued on as were some other bits like DF antenna and step. Decals were applied and even over gloss clear, I had problems with silvering. Various setting solutions did not work as I wish they had, so rather than cause more problems (as in increased bubbling), I left things go. Matte clear was then sprayed over the airframe, the prop pushed in place, the masking removed from the canopy parts and Tamiya weathering kit was used for the exhaust (which in late war planes was often very heavy). I installed tubing for the guns and EZ Line was used for the radio wire.
| CONCLUSIONS |
 Of all the
1/72 190D kits floating around out there, this is near the bottom of the 'best
kit to have' list. However, it was cheap, I had it sitting around and thought it
would be a pretty simple build. Of course, I was wrong in that assessment and it
took considerably longer to build, thanks in part to the generally dodgy fit of
many of the bits. Old, simple-looking kits do not always equate to easy builds,
especially if you are concerned about getting rid of seams and such. However, it
is now done and while I'd suggest the Academy or Hasegawa kit to someone who is
looking for a 1/72 FW-190D-9, there is no reason not to get this one if looking
for one on the cheap.
Of all the
1/72 190D kits floating around out there, this is near the bottom of the 'best
kit to have' list. However, it was cheap, I had it sitting around and thought it
would be a pretty simple build. Of course, I was wrong in that assessment and it
took considerably longer to build, thanks in part to the generally dodgy fit of
many of the bits. Old, simple-looking kits do not always equate to easy builds,
especially if you are concerned about getting rid of seams and such. However, it
is now done and while I'd suggest the Academy or Hasegawa kit to someone who is
looking for a 1/72 FW-190D-9, there is no reason not to get this one if looking
for one on the cheap.
| REFERENCES |
The vastness of the Internet, where all you can desire is awaiting you to ask the right questions.
October
2011 If you would like your product reviewed fairly and fairly quickly, please contact the editor or see other details in the
Note to
Contributors.