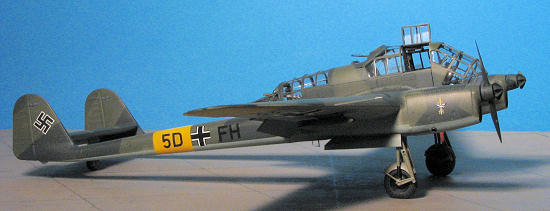
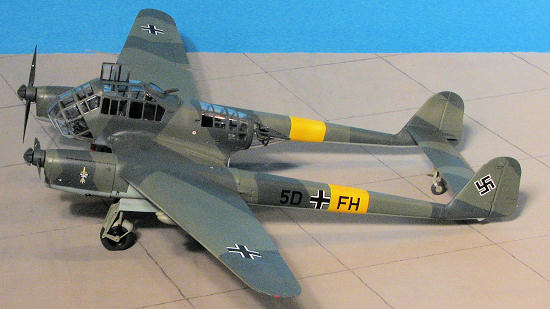
Great Wall Hobby 1/48 FW-189A-2
| KIT #: | L4803 |
| PRICE: | $55.95 MSRP |
| DECALS: | Two options |
| REVIEWER: | Scott Van Aken |
| NOTES: | New mold kit with photo etch parts |
| HISTORY |
In 1937, the
Reichsluftfahrtministerium
(RLM) issued a specification for a short-range, three-seat reconnaissance
aircraft with a good all-round view to support the German army in the field,
replacing the Henschel Hs 126, which had just entered service. A power of about
850-900 hp (630-670 kW) was specified. The specification was issued to Arado and
Focke-Wulf. Arado's design, the Ar 198, which was initially the preferred
option, was a relatively conventional single-engined high wing monoplane with a
 glazed gondola under the fuselage. Focke-Wulf's chief designer Kurt Tank design,
the Focke-Wulf Fw 189 was a twin-boom design, powered by two Argus As 410
engines rather than the expected single engine and a central crew gondola, while
Blohm & Voss proposed as a private venture something even more radical: chief
designer Dr. Richard Vogt's unique asymmetric BV 141. Orders were placed for
three prototypes each of the Arado and Focke-Wulf designs in April 1937.
glazed gondola under the fuselage. Focke-Wulf's chief designer Kurt Tank design,
the Focke-Wulf Fw 189 was a twin-boom design, powered by two Argus As 410
engines rather than the expected single engine and a central crew gondola, while
Blohm & Voss proposed as a private venture something even more radical: chief
designer Dr. Richard Vogt's unique asymmetric BV 141. Orders were placed for
three prototypes each of the Arado and Focke-Wulf designs in April 1937.
Possibly the best reconnaissance aircraft to operate during World War II, the Fw 189 was produced in large numbers, at the Focke-Wulf factory in Bremen, at the Bordeaux-Merignac aircraft factory (now the Dassault Mirage plant) in occupied France, then in the Aero Vodochody aircraft factory in Prague, occupied Czechoslovakia. Total production was 864 aircraft of all variants.
Called the "Flying Eye" of the German army, the Fw 189 was used extensively on the Eastern Front with great success. Its Russian nickname was "Rama" (Frame), referring to its distinctive tailboom shape. Despite its slow speed and fragile looks, the Fw 189's maneuverability made it a difficult target for attacking Russian fighters. When attacked, the Fw 189 was often able to out-turn attacking fighters by simply flying in a tight circle into which enemy fighters could not follow. Its ruggedness was demonstrated when Fw 189s routinely returned to bases with one tail shot or torn off.
| THE KIT |
Though
it is number 4803, I believe this is Great Wall Hobby's first 1/48 aircraft kit.
If you have seen or built any of their armor kits, then you are aware of the
quality of their kits. This one is no exception. Thankfully, there are not the
usual mass of rivets as you often see on other kits developed in China. I do
appreciate that. The kit comes on six sprues, one of which is clear and two of
which are identical. The clear bits are very well done and quite clear. Though
each of the sprues is individually packaged, the mails managed to crack the
forward upper canopy section.
It can be used, but has a big crack running through it. Great Wall has since
sent a new part. My thanks for such great service.
 Molding on the rest is very crisp and clean. I did find ejector pin marks on the
inside of flaps, upper gear wells and some other areas. Most of these will either
be easy to remove or will be difficult to see when the kit is complete. I should
also mention that the fabric flight control surfaces many have more 'hills and
valleys' than some will want, but to me it looked fine. The kit comes with a
photo etch fret that is used for seat harnesses, rudder pedals, upper flap
wells, engine wiring, tail
wheel door, gun sights, and a few other small pieces. Another real bonus is that
a full set of canopy masks is included. With all that 'glass', masking in the
normal way would be time consuming and tedious. Great Wall has not only given
us
the masks, but each one is numbered and the kit comes with a full placement
guide, making things almost easy.
Molding on the rest is very crisp and clean. I did find ejector pin marks on the
inside of flaps, upper gear wells and some other areas. Most of these will either
be easy to remove or will be difficult to see when the kit is complete. I should
also mention that the fabric flight control surfaces many have more 'hills and
valleys' than some will want, but to me it looked fine. The kit comes with a
photo etch fret that is used for seat harnesses, rudder pedals, upper flap
wells, engine wiring, tail
wheel door, gun sights, and a few other small pieces. Another real bonus is that
a full set of canopy masks is included. With all that 'glass', masking in the
normal way would be time consuming and tedious. Great Wall has not only given
us
the masks, but each one is numbered and the kit comes with a full placement
guide, making things almost easy.
The kit provides several nice features. First of all, it has separate control
surfaces, including the two section ailerons. The rudders and ailerons are
hinged and designed to move. I'm not sure how receptive most modelers are to
this sort of thing. Personally, I'd not mind if they were not movable, but from
the look of things, it will not detract from the overall presentation. The tail
wheel is also hinged, which is a bit odd as the gear door is photo etch and has
to be bent in a specific manner when attached. In case you were wondering, the
superbly detailed main gear is not designed to retract. The kit also comes with
a crew figure, something one doesn't always see in modern kits.
The kit also comes with two nicely detailed Argus engines. There are engine
covers in case you do not want to display them open, but you'll have to build
them up anyway in order to attach the exhaust and the propellers. These engines
have a photo etch ignition harness for each side. Something interesting I
noticed in the instructions is that one attaches the lower outer wing section to
the booms first, then the upper wing section. The center lower wing section is
part of the fuselage nacelle. This is very
 nicely detailed with about anything
you'd ever want from a kit of this type. There are decals to fit over the
instrument faces providing us with nicely raised instruments and face detail as
well. Other options are the ability to carry bombs under the wings, two wheel
chocks and two maintenance/boarding stands.
nicely detailed with about anything
you'd ever want from a kit of this type. There are decals to fit over the
instrument faces providing us with nicely raised instruments and face detail as
well. Other options are the ability to carry bombs under the wings, two wheel
chocks and two maintenance/boarding stands.
The
instructions are very well done with well drawn construction drawings along with
some smaller detail drawings to be sure you got everything together OK. One
thing that is missing is any hint of color information for the interior pieces.
No paint call outs at all until one gets to the overall decal placement and
camouflage sheet (which is in full color). I can only guess that Great Wall
figures that modelers who buy these kits will intuitively know what colors to
paint the interior, instrument panels, seat harness, wheel wells, flap wells and
so on. Great Wall has read this section and indicates that on future kits, more
complete interior color data will be included.
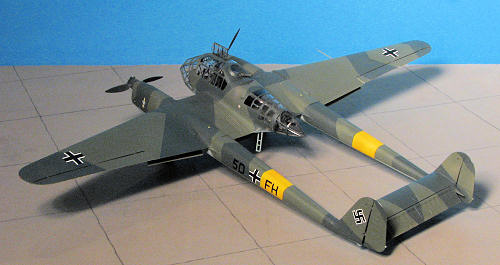
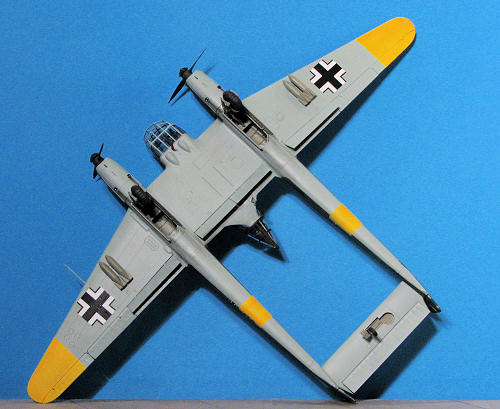
The camouflage and markings instructions are, as I mentioned, in full color with
both Gunze and RLM color information. Both aircraft are in RLM 70/71/65 and with
either 1 or 2 (H)/31 in Russia during 1942/43. Both have yellow lower wing tips
and boom bands. The 2(H)/31 aircraft has a patchy winter whitewash over the
upper surfaces. The decals are superbly printed and come with swastikas in
sections as well as stencils and wing walk areas.
| CONSTRUCTION |
 Deciding to start on this one shortly after receipt, I started by following
the instructions. Considering their different construction sequence regarding
parts of the kit (as in the wings and booms), I felt it would be best to follow
their lead. In that respect, I first started building up the interior. Initial
cementing was for all those parts that would be painted the interior color, so I
left off some bits like the camera and extra gun rounds. As most of you know,
officially, all Luftwaffe aircraft interiors were to be painted in RLM 66 as of
November 1941. Several companies started doing this early and some were a bit
delayed. Since the FW-189 was one of these aircraft build during the transition,
one could really paint the inside with RLM 66 or RLM 02 as it first entered
service and was built until 1944. As both of these markings options were from
the 1942/43 time frame, I went with RLM 66. But before that, I glued on the
various belts and harnesses as well as the rudder pedals, which are offered in
photo etch.
Deciding to start on this one shortly after receipt, I started by following
the instructions. Considering their different construction sequence regarding
parts of the kit (as in the wings and booms), I felt it would be best to follow
their lead. In that respect, I first started building up the interior. Initial
cementing was for all those parts that would be painted the interior color, so I
left off some bits like the camera and extra gun rounds. As most of you know,
officially, all Luftwaffe aircraft interiors were to be painted in RLM 66 as of
November 1941. Several companies started doing this early and some were a bit
delayed. Since the FW-189 was one of these aircraft build during the transition,
one could really paint the inside with RLM 66 or RLM 02 as it first entered
service and was built until 1944. As both of these markings options were from
the 1942/43 time frame, I went with RLM 66. But before that, I glued on the
various belts and harnesses as well as the rudder pedals, which are offered in
photo etch.
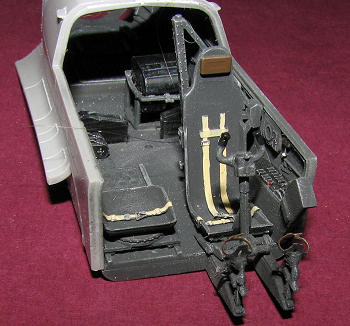 Once the
interior was painted, I did some detail work on the camera, film magazines and
instrument panel faces with black. Then all the bits not yet glued in place were
so attached and everything was dry brushed with both RLM 02 and with a medium
grey. I painted the belts with buff. The fuselage side walls are actually two
pieces for each side and fit quite well. These are then detailed with their own
boxes and s
Once the
interior was painted, I did some detail work on the camera, film magazines and
instrument panel faces with black. Then all the bits not yet glued in place were
so attached and everything was dry brushed with both RLM 02 and with a medium
grey. I painted the belts with buff. The fuselage side walls are actually two
pieces for each side and fit quite well. These are then detailed with their own
boxes and s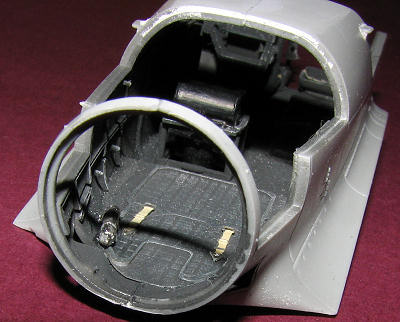 uch
before trapping the interior section between them. I left the rear lower windows
off at this time, installing them after all the seam work was done on the
fuselage section. The engineering on this is actually quite good and one has a
nice, sturdy construct. I'll warn builders not to install the camera too deeply
into the holder as doing so will cause problems later. The fuselage section will
later be glued to the lower wing center section in which there are alignment
tabs.
uch
before trapping the interior section between them. I left the rear lower windows
off at this time, installing them after all the seam work was done on the
fuselage section. The engineering on this is actually quite good and one has a
nice, sturdy construct. I'll warn builders not to install the camera too deeply
into the holder as doing so will cause problems later. The fuselage section will
later be glued to the lower wing center section in which there are alignment
tabs.
Though there are still a lot of clear bits to add to the fuselage, at this
time, I decided to move to the wings and booms. Great Wall Hobby provides two
very nicely detailed Argus engines. These have to be installed in order to
provide a mount for the props. Now one can display the model with the engine
hatches open. The mesh for the hinges on these hatches is superlative. There are
also dzus fastener mounts on the inside of the engine bay
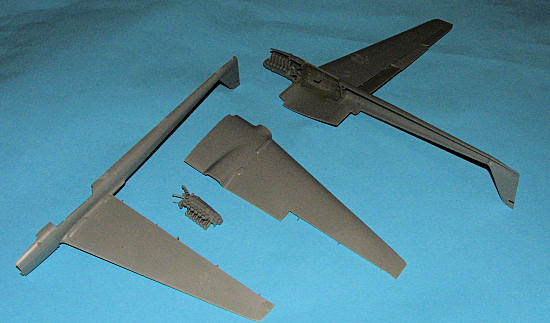 openings,
something I've not seen before in other kits with similar features. As I wanted
my engine covers closed, I glued them shut. Fit is very good. These covers are
not smooth, flush covers and so it is OK for them to stick out a bit, especially
at the back.
openings,
something I've not seen before in other kits with similar features. As I wanted
my engine covers closed, I glued them shut. Fit is very good. These covers are
not smooth, flush covers and so it is OK for them to stick out a bit, especially
at the back.
I then assembled the upper and lower outer wing sections. The lower wing section to the outer boom piece and the upper wing section to a separate section. This piece sets the dihedral for the upper wing. The wing attachment covers should stick up so don't think you have to get them flush as you do not. Now you have the option for raised or lowered flaps. If lowered, then there is a photo etch part that needs to be glued to the underside of the upper wing. This is also the time to open the holes for the bomb racks in the lower wing. Once that is done, then the upper and lower wing can be glued together, trapping both ailerons between them. These ailerons are not glued in place so you can position them later. Then the engine block with mounts is glued into the boom half. The engines should be painted black as the forward section will be quite visible through the forward nacelle opening. This was done for both wings and the assemblies set aside after I glued on the small etched fasteners to the depressions on the engine doors. As a note on the last items. The instructions show these only being installed on the two outer doors, but in reality, they'd be on all four. There are nine of these included on the etched fret, providing a spare. Thanks to the semi-sticky plastic backing on the etched fret, I didn't lose a single one.
 Switching over to the landing gear while the filler on the wing leading edges
dried, I carefully removed the main gear bits. There are some very fine pieces
that fit into forks on the gear. The openings for these pieces is too close
together, and as a result, you either have to open up the slots or thin the
parts. Thinning the fine pieces only results in breaking them so I opened up the
slots with a sharp edged file. I then painted all the gear strut pieces with RLM
02 and the boots in black. The gear was then assembled. Now these pieces are to
be put into the boom halves before the booms are closed. This ensures that
things are tight, but makes for a bit of a masking chore when it comes to the
final painting. A suggestion on future aircraft kits would be to design the
landing gear and attachment points in such a way that they can be installed
after the airframe is painted. It will cure some headaches in this regard. I
also attached the mud flaps. These are held on entirely by a single piece of
brass strip that is bent over the flap section. It would be quite helpful to
have some sort of etched mark on these strips to line up with the outer edges of
the flap piece as getting them the same length on both sides is difficult.
Switching over to the landing gear while the filler on the wing leading edges
dried, I carefully removed the main gear bits. There are some very fine pieces
that fit into forks on the gear. The openings for these pieces is too close
together, and as a result, you either have to open up the slots or thin the
parts. Thinning the fine pieces only results in breaking them so I opened up the
slots with a sharp edged file. I then painted all the gear strut pieces with RLM
02 and the boots in black. The gear was then assembled. Now these pieces are to
be put into the boom halves before the booms are closed. This ensures that
things are tight, but makes for a bit of a masking chore when it comes to the
final painting. A suggestion on future aircraft kits would be to design the
landing gear and attachment points in such a way that they can be installed
after the airframe is painted. It will cure some headaches in this regard. I
also attached the mud flaps. These are held on entirely by a single piece of
brass strip that is bent over the flap section. It would be quite helpful to
have some sort of etched mark on these strips to line up with the outer edges of
the flap piece as getting them the same length on both sides is difficult.
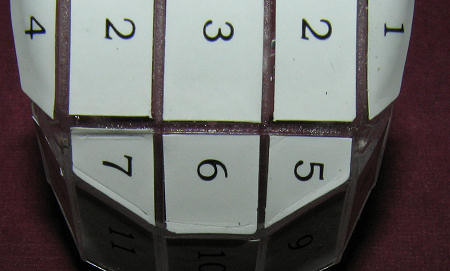
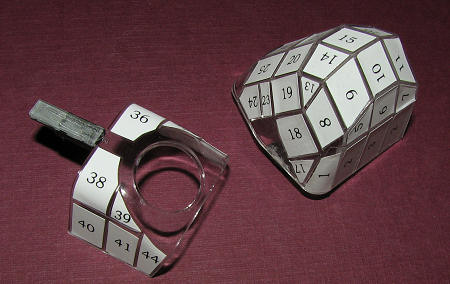
More intermediate building had be installing the two control boxes on the two clear bits that require them. After that, I started installing the pre-cut canopy masks.
 This
is not a quick process. What I did, was to work
This
is not a quick process. What I did, was to work
 on
one piece at a time, taking a long break in between sessions. One thing I found
is that while most pieces fit perfectly, some were a bit too large (see image)
and some didn't cover everything, though these latter were a minority and mostly
around the upper gun position. The large one were easily cut away with a sharp
scalpel. I also noted that some pieces were a bit rounded on the edge instead of
being square and some were pointed when they should have been a more squared off
shape. Again, nothing major and in all, I'd have to say the precut masking was a
real help. I'd recommend not masking the plane until just prior to painting.
This is because some of the masks that are small and go on curved surfaces are
not sticking down all the way after being on for a few days.
on
one piece at a time, taking a long break in between sessions. One thing I found
is that while most pieces fit perfectly, some were a bit too large (see image)
and some didn't cover everything, though these latter were a minority and mostly
around the upper gun position. The large one were easily cut away with a sharp
scalpel. I also noted that some pieces were a bit rounded on the edge instead of
being square and some were pointed when they should have been a more squared off
shape. Again, nothing major and in all, I'd have to say the precut masking was a
real help. I'd recommend not masking the plane until just prior to painting.
This is because some of the masks that are small and go on curved surfaces are
not sticking down all the way after being on for a few days.
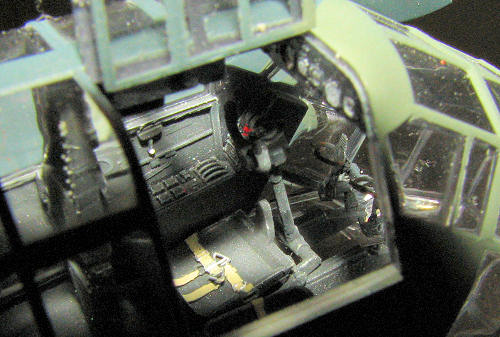
The instrument panel, which fits into the upper section of the clear nose piece, has several small instrument decals to apply. These fit well and with help from Solvaset, snuggled down into their recesses quite well. With the interior finished, I glued on the two clear bits you see. Fit is really very good, among the best I've ever seen.
 Meanwhile,
back at the engines and booms, I glued in the main landing gear legs, trapping
them between the booms. I also made sure the rudder was in place when I did
this. It took some fiddling to get the gear in place and cemented down. There is
a small strut that sticks down from the roof of the wheel well, but I found it
difficult to place and ended up leaving it off. Then the lower cowling and
cowling face were glued on. This was not the best fit in the world and it could
well have been me, but be wary when reaching this area. I used super glue as a
filler after all the glue joins had dried and were sanded. When that was sanded
down, I attached the clear wing tips.
Meanwhile,
back at the engines and booms, I glued in the main landing gear legs, trapping
them between the booms. I also made sure the rudder was in place when I did
this. It took some fiddling to get the gear in place and cemented down. There is
a small strut that sticks down from the roof of the wheel well, but I found it
difficult to place and ended up leaving it off. Then the lower cowling and
cowling face were glued on. This was not the best fit in the world and it could
well have been me, but be wary when reaching this area. I used super glue as a
filler after all the glue joins had dried and were sanded. When that was sanded
down, I attached the clear wing tips.
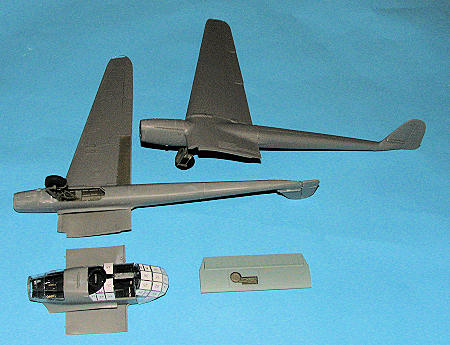
Back at the fuselage, I started gluing in the rest of the clear parts. The aft section prior to the cone shaped piece was a bit large so some sanding on the fore and aft of it was needed to get it to fit in place. During this sanding and fitting session, I broke the rear 'hoop' but was able to glue it back in place with no problem. I also assembled the horizontal stab and tail wheel just to have it ready to go. Here is a photo of what things look like at this point.
 Now that all the major airframe bits were done, it was time to join them up.
A bit of apprehension here as boom aircraft are not always the easiest to line
up. What I did was to attach one wing/boom assembly by gluing the lower wing
join first. This was an area I thought would have the greatest chance of not
lining up. Once that was dry, then the upper wing join was glued. The same for
the other side and when those were dry, the horizontal stab was glued in place.
This was all held together with tape. Even then, I had some gaps to fill on the
wing/fuselage areas, though nothing major. This was eventually all sanded down
as required.
Now that all the major airframe bits were done, it was time to join them up.
A bit of apprehension here as boom aircraft are not always the easiest to line
up. What I did was to attach one wing/boom assembly by gluing the lower wing
join first. This was an area I thought would have the greatest chance of not
lining up. Once that was dry, then the upper wing join was glued. The same for
the other side and when those were dry, the horizontal stab was glued in place.
This was all held together with tape. Even then, I had some gaps to fill on the
wing/fuselage areas, though nothing major. This was eventually all sanded down
as required.
I continued with the build process by adding in the rest of the clear bits and masking them off. The rear turret was also painted and assembled at this time. It is a bit tricky to get things properly aligned and it never did fit snugly with some gaps being present. I must have messed something up in doing this. I also constructed the four piece prop assemblies and had those ready to attach. Before starting the paint job, the lower antenna, wing tip pitot tube and the boarding ladder were glued in place. I think the boarding ladder is a bit too angled as it should have the steps level with the ground. Again, I may have screwed this up somehow.
| COLORS & MARKINGS |
I decided to do the version without the winter wash
so, starting with the yellow bits. sprayed those areas white then yellow. Once
dry, they were masked off and the canopy sections were painted RLM 66 to match
the interior color. If you are doing yours with an RLM 02 interior, you should
paint the outside of the canopy with this shade first. I then did the underside
bits painted RLM 65. I
 used Testors Model Master enamels for all these colors.
With the underside done, some areas were masked off and the upper surface
painted RLM 71, the lighter of the two upper shades. After a considerable amount
of masking, the RLM 70 was then painted on. I also painted the prop assemblies
with RLM 70 at this time. There was the usual back and forth touch up painting
that seems to be the norm with me.
used Testors Model Master enamels for all these colors.
With the underside done, some areas were masked off and the upper surface
painted RLM 71, the lighter of the two upper shades. After a considerable amount
of masking, the RLM 70 was then painted on. I also painted the prop assemblies
with RLM 70 at this time. There was the usual back and forth touch up painting
that seems to be the norm with me.
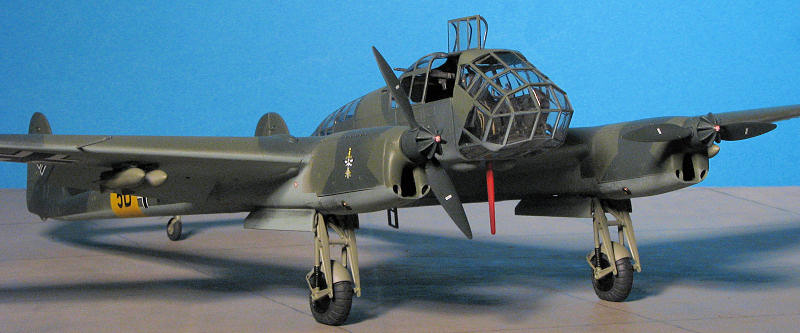
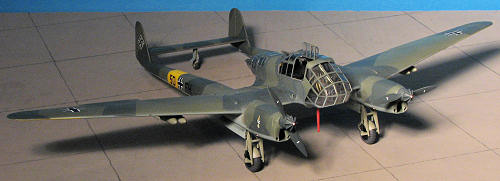
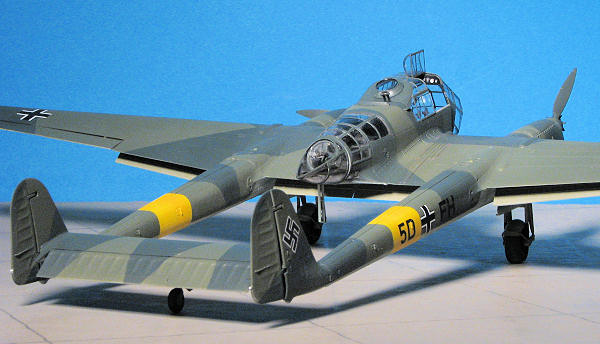
I then sprayed the entire airframe with Future to provide a gloss surface for the decals. A couple of notes on the decals; well the placement guide anyway. Both options show the underside crosses in line with the leading edge of the wings. Looking at many photos in FW-189 in Action, I didn't see any that were so aligned. They were all straight fore/aft. Now the upper wing crosses were another story. It was about 50/50 in having them aligned with the wing leading edge. I think you could pick either and be safe from the insignia police. Another note is that the markings guide has the boom unit codes as being handed. They were not. Reading from left to right should be 5D+FH or CK on both sides.
The decals themselves are well done and while it takes a bit of time for them to come clear of the backing, they fit well and are able to handle any setting solution you might use on them. Despite my care, I still had a few that silvered on me. Once all the decals were attached and dry (and some of them like the walk area markings were a real challenge to get into position), a coat of clear matte was sprayed over it all.
| FINAL CONSTRUCTION |
After that, the masking was removed from the clear bits. Overall, the kit supplied masks worked very well. There were a few that refused to stay stuck, and those were mostly around curved surfaces. The majority stuck like limpets and there was no bleed-under.
I then did a bit more touch-up painting such as
painting the tail wheel, the exhausts and the radio mast. Apparently this latter
was red to keep crews from bumping into it. Then the tail wheel door was bent
and glued in place (it had been painted earlier). The bombs were cemented under
the wings and the props were pushed into place. I removed the gun sights from
the etched fret and got one in place just fine, but the second one escaped (Freeeeeeedom!)
to where ever etched parts go when they zing into nowhere.
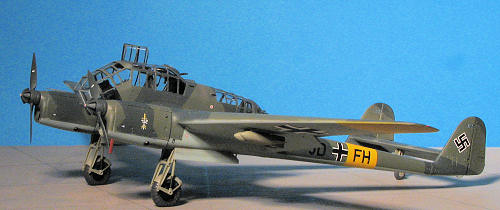
Next, I installed the right side canopy in the open position. This isn't supposed to be open, but since the panels are separate, and it is pretty easy to do so, I did. Purists will want to add handles and various supports. It does provide a nice way to see into the cockpit. The two turrets were then glued in place. The tail turret can really only be installed either up or down. Though the conical piece rotates on the real plane, the part with the gun does not. That option is not provided in the kit, hence it is up or down. As a note, I attached the guns with clear paint to keep from marring the clear parts. Then I installed the four flap sections. The absolute last pieces to be installed were the often knocked off mud guards. I had seriously considered leaving them off, but was unable to find a photo without them.
These were then attached first with clear paint, then reinforced with super glue. I also took the opportunity to glue the main wheels in place and also did more of the usual touch up painting that included the newly reinstalled mud guards. A bit of pastel work was done to add some exhaust staining and that was pretty well it.
| CONCLUSIONS |
 I have to say
I'm pretty impressed with Great Wall Hobby's first full aircraft kit. It has all
the bits and pieces one would want in a kit of this type. The engineering of the
parts is very good and those with a bit of experience with photo etch will have
no real problems. The inclusion of the canopy masks is a real bonus as that
takes some of the hard work out of masking canopies. The kit has a few oddities
like a tail wheel that can be built to retract and the movable ailerons and
wheels that I ended up having to glue into position. And then there is the lack
of color info during the build process, but the folks at Great Wall are open to
suggestions and I'm sure that future kits will have some of these taken care of.
I have to say
I'm pretty impressed with Great Wall Hobby's first full aircraft kit. It has all
the bits and pieces one would want in a kit of this type. The engineering of the
parts is very good and those with a bit of experience with photo etch will have
no real problems. The inclusion of the canopy masks is a real bonus as that
takes some of the hard work out of masking canopies. The kit has a few oddities
like a tail wheel that can be built to retract and the movable ailerons and
wheels that I ended up having to glue into position. And then there is the lack
of color info during the build process, but the folks at Great Wall are open to
suggestions and I'm sure that future kits will have some of these taken care of.
It builds well and is a most impressive model when you are done. I very much look forward to any of their future releases and judging by the parts left over, there will be several other 189 boxings. This is a kit that will be very difficult to surpass. I can quite easily recommend this one to you. As has been said; "Buy with confidence."
| REFERENCES |
http://en.wikipedia.org/wiki/Fw_189
December 2010
Copyright ModelingMadness.com. All rights reserved. No reproduction in part or in whole without express permission from the editor. If you would like your product reviewed fairly and quickly, please
contact the editor or see other details in the Note to
Contributors.
Back to the Review
Index Page 2022