|
KIT # |
047 |
|
PRICE: |
@ $40-50.00 |
|
DECALS: |
One version, Blue 10 |
|
REVIEW: |
|
|
NOTES: |
No swastika |
|
HISTORY |
It is the beginning of another clear night. As Oberleutnant Werner Schloss gets ready for the mission, he thinks back upon how things have changed since he joined the Luftwaffe back in 1942. Was it really five years ago? So much has happened. He remembers the dark days of 1943-44 when all seemed to go wrong for the Reich. North Africa was lost, the Allies had invaded Italy and the Russians were gaining after the debacle at Stalingrad. It was the Kursk Battle that turned the tide in Russia. There the Panzers had managed to defeat an overwhelmingly superior force thanks to the idiocy of the Russian commanders.
Following a lightning push to the Caucasus due to an unseasonably mild winter, the Russians were cut off from their oil supplies. Unable to make any gains and loosing territory quickly, the Soviets sued for a cease-fire and accepted Axis demands. With them out of the war, and the Allies slowly slogging up the Italian boot, the movement of units to Europe was able to throw the British, Americans and Canadians into the sea at Normandy. In addition, a successful amphibious landing in southeastern Italy was able to trap the Allies in a pincer movement. Nearly 500,000 Allied troops surrendered as they were surrounded near Rome.
With increased resistance in the Pacific, the Americans were unable to provide the kind of support in Europe that they had originally planned. This left Europe to the British and Commonwealth nations. In the years following the unsuccessful invasion of Normandy, German forces again, were able to count on the Italians, this time under German command. Influxes of new equipment enabled North Africa as well as the Near East to come under Axis control. Lt. Schloss remembers fondly his last leave in Egypt. The trip to the pyramids was unforgettable as was his week stay along the Gulf of Aqabah. Especially Shaharah! Yikes! I almost married her!
Driving such thoughts from his head, he returned to August 1947 and his current mission. Many of his comrades didn't like being isolated here on Guernsey, but Werner enjoyed the small towns and the city of Saint Peter Port. The closeness to the British was unsettling to some. However, the radar and SAMs were quite effective and made raids costly. Tonight's attack is to be against Newport in Wales just north of Cardiff. They are to fly low up the Bristol Channel and attack the munitions factory from east southeast. Flying low over water is not what Lt. Schloss had in mind, but the men of II. /ZG 84 have been trained for low level penetration flights and are up to the task.
Walking out of the briefing, he goes to his aircraft, Blue 10. It sits there menacingly with its jet black undersides and dotted uppersurface. Calling it the 'Leopard' scheme is quite appropriate! It is odd, he thinks, that the Zerstroyer Gruppen have given up on code letters and started numbering aircraft like the Jagdwaffe. Of course, his bat-like Focke-Wulf has no room for lengthy codes so it is better this way. Talking to the 'black men' raises his spirits. The electronic glitch has finally be found and repaired. It is no fun trying to return with an intermittent IFF system! He checks the bomb load for tonight's mission. Three thermite bombs of 250Kg. Not much, but the damage these do is extensive!
He climbs into his twin engined attack aircraft and goes through the checklist. His navigator/bombardier runs through his. Uffz. Jon Grieg has been with him for two years. A very long time for two to fly together. But it is better this way. They can almost read each others thoughts. The checklist done, the tower gives the word to start engines. The Heinkel HeS 11f engines whine into life.
As they gain in power, the first of the flight heads for the runway. Soon they are all in the air. Initially flying at 8,000 meters, they drop to 150 meters as they near the coast. Their electronic altimeters keep them above the water. At the speeds they are flying, as slight bobble will mean a long swim if not death. Nearing Cardiff they drop another 76 meters. It is nearly impossible to tell there are any people living here. The shoreline is just a black outline. As they near the target coordinates, the flight pops up to bombing height of 1,000 meters.
Immediately the sky is alive with tracer and rocket trails. What seemed like a deserted landscape is crawling with weapons. To his left, Lt. Nells is hit and his aircraft explodes with a blinding flash. Those thermite bombs are as dangerous to the aircrew as to the target. Lt. Schloss starts jinxing his aircraft in an attempt to throw off the guns. Meanwhile Jon has been releasing chaff and flares to throw off the missiles.
IP in a few moments. The flak gets more intense. He feels he could walk on it if he had to. The bomb bay doors open and the aircraft suddenly slows. It is now up to Jon and the electronics to place the bombs on target. Bombs Away! The aircraft lurches skyward. There is a huge flash of light as his weapons strike the target. Suddenly, there is a tremendous THUMP! And the aircraft starts to swerve to the left. He has been hit and the left engine is out. Schloss increases the power to the right engine and trims the aircraft. It is difficult to hold steady. He pulls the extinguisher for the left engine just in case there was a fire.
He heads for the deck and hopes that he doesn't run into any mountains! Skirting Cardiff, Schloss heads for the Channel and home, his bird wounded, but able to keep on flying. Away from danger, he now increases altitude to 1,000 meters. Looking over the instruments, it is comforting to see that there is enough fuel to last and despite the loss of the engine, his aircraft flies well enough.
Finally coming in to Guernsey, he declares an emergency and is given a straight in approach. Finally touching down and taxiing to his usual position, Schloss and Grieg take a look at their wounded aircraft. There is a huge hole in the underside of the airplane. If the bombs had still been there they would have exploded like Nells' aircraft! This will take a while to fix. They look at each other, shake their heads, and trundle off to postflight debrief.
Now for some info on the aircraft.
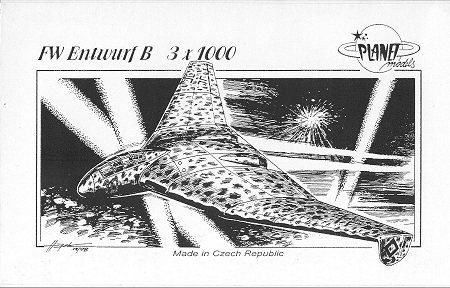
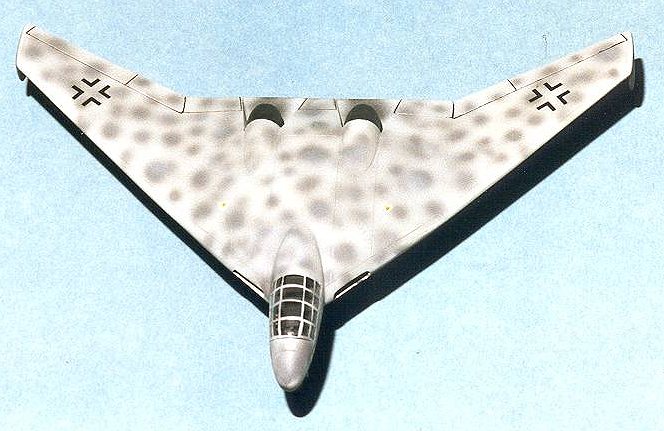
In 1944, three design studies were performed by Focke-Wulf in response to a specification that called for a medium jet bomber able to carry a 1,000 kg load, 1,000 km at a speed of 1,000kph. Hence the 3x1000 designation. Focke-Wulf entered three designs; a Projekt A, B, and C. The most interesting of them was Projekt B, the subject of this kit. Unlike the more conventional Projekts A and B, this aircraft was more of a flying wing with the HeS 011 turbojets buried in the wing. The wing was swept 25 degrees and had downturned rudders on the tips of the wings.
|
THE KIT |
 Planet
Models kit of Projekt B is typical of their other kits. A light tan resin with
superb detailing. Kit packaging is equally outstanding. Not only are the major
bits segregated from each other to cut down on damage, but the entire ensemble
is double bagged. There are 23 resin and one vacuformed part in the kit. Most of
the resin parts are contained within a wafer of resin, but cleanup should be
quite easy. There is also some flash on the major bits that will need cleaned up
before construction begins.
Planet
Models kit of Projekt B is typical of their other kits. A light tan resin with
superb detailing. Kit packaging is equally outstanding. Not only are the major
bits segregated from each other to cut down on damage, but the entire ensemble
is double bagged. There are 23 resin and one vacuformed part in the kit. Most of
the resin parts are contained within a wafer of resin, but cleanup should be
quite easy. There is also some flash on the major bits that will need cleaned up
before construction begins.
The instruction sheet is basically a folded 8 1/2 by 14 sheet with an exploded view of the kit on one side and on the other, decal and painting instructions for the exterior of the aircraft. There is also a very brief history of the aircraft. Missing is any kind of interior color information. Camouflage scheme is given as RLM 76 blue-grey upper with RLM 75 grey blotches over it, with a black undersurface. The decal sheet is by Propagteam and though small, is sufficient for the aircraft. No swastika is provided. For images of the kit contents,
go here.As with any resin kit, one needs to be very careful concerning resin dust. The dust is carcinogenic so use of a dust mask or filter is highly recommended to prevent breathing in the contaminants. The first step when dealing with any resin kit is to clean up the parts. There is some flash and all the mating surfaces need to be sanded flat. In addition, any glitches in the form of lumps of resin need to be removed before construction begins. To ensure that the paint will stick, the parts should also be washed in a solution of warm, soapy water. This should remove any mold release agent.
|
CONSTRUCTION |
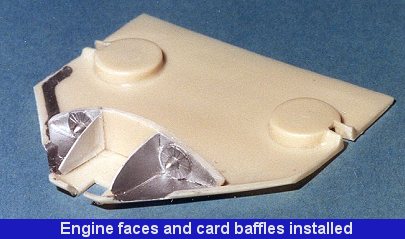 Once
preparation is finished, construction starts with the fuselage. There is a
blanking plate to which two resin engine inlet vanes are attached. The location
of these vanes as well as placement of the plate are marked, though careful dry
fitting of every component is needed to ensure a proper fit. In this case the
two engine parts were larger than the blanking plate and needed to be thinned
down. Superglue was the adhesive of choice for this kit as well as an
accelerator to speed up drying. There is no blanking plate provided to prevent
one from seeing from one side of the engine area to the other. Thin, plastic
card was used to provide the blanking needed, though those who wish could
probably have made real tubular inlets instead. This area was painted aluminum
and given a darker wash.
Once
preparation is finished, construction starts with the fuselage. There is a
blanking plate to which two resin engine inlet vanes are attached. The location
of these vanes as well as placement of the plate are marked, though careful dry
fitting of every component is needed to ensure a proper fit. In this case the
two engine parts were larger than the blanking plate and needed to be thinned
down. Superglue was the adhesive of choice for this kit as well as an
accelerator to speed up drying. There is no blanking plate provided to prevent
one from seeing from one side of the engine area to the other. Thin, plastic
card was used to provide the blanking needed, though those who wish could
probably have made real tubular inlets instead. This area was painted aluminum
and given a darker wash.
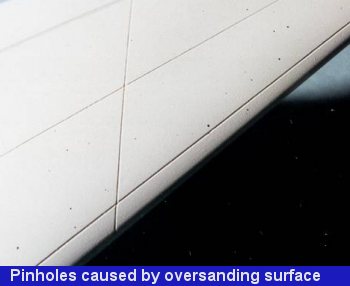
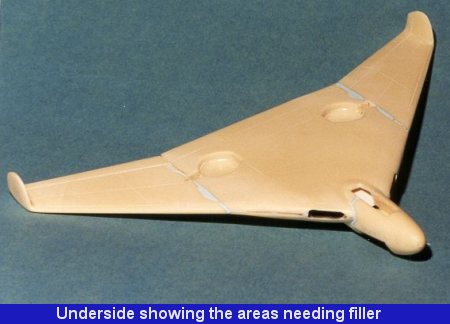
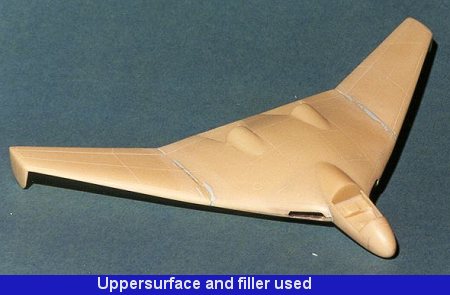
Next step was the joining of the fuselage top and bottom. Just before this, two very large fishing weights were glued in the fuselage to prevent tail sitting. This was a rather painless exercise and fit of the upper and lower halves is quite good. Some gaps in the leading and trailing edge were filled with superglue or putty and then sanded smooth. Unlike many early resin kits that had a score of air bubble just below the outer surface, this kit is relatively free of them, however my vigorous sanding caused a number of them to appear on the upper surface of the wings. Using a very thin filler like Mr Surfacer, I was able to fill in the holes. Once the fuselage center section is finished, the outer wings are joined. Either due to a construction glitch on my part or differences in manufacture, one of the wings didn't have the same chord as the fuselage it was designed to butt up against. Not a real problem, but it did require some filler to smooth things out. There is sufficient area on the wing/fuselage join that no additional reinforcement was needed. It is imperative that you sand the wing join area to the correct angle. Lots of dry fitting is the answer to this possible dilemma. Somehow, things went right for me and both wings are at the same dihedral!
|
|
|
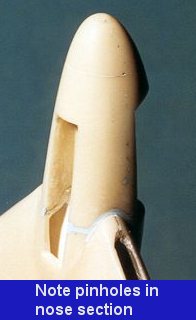
While the wings are being fiddled with, it was on to the cockpit. This is a separate section from the rest of the kit. It also has prominent mold lines and a few holes that need the attention of superglue and filler. Once smoothed to your liking, it needs to be test fit to the fuselage. I found that some adjustment was needed to the interface area to prevent a nose down appearance. The bottom of the fuselage and cockpit section should be level with each other. Once this was done, the cockpit section was glued in place and the join area filled and sanded smooth.
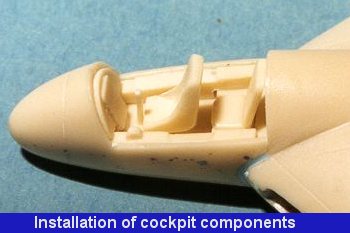
The cockpit itself comes with a number of parts. One gets two side consoles, an instrument panel, control stick, full pilot's seat and the back for the bombardier's seat. Some minor cleanup is all that is before they are glued in place. Once that was done, the interior was painted RLM 66 dark grey. Since the canopy is very clear, at this time some instrument and console decals were scrounged from various sources and installed. Upon completion of this step, the canopy was carefully trimmed down to fit the cockpit. This is a very nervous procedure for me and I do wish that Planet Models would supply a spare!
The canopy was not installed at this time as I had other things to do before then. One of these was to assemble and install the engine exhaust cones. First, the exhaust 'bullets' had to be glued onto the back of the engine space. This was not that easy to do as first the exhaust cones themselves had to be placed so that the bullets could be properly centered. The exhaust was not very well molded, unlike the rest of the kit so far. There were areas where it looked like the mold was defective as there was a ragged aspect to the cones. Two choices presented themselves. One was to fill the ragged areas and the other was to sand them down and hope for no air bubbles. I chose the sanding option and wasn't bitten too bad. The cone halves were then glued together and used as a template to locate the bullets. Once the bullets were in place, the cones were installed. Both stood a bit proud of the upper surface and some filing was needed for a good fit. Then it was on to the first coat of paint.
 First,
the main gear doors were trimmed and fit into their respective wheel wells.
Unfortunately, the nose gear doors were too wide to accomplish this and were
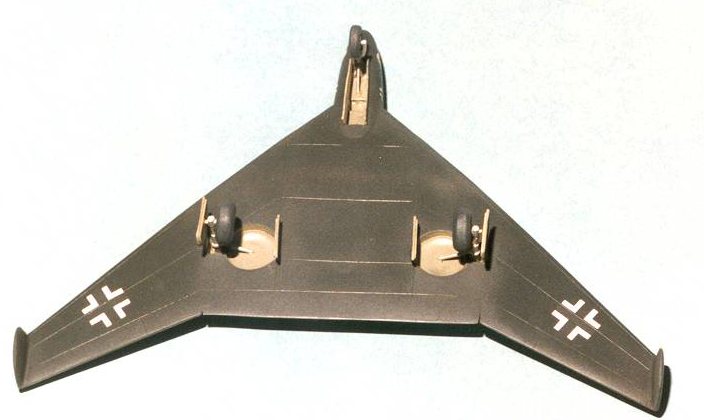
painted separately. The underside of the aircraft was then painted a very dark
grey, using Aeromaster RLM 66 enamel. It should have been black but black just
is too dark! Once that was accomplished, the wheel wells were painted RLM 02
green/grey, this time brushing it on using Polly Scale Acrylic.
First,
the main gear doors were trimmed and fit into their respective wheel wells.
Unfortunately, the nose gear doors were too wide to accomplish this and were
painted separately. The underside of the aircraft was then painted a very dark
grey, using Aeromaster RLM 66 enamel. It should have been black but black just
is too dark! Once that was accomplished, the wheel wells were painted RLM 02
green/grey, this time brushing it on using Polly Scale Acrylic.
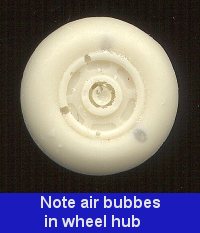
While this was drying, the landing gear components were removed from the resin wafer and cleaned up. The wheels were also cleaned up and it was here that the worst of the air bubbles presented themselves. Unfortunately they were on the rims of the main wheels and impossible to repair (sigh). The hubs were drilled out to accept the resin gear and the gear attachment points in the fuselage were also drilled out. Next the landing gear struts were painted aluminum and when dry superglued into place. For the first time, the aircraft was standing (a bit shakily) on its own landing struts. The rear struts have smaller retraction struts to help stabilize it. The front wasn't provided with one, but one was found in the spares box and added. The wheels will be installed along with the doors later, after painting.
|
PAINT & DECALS |
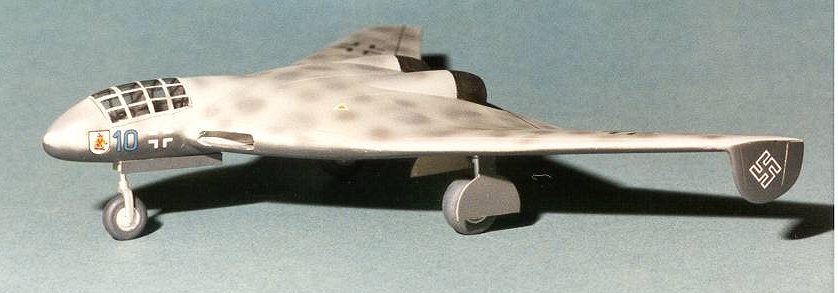
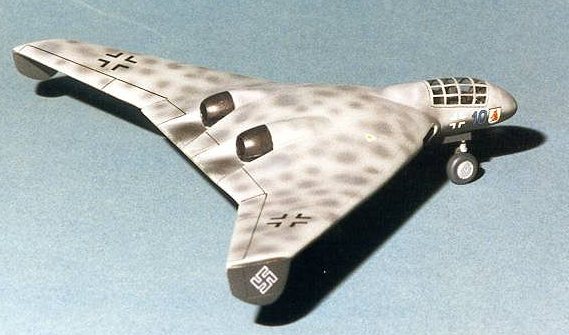
Prior to painting the kit, the canopy was masked with Scotch Transparent tape and then glued into place with non-fogging superglue. Then it was sprayed with RLM 66 so that when looking into the cockpit one would see the interior color on the underside of the transparency. The upper surface colors were then applied. First was a coat of RLM 76 light blue. When that was dry, there were spots of RLM 75 dark grey applied to the entire upper surface.
Once all that was dried, Future clear acrylic was sprayed to seal the paint and provide a gloss surface for the decals. At this time the landing gear doors, which were already painted, were attached and touched up. Despite my best efforts, all the handling broke the canopy loose several times. I guess there is no easy way to attach these things so they will stay.
I used the kit decals for the wing insignia, the swastika coming from an Xtradecal sheet. Typical of Propagteam decals, they are super thin and stick very well. Because of this trait, I totally hosed the underwing decals and had to go to a Microscale sheet for replacements. The nose cross also came from this sheet. The unit badge is for an Me-110 unit, SKG 210, and that came from an ESCI 1/72 Ju-88 sheet.
The kit was then oversprayed with a semi-gloss clear and when dry the masking removed from the transparency. Of course it broke loose once again, but was reattached with white glue this time. A bit of exhaust staining and that was it.
|
CONCLUSIONS |
Despite my initial concerns, this turned out to be a very nice kit. The resin is of high quality and withstood a lot of my heavy-handed sanding without breaking into a pox of air bubbles as has happened with cheaper quality resin kits. It is a well engineered kit and I can recommend this to someone as their first resin kit.
Copyright ModelingMadness.com. All rights reserved. No reproduction in part or in whole without express permission from the editor.
Many thanks to Dan Johnson of Luft '46 and Planet Models for providing this interesting kit.
Back to Reviews Page 2015