Airfix 1/72 Ju-87B-1 Stuka
| KIT #: | A03087 |
| PRICE: | $13.99 SRP |
| DECALS: | Two options |
| REVIEWER: | Scott Van Aken |
| NOTES: | New Tool Kit |
| HISTORY |
The Ju 87 B series was to be the first mass-produced variant. A total of six pre-production Ju 87 B-0 were produced, built from Ju 87 An airframes.Test flights began from the summer of 1937. A small number, at least three, served as conversion Cs or Es for potential naval variants.
The first production version was the Ju 87
B-1, with a considerably larger engine, its Junkers Jumo 211D generating
1,200 PS (883 kW or 1,184 hp), and completely redesigned fuselage and
landing gear, replacing
 the twin radio masts of the "A" version with a
single mast mounted further forward on the "greenhouse" canopy, and much
simpler, lighter-weight wheel "spats" used from the -B version onwards,
discarding the transverse strut bracing of the "A" version's maingear
design. This new design was again tested in Spain, and after proving its
abilities there, production was ramped up to 60 per month. As a result,
by the outbreak of World War II, the Luftwaffe had 336 Ju 87 B-1s on
hand.
the twin radio masts of the "A" version with a
single mast mounted further forward on the "greenhouse" canopy, and much
simpler, lighter-weight wheel "spats" used from the -B version onwards,
discarding the transverse strut bracing of the "A" version's maingear
design. This new design was again tested in Spain, and after proving its
abilities there, production was ramped up to 60 per month. As a result,
by the outbreak of World War II, the Luftwaffe had 336 Ju 87 B-1s on
hand.
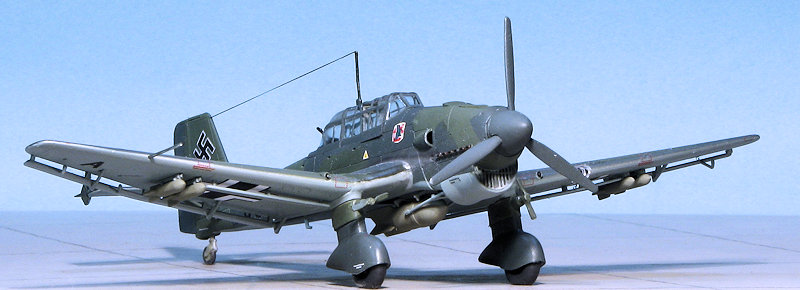
The B-1 was also fitted with "Jericho trumpets", essentially propeller-driven sirens with a diameter of 0.7 m (2.3 ft) mounted on the wing's leading edge directly forward of the landing gear, or on the front edge of the fixed main gear fairing. This was used to weaken enemy morale and enhance the intimidation of dive-bombing. After the enemy became used to it, however, they were withdrawn. The devices caused a loss of some 20–25 km/h (10-20 mph) through drag. Instead, some bombs were fitted with whistles on the fin to produce the noise after release.
The trumpets were a suggestion from Generaloberst Ernst Udet (but some authors say the idea originated from Adolf Hitler).
Total production amounted to 697 B-1s (311 by Junkers, 386 by Weserflug) and 225 B-2s (56 by Junkers, 169 by Weserflug). The last Ju 87B rolled off the production lines in October 1940.
| THE KIT |
 Hornby
continues to make Airfix a highly successful company, having pulled it from the
ashes of receivership where the the previous owners had driven it. It was much
to everyone's delight when Hornby purchased the company as they have pulled
several other companies from oblivion and made them highly successful, mainly by
revamping what was there. In the case of Airfix, it meant a program of issuing
new tool kits, some of them old favorites and some of them new subjects.
Hopefully Hornby will be able to weather its current crisis, caused by a down
turn in the world economy and issues with its suppliers when it comes to their
other lines.
Hornby
continues to make Airfix a highly successful company, having pulled it from the
ashes of receivership where the the previous owners had driven it. It was much
to everyone's delight when Hornby purchased the company as they have pulled
several other companies from oblivion and made them highly successful, mainly by
revamping what was there. In the case of Airfix, it meant a program of issuing
new tool kits, some of them old favorites and some of them new subjects.
Hopefully Hornby will be able to weather its current crisis, caused by a down
turn in the world economy and issues with its suppliers when it comes to their
other lines.
In the area between old favorites and new subjects, we have this latest release. This is the first time the Ju-87B-1 has been tooled in this or any other scale and I know that many of us are delighted that this happened. The B-1 variant was a major player in the first year of the war and the aircraft that gave the Stuka its reputation. Since the B-1 was built in nearly twice the numbers of the B-2, it has been a mystery why it has taken so long to have a kit of this version.
This latest kit is typical of the most recent
releases with engraved panel lines and semi-soft plastic that seems to be
the norm for non-Japanese kit makers. It is also nicely engineered and it is
obvious from the way the parts are arranged that Hornby plans for other
variants to be kitted. The interior floor includes some beefy short spars to
hold the wings later in the build sequence. We have a nice choice of pilot
seats, one with belt detail and the other without so that the pilot figure
can fit more easily. Rudder pedal stubs are molded onto the wing itself and
one sticks the control column as well as the rear gunner's seat onto the
cockpit floor piece. The kit comes with sidewall pieces and the instrument
panel fits into a fuselage
 half. A decal is supplied for the main panel.
Something I do not recall seeing in other 1/72 Ju-87 kits is a bomb aiming window just behind the engine cowling. Once the fuselage halves are closed, the instructinos would have you mount the upper wings first, followed by the lower wings. This will ensure that they fit over the spar stubs. One will need to open holes in the wings for the outer bomb racks if one wishes to use those. I fount it interesting that the horizontal stabs have separate end pieces.
The major difference between the B-1 and later B-2 is the engine cowling. Airfix has gotten this right with the stub exhaust and more rounded upper radiator. This is built up as a 'power egg' and attached to the rest of the airframe. The nose and prop are on a separate sprue, indicating that it will be easier to do the B-2/R/D/G series later on. The wheels are flat spotted on one side for ground display, and if one wishes to portray it in flight, one simply reverses the wheel. This is accomplished by having a tab on the wheel that fits into a slot inside the wheel legs. One also has the option of adding the stub for the siren. The stubs with the prop are also included but not used. The scream of this prop in a dive is what helped add to the terror of being under attack by this aircraft. The tail gear comes either with or without its strut covering.
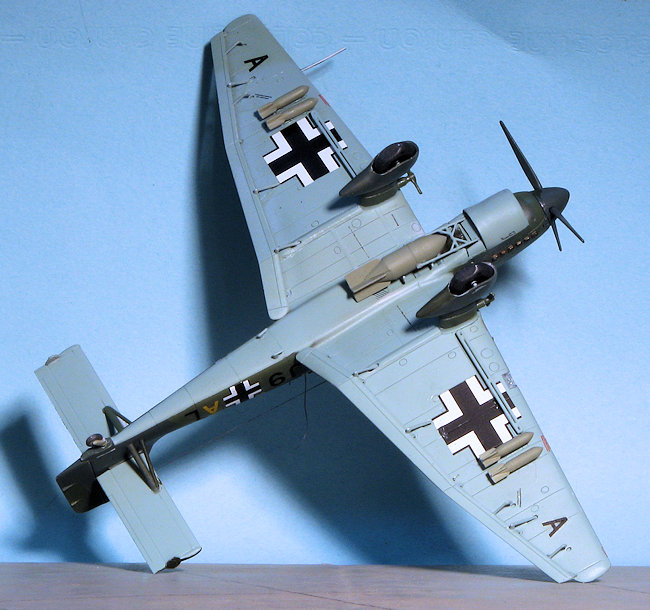
Dive brakes are a single piece that fits into holes in the wing that were opened earlier. The aileron and flap assembly is also a single piece that includes the aileron mass balances, something Airfix has omitted in several previous Luftwaffe kits. The shape of these balances is not good, but at least they are there. For the main bomb load, one has a choice between two bomb sizes and to accommodate these differences, two different bomb crutches are provides.
 For those thinking that there should be a roll
over assembly and radios for the back seat, this is not added until the end
of the build when one also attaches the clear bits. There are two central
canopy sections provided for open and closed main canopy. The prop assembly
is the proper thin bladed propeller and can be built up and installed after
everything else is built and painted.
For those thinking that there should be a roll
over assembly and radios for the back seat, this is not added until the end
of the build when one also attaches the clear bits. There are two central
canopy sections provided for open and closed main canopy. The prop assembly
is the proper thin bladed propeller and can be built up and installed after
everything else is built and painted.
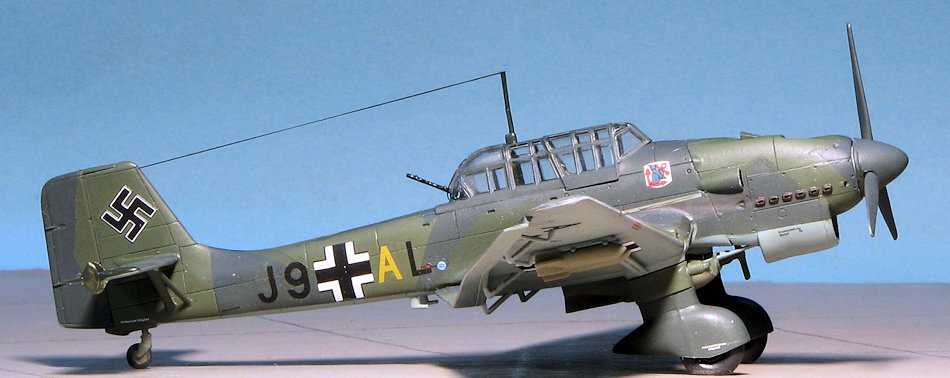
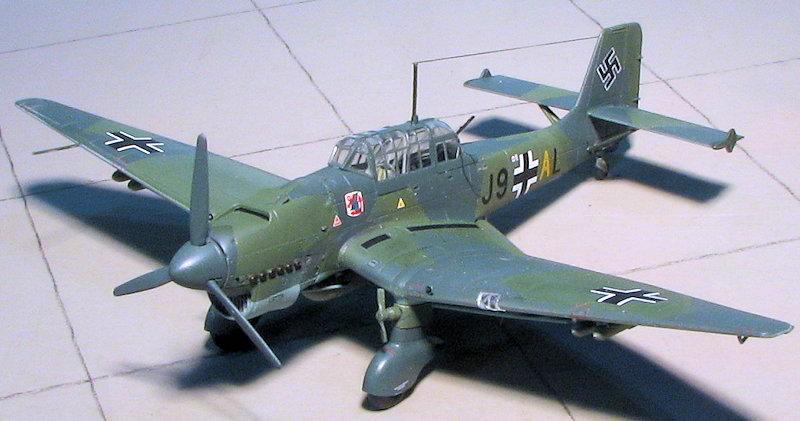
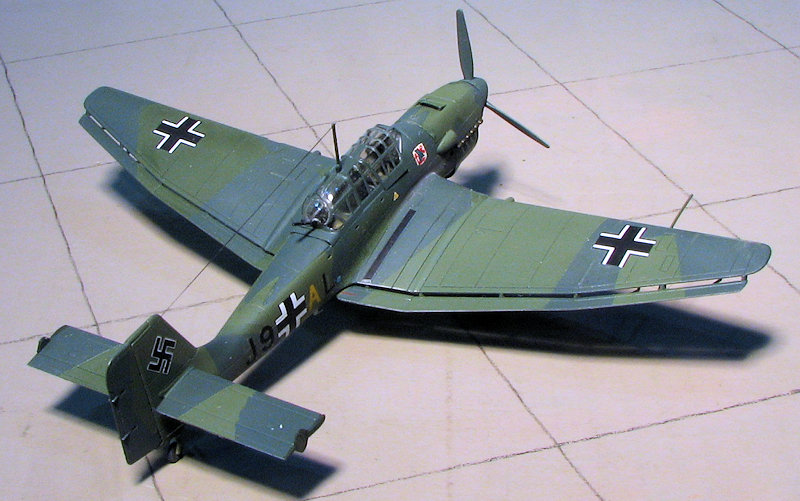
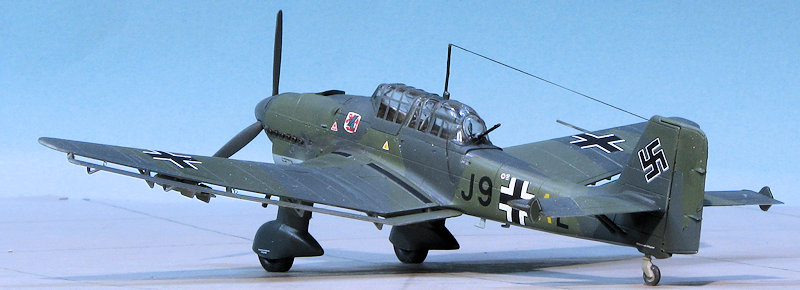
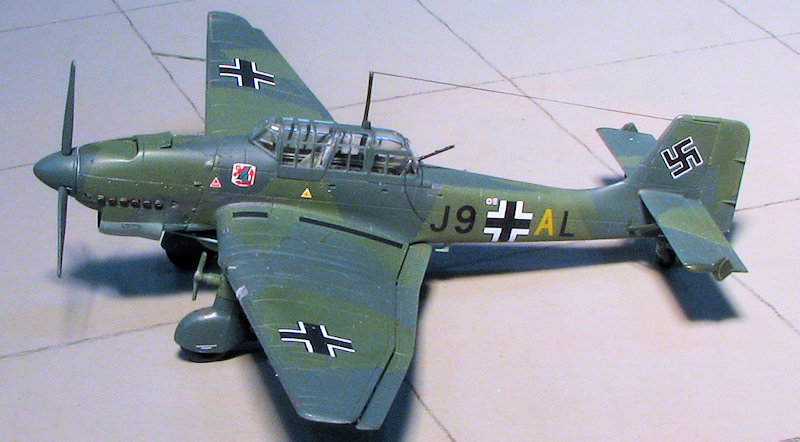
Instructions are very nicely done with color areas to assist with building the kit. Paints are Humbrol numbers except for the overall camouflage when names are also provided. Both markings options are standard bomber shades of RLM 70/71/65 with the upper colors in a splinter camouflage. The box art plane is from 9./StG 51 in France during August 1940 while the other is from the Spanish Civil War in last year of the war. This plane has a white rudder and wing tips. The decals are nicely printed and without swastikas. I am sure there will be a number of aftermarket decal sheets to cover this variant now that the kit has been released.
| CONSTRUCTION |
I decided to throw caution to the wind and follow the instructions. I first built up the cockpit bits and that included attaching the sidewalls to the inside of the fuselage halves. Since I wasn't using a pilot, I used the seat with the belt detail. This is one of the first times I can recall an Airfix kit in this scale having molded on seat belts and I appreciate it. Once dry, all the inside bits were given a spray of Model Master RLM02 and then some areas were detail painted. It was all given a wash with thinned flat black and then dry brushed with white. The seat harness and the rear seat web were then painted buff.
With some difficulty, the instrument panel was installed and the fuselage halves glued together. This one will need filler as the mating surfaces are not square edged. Once dry, I then tried to fit in the lower wing center section that held the interior bits. The forward opening is narrower than the forward spar piece so that had to be opened up more. The fit is quite tight as the interior bits kept catching on the sidewall detail pieces. Eventually it was attached and I used super glue and pressure in a few areas to keep from having to deal with steps.
 Then the upper and lower wings were attached. I was wondering
how that would all play out and was quite pleased that it pretty much went quite
easily. Still needed to fill a small seam or two, but nothing major. I also
remembered to open the holes in the lower wing for the dive brakes and outer
bomb racks. The wing gun inserts were then installed and I found those a bit
tricky to get into place. With that accomplished, I assembled and installed the
bomb aiming window assembly, masking the upper and lower windows and painting it
RLM 02 before installation. I left the masking on the larger, lower window.
Then the upper and lower wings were attached. I was wondering
how that would all play out and was quite pleased that it pretty much went quite
easily. Still needed to fill a small seam or two, but nothing major. I also
remembered to open the holes in the lower wing for the dive brakes and outer
bomb racks. The wing gun inserts were then installed and I found those a bit
tricky to get into place. With that accomplished, I assembled and installed the
bomb aiming window assembly, masking the upper and lower windows and painting it
RLM 02 before installation. I left the masking on the larger, lower window.
Then the tailplanes with their braces and end plates were glued in. I found them to be quite a loose assembly, a characteristic that was repeated later when it came time to install the landing gear. The next area was the forward cowling pieces. Due to the design of the parts, it is impossible to prepaint the exhaust stubs, so you do need to be aware of that. The actual assembly is actually quite ingenious in the way it is engineered and I think you'll be impressed. Note that the upper cooler exhaust door does protrude through the upper cowling piece so you may want to thin the edge of this before installation. When I glued this to the forward fuselage, I glued the lower part first, and when dry attached the upper cowling rather than gluing the entire cowling together first. It seemed to help me when it came to gluing the bits and keeping things aligned. Thanks to the rather soft plastic Airfix uses, if something doesn't quite fit, an additional application of cement will often soften things up a bit and allow you to press things more closely together. Just be a bit sparing on the glue as it really attacks this sort of plastic.
With the cowling in place, I then ttached the tailplanes and their braces. I then installed the rollover piece in the cockpit and began the rather tedious task of masking the clear bits. I ended up using some liquid mask on the really small windscreen windows and it seemed to work OK. All the clear bits were then glued in place. I did not install the gun sight as mine was short shot, resulting in only an attachment bar and nothing else. A piece of rolled up tape stuffed with some tissue was put in the hole where the rear gun would later fit. The aileron/flaps piece was next. It had to be attached in sections and the actuator rods did not want to fit into their slots so it took a while to get those on.
| COLORS & MARKINGS |
At this stage, I was not sure what markings I would use, so for that reason had not glued on the rudder permanently. The RLM 70/71/65 splinter scheme was applied using a combination of Model Master enamels and AK Interactive acrylics. There was a great deal of masking and truthfully, the Airfix instructions were difficult to use as there was little differentiation in the colors on the instructions. I know it is more prototypical, but when it comes to painting guides, I prefer greater contrast between colors or even black and white drawings.
I then assembled and painted the landing gear along
with the sirens. I had ordered a decal sheet, but it had not yet arrived so at
this time, I glued on the landing gear legs and worked on building up the bomb.
This item built up in a way that is different from any bomb I've ever built. Not
sure if it is better, but it is
 different. The
wing racks were attached and I did the usual back and forth painting that is the
norm with me. I also built up the prop assembly, but left it off until near the
end of the build.
different. The
wing racks were attached and I did the usual back and forth painting that is the
norm with me. I also built up the prop assembly, but left it off until near the
end of the build.
At this time, I clear coated the airframe and started applying decals. I decided to go ahead and use all the kit decals for the insignia and the stencils. This took a while as I tend to go slow with decals anyway. The Airfix decals really are quite good and they behaved themselves when Mr. Mark Softer was used. With those applied, the dive brakes were glued in place as were the small bombs, the bomb crutch and centerline bomb.
Finally the sheet arrived. I used Print Scale 72014 as it had markings on it for several B-1 variants. One was identical to the Airfix sheet, another used earlier wing insignia, another had big yellow bits for the Greek campaign which left an aircraft with Tragergruppe 186. The decals are quite thin and while the codes appeared attached to each other on the sheet, when removing them from the backing, they separated. They are also easily torn. The swastika came from an Xtradecal sheet as Airfix does not provide one.
This was all given a semi-matte clear coat and the masking removed. The one for the bomb aimer's window was a bit tricky as it was under the bomb crutch. The exhaust was painted using a fine brush, tail wheel attached, pitot tube glued in as well as the radio mast. The rear gun was an easy installation, thanks to Airfix's good engineering. A radio wire was made from EZ Line, exhaust done with pastels, a bit of touch up painting done, the prop pushed in and that was it.
| CONCLUSIONS |
I have to say that Airfix really did their work on this one. The engineering is excellent and while not filler free, is a kit that builds very well. I fully plan to do another though when is still up in the air. Perhaps by then, there will be more aftermarket bits available. The subtype was built in greater numbers than the B-2 so there should be a lot of different markings available to decal makers. It is great to see this variant finally kitted and I know you will be pleased with it.
| REFERENCES |
https://en.wikipedia.org/wiki/Junkers_Ju_87
February 2016 Copyright ModelingMadness.com Thanks to your editor for this one.
If you would like your product reviewed fairly and fairly quickly, please contact the editor or see other details in the Note to Contributors.