Revell 1/72 Ju-87G 'Tank Buster'
|
KIT # |
H-142 |
|
PRICE: |
$ |
|
DECALS: |
One aircraft |
|
REVIEW : |
|
|
NOTES: |
|
|
HISTORY |
The Ju-87 came about because of Ernst Udet, who saw the dive bombing capabilities of the American Hawk biplanes on a tour of the US and became infatuated with the type. In fact, this infatuation permeated the Luftwaffe for a number of years and all manner of aircraft had to have dive bombing capabilities built into the design, much to the detriment of the design. Even the huge He-177 had a requirement to be able to perform dive bombing.
 With free run over the battle field and no defending fighters,
the dive bomber was a very successful weapon. However, with any kind of active
air defense, most dive bombers were sitting ducks. This was not only proven
during the Battle for Britain, but also in many fleet battled in the early
stages of the Pacific war. No defending fighters = successful dive bombing;
defending fighters = lots of dive bombers shot down.
With free run over the battle field and no defending fighters,
the dive bomber was a very successful weapon. However, with any kind of active
air defense, most dive bombers were sitting ducks. This was not only proven
during the Battle for Britain, but also in many fleet battled in the early
stages of the Pacific war. No defending fighters = successful dive bombing;
defending fighters = lots of dive bombers shot down.
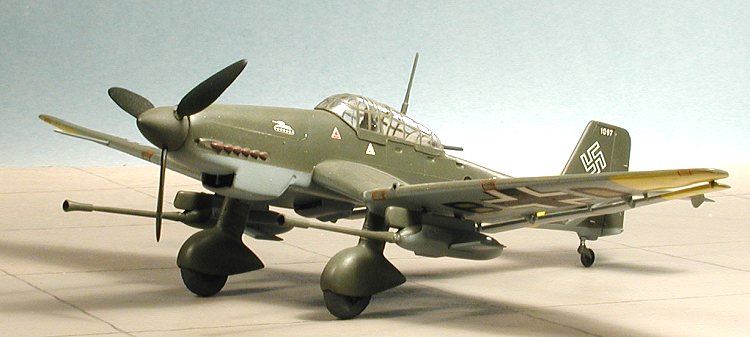
Anyway, the German strategy required the use of dive bombers in its planning and it was assumed that they would have air superiority. This they did, in testing in Spain as well as the early campaigns of WWII. When the Stuka became easy meat for Allied fighters, it was switched to an area where local air superiority was easier to maintain and that was the Russian front. The Stuka was quite successful in that area. It was a good platform for ground attack as well, and when equipped with two 37mm anti-tank cannon, proved to be quite lethal to Russian tanks. The plane flew like a pig with these guns, but the Luftwaffe was generally able to maintain local air superiority over whatever sector of the battle field was being attacked.
|
THE KIT |
 This is not exactly a new kit. Revell has had this Ju-87G around for many
decades. However that age does not mean that it is a worthless kit. Though
overshadowed by the much nicer Fujimi versions in this scale, the Revell kit
still holds up well. Now I'm not sure if this is an old Frog mold or not, but
I'd be willing to bet not as it has greater detail than what we have come to
expect from Frog. I cannot give you much of a description of the kit itself
since it has been nearly two decades since this kit was built. However I can
tell you that you get a rudimentary interior and that the kit was molded in a
rather light green plastic. You also got a sheet of decals for a generic Stuka.
Aside from a few common markings, I didn't use the sheet as my copy had not aged well and was yellow and brittle
as these old decal sheets tend to be.
This is not exactly a new kit. Revell has had this Ju-87G around for many
decades. However that age does not mean that it is a worthless kit. Though
overshadowed by the much nicer Fujimi versions in this scale, the Revell kit
still holds up well. Now I'm not sure if this is an old Frog mold or not, but
I'd be willing to bet not as it has greater detail than what we have come to
expect from Frog. I cannot give you much of a description of the kit itself
since it has been nearly two decades since this kit was built. However I can
tell you that you get a rudimentary interior and that the kit was molded in a
rather light green plastic. You also got a sheet of decals for a generic Stuka.
Aside from a few common markings, I didn't use the sheet as my copy had not aged well and was yellow and brittle
as these old decal sheets tend to be.
|
CONSTRUCTION |
Though the kit was old, it built well. That is one of the major benefits of not having a ton of parts. In fact, I recall it building rather quickly. I did know that RLM 02 was a cockpit interior color and so that is what the interior was painted. You really cannot see much of it through the rather thick plastic, but again, this isn't a kit that the 'obsessed' will be building anyway!
 Once the interior was painted and
installed, the nose radiator piece was glued in and the fuselage halves were
glued together. Not a bad join, but one that needed some filler, especially in
the forward area around the radiator. There is nothing but a large hole for the
radiator exhaust opening, but like I said, models of that time didn't need any
fancy stuff. It is easy enough to block with plastic card should you wish to do
so. You may also want to open the intake on the right side as it is molded
closed, but I did not.
Once the interior was painted and
installed, the nose radiator piece was glued in and the fuselage halves were
glued together. Not a bad join, but one that needed some filler, especially in
the forward area around the radiator. There is nothing but a large hole for the
radiator exhaust opening, but like I said, models of that time didn't need any
fancy stuff. It is easy enough to block with plastic card should you wish to do
so. You may also want to open the intake on the right side as it is molded
closed, but I did not.
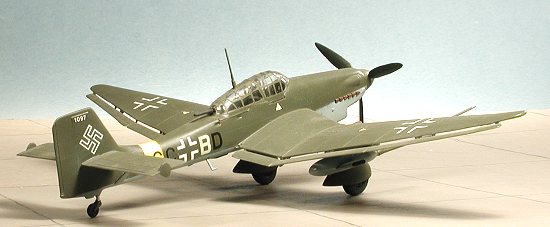
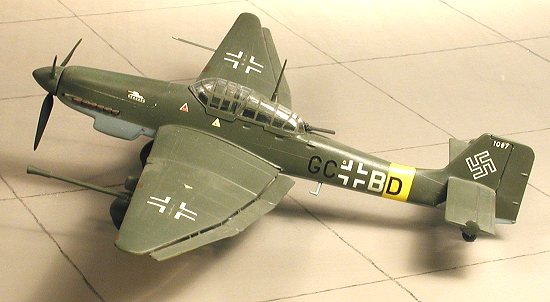
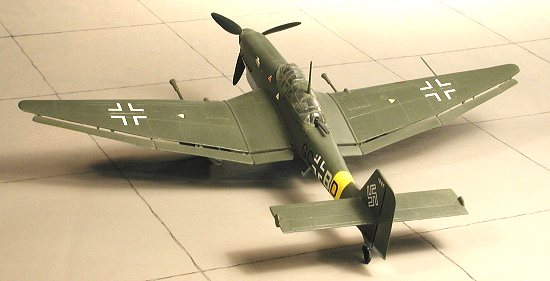
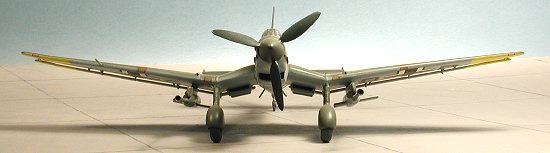
While the fuselage was drying and being sanded, I assembled the guns and the landing gear. The gear is fixed and in wheel 'pants'. The two halves trap the wheel between them. Next the wings were glued together. These fit quite well. The ailerons/flaps are molded to the lower wing section so no worries about breaking these items off. The underwing radiators were glued in place at this time as well. Once the fuselage is together, the wings can be glued in place. The tailplane was then glued on without the struts to facilitate painting. Final bit was the gluing of the canopy. This was then masked. There are no dive brakes on the 'Kannonvogel'.
Speaking of the cannon, these have a solid front so they were drilled out using bigger and bigger drill bits. The final scraping was done with an Xacto blade. The plane was then ready for the paint shop.
|
PAINT |
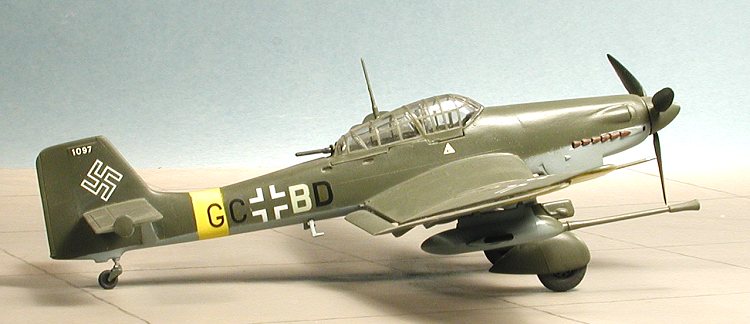
 Painting is really quite simple;
RLM 71 upper and RLM 65 lower surfaces. The scheme was from a book on WWII
aircraft and the profile I was using was supposed to be one of Hans Rudel's
aircraft. Wing tip undersides and rear fuselage band were yellow as it is a
Russian Front plane. To get the yellow to show up properly, the areas were first
painted white, then yellow. When dry, it was masked. The lower colors were
painted first and then any areas needing masked had that done. Then the upper
colors were painted. The landing gear spats were painted with the upper color.
At this stage of my model building, I was using Gunze Sangyo acrylic paints
almost exclusively. They really are good paints and dry to a semi-matte that
makes decal application easy. Oh yes, the prop was painted RLM 70 black
green, and the guns were painted the same as the rest of the plane.
Painting is really quite simple;
RLM 71 upper and RLM 65 lower surfaces. The scheme was from a book on WWII
aircraft and the profile I was using was supposed to be one of Hans Rudel's
aircraft. Wing tip undersides and rear fuselage band were yellow as it is a
Russian Front plane. To get the yellow to show up properly, the areas were first
painted white, then yellow. When dry, it was masked. The lower colors were
painted first and then any areas needing masked had that done. Then the upper
colors were painted. The landing gear spats were painted with the upper color.
At this stage of my model building, I was using Gunze Sangyo acrylic paints
almost exclusively. They really are good paints and dry to a semi-matte that
makes decal application easy. Oh yes, the prop was painted RLM 70 black
green, and the guns were painted the same as the rest of the plane.
|
CONSTRUCTION CONTINUES |
Once the basic paint was applied, fuselage masking was removed
and construction continued. This involved installing the main gear (the tail
wheel is molded into a fuselage half), and the tailplane struts. Some of the
smaller bits like the tailwheel and exhausts were then brush painted.
 Decals were picked from various sheets
as the kit ones were pretty useless. The code letters came from a Modeldecal
sheet while the rest came from a number of different Microscale sheets. As you
can see, over the years, some of the decals have turned brown. Not sure if this
is from heat or because there is setting solutions that wasn't properly removed.
I'm willing to bet on heat as others I know have run into this situation.
Anyway, once the decals were on, the model was given a coat of clear to seal
things in. The canopy was unmasked, the antenna and steps glued on and the guns
snapped into place. A bit of last minute touchup painting was done and that was
it!
Decals were picked from various sheets
as the kit ones were pretty useless. The code letters came from a Modeldecal
sheet while the rest came from a number of different Microscale sheets. As you
can see, over the years, some of the decals have turned brown. Not sure if this
is from heat or because there is setting solutions that wasn't properly removed.
I'm willing to bet on heat as others I know have run into this situation.
Anyway, once the decals were on, the model was given a coat of clear to seal
things in. The canopy was unmasked, the antenna and steps glued on and the guns
snapped into place. A bit of last minute touchup painting was done and that was
it!
|
CONCLUSIONS |
OK, so the Revell kit isn't exactly state of the art. Most will go for the Fujimi Stukas in this scale (providing they can find them). However, if you want a pretty easy build and something that looks good once yo
Review kit courtesy of me and my wallet!
Copyright ModelingMadness.com. All rights reserved. No reproduction in part or in whole without express permission from the editor.
If you would like your product reviewed fairly and fairly quickly, please contact the editor or see other details in the Note to Contributors.