|
KIT # |
72001/3 |
|
PRICE: |
$ |
|
DECALS: |
Three aircraft |
|
REVIEWER: |
|
|
NOTES: |
Test shot with no instructions |
AMtech 1/72 Ju-88T
|
KIT # |
72001/3 |
|
PRICE: |
$ |
|
DECALS: |
Three aircraft |
|
REVIEWER: |
|
|
NOTES: |
Test shot with no instructions |
|
HISTORY |
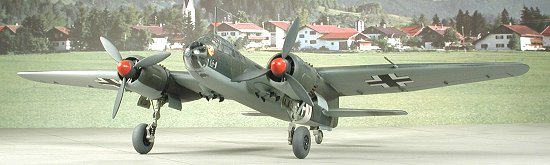
By 1943, the current Ju-88s had proven themselves to be on the verge of obsolescence. What was needed was a faster aircraft. As we all know, there are a few ways to make a plane faster. One can cut back on weight, streamline a few things and give it more power. Junkers did all of that for the next batch of schnell bombers; the Ju-88S. The long under fuselage gondola was removed as was all defensive armament except for a single aft pointing gun. Also gone was the 'beetle' nose; replaced by a smoother, more contoured nose transparency.
 In the engine department, the Junkers Jumo water cooled engines
were replaced by BMW air cooled radials. In addition to providing more power,
the BMWs were more rugged and able to take more damage than the Junkers engines.
Though there was a bomb bay, most of the heavier load was carried externally
with two racks mounted between the engine nacelles and the fuselage. Each could
carry a 1,000 kg bomb, though such a load would definitely cause range to
suffer.
In the engine department, the Junkers Jumo water cooled engines
were replaced by BMW air cooled radials. In addition to providing more power,
the BMWs were more rugged and able to take more damage than the Junkers engines.
Though there was a bomb bay, most of the heavier load was carried externally
with two racks mounted between the engine nacelles and the fuselage. Each could
carry a 1,000 kg bomb, though such a load would definitely cause range to
suffer.
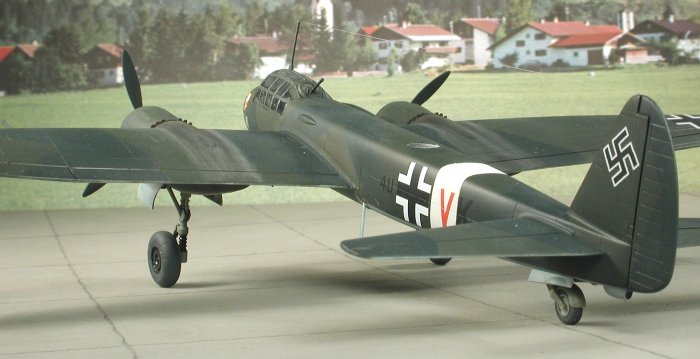
As with all bombers the Germans developed, a reconnaissance version was either planned or built. In this case it was the Ju-88T. The only difference between the two was the deletion of the bomb sight housing from the front under the nose and the installation of cameras in the bomb bay. The bomb racks were retained on this version, though probably housed extra fuel tanks rather than bombs.
|
THE KIT |
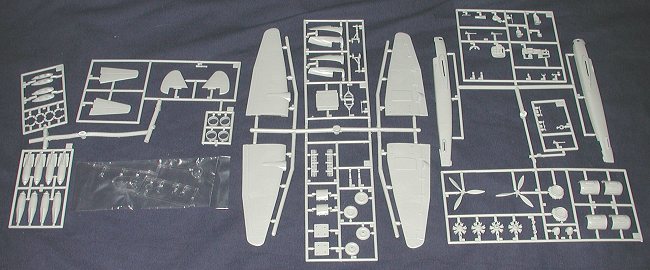
 Those of you who have built the Ertl Ju-88C or G kits in this scale will see a
lot in common. Just take a peek at the Ju-88G-6 built a
while back for some similarities. You get the same wings, fuselage and radial
engines. Much of the rest is changed in some way or another. What is new is
basically the clear bits as Ertl did a very similar C version. Unlike those
night fighters, this one is a bomber so has four very large bombs. Sharp eyed
people will notice a lack of cooling fans for the engines. Ertl dropped the ball
on this one and did not supply them with ANY of their 1/72 BMW powered Ju-88
kits. AMtech did not design these molds and is just releasing kits
that were in line to be produced by Ertl. I should also mention that AMtech is
only doing 5,000 kits and when they are gone, that's it!
Those of you who have built the Ertl Ju-88C or G kits in this scale will see a
lot in common. Just take a peek at the Ju-88G-6 built a
while back for some similarities. You get the same wings, fuselage and radial
engines. Much of the rest is changed in some way or another. What is new is
basically the clear bits as Ertl did a very similar C version. Unlike those
night fighters, this one is a bomber so has four very large bombs. Sharp eyed
people will notice a lack of cooling fans for the engines. Ertl dropped the ball
on this one and did not supply them with ANY of their 1/72 BMW powered Ju-88
kits. AMtech did not design these molds and is just releasing kits
that were in line to be produced by Ertl. I should also mention that AMtech is
only doing 5,000 kits and when they are gone, that's it!
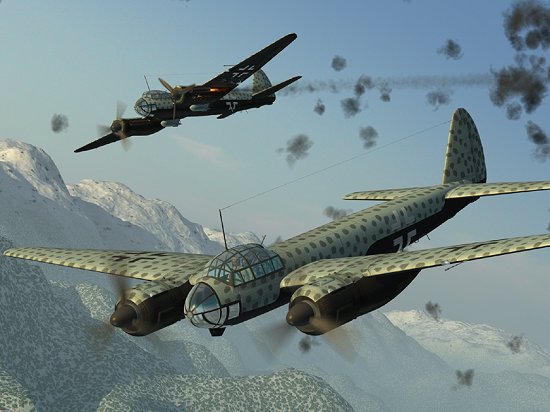
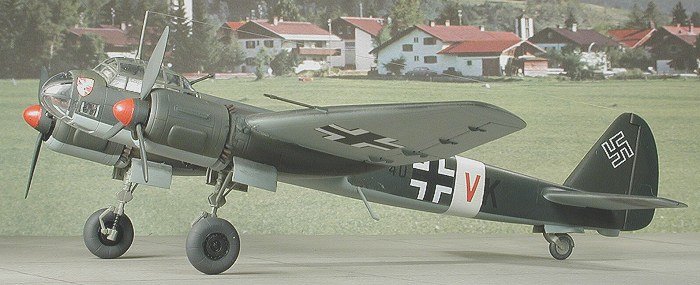
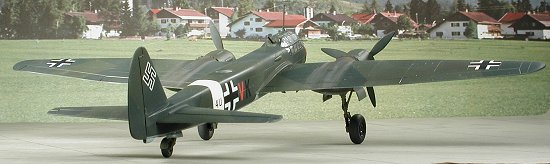
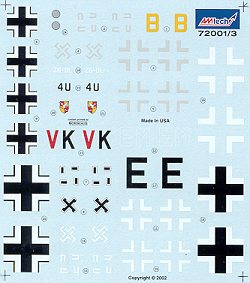
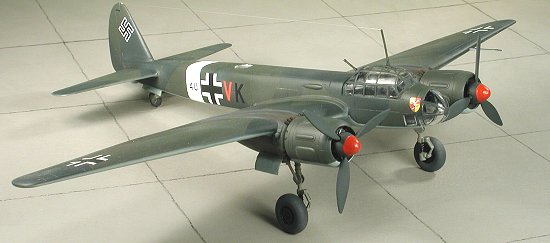
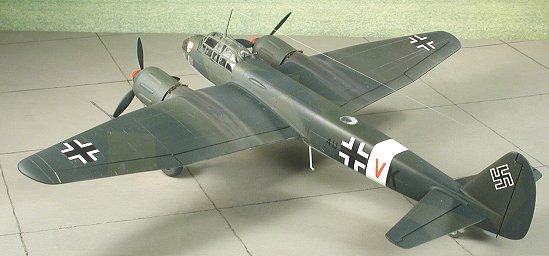
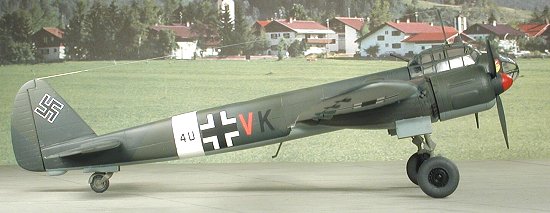
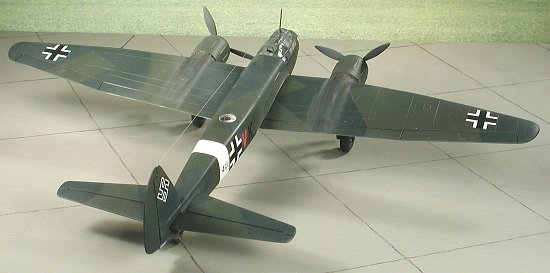
Markings will be provided for three planes. Two Ju-88S bombers and one Ju-88T recce bird. All of the schemes are quite different with the two S versions in a mirror-wave (squiggly lines) and an upper surface mottle pattern (see box art above). The T version is in the 'normal' bomber splinter scheme of RLM 70/71 uppers. Frankly, I'm amazed that they found any usable schemes at all as there is not very much out there on these later war Ju-88s. The decals are excellent and printed by Microscale. I saw no evidence of mis-registration. You will notice that this sheet is for international consumption and has joined the 'broken swastika' group.
|
CONSTRUCTION |
Construction starts with subassemblies. These consist of the wheels, a pair of bombs (the S/T only carried two wing racks), the fin, the wings and, of course, the interior. The interior was painted RLM 66 dark grey as was the side walls and when dry, some components painted black. This was all later dry-brushed to bring out highlights.
 With the subassemblies dry, the engine nacelles were glued in place. Fortunately
for me, I kept the Ju-88G instructions so had some idea of what went where on
this plane The engine nacelles were just as much trouble on this kit as the G
night fighter. I am, however, proficient with filler! The interior was then
glued into the fuselage halves along with the short wing spar piece. Interior
was a bit fiddly to get straight and I did have to use super-glue on a few
joins. You'll be using filler on the fuselage as well.
With the subassemblies dry, the engine nacelles were glued in place. Fortunately
for me, I kept the Ju-88G instructions so had some idea of what went where on
this plane The engine nacelles were just as much trouble on this kit as the G
night fighter. I am, however, proficient with filler! The interior was then
glued into the fuselage halves along with the short wing spar piece. Interior
was a bit fiddly to get straight and I did have to use super-glue on a few
joins. You'll be using filler on the fuselage as well.
I never said this was a toss-together kit as really, no Ertl-designed kit is or was. After a few sanding sessions, the tail bits were glued in place. Then the wings were glued on. Fit of the wings was quite good and only a bit of filler was used on the tail section parts. You do have to fiddle with the various pieces while the glue dries to make sure all is aligned. Then you can fill in the outer pair of holes for the wing bomb racks as only the inner two will be used.
As with the Ju-88G kit, the most difficult part is the installation of the engines. First of all, the nacelle fronts are not very square. As a result, I sanded on them a bit to make for a better mating surface. During this time I glued the engines together. The way they are keyed, the aft set of cylinders would be directly behind the front set. This would mean no cooling air to the aft cylinders. You should cut the key and then realign the aft set so that they will be visible in the spaces between the forward ones. I did this and then trapped the engine between the two cowling halves. Some sanding and filler was needed. I did not glue the engines at this time as I wasn't sure just how much they protruded. I then made what I think is an error and glued the firewall to the engine and cowling.
 Trying to fit the firewall to the nacelle and get a good fit was a bit difficult
for me. It seemed the firewall was larger in diameter than the nacelle. Having
it free of the engine and cowling would have made it much easier to fit.
However, having the cowling attached made it easier to sand on the nacelle to
get the engines to fit in proper alignment with the rest of the airframe. A bit
of a Catch 22 on this one.
Trying to fit the firewall to the nacelle and get a good fit was a bit difficult
for me. It seemed the firewall was larger in diameter than the nacelle. Having
it free of the engine and cowling would have made it much easier to fit.
However, having the cowling attached made it easier to sand on the nacelle to
get the engines to fit in proper alignment with the rest of the airframe. A bit
of a Catch 22 on this one.
With the engines on, I turned my attention to the transparencies. There are three small ones for around the nose. All but the larger one fit well. The big one seemed to be of a shape that did not match the opening and was actually a bit small in one dimension. The nose transparency was glued on at this time and fit well. I later discovered that it was a mistake to glue this on at this time as it ended up being slightly out of alignment. When dry, it and the three other smaller transparencies were masked. The larger canopy was masked and the machine gun glued in place. This gun was painted gun metal (duh!) and the large canopy glued on. It is perfect fore and aft but a bit too narrow side to side. Oddly, I do not recall having this problem with the ERTL Ju-88G-6 which used the same fuselage and canopy.
|
PAINT & DECALS |
At this time, the first overall painting was done. Initial painting was the underside, which was done in RLM 65, using Aeromaster enamels. The cockpit section was painted RLM 66 from the outside as was the nose transparency. Then the upper surface and fuselage sides were painted RLM 70. I used Aeromaster enamels for all these paints. I also painted a white area around the rear section of the fuselage for the band using Floquil Reefer White lacquer.
 When those had properly cured, I then started on the most tedious part of the
model. That is masking off all the various areas. The first thing I did was the
wings, horizontal stabilizer and fin. I went through a LOT of tape for this and
used the painting diagram that came with the kit. I then masked off the fuselage
band and then returned to the paint shop. There the wings, fin and stabilizers
were painted RLM 71. I also sprayed this color on the lower part of the engine
nacelles. When it had dried, those areas were covered with tape. The next step
was to spray over the white of the fuselage band. This was done with RLM 70. I
also sprayed this color pretty far down the fuselage as the diagram showed a
very low demarcation line.
When those had properly cured, I then started on the most tedious part of the
model. That is masking off all the various areas. The first thing I did was the
wings, horizontal stabilizer and fin. I went through a LOT of tape for this and
used the painting diagram that came with the kit. I then masked off the fuselage
band and then returned to the paint shop. There the wings, fin and stabilizers
were painted RLM 71. I also sprayed this color on the lower part of the engine
nacelles. When it had dried, those areas were covered with tape. The next step
was to spray over the white of the fuselage band. This was done with RLM 70. I
also sprayed this color pretty far down the fuselage as the diagram showed a
very low demarcation line.
Back to the bench for more masking. A problem I ran into is that the side views and top views of the fuselage do not match each other. You really can't make a logical transition from one to the other as it just doesn't work. That being the case, I interpolated a lot to give the general feel for what the scheme is supposed to look like. I do have a few references that show Ju-88 paint diagrams, but for this kit, I didn't want to go through all the work of redoing anything that had already been painted. Most folks will never spot the difference, especially as the two upper colors are so close to each other in hue. The 2 hours of masking was removed in about 10 minutes and I started on the touchup. After the usual back and forth, the painting was, for the most part, done.
 It was then back to the work bench to have the landing gear installed. At this
time I also painted the wheel wells RLM 02 using Testors Model Master enamels.
The tail gear simply plugs in place, though I used superglue for this as the
attachment point on my tail gear broke off; my fault. The main gear were glued
onto their posts and it was time to attach the retraction strut. Much to my
dismay, I found that I had crossed them up and put the right in the left and
vice versa. The attachment holes are at an angle and they were backwards. RATS!
This left me no choice but to trim off the attachment stubs and glue them in
there best I could. Once that was dry, the gear were touched up as needed and
the plane was taken back to the paint shop and sprayed with Future clear acrylic
gloss in preparation for decals.
It was then back to the work bench to have the landing gear installed. At this
time I also painted the wheel wells RLM 02 using Testors Model Master enamels.
The tail gear simply plugs in place, though I used superglue for this as the
attachment point on my tail gear broke off; my fault. The main gear were glued
onto their posts and it was time to attach the retraction strut. Much to my
dismay, I found that I had crossed them up and put the right in the left and
vice versa. The attachment holes are at an angle and they were backwards. RATS!
This left me no choice but to trim off the attachment stubs and glue them in
there best I could. Once that was dry, the gear were touched up as needed and
the plane was taken back to the paint shop and sprayed with Future clear acrylic
gloss in preparation for decals.
The decals gave me no trouble whatsoever. They are printed by Microscale, so in addition to being in perfect register, are a known product. You can use just about any decal setting solution on them with no problems. I used Solvaset just to make sure, though you could also use Microscale solvents as well. The only glitch with the decals was self-inflicted. I painted the fuselage band a bit too wide. It needs to be narrower, however the difference is not that bad. I also had zero problems with the two-piece swastika, much to my delight. For the Ju-88T, the camera openings are provided as a decal and are convincing.
Once the decals were on and dry, the plane was cleaned up with clean water to remove any residue. Then the model was given a complete overcoat of matte clear acrylic to seal the decals in place. When that was done, it was time to have a few more things glued in place.
|
FINAL BITS |
There were a few more bits and pieces to attach. The gear doors were the first ones. These have to be cut in half so you'll end up retouching the paint on the edges where you cut them. The main gear doors fit just fine in the slots provided. The tail wheel doors are a butt join, so you need to exercise some care when gluing them in place. At this time, the masking was taken off all the clear parts and what little paint got under the masking was removed by scraping with a toothpick.
 Then the antenna mast on the top of the canopy and the one on
the lower fuselage behind the wings were glued in place. The pitot tube was
glued onto the wing and when dry, all three of these were brush painted the
appropriate colors. I'd previously painted the props and spinners, but the
spinners didn't turn out as well as I'd hoped. I'm not that good at painting
portions of spinners and it showed. The end result was that the red was
over-painted with some Gunze red and any really bad slops touched up with RLM
70. Then these and the clear DF loop antenna were attached. The DF antenna was
merely pushed into place. I'm sure that the 'star' pattern in the antenna is
supposed to be painted some gold or bronze color, but I left it clear. There are
probably other antennas that research will show. Those will have to come from
the spares box or be made from sprue. The final
steps were to apply exhaust stains with pastels and rig the antenna long wire. I
used hair for the long wire again. Hair seems to be the best thing around for
this function as it glues well and is slightly elastic. It is also probably
pretty close to scale thickness!
Then the antenna mast on the top of the canopy and the one on
the lower fuselage behind the wings were glued in place. The pitot tube was
glued onto the wing and when dry, all three of these were brush painted the
appropriate colors. I'd previously painted the props and spinners, but the
spinners didn't turn out as well as I'd hoped. I'm not that good at painting
portions of spinners and it showed. The end result was that the red was
over-painted with some Gunze red and any really bad slops touched up with RLM
70. Then these and the clear DF loop antenna were attached. The DF antenna was
merely pushed into place. I'm sure that the 'star' pattern in the antenna is
supposed to be painted some gold or bronze color, but I left it clear. There are
probably other antennas that research will show. Those will have to come from
the spares box or be made from sprue. The final
steps were to apply exhaust stains with pastels and rig the antenna long wire. I
used hair for the long wire again. Hair seems to be the best thing around for
this function as it glues well and is slightly elastic. It is also probably
pretty close to scale thickness!
|
CONCLUSIONS |
It is great that AMtech is releasing all of these 'forgotten' kits from the ERTL stable. It gives us a chance to add some interesting models to our collections that we normally wouldn't see. Ju-88 fans will love the chance to get these "schnell-bombers" onto their shelves. The kits are a known quality and while not shake and bake, are not that difficult for most modelers to build. The end results are well worth it.
August 2002
Copyright ModelingMadness.com. All rights reserved. No reproduction in part or in whole without express permission from the editor.
If you would like your product reviewed fairly and fairly quickly, please contact the editor or see other details in the Note to Contributors.