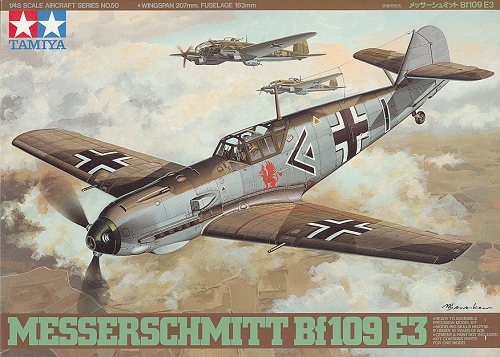
Tamiya 1/48 Bf-109E-3
|
KIT # |
61050 |
|
PRICE: |
$26.98 |
|
DECALS: |
See review |
|
REVIEW : |
|
|
NOTES: |
|
HISTORY |
When one thinks about famous fighters of World War 2, one of the first ones that pops into mind is the Messerschmitt Bf-109. First flown in the mid 1930s and thoroughly tested in Spain during 1937/38, it was the most successful German fighter of the war. In addition, it was in action from the first to the last day of the war.
Where the 109 became truly well known was during the Battle of Britain, where it was pitted against the Hurricanes and Spitfires of the RAF. Here the short range of the 109 was to prove a deficit to those 109 pilots whose job it was to protect German bombers. It was also here that the 109E version was truly blooded.
|
THE KIT |
 Tamiya's kit of the Bf-109E was heralded by many to be the best 'Emil' on the
market. The early production kits (of which this is one) have a flaw in the nose
section. The angle of the nose from the upper intakes forward is too shallow.
With the kit standing by itself, this is not at all noticed, but when compared
to the other current crop of E's from Hasegawa and Hobbycraft, it is noticeable.
It is to Tamiya's credit that they redid the nose section at a higher angle. It
should also be pointed out that this modification and the one they did on the
Meteor were done by removing material from the mold. Would the correction
have needed the addition of material to the mold, I seriously doubt if it
would have been done.
Tamiya's kit of the Bf-109E was heralded by many to be the best 'Emil' on the
market. The early production kits (of which this is one) have a flaw in the nose
section. The angle of the nose from the upper intakes forward is too shallow.
With the kit standing by itself, this is not at all noticed, but when compared
to the other current crop of E's from Hasegawa and Hobbycraft, it is noticeable.
It is to Tamiya's credit that they redid the nose section at a higher angle. It
should also be pointed out that this modification and the one they did on the
Meteor were done by removing material from the mold. Would the correction
have needed the addition of material to the mold, I seriously doubt if it
would have been done.
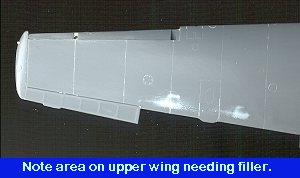
Anyway, the kit is just what one would expect from Tamiya in that the detailing is superb and the engineering top-notch. I can't show you the sprues as this kit was purchased at a swap meet and most of the parts are off the trees. The parts are all flash free and devoid of any ejector pin marks where they will show. On the down side, there are a number of sink marks, most notably on the trailing edge of the upper wing and on the fuselage side opposite the cockpit detail.
You get positionable flaps, slats, and rudder, as well as the ability to display the canopy open. The canopy is only for the E-3 and earlier versions, so one cannot do an E-4/7 with this kit. There are also three spinners, one open and two bullet-shaped ones, one with a greater point than the other. Also included is a drop tank and mount, which is not appropriate for the E-3. Another nice touch is that the outer wheel centers are separate from the wheels, making it that much easier to paint. It is interesting to compare the Tamiya and Hasegawa kits. Both produce fine kits and each has a slightly different way of engineering its kits to achieve this result.
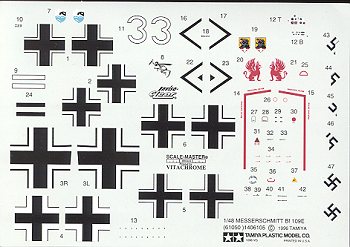 The decal sheet includes
markings for three aircraft, all from 1940:
The decal sheet includes
markings for three aircraft, all from 1940:
Adolf Galland's aircraft from III./JG 26 in France as shown on the box top, White 3 from II./JG 77 in Norway, and finally, one from II./JG 54 in France. All of them are in RLM 71/02 upper with RLM 65 lower and the JG 54 aircraft has the fuselage side mottled in RLM71. The sheet offers swastikas and even includes them separated for the rudder should one wish. Probably the only glitch that I noticed on the sheet is that the red is a bit too pinkish for my tastes. The sheet is produced by Scalemaster and unlike those in the ProModeler kits, this one appears to be in register!
Instruction sheet is typical of Tamiya in that it is very complete and offers all paint references in Tamiya paint colors. There is also an additional sheet that just includes the basic paint scheme, a feature that is much appreciated.
|
CONSTRUCTION |
 For this kit, what
say we start with the cockpit? Construction here is really a breeze. The
details are such that aftermarket additions are almost superfluous. Wanting to
keep construction time to a minimum, I decided to stick with what was in the
box. There are a few add on bits to the sides, mainly the oxygen canister and
trim wheels. Those were painted aluminum and black respectively and not added
until the rest of the cockpit was painted. After gluing down the seat, stick,
bulkhead, and pedals, the interior and sidewalls were painted RLM 02 green grey.
Throughout construction, Aeromaster Enamels were used unless otherwise noted.
One thing missing from the interior is the slot in the seat back for the
shoulder harness. Since Tamiya does provide a very nice pilot figure, this
omission is understandable as they actually expect you to use the figure!
For this kit, what
say we start with the cockpit? Construction here is really a breeze. The
details are such that aftermarket additions are almost superfluous. Wanting to
keep construction time to a minimum, I decided to stick with what was in the
box. There are a few add on bits to the sides, mainly the oxygen canister and
trim wheels. Those were painted aluminum and black respectively and not added
until the rest of the cockpit was painted. After gluing down the seat, stick,
bulkhead, and pedals, the interior and sidewalls were painted RLM 02 green grey.
Throughout construction, Aeromaster Enamels were used unless otherwise noted.
One thing missing from the interior is the slot in the seat back for the
shoulder harness. Since Tamiya does provide a very nice pilot figure, this
omission is understandable as they actually expect you to use the figure!
Once the main color was put on, a few bits were picked out in black and red. The instrument panel was painted RLM 66 dark grey and when dry, the instrument decals added. Typically, these fit perfectly. An interesting note is that Tamiya would have you paint the floor RLM 66. This is the first I have heard of this practice. You Luft Experten might want to look into this and let me know if this was normal or not. I left the floor RLM 02. Once dry all the interior bits were given a dark wash and then dry brushed with light grey or aluminum. The interior was then trapped between the fuselage halves and the fuselage cemented together.
 While this was drying, the wings received my
attention. FIrst the top and bottom sections were glued together. Tamiya's
engineering does not require the radiators to be trapped between the wing halves
as you must do with the Hasegawa kits. The edges were cleaned up with varying
grades of sandpaper. The upper wings have some rather obvious sink marks and
those were filled with putty and sanded smooth. A shame really, but one does
find these things from time to time.
While this was drying, the wings received my
attention. FIrst the top and bottom sections were glued together. Tamiya's
engineering does not require the radiators to be trapped between the wing halves
as you must do with the Hasegawa kits. The edges were cleaned up with varying
grades of sandpaper. The upper wings have some rather obvious sink marks and
those were filled with putty and sanded smooth. A shame really, but one does
find these things from time to time.
Then the fuselage was cleaned up, the nose guns painted and installed into the cowling and the cowling then glued to the fuselage. It was after the glue had dried that I realized that I goofed by gluing on the cowling. The aircraft I am modeling had a yellow nose so prepainting the cowling and installing it after the rest of the airframe was painted would have been smarter. That is what I did to the lower nose and the supercharger intake.
 Once the wings were dry, they
were glued onto the fuselage. Fit is very good, though I did use filler on the
aft section and there was a bit of a gap on the left wing root. Once that
was dry, the tailplanes were glued in place. All fit very well and it is obvious
that Tamiya spends a bit of extra time in engineering its kits. Assembly was
going smoothly and rather quickly. While the airframe was drying, several of the
smaller components were painted the appropriate colors, ready to install. I
especially like the fact that the radiators on this and other similar aircraft
are installed from the outside. Here again, Tamiya has engineered the kit in a
way similar to the real aircraft, using existing panel lines to encompass the
parts.
Once the wings were dry, they
were glued onto the fuselage. Fit is very good, though I did use filler on the
aft section and there was a bit of a gap on the left wing root. Once that
was dry, the tailplanes were glued in place. All fit very well and it is obvious
that Tamiya spends a bit of extra time in engineering its kits. Assembly was
going smoothly and rather quickly. While the airframe was drying, several of the
smaller components were painted the appropriate colors, ready to install. I
especially like the fact that the radiators on this and other similar aircraft
are installed from the outside. Here again, Tamiya has engineered the kit in a
way similar to the real aircraft, using existing panel lines to encompass the
parts.
Next, the canopy was masked using Bare Metal Foil. I know this stuff is expensive, but I have found little else that is better as a masking material. The gunsight was glued in place and then the clear bits glued on using non-fogging superglue. Since the canopy was left off until the kit is done, the cockpit opening was masked with tape to prevent paint from getting in. Then it was off to the paint shop for the first coat of paint.
|
PAINT & DECALS |
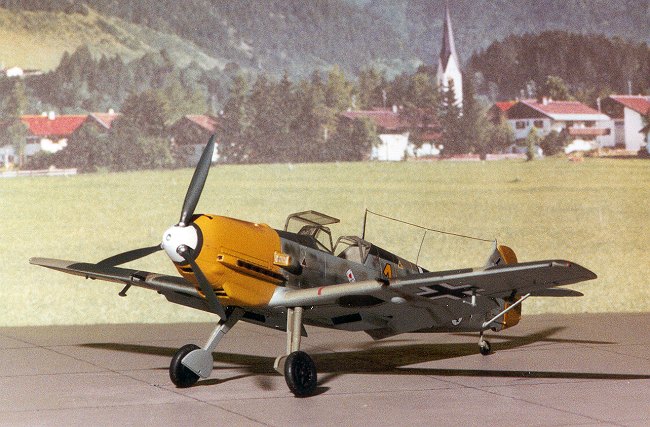
This kit is to be painted in RLM 02/71 upper and RLM 65 lower. The nose, and rudder are RLM 04 yellow. Fortunately, the rudder is a separate piece as this makes it easy to paint. First, the yellow areas were given a coat of Model Master white and when dry, Xtracolor RLM 04 was sprayed over it. Unlike other Xtracolor paints, this yellow is matte so dries quickly. When the yellow on the nose and supercharger intake were dry, they were masked with Tamiya masking tape. I have just started using this tape and find it to be the right combination of stick without having to worry about it pulling up the paint underneath it. It really is great stuff.
All the main camouflage paints are Aeromaster enamels as I have found them to be excellent paints. First the RLM 02 was sprayed on the masked canopy pieces and the upper surfaces. When that was dry, RLM 65 was sprayed on all the lower surfaces and the fuselage sides. As you can imagine, there was a lot of overspray, but that isn't much of a problem as it will be repainted later. The RLM 65 areas were then masked fairly well and the upper RLM 02 was touched up where there was overspray. After drying overnight, the 02 was masked off using low tack Scotch 811 tape and the RLM 71 was sprayed on. When that was dry, the upper surface colors were masked and the final spraying of RLM 65 was done to take care of the overspray.
 When dry, the tape was removed from the fuselage and it was time
to start the mottle paint job. According to the instructions on the Aeromaster
sheet I am using, the sides were mottled in the upper surface colors in a random
and medium density pattern. Frankly, I really like this part of the painting so
look forward to it. To make sure I did a good job, I installed a new needle and
head in
my trusty Badger 150. After the paint had dried, the masking tape was removed in
preparation for the overall clear. The tape came off cleanly and there was no
residue left behind by the Tamiya tape.
When dry, the tape was removed from the fuselage and it was time
to start the mottle paint job. According to the instructions on the Aeromaster
sheet I am using, the sides were mottled in the upper surface colors in a random
and medium density pattern. Frankly, I really like this part of the painting so
look forward to it. To make sure I did a good job, I installed a new needle and
head in
my trusty Badger 150. After the paint had dried, the masking tape was removed in
preparation for the overall clear. The tape came off cleanly and there was no
residue left behind by the Tamiya tape.
Having completed that, the kit was sprayed with Future clear acrylic in preparation for the decals. Once dry, the kit had its landing gear and tail wheel installed to facilitate the decals.
I did not use all the kit decals for several reasons. One is that I usually like to use aftermarket decals as they offer different schemes from the kit. Secondly, the Scalemaster decals were slightly off register (no surprise to me), as I discovered when trying to use one of the kit crosses. Finally, I had spent $20 on an Aeromaster Battle of Britain sheet and wanted to use it. It has 10 109 schemes in it, but only one seems to be for a 109E-3, the rest are for E-4 or E-7 variants.
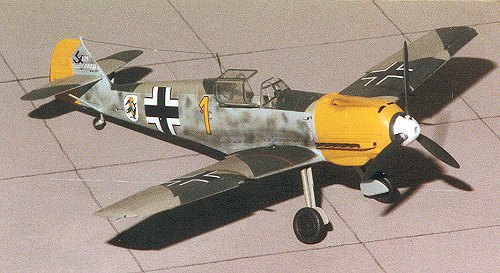
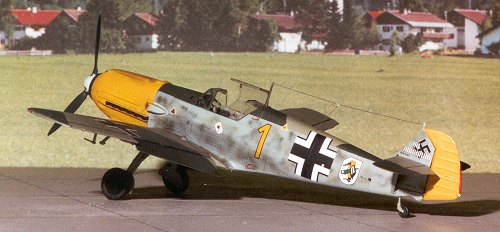
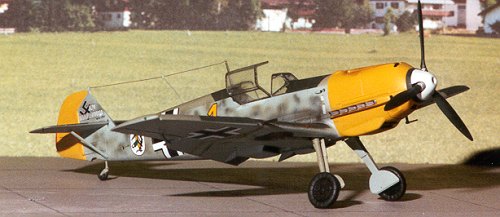
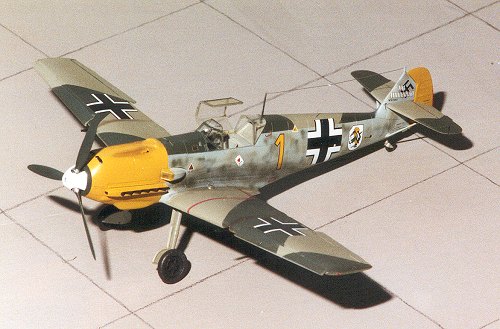
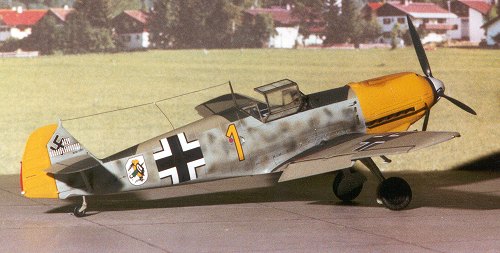
The one I chose was for Staffel Kaptain Josef 'Pips' Priller of 9./JG 51, who went on to gain 101 victories, most of them in the west. This particular aircraft sports a yellow nose and rudder with 24 victories tallied on the tail. I used the kit stencils as most were monochrome and not out of register. The decal sheet provided insignia and personal markings. Superscale setting solution was more than enough for these decals. Once dry, the airframe was wiped down to rid it of dried setting solution. The flaps and slats were then glued in place. A coat of clear matte was then sprayed on to seal the decals and give the pastels something to 'bite' into. When dry, the kit had engine and gun exhaust stains added with pastels. Again, the kit was lightly weathered as good care was taken of these aircraft during the early war. When done, another coat of clear matte was applied.
|
CONSTRUCTION CONTINUES |
 After the final weathering, it was time to add on all the bits
left in the box. First of these were the tailplane struts. Fit is superb. All of
the attachment points on this kit are really large. None of those petite little
holes, here you get craters. Yet the kit looks fine once one is finished. Then
the Bare Metal Foil was removed from the transparencies. You know, when I first
started using this stuff, I really liked it. However, it is a real chore to
remove, having to be scraped off and coming off in teeny chunks. It also leaves
an incredible amount of residue that is a real pain to remove. I think I'll
stick with Scotch tape unless I'm dealing with some really difficult curvatures.
After the final weathering, it was time to add on all the bits
left in the box. First of these were the tailplane struts. Fit is superb. All of
the attachment points on this kit are really large. None of those petite little
holes, here you get craters. Yet the kit looks fine once one is finished. Then
the Bare Metal Foil was removed from the transparencies. You know, when I first
started using this stuff, I really liked it. However, it is a real chore to
remove, having to be scraped off and coming off in teeny chunks. It also leaves
an incredible amount of residue that is a real pain to remove. I think I'll
stick with Scotch tape unless I'm dealing with some really difficult curvatures.
At this time the propeller, which was painted RLM 70 black-green along with the backing plate, was glued to the plate after the insertion of one of those plastic washers. Then the nose cap, which had been painted white, was attached to the plate. This assembly was pressed onto the propeller shaft.
The radio antenna as well as the two wing gun barrels were actually press fit into place! Then the canopy was glued in the open position. Final bits to assemble were the underwing pitot tube and the elevator balances, again having large attachment points. The paint was touched up and a radio antenna made of stretched sprue. Voila! (or something like that). The kit was finished and added to the ever-growing collection of Bf-109s in the display case.
|
CONCLUSIONS |
Did I have a disaster or two. Sure. The wings are not the same dihedral and the canopy is a mess thanks to the Bare Metal Foil. But those have been about it. Like the Spitfire, the kit really is a beauty to build. A very non-stressful model that one needs to build on occasion, especially after all the problems one has when doing those very interesting, but poorly fitting Czech short run kits! Recommended for all skill levels.
April 2000
Copyright ModelingMadness.com. All rights reserved.
Review copy courtesy of me and my wallet!
If you would like your product reviewed fairly and fairly quickly, please contact the editor or see other details in the Note to Contributors.
Back to Reviews Page 2020