| HISTORY |
Hasegawa 1/48 Bf-109E-4/7 'Jabo'
| KIT #: | 09261 |
| PRICE: | 2200 yen |
| DECALS: | Two options |
| REVIEWER: | Scott Van Aken |
| NOTES: | Limited Reissue (1998) |
| HISTORY |
The Bf-109E-7 was the last major version
of the E to be produced, entering service and seeing combat at the end of August
1940. One of the limitations of the earlier Bf 109E was their short range of
660 km 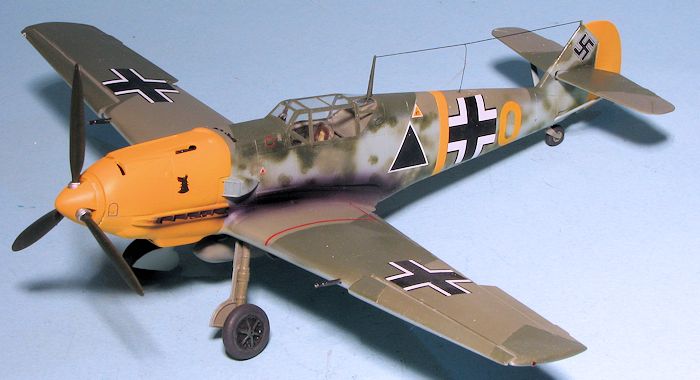 (410 mi) and limited endurance, as the design was originally conceived as
a short-range interceptor. The E-7 rectified this problem as it was the first
subtype to be able to carry a drop tank, usually a 300 L (80 US gal) capacity
unit mounted on a rack under the fuselage, which increased their range to
1,325 km (820 mi). Alternatively, a bomb could be fitted and the E-7 could be
used as a Jabo fighter-bomber. Previous
Emil subtypes were progressively retrofitted with the necessary fittings for
carrying a drop tank from October 1940. Early E-7s were fitted with the 1,100 PS
DB 601A or 1,175 PS DB 601Aa engine, while late-production ones received
1,175 PS DB 601N engines with improved altitude performance – the latter was
designated as E-7/N. A total of 438 E-7s of all variants were built.
(410 mi) and limited endurance, as the design was originally conceived as
a short-range interceptor. The E-7 rectified this problem as it was the first
subtype to be able to carry a drop tank, usually a 300 L (80 US gal) capacity
unit mounted on a rack under the fuselage, which increased their range to
1,325 km (820 mi). Alternatively, a bomb could be fitted and the E-7 could be
used as a Jabo fighter-bomber. Previous
Emil subtypes were progressively retrofitted with the necessary fittings for
carrying a drop tank from October 1940. Early E-7s were fitted with the 1,100 PS
DB 601A or 1,175 PS DB 601Aa engine, while late-production ones received
1,175 PS DB 601N engines with improved altitude performance – the latter was
designated as E-7/N. A total of 438 E-7s of all variants were built.
| THE KIT |
 also install the drop tank and rack
if not doing a fighter-bomber version. There is also a sand filter if you decide
you need one.
also install the drop tank and rack
if not doing a fighter-bomber version. There is also a sand filter if you decide
you need one. The initial boxing of this kit, in the J series (as opposed to the Jt series and later) had some glitches. Apparently the rear fuselage was a bit too thin and the forward part of the upper cowling was not exactly right. If I recall, Tamiya glitched the upper cowling as well. It seems that these problems were ones that could be fixed by shaving material from the mold so Hasegawa went back and corrected the flaws after boxing about a half dozen versions of this kit. In other words, don't buy the initial J series of kits if you are concerned about this.
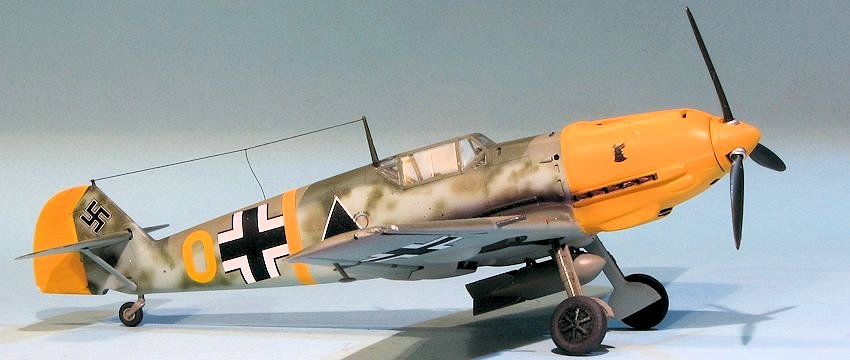
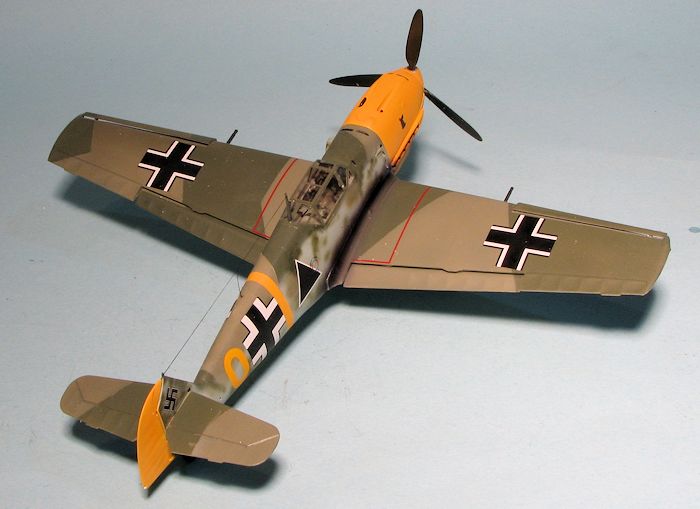
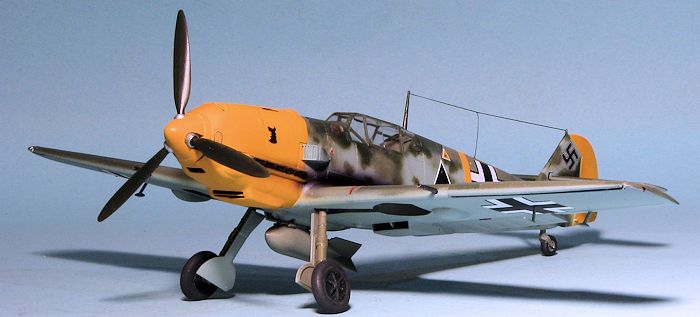
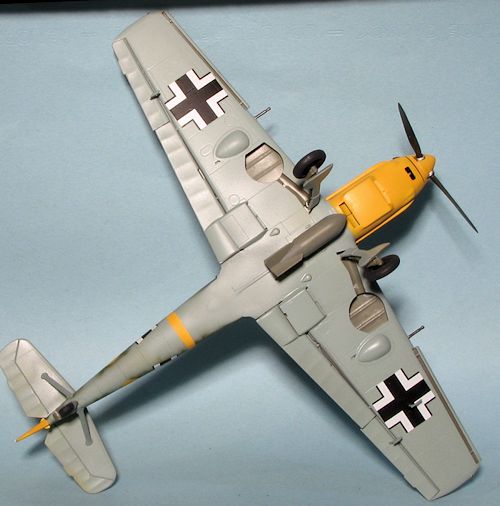
In line with other limited edition boxings, this kit includes the standard instruction sheet and provides an addendum sheet to take care of the bits not covered in the other sheet (usually markings). In this case, there are two options. One is the wasp-nosed version from III./SKG 210 in RLM 74/75/76 with a green spinner and rather heavy fuselage mottling. The lower cowling is painted yellow and there is a yellow fuselage band and wing tips. The other aircraft is in the same scheme with a yellow nose and yellow rudder with a white fuselage band. The mottling on this one is not as heavy. This aircraft was with III./JG 27. The spinner has fine yellow bands that are provided as decals. These are the 'old school' decals so are a bit thick and with white that is off white. I'd recommend painting the fuselage bands.
| CONSTRUCTION |
This isn't the first Hasegawa 109E kit I've built, but it has been a while since I last did one. As I did not have a mass of aftermarket for the kit, I decided to do this one pretty much out of the box with one exception.
First step is to build up the cockpit. For this build I
used a True Details resin seat because I had one. This has some nice belt
detail and is nicer than the rather bland one provided in the kit. The
interior bits
 were painted RLM 02 using AK Interactive's acrylic paints. I
used a set of ProModeler 109 instrument panel decals for the main instrument
panel. The rest of the interior had parts picked out in various colors
before the side panels were closed up.
were painted RLM 02 using AK Interactive's acrylic paints. I
used a set of ProModeler 109 instrument panel decals for the main instrument
panel. The rest of the interior had parts picked out in various colors
before the side panels were closed up.
While doing this, I opened the hole in the lower wing for the bomb rack and then glued on the etched radiator grilles. The covers went over these parts and then the upper wing sections were glued onto the lower wing. Back at the fuselage, the intake splitter was glued to the etched oil cooler radiator and then glued into the forward fuselage. The fuselage halves were then glued together. One thing I noticed is that there is no really positive alignment pins or shelves for either the radiator piece or the cockpit. I then attached the wings after drilling out the gun barrels. Fit for the upper wings is quite good. The forward and aft lower wing/fuselage join required filler.
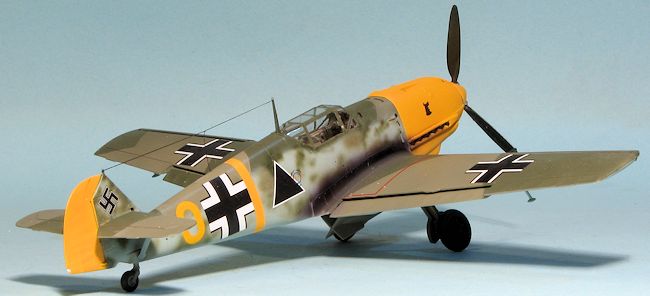
With the wings in place, I then added the tailplanes minus the struts. The bomb rack was then glued on. I then masked and attached the clear bits. While I thought I had just tacked the main canopy section in place, it turned out later that I had been too generous with the fixative so could not later remove it. Hence there is no head armor.
| COLORS & MARKINGS |
 First
step on this one was to paint all the yellow areas white. For this build I
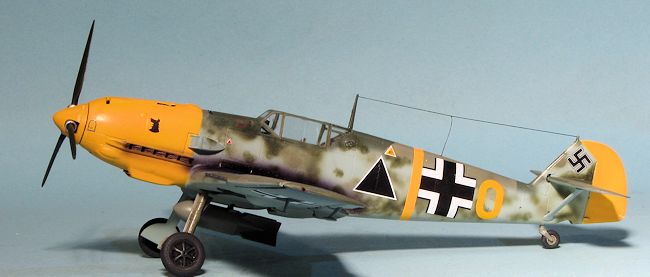
used Eagle Strike 48-120, Bf-109s of the Balkans to do a III./JG 77 plane.
All of these planes had yellow rudders and yellow noses with my option
having a thin yellow fuselage stripe. I chose it because it was an E-7 and
because it was obviously a fighter-bomber version and I wanted to do that
version.
First
step on this one was to paint all the yellow areas white. For this build I
used Eagle Strike 48-120, Bf-109s of the Balkans to do a III./JG 77 plane.
All of these planes had yellow rudders and yellow noses with my option
having a thin yellow fuselage stripe. I chose it because it was an E-7 and
because it was obviously a fighter-bomber version and I wanted to do that
version.
The scheme for all of these options was RLM 71/02/65 and I used AK Interactive paints on this one. Unlike the Airfix kit done recently, the AK paints stuck just fine to bare plastic. I used Tamiya for the white areas and then Model Master enamels for the overlying RLM 04 yellow. As usual, there was a lot of back and forth painting, but once it was done, I returned to the bench.
Here I installed the main landing gear legs. It has been a while since I did a Hasegawa 109E and was aware of how thick the lower landing gear legs are in comparison to newer kits. I then sprayed on some clear gloss acrylic (Future) and applied the decals. Despite some initial trepidation on how well the decals might work as I'd had issues with Made in Mexico decals from ES before, these went on without any trauma though they did take a while to come free of the backing sheet. I used enough stencils to make it look busy. Once dry, a coat of clear semi-matte was sprayed on it.
| FINAL CONSTRUCTION |
 underside
of the wings, the aileron mass balances, pitot tube, bomb anti-sway
braces and finally the bomb.
underside
of the wings, the aileron mass balances, pitot tube, bomb anti-sway
braces and finally the bomb. | CONCLUSIONS |
 While
I know that many consider the Hasegawa 109 to be 'old hat',
particularly with newer releases by Eduard and Airfix, it is
still a very nice kit, though frankly not worth the current US
SRP. However, many of us have these kits in our stash and we can
usually find them at a good price from vendors and sales tables.
Still very much worth building and from what I gather, is pretty
much free from the shape issues that other 109Es seem to have.
While
I know that many consider the Hasegawa 109 to be 'old hat',
particularly with newer releases by Eduard and Airfix, it is
still a very nice kit, though frankly not worth the current US
SRP. However, many of us have these kits in our stash and we can
usually find them at a good price from vendors and sales tables.
Still very much worth building and from what I gather, is pretty
much free from the shape issues that other 109Es seem to have.
| REFERENCES |
http://en.wikipedia.org/wiki/Messerschmitt_Bf_109_variants
October 2014
Review kit courtesy of my kit collection.
If you would like your product reviewed fairly and fairly quickly, please contact the editor or see other details in the Note to Contributors.