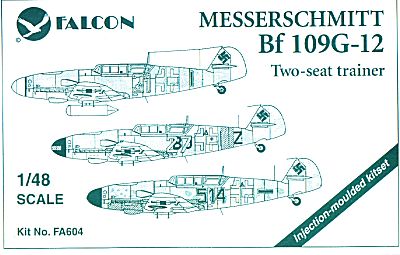
Falcon 1/48 Bf-109G-12 *
Kit #: 604
MSRP: $45.95
Decals: five versions; four of them from unknown units and one from JG101. All are in 74/75/76 with various levels of mottling. All subjects are G-12s converted from G-4s so have no cowling gun bulges.
Media: Limited run with pewter parts and vacuform canopy (2)
Date of review: 9 March 1999
Review and photos by: Scott Van Aken.
 Following
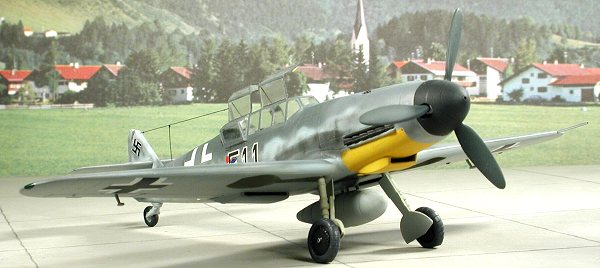
in sequence from the last 109 review, the 109G-12 was a dedicated trainer
version with minimal armament. In fact, the cannon was removed
from this version, as was the fuel tank behind the pilot in order to have
room for the instructor's position. A revised canopy was also provided, giving
the instructor a bit of side view so he could see what his student was about
to pile into!!
Following
in sequence from the last 109 review, the 109G-12 was a dedicated trainer
version with minimal armament. In fact, the cannon was removed
from this version, as was the fuel tank behind the pilot in order to have
room for the instructor's position. A revised canopy was also provided, giving
the instructor a bit of side view so he could see what his student was about
to pile into!!
All G-12's were rebuilt from various G models from -1 thru -6, except the pressurized -5. There were even those modified from the high powered G-6/AS with the revised cowling of the later G-10 and K models. A little over 100 aircraft were known to have been converted to G-12 standard. The Falcon kit is based on the G-4 version of the 109 with upper wheel fairings and no gun cowl covers. All carried the attachment for the underfuselage tank as the removal of the fuselage tank drastically shortened the range of the aircraft. Two types of canopy were used by the G-12; a flat topped version and one a bit more rounded over the instructor. Both are provided by Falcon.
I have built a couple of Falcon's vacuform kits and used their canopies. They are superb products. This is the first time I have built one of their limited run kits. Actually, the only reason I bought the kit was that I got it for 60% off the retail price!!
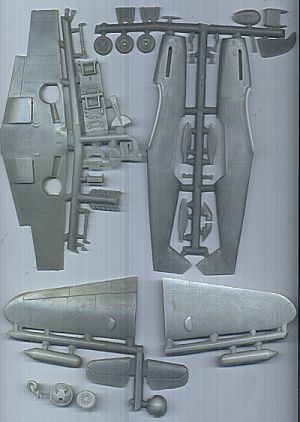
It is typical of many low pressure injection molded kits in that it has gigantic
mold gates and lots of mold runs throughout the larger pieces, especially
the wings and fuselage.
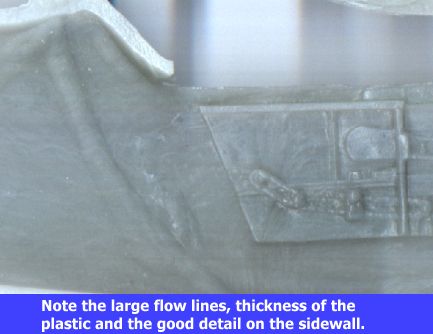
The fuselage ones are not in strategic areas, but the ones on the wings will need work before the parts can be glued together. The surface detail is very good as are the interior details, especially considering the molding process. However, the thickness of the plastic has produced several areas of 'sink holes' where the plastic has shrunk. This basically means that the surface needs to be smoothed out and these depressions filled. There are also some areas where lumps of plastic needs to be removed. (see illustration)
As you might expect, the canopies are true works of art and are superb,
and the decals look very good as well. the instructions are four pages of
which two are painting information, and one is a parts list and exploded view .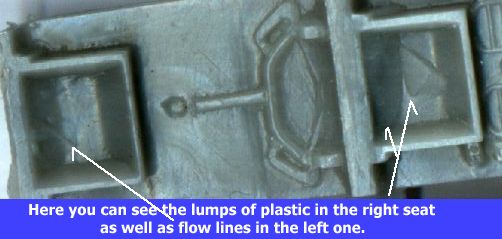
Half of the final page is a history and the rest is assembly instructions,
including a template for making exhaust shrouds. The metal bits, however
are less than encouraging. After looking at the parts and seeing the amount
of work required, I had despaired that I would ever build this kit.
Fortunately, a review of this kit in Scale Aircraft Modelling, changed my
view. The reviewer had the same reservations that I did and decided
to kitbash the Falcon G-12. He used a Fujimi G-6 for most of the parts,
using only the dedicated G-12 parts supplied by Falcon. Well, I wasn't
about to part out a $30 Fujimi kit, so decided to use a Hobbycraft G-14 kit
that I bought at a swap meet. This Hobbycraft kit had been started
and was really beyond saving as the fuselage had been cut at the wrong place
to incorporate the larger tail!! A perfect parts
kit! 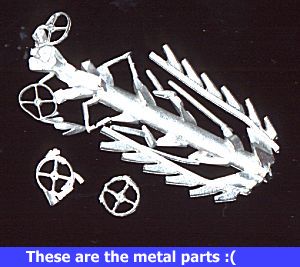
As with all short run kits of this type, the parts need to be removed from the sprue with a razor saw. The plastic is a bit brittle and tends to snap easily so care needs to be taken when removing parts.
The first thing I did was to decide what parts to use from what kit and put the rest in the spares box. When I was done, parts not from the Falcon kit were; prop and spinner, wings, landing gear, tailplane, drop tank and rack, and wheels. For wheels, True details is coming to the rescue as the Hobbycraft kit has only the larger late war ones provided.
Next it was time to start on the interior. The first step was to carve away all the lumps in the seat using a rounded tip xacto blade. Rather time consuming but necessary. Then the interior bits were all painted RLM 66 to show up any other flaws. Surprisingly, there were not that many where it counted! All the back sections of parts needed the long, lumpy flow lines sanded down, and the edges smoothed out, but that was about it. The interior and instrument panels are really beautifully detailed, almost like aftermarket resin.
 First parts to be glued were the backs of the seats. Fit is not great,
but not that bad. Some gently scraping took care of any overhang. Trying
to get the backs properly aligned is a bit fiddly, but the cutaway on the
side of the fuselage is a big help. While the backs were drying, the
wings had the wheel bumps attached and then the underside of the upper wings
was filled and sanded smooth. Otherwise the holes for the wheel bumps
would be very visible in the wheel wells.
First parts to be glued were the backs of the seats. Fit is not great,
but not that bad. Some gently scraping took care of any overhang. Trying
to get the backs properly aligned is a bit fiddly, but the cutaway on the
side of the fuselage is a big help. While the backs were drying, the
wings had the wheel bumps attached and then the underside of the upper wings
was filled and sanded smooth. Otherwise the holes for the wheel bumps
would be very visible in the wheel wells.
Next the large flow lines in the tail were sanded off and the fuselage was generally cleaned up of all the flash and lumps. Next the oxgen regulator and throttle quadrants were sawn off the sprue, cleaned up, and attached to the fuselage sides. Then additional parts of the interior were installed such as foot pedals, trim wheels, and control sticks. The control sticks and rudder pedals are really way too thick, but I used them anyway. Once in place, the interior was repainted RLM 66, and drybrushed to bring out some detail.
 |
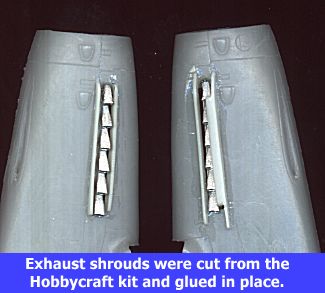 |
Next area for attention was the exhaust. This kit has no exhaust flame shields and all one gets is a drawing in the book on how to make them from scrap card. Well, I'm not very good at that, so it was off to the 'parts' kit to see what was there. The Hobbycraft shields are not too bad so I decided to cut them off and glue them in place on the Falcon fuselage. Actually a pretty easy job, given enough glue!!
The kit supplied metal exhaust were cleaned up and installed using white glue. These exhaust are molded with the openings indented, a big plus over what is given in the Hobbycraft kit. A card backing painted black was then glued behind the exhaust. Once that was done, it was time to start thinking about installing the interior. Before that, though, the Reheat seat belts were installed and painted. Then rudder pedal straps were made of tape and brass sheet, glued in place and painted leather. Finally, the interior was glued to the left fuselage side. When dry the forward instrument panel was glued in place (after much scraping of the fuselage interior so it would fit).
 |
|
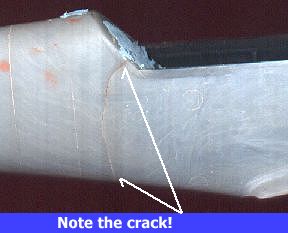
The next day, it was time to see how the fuselage fit. Well, in the front it was good, however, in the rear it was apparent that the interior was too wide. Out came the killer file and after much plastic dust production, it fit. First the front was glued and when it was good and dry, the rear was glued. One of the fuselage halves was warped so a little help from superglue and clamps was required. It was at this time that I cracked the right rear fuselage half. Thanks to a bit too much clamp pressure and the brittleness of the plastic. AARRGGHH! Well, all my kits have at least one disaster and this was the first (and hopefully only) one.
 Then
it was time to fill in the rather large gap at the rear bulkhead. This
was done with a small piece of plastic card. The mess was then filled and
sanded down to a nice level surface. At this time the backseater's instrument
panel was installed. The console proved to be a bit wide and needed trimmed
down to fit. Next the fuselage crack was repaired and the wing installed.
Before installing the Hobbycraft wing, a lot of cleanup and filing
and dry fitting was required to get a reasonable fit. Fortunately,
the wing roots matched quite well and alleviated a lot of possible trauma.
To ensure a good fit, I glued one side and when dry, glued the other. Next
the gap at the front of the wing was filled with scrap card, filed and filled,
then sanded.
Then
it was time to fill in the rather large gap at the rear bulkhead. This
was done with a small piece of plastic card. The mess was then filled and
sanded down to a nice level surface. At this time the backseater's instrument
panel was installed. The console proved to be a bit wide and needed trimmed
down to fit. Next the fuselage crack was repaired and the wing installed.
Before installing the Hobbycraft wing, a lot of cleanup and filing
and dry fitting was required to get a reasonable fit. Fortunately,
the wing roots matched quite well and alleviated a lot of possible trauma.
To ensure a good fit, I glued one side and when dry, glued the other. Next
the gap at the front of the wing was filled with scrap card, filed and filled,
then sanded.
Once the wing was properly glued, puttied and smoothed out, the separate rudder was attached. It was then that I noticed that the fin appeared too tall. Comparing the kit rudder with that of the Hobbycraft kit, they were the same size. This meant that the kit fin was too tall and was not raked back far enough. Out came the killer file and after another round of plastic dust creation, the fin was trimmed down to the proper size. The Hobbycraft rudder wasn't used as it has no detail on it at all, compared to the kit rudder. Next the Hobbycraft horizontal stabilizers had their tabs removed and were then butt joined to the fin. It was a good tight fit.
Attention was then turned to the underchin oil cooler. This has a radiator insert that needed to be thinned and shaped once fit in the fairing. In addition, there was no rear door with the chin fairing. Now I have never seen an image of a 109 of any type without one so one was made from scrap card. The cooler was glued in place as was the Hobbycraft drop tank mount.
 |
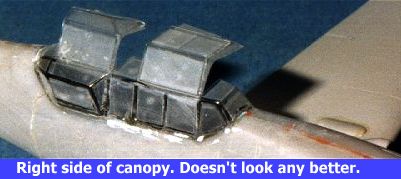 |
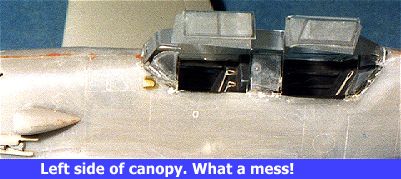
Now for my least favourite part of doing short run kits; the canopy. This one is particularly fussy because of all the panes that it has. Needless to say, masking took a long time. After that, the front and rear canopies were cut open. Unlike the fighter 109, the trainer canopy does not completely open. the right side panels are fixed and they are hinged at the upper right, allowing the left and top of the canopy to open up. Then came probably the most daunting part of this whole kit. Installing the canopy. Now I will admit to you that I am terrible when it comes to canopies. If they are not perfectly engineered to fit, they are usually screwed up something terrible. Well, vac canopies are NEVER perfectly engineered to fit and this one was no exception. After much cutting and dryfitting, I got it close. Then I used some non-fogging superglue to attach the thing along with lots of accelerator. Then the killer files were brought into play to even things out and finally some filler was used to even out the evening out! Final result is a relatively nice looking canopy that won't win contests, but will look nice on the shelf with the other zillion Bf-109s! In the process the small vents on either side of the windscreen disappeared, so they were cut from the Hobbycraft G-14 kit and replaced.
 Well,
this whole thing was masked and the cockpit was filled with tissue.
The frames were sprayed RLM 66 like the interior and to show any need
for more filler. Then the Hobbycraft nose guns were installed in the
Falcon fuselage. Now there are references stating that many had only
one gun, but I used both as these aircraft are late war and would have needed
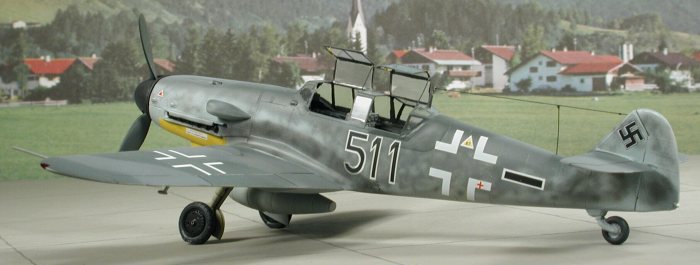
self-defense capabilities. The underside of the kit was painted RLM 76 and
once dry, some areas were masked off and the upper surfaces painted in RLM
75 and RLM 76; a pretty standard scheme for G's. It was at this time that
I noticed the scheme I was doing had a yellow lower cowl. Out came
the white and when dry the yellow. Then it was masked off and the areas I
had oversprayed redone to get a close match.
Well,
this whole thing was masked and the cockpit was filled with tissue.
The frames were sprayed RLM 66 like the interior and to show any need
for more filler. Then the Hobbycraft nose guns were installed in the
Falcon fuselage. Now there are references stating that many had only
one gun, but I used both as these aircraft are late war and would have needed
self-defense capabilities. The underside of the kit was painted RLM 76 and
once dry, some areas were masked off and the upper surfaces painted in RLM
75 and RLM 76; a pretty standard scheme for G's. It was at this time that
I noticed the scheme I was doing had a yellow lower cowl. Out came
the white and when dry the yellow. Then it was masked off and the areas I
had oversprayed redone to get a close match.
Next the mottling was applied using RLM 74 and RLM75. It was put on as per the instruction sheet with it very heavy from the back seat aft. Once dry, the airframe was overcoated in clear gloss to get ready for the decals. At this time, the kit wheels which are the early spoked ones, were replaced. A bit of background on wheels and the upper wing bulges on the 109. First off, all 109s from the first ones to the G-4 were delivered with the 'spoked' variety of wheel. The upper wing bulges were introduced with the G-2 about half way through the production run to accommodate a change in the angle of the wheels on the strut. This G-12 was a G-4 rebuild, and G-4s were built with 'spoked' wheels. However many were retrofitted with the later 'solid' wheel of the G-6 during the rebuild. I turned to True Details for a set of G-6 resin wheels for this kit. Now I know that many do not like them because the tires look like they are flat, but I like them for their detail. The center sections were painted black while still on the block and then they were cut away and the holes in the back drilled out to fit the Hobbycraft struts. Finally, the tires were painted with my secret tire paint formula. They were then installed using superglue. The Hobbycraft gear doors were then glued in place on the struts and the belly tank installed. There is something about the gear doors that just doesn't look right. Can't really pin it down. I would have thought the angle of the bottom of the doors looked a bit odd, but can't prove it.
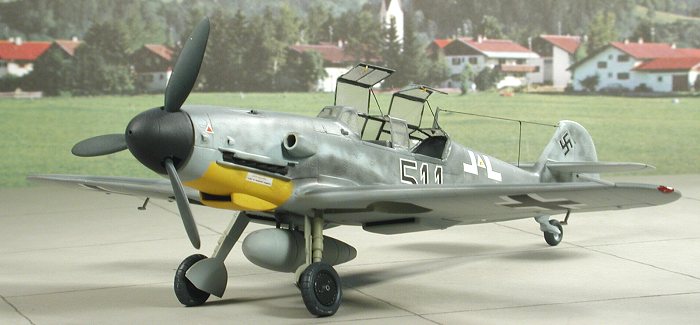
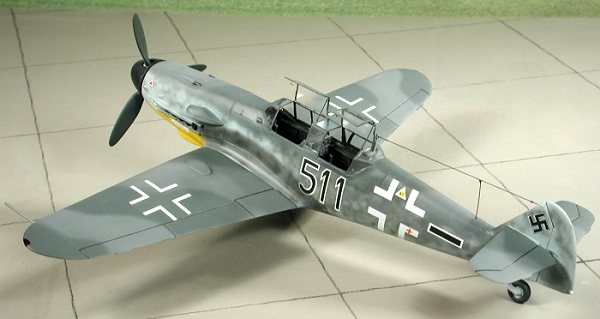
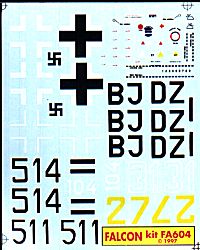 Anyway,
time for the decals!! As you can see from the image, there are a number of
possibilities. The scheme I chose can be numbered either 511 or 514 (that
way if I screw up a number, I can use the other. Smart, eh?). The decals
look fine and a bit glossy, but otherwise not bad. All the small stencils
were in one block so had to be cut out. They were also not as sharp as I
would have liked. I had read a review that said they were not opaque
enough and that the under color showed through the white when they dried.
Naturally, this made me a bit cautious about using them so I cut a white
number that I wasn't going to use and tested it on a piece of scrap. It looked
fine. A touch transparent, but since they wouldn't be used across any widely
differing colors, not a problem. It also took well to setting solution. One
interesting thing is that it took seemingly forever to separate from its
backing.
Anyway,
time for the decals!! As you can see from the image, there are a number of
possibilities. The scheme I chose can be numbered either 511 or 514 (that
way if I screw up a number, I can use the other. Smart, eh?). The decals
look fine and a bit glossy, but otherwise not bad. All the small stencils
were in one block so had to be cut out. They were also not as sharp as I
would have liked. I had read a review that said they were not opaque
enough and that the under color showed through the white when they dried.
Naturally, this made me a bit cautious about using them so I cut a white
number that I wasn't going to use and tested it on a piece of scrap. It looked
fine. A touch transparent, but since they wouldn't be used across any widely
differing colors, not a problem. It also took well to setting solution. One
interesting thing is that it took seemingly forever to separate from its
backing.
From the kit decals I used the tactical numbers and some of the stencils. The Hobbycraft insignia were more crisp than the Falcon offerings so those were used. The swastikas on both sheets were not that great and I used spares for those, courtesy of Xtradecal. Once those were dry, the excess Champ setting sollution was removed, the antenna installed and painted, and the antenna wire made of stretched sprue. The kit was then sprayed with clear matte. Next the very tedious and seemingly endless job of removing the masking from the canopy was done. Pastels were used to simulate exhaust stains and finally clear matte was used to fix the pastels in place. Canopy handles and braces were made of stretched sprue and that was it.
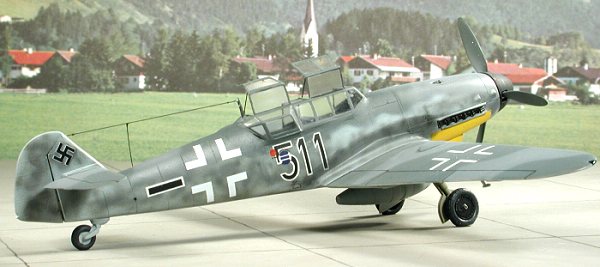
Overall it looks very nice on my shelf. Were I to do another, I wouldn't botch the canopy to fuselage job so badly. It was a nice change from a 'slap together' kit and let me use up a bunch of spare parts!
Recommended if you have experience with limited production kits and have a goodly supply of spare parts.
March 1999
Copyright ModelingMadness.com All rights reserved.
Back to Reviews Page
2020