Kit: Bf-109G-6
Scale: 1/72
Kit Number: 230
Manufacturer: Heller
Price: $3.00
Media: Injected Plastic
Decals: one version, Luftwaffe
Reviewer: Scott Van Aken
Date of Review: 13 August 1997
The Bf-109 G-6 was probably the most produced variant of the 109 family. Estimates are that of the 33,000 109s manufactured, around 10,000 or more were of the 109G. Despite its known weaknesses (fragile undercarriage, poor handling at high speed, cramped cockpit) the 109 was much loved by most of those that flew it.
The Heller Bf-109G-6 was one of many aircraft produced by this French company in the mid 1980's. Considered very simple by today's standards, this kit makes into a nice representation of the 109. Molded of grey plastic with raised panel lines, Heller's Bf-109G kit had several options not available on other 109 models in this scale. They include boxed in main wheel wells, opening canopy, and a relatively well appointed interior.
As with most kits, the interior is where this review starts. It is relatively complete with seat, stick, instrument panel and armor plate (which is actually attached to the canopy). There is some rudimentary sidewall detail, consisting of a few black boxes and the trim wheel. This was painted RLM 02, although I now know that interiors should be RLM 66. I had no problems with the fuselage halves, which trap the baseplate of the prop spinner. Next the supercharger intake was attached. This is a two piece affair that looks quite convincing when complete. Wings and tailplanes also provided no problems in construction. I opened up the hole in the wing for attachment of the underwing fuel tank. You can also place 20mm canon gondolas on the kit. There are spaces marked on the wing for them that need to be sanded off if not installing these guns.
Attachment of the wing to fuselage is straightforward and only a small amount of filler is needed for a good fit. At this time I attached the fuel tank mount and the very over scale aileron balances. The windscreen and aft canopy were glued in place and masked. Next the center section of the canopy was masked and temporarily attached using white glue. The actual fit of the center section is not good unless you file away a portion of the lower section of this transparency. Otherwise it will ride too high on the sills. Since I was mounting it open, this was not a problem.
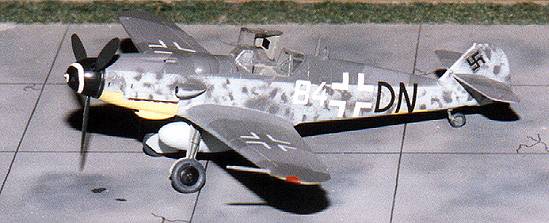
Paint scheme was RLM 74/75/76 with 74/75/02 mottle. First step was painting various parts of the airframe white in preparation for the yellow markings. I chose a training unit that was stationed in eastern Poland during the last year of the war. This meant that it needed eastern front markings of yellow fuselage band, under nose section and under the wing tips. There has always been some confusion as to the exact shade of yellow used as there are two yellows, RLM 04 and 27. RLM 04 is a deep yellow/orange similar to what you see on a school bus, while RLM 27 is a paler yellow. I tried for the pale yellow by mixing various Testors paints until I got what looked good. These areas when painted white then yellow were masked off when dry. Note that the fuselage band is only on the underside on this aircraft.
The mottling was done using a mask. A sheet of paper was pierced with different size holes and then held close to the fuselage. An interesting way of doing mottling, but more time consuming than doing it free-hand. Since this was a training aircraft, the factory codes (HA+DN) were left on the fuselage and under wings except where oversprayed for the aircraft number. All decals came from various sheets of Microscale and Modeldecal decals.
Probably the least convincing part of the kit are the landing gear. The tail wheel in particular, looks toy-like. The main gear are quite basic and the wheels are supposed to be late war stamped steel, but seem too thin. Final assembly consisted of attaching the undercarriage, propeller and spinner. Radio antennas, pitot tube and aileron balances being glued on prior to painting. The last job was to hand paint the propeller spiral. It doesn't look pretty, but since these things were hand painted anyway, at least I'm accurate!
The kit was fun to build and took very little time compared to kits today. The end result is nice model and one that can be built by anyone. Highly recommended.