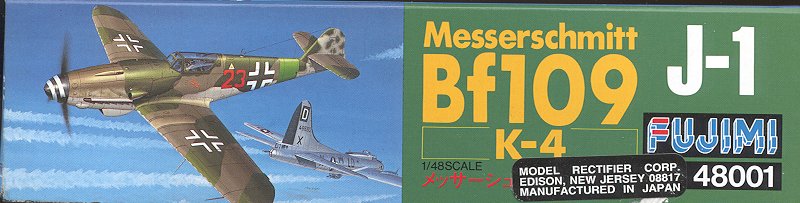
Kit: Fujimi 1/48 Bf-109K-4
Kit # 48001 (J1)
MSRP $35.00
Decals: four versions all painted the same in late war RLM 81/83 upper
with RLM 76 or '84' undersides.
Yellow 1,4 and 8 from 11/JG 3 and Red 23 from JG 27
Date of Review: May 1999
Review and photos by: Scott Van Aken
Last in a line of Bf-109s that extends from the mid-1930's, the K was the ultimate 109. All the previous modifications and upgrades were designed into this one version. Powered by the DB605D engine with MW 50 Methanol/water injection power boost, driving a new paddle bladed prop, and armed with two MG 131 13mm machine guns and on MK 108 30mm cannon, the 109K-4 was further refined with outer main landing gear doors (originally designed for the 109G-1) and a retractable tail wheel. While all these modifications made for a fast aircraft, it was still a 1935 design and the added weight only made it more difficult to handle at high speeds.
The new Bf-109 appeared on the front in late summer of 1944 and together with the G-10 an G-14 were delivered to a number of Luftwaffe fighter groups flying the Bf-109. Unfortunately, by this time the quality of pilots was not up to the task of handling this aircraft so the success of the type was not what it would have been with a more experienced pilot. Having said that, those pilots of quality still in service used the K-4 to further increase their scores until the final days of the Reich.
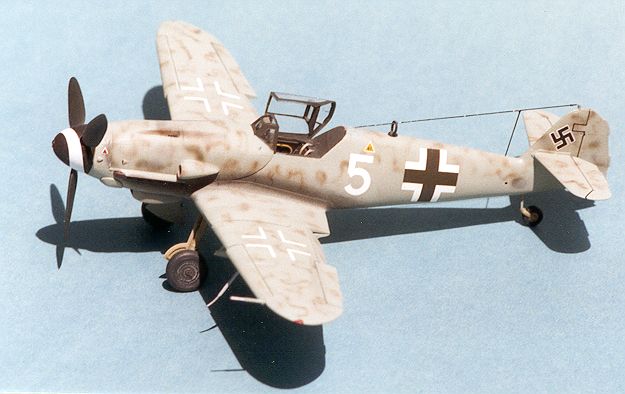
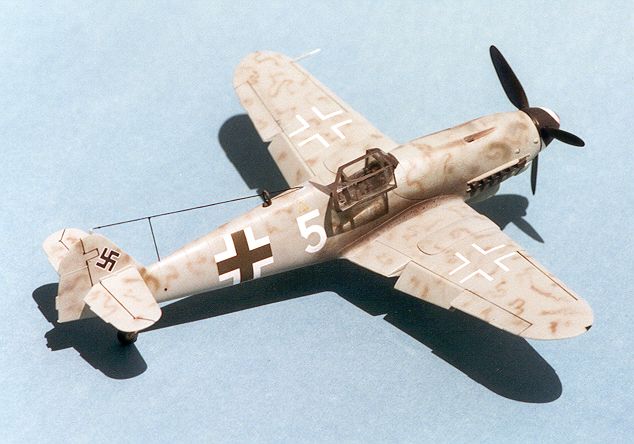
Probably the most interesting thing about the K-4 for the modeler, is the number of 'non-standard' camouflage schemes that it wore. This kit is being built as White 5 for NJG 11, found at Holzkirchen, Germany at the end of the war, using the great new decal set from Kommandeur. For more information on the 109K, I can heartily recommend any of the references listed at the end of this review.
Now, on to the kit. In 1993, Fujimi embarked on a program of new 109 kits; choosing the later versions of G-6 to K-4. The reason for this was to enable Fujimi to use the commonality of the airframes to produce a variety of versions using the 'mix and match' tooling that is now so common. The result of this is two-fold. First of all, it does produce a very fine selection of 109 kits and secondly, it provides a lot of extra parts for your spares box! Fujimi's 109's have come to be scorned by a number of 'plastic experten' who bemoan some sort of inaccuracy in the profile of the kit. While it may be true that it is off a millimeter here or there, the fact is that 99.99% of modelers and others cannot spot the errors and it shouldn't put you off building this kit. What may put you off (and did a number of people when it was released), is the price of the kit. Much of the blame for this goes to the distributor, MRC, who grossly overpriced Fujimi kits. These kits, when you can find them, are now more reasonably priced around $20.00.
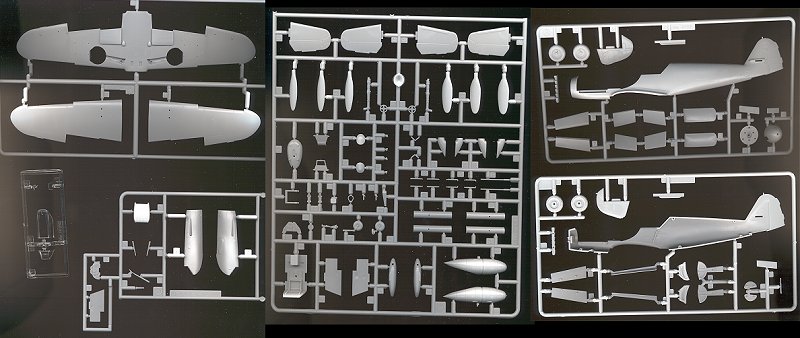
As you can see from the image, you get a lot of plastic for your money with this kit. The flaps and oil cooler outlet doors can be placed in the down position if so desired. In addition, the canopy (a late war Erla Haube with armor plate) can be placed in the open position if desired. Before we begin construction, you need to be warned of a couple of things. First off, for some odd reason, the main landing gear wheels are a different thickness. While this can be cured by having two kits and just matching the same thickness wheels, you may not have two kits so aftermarket wheels are a must. Next, probably the trickiest part of building this kit is getting the engine cowling to properly fit. It can be done, but needs patience and tweaking to succeed. Finally, the tailplanes suggested for this version have some sort of plate on the leading edge. Where Fujimi got this is beyond me as no 109 ever had such a thing. Simply use the other tailplanes. This kit includes the correct late war fin and rudder. There were two versions, one without the external trim tabs so you may have to sand them off, depending on the aircraft you are modelling.
 |
 |
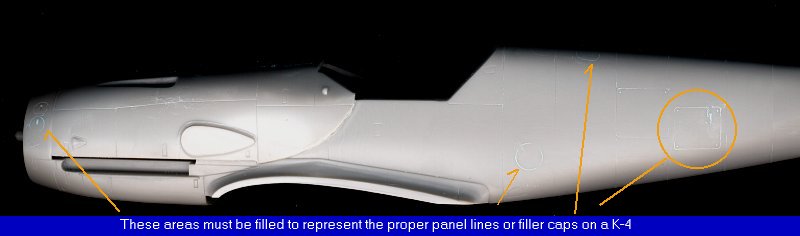
 Finally,
since this is a multi-version airframe, all possible combinations of panel
lines, hatches and attachment points are given, This means you need to fill
in what is not appropriate. Fujimi does not point this out directly,
but looking at the drawings helps. I went to the drawings in the references
to get a more accurate assessment. On the left side you need to fill in the
aft radio hatch, the aft fuel filler and the large circle under the cockpit.
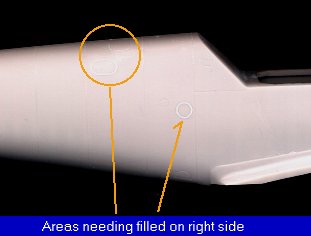
On the right side the two oval fillers on the second frame aft of the cockpit
need filled as does the large circle on the first frame aft of the cockpit.
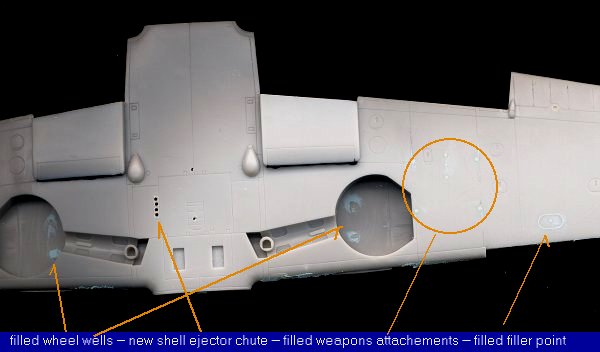
On the underside of the wings, the large oval just behind the slat on the
right side needs filled. On both sides the three small holes between the
mounting holes for the 21CM rocket tube need filled as do the rocket tube
mounts if you are not using that option. In the center section, the
vents behind the MG link ejector holes need filled. The vent for the MK 108
cannon needs to be cut out and this is shown in the Fujimi instructions,
however it is shown on the wrong side as compared to the drawings in the
Poruba/Jana book and those drawings in the Monogram Close-up. The choice
is yours as only the anal-retentive will notice. However, being anal in this
step, I rescribed the area, drilled several small holes inside the rescribed
section and later opened it up!
Finally,
since this is a multi-version airframe, all possible combinations of panel
lines, hatches and attachment points are given, This means you need to fill
in what is not appropriate. Fujimi does not point this out directly,
but looking at the drawings helps. I went to the drawings in the references
to get a more accurate assessment. On the left side you need to fill in the
aft radio hatch, the aft fuel filler and the large circle under the cockpit.
On the right side the two oval fillers on the second frame aft of the cockpit
need filled as does the large circle on the first frame aft of the cockpit.
On the underside of the wings, the large oval just behind the slat on the
right side needs filled. On both sides the three small holes between the
mounting holes for the 21CM rocket tube need filled as do the rocket tube
mounts if you are not using that option. In the center section, the
vents behind the MG link ejector holes need filled. The vent for the MK 108
cannon needs to be cut out and this is shown in the Fujimi instructions,
however it is shown on the wrong side as compared to the drawings in the
Poruba/Jana book and those drawings in the Monogram Close-up. The choice
is yours as only the anal-retentive will notice. However, being anal in this
step, I rescribed the area, drilled several small holes inside the rescribed
section and later opened it up!
As with most of my models, the first step is to put into the spares box all the parts that I won't be using on the kit. Next, is to start building subassemblies. In this case, it means drilling out holes where needed , puttying up all the unwanted panel lines, and gluing together smaller bits like the fuel tank and supercharger intake. Don't forget to open the holes in the lower nose for the oil cooler line fairings and the aft hole in the upper fuselage for the DF antenna. With this kit, the upper wing needs to have the long wheel bumps added. Now this can be a problem as they come very close to the leading edge of the wing, making any filler work difficult at best. However, since the holes for attaching the upper wing wheel bumps are very prominent in the wheel wells, these items need to be added so the holes can be filled and smoothed prior to attaching the upper wing. At this time the radiators were also installed in the lower wing. The grills face forward leaving a bare plastic back to look upon should you decide to display the coolant flaps open. Also the flaps and coolant doors were glued together.

The fuselage can be glued together prior to the installation of the interior which will neatly fit through the large opening in the bottom of the fuselage. After the glue dried, I applied filler to a few spots on the spine. I'm not the careful builder that many of you are so have to pay for it with filler! It was then on to the interior. I must mention at this time that the gun breech cover in the kit is actually too small for the Mk108 30mm nose cannon installed in the 109K. Having said that, I used it anyway as I am building this kit as close to out of the box as possible. The only additions to the interior were tape seat belts and rudder pedal foot straps. The instrument panel was painted and gussied up a bit, glued into place and then it was time to insert the interior. Whoops! No go! A bit of trimming on the aft guides and it slides right in. (whew!). As that is drying the nose 'bumps' for the oil lines are installed. (You did remember to open the holes for these didn't you?)
Following that, the lower wing is glued in place. The fit is a bit fussy but pretty good. Tight is not the operative word on this and a bit of filler may be needed on the aft wing/fuselage join. The wing upper surface fits well and with the wings held with tape, the join in glued. Once dry it is a good fit. Moving aft, the tailplanes are glued in place. Don't use the ones the kit suggests. Where they got those large plates is anyone's guess, but I have never seen such things on any 109. Use the other tailplanes.When that is dry, flip the aircraft over and attach the nose cooler and radiator. My 109K had a fixed tail wheel so the doors were glued in the closed position. Wing radiator doors and flaps were then glued in place and attention was then paid to some smaller bits that needed installed prior to painting. Specifically the tiny little nose air intakes, the supercharger intake and the aileron balances. The cockpit and wheel wells were then stuffed with tissue and it was off to the paint shop for the first round of painting.
 Actually, painting is one of my favourite parts of kit building. I have always
maintained that a kit is just a blank canvas for a camouflage and markings
scheme! This one was to be painted as per the
Kommandeur
sheet. Actually pretty simple. Overall RLM 76 with little squiggles all
over it in RLM 81 with a few in RLM 83. All paint from the Aeromaster line
of enamels. Once the little squiggles were painted on, it looks a bit too
harsh so the entire airframe was lightly misted with RLM 76. It was
then overcoated with Future when dry. Next the decals were applied.
The instructions state that this aircraft had no stencils on it. . Kommandeur
is pretty meticulous about their schemes so can be trusted to give good
information. However I couldn't leave it so bare so added just a few. As
usual the decals are superb. Very thin and opaque. A real joy to use.
Even killer setting solution like Champ doesn't faze them.
Actually, painting is one of my favourite parts of kit building. I have always
maintained that a kit is just a blank canvas for a camouflage and markings
scheme! This one was to be painted as per the
Kommandeur
sheet. Actually pretty simple. Overall RLM 76 with little squiggles all
over it in RLM 81 with a few in RLM 83. All paint from the Aeromaster line
of enamels. Once the little squiggles were painted on, it looks a bit too
harsh so the entire airframe was lightly misted with RLM 76. It was
then overcoated with Future when dry. Next the decals were applied.
The instructions state that this aircraft had no stencils on it. . Kommandeur
is pretty meticulous about their schemes so can be trusted to give good
information. However I couldn't leave it so bare so added just a few. As
usual the decals are superb. Very thin and opaque. A real joy to use.
Even killer setting solution like Champ doesn't faze them.
Once all that was done, the canopy and windscreen were masked and painted RLM 66 along with the DF antenna for the spine. Next the exhaust and the shields were installed. A bit of surgery was required to get them to fit, but nothing major at all. This kit was built basically out of the box. in order to keep it that way, the pilot's harness was made from masking tape. The underfuselage rack is not part of the kit and was not permanently attached in case I wanted to take the aircraft to a contest. It was swiped from a Hobbycraft kit. It is an ETC 500 rack designed to carry a 250Kg bomb. It fits in the holes for the drop tank so come contest time, the drop tank can be fit in it's stead.
Did I mention how nice the decals are? In fact, I didn't get the upper wings gloss enough but the use of Champ setting solution ensured that the decals snuggled right down with no silvering. After that it was setting solution cleanup, a matte overspray and addition of the final parts like the canopy, underwing antenna, wheels and struts, gear doors, slats, and DF loop, The antenna long wire was made from stretched sprue. The prop was glued on and pastels were used for gun and engine exhausts. Finally the aileron, rudder and stabilizer hinge lines were accented with a Rapidograph pen.
Overall a very nice model. In fact, all the Fujimi 109's build up very well, and give you lots of spare parts for other kits. This is the fourth one I have built and have several more stashed away for future projects. If you have one and haven't built it yet, give it a try. You'll like the result.
References:
Monogram Closeup #16, Bf-109 G/K: Thomas Hitchcock, 1979
Broken Eagles #2 Bf-109G/K: Carl Hildebrandt, 1988
Messerschmitt Bf-109F,G,K: Jochen Prein & Peter Rodeike, 1995 (revised)
Messerschmitt Bf-109K: T Poruba & A Jana, 1997
Copyright ModelingMadness.com. All rights reserved.