|
BACKGROUND |
For a peek in the box at the naked kit and bit of historical background, visit the preview.
MPM 1/72 Bf-109v1
|
KIT # |
72029 |
|
PRICE: |
$12.98 |
|
DECALS: |
One aircraft |
|
REVIEW: |
|
|
NOTES: |
Short run kit |
BACKGROUND For a peek in the box at the naked kit and bit of historical
background, visit the preview.
|
CONSTRUCTION |
If you don't think that MPM has come a long way, then compare
this, one of their earlier (though not REAL early) kits with what is now being
produced. It is a real difference. MPM is on the verge of being one of the best,
a plateau that has been reached by Eduard over the last year or so.
First thing is to clean up the parts that are to be glued together. This is a
chore but one that must be done. Fortunately, MPM used a relatively hard plastic
during this time so overdoing the cleanup isn't a problem as it is with more
current and softer plastic. Though the kit seems relatively simple, I've learned
that simple is not always easy! The first thing I did was to glue as many of the
cockpit parts together. This included the etched rudder pedals and trim wheels
as well as the etched circuit breaker panel on the inside of the fuselage. All
of this was then painted RLM 02 grey as it seemed like a logical color for the
time.
Then the fuselage halves were glued together and the seams filled and
sanded smooth. I also glued together the upper and lower wing halves and
sanded down the join lines. Test fitting the wing and fuselage showed that
things were not going to be easy. I also glued the etched radiator and the
radiator housing in place. This was a mini-disaster as the etched radiator
was smushed during installation. To keep the situation from being really
obvious, I glued the plastic radiator into the back of the opening so that
things would stay nice and dark in there! And then the kit sat for nearly
two years as I'd lost interest in it.
Deciding that I needed to decrease the pile by one, I got back into working
on this kit. Blowing the dust out of things, I started by gluing the
instrument panel into the fuselage. Then I added the seat belts to the
interior, painted them tan (which is a tad too dark), bent them in place
and then forced the interior into place. Liberally applying Pro-Weld to it,
it managed to slither into place where it was clamped until dry. I then cut
the rudder off the sprue, cleaned it up and glued it in place. Though this
is an MPM kit, it is something from the dark ages of short run and not at
all like what they do today. All the parts have lots of flash, very large
sprue attachment points and detailing is soft.
While that was drying, I cleaned up the tail wheel assembly. It was glued
in place and it does seem overly large. The main gear legs were cleaned up
and holes drilled in the wheel wells to accept them. I should mention at
this time that there was quite a bit of flash around and in the wheel wells
that needs to be cleaned up.
I then cut the canopy from its backing and after a bit of trimming to get a
good fit, It was glued in place using non-fogging superglue. It was then
masked off in preparation for painting. I decided on the overall light grey
scheme so installed the tail plane braces and headed for the paint shop.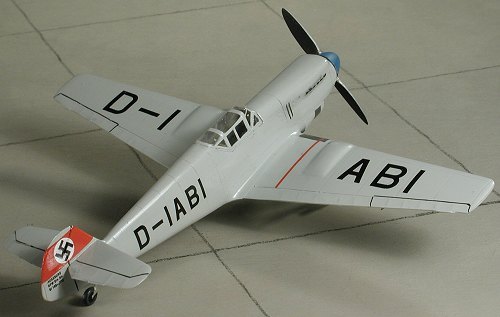 This kit has rough edges, flash, soft molding, a brass fret, vac
canopy and vague parts attachment points. However, nearly all short run model
companies go through this sort of thing, producing mediocre kits at the
beginning. It is too bad that some of the more interesting subjects are usually
done right off the bat. That is the case with this Bf-109V1. It is unlikely that
MPM will retool it so one does the best with what is offered.
This kit has rough edges, flash, soft molding, a brass fret, vac
canopy and vague parts attachment points. However, nearly all short run model
companies go through this sort of thing, producing mediocre kits at the
beginning. It is too bad that some of the more interesting subjects are usually
done right off the bat. That is the case with this Bf-109V1. It is unlikely that
MPM will retool it so one does the best with what is offered.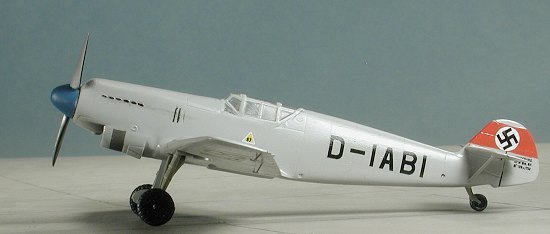 After much fiddling, I got the wing somewhat in place. The wing is too thin
to have the upper wing match with the wing roots so I had to slather filler
on this and all the other wing joins. I'm sure it will require multiple
applications to get a decent fit. Once that was accomplished, the
tail planes were glued in place. These seem a bit too wide as they'd block
the movement of the rudder. I left the bracing off until a bit later as I
was unsure of just what the paint scheme was to be, there being some
difference of opinion in the various literature as to whether it was an
overall light grey or if it had a light blue underside.
After much fiddling, I got the wing somewhat in place. The wing is too thin
to have the upper wing match with the wing roots so I had to slather filler
on this and all the other wing joins. I'm sure it will require multiple
applications to get a decent fit. Once that was accomplished, the
tail planes were glued in place. These seem a bit too wide as they'd block
the movement of the rudder. I left the bracing off until a bit later as I
was unsure of just what the paint scheme was to be, there being some
difference of opinion in the various literature as to whether it was an
overall light grey or if it had a light blue underside.
|
PAINT & DECALS |
Once dry, the main gear was inserted into the holes in the wheel well and
the gear doors glued in place. Those who are really into the 109 and want
everything perfect will be wanting to replace the gear with parts from a
Hasegawa 109 kit and make new gear doors. The ones with the kit are not
like those on the prototype, whose doors were more semi-circular with no
notches on the ends. Next the little etched aileron mass balances were
glued in place after drilling small depressions in the aileron for them to
fit. Etched brass just doesn't hack it for things like this that are
clearly three dimensional. Not only that, but they bend easily. I've
mentioned many times that some inventive aftermarket company who does
things in either metal, resin or injected plastic would do well to make
these things in many different scales. Anyone who does models that have
these things can always use them to replace etched pieces or the regular
injected ones that so frequently go missing or broken off.
The model was then sprayed with an overcoat of Future to keep the decals in
place and the prop/spinner was glued onto the nose. Masking was removed
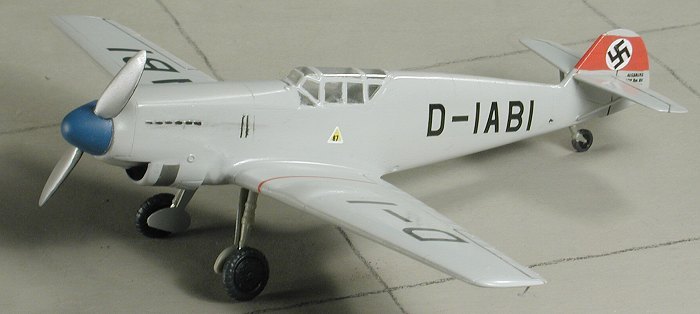
from the canopy, a teeny bit of pastel used for exhaust and I was done!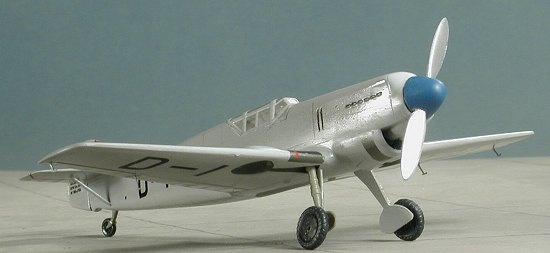 According to one of the more recent books on German camouflage, a color one
could refer to as 'Lufthansa Grey'
was frequently used on prototypes during the time that the Bf-109, He-112
and others were developed. Not having this, but having a color chip in the
book, I mixed up something that came pretty close using Xtracolor paints. I
then sprayed the entire airframe with this hybrid light grey scheme. The
prop and hub were painted polished aluminum using Alclad II paints. I also
painted the wheel hubs and the back of the prop blades black at this time.
Then the small strip under the nose and the equally small bit on the right
wing were painted steel as the instructions called for a dark metallic
color. I chose not to model the option with the blue lower surface. It is
also quite possible that my grey is too light, but it is done and it looks
nice to me. I also painted the prop with polished aluminum on one side and
flat black on the other. The spinner was done in a nice blue I happened to
have already mixed and it looked close enough. The spinner seems a bit on
the bulbous side to me as well, though I couldn't really tell for sure from
the few images of the plane that are around.
According to one of the more recent books on German camouflage, a color one
could refer to as 'Lufthansa Grey'
was frequently used on prototypes during the time that the Bf-109, He-112
and others were developed. Not having this, but having a color chip in the
book, I mixed up something that came pretty close using Xtracolor paints. I
then sprayed the entire airframe with this hybrid light grey scheme. The
prop and hub were painted polished aluminum using Alclad II paints. I also
painted the wheel hubs and the back of the prop blades black at this time.
Then the small strip under the nose and the equally small bit on the right
wing were painted steel as the instructions called for a dark metallic
color. I chose not to model the option with the blue lower surface. It is
also quite possible that my grey is too light, but it is done and it looks
nice to me. I also painted the prop with polished aluminum on one side and
flat black on the other. The spinner was done in a nice blue I happened to
have already mixed and it looked close enough. The spinner seems a bit on
the bulbous side to me as well, though I couldn't really tell for sure from
the few images of the plane that are around.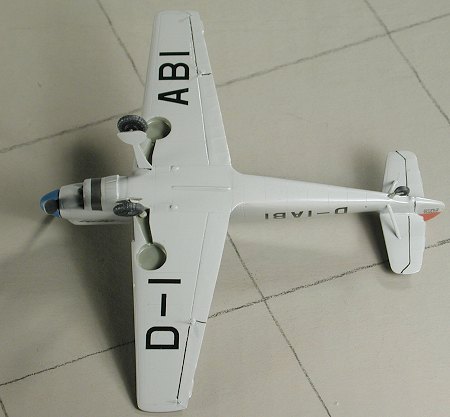 Returning to the workbench to add on some more bits and pieces, I first
brush painted the wheel wells with RLM 02 from Testors ModelMaster line of
enamels. I also painted the tail wheel strut, main gear struts and inner
gear doors this color. The wheels were black with weathered black tires.
The gear legs had Bare Metal Chrome foil wrapped around the oleos. The main
gear have these large circular bits at the end of them. They look like some
sort of huge drum brake, but I doubt if the prototype had these at all.
There are indentations in the wheels to accept a pin from the end of the
struts, but those little nubbins got eradicated when I cleaned up the
strut. The small oleo scissors were glued in place and the wheels glued to
the end of the strut.
Returning to the workbench to add on some more bits and pieces, I first
brush painted the wheel wells with RLM 02 from Testors ModelMaster line of
enamels. I also painted the tail wheel strut, main gear struts and inner
gear doors this color. The wheels were black with weathered black tires.
The gear legs had Bare Metal Chrome foil wrapped around the oleos. The main
gear have these large circular bits at the end of them. They look like some
sort of huge drum brake, but I doubt if the prototype had these at all.
There are indentations in the wheels to accept a pin from the end of the
struts, but those little nubbins got eradicated when I cleaned up the
strut. The small oleo scissors were glued in place and the wheels glued to
the end of the strut.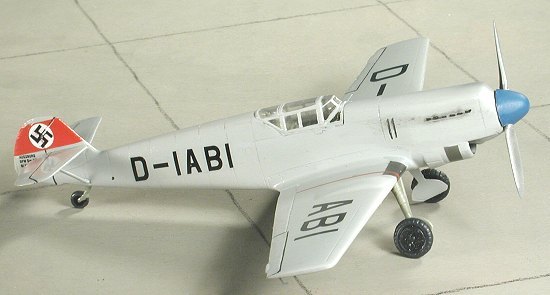 I now had the aircraft basically done in terms of fitting bits on it. The
decals in the kit are by Propagteam. These took an age to get loose enough
to come off the backing sheet, but once they did, they worked very well.
They were not as prone to tearing as other Propagteam decals. One thing,
though. The tail band is way too wide for the kit. It may be that the tail
planes are too high or the fin/rudder too short, but I ended up going to an
Xtradecal sheet of swastikas that has a variety of sizes and a large chunk
of red. I cut out the proper sized band and fit it on the fin.
Unfortunately, all the white circles on the sheet were too large. I then
went to a stash of geometric shape decals I have from back in the 80's. It
has rings and circles in many sizes and colors. I chose one ring and one
full circle that fit properly. Later, I added the smallest swastika from
the Xtradecal sheet and it seemed to work fine. All these decals reacted
well to my Solvaset.
I now had the aircraft basically done in terms of fitting bits on it. The
decals in the kit are by Propagteam. These took an age to get loose enough
to come off the backing sheet, but once they did, they worked very well.
They were not as prone to tearing as other Propagteam decals. One thing,
though. The tail band is way too wide for the kit. It may be that the tail
planes are too high or the fin/rudder too short, but I ended up going to an
Xtradecal sheet of swastikas that has a variety of sizes and a large chunk
of red. I cut out the proper sized band and fit it on the fin.
Unfortunately, all the white circles on the sheet were too large. I then
went to a stash of geometric shape decals I have from back in the 80's. It
has rings and circles in many sizes and colors. I chose one ring and one
full circle that fit properly. Later, I added the smallest swastika from
the Xtradecal sheet and it seemed to work fine. All these decals reacted
well to my Solvaset.
|
CONCLUSIONS |
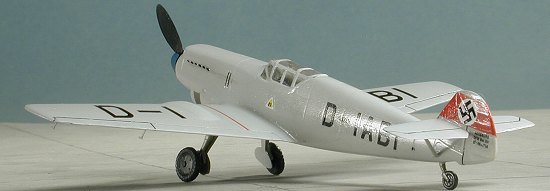 A perfect 109v1 it isn't. It needs a new set of landing gear and smaller
tailplanes. You know about the decals. However, for most of us, we'll be
quite pleased with it and it will look great in with our 1/72 109
collection. It is quite doubtful if we'll see a better kit of this plane in
the near future as one-off prototypes are not exactly what the injected
plastic people do a lot of. Thankfully, MPM saw fit to produce this and
several others in its line and for that we should be thankful. Hopefully,
my next MPM kit won't take 2 years plus from start to finish!
A perfect 109v1 it isn't. It needs a new set of landing gear and smaller
tailplanes. You know about the decals. However, for most of us, we'll be
quite pleased with it and it will look great in with our 1/72 109
collection. It is quite doubtful if we'll see a better kit of this plane in
the near future as one-off prototypes are not exactly what the injected
plastic people do a lot of. Thankfully, MPM saw fit to produce this and
several others in its line and for that we should be thankful. Hopefully,
my next MPM kit won't take 2 years plus from start to finish!
|
REFERENCES |
German Aircraft of the Second World War, by JR Smith & Antony Kay, Putnam, 1978 (3rd Edition)
February 2004
#1304 in a series
Copyright ModelingMadness.com. All rights reserved
If you would like your product reviewed fairly and fairly quickly, please contact the editor or see other details in the Note to Contributors. 20