| KIT #: | 84164 |
| PRICE: | $24.95 SRP |
| DECALS: | One option |
| REVIEWER: | Scott Van Aken |
| NOTES: | Weekend edition |
| HISTORY |
 bit confusing to those who try to keep track of
such things, but the Bf-109 E-3 is not a 'newer' aircraft than the
Bf-109E-1.
bit confusing to those who try to keep track of
such things, but the Bf-109 E-3 is not a 'newer' aircraft than the
Bf-109E-1.
It wasn't until the Bf-109E-4 went into production that Messerschmitt settled on cannon armament for the wings. At that time, combat experience had shown that a more robust canopy and armor plating might not be a bad idea and so was made standard. Some of that was retrofitted to the earlier E-1 and E-3 airframes. Several E-1s were also modified for fighter-bomber roles and outfitted with a bomb rack. These early 109Es were NOT plumbed for a drop tank. By the time the F models entered service, most of the early E-1/3 planes had either been sold overseas, sent to training squadrons, or used in areas where there wasn't much Allied air activity.
Though only used for a few months prior to the end of hostilities, there were some Bf-109E-1s that were sent to fight with the Condor Legion in Spain. However, by the time they arrived, there was little in the way of air to air activity.
| THE KIT |
For those of you not familiar with Eduard's Weekend Edition kits, these are the standard plastic bits from their Profipack kits, but without the photo etch, any resin, any masks and limited to but a single, often rather basic, decal option. This causes some omissions that many other kits would have included and I will touch on those in a bit.
Eduard's kits have earned a reputation for being well
engineered and quite detailed. No longer are they high volume short run kits,
but are right up there with the big boys and have been for several years. Often
accused of over-engineering their kits, this one shows signs of some of that,
but at least one does not have to build it with everything open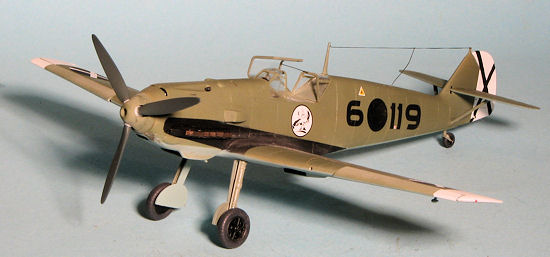 ed up as was the
curse of their very nice FW-190A kit.
ed up as was the
curse of their very nice FW-190A kit.
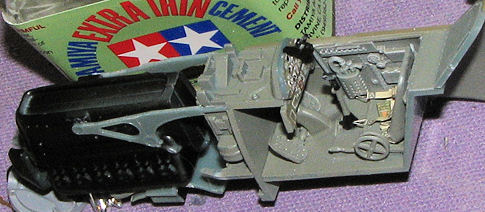
This kit has a nicely detailed cockpit with sidewall detail, rudder pedals, a nice seat and well detailed instrument panels. By having no photo etch, you get a rather bland seat, but there are resin replacements that include belt detail. The kit also comes with a complete engine. Some will think this is a great addition and others are more luke-warm to the idea. Fortunately, those who want to model their 109 with all the covers in place, this has been taken into consideration and the instructions have sections on building things closed up, though the construct will be more fiddly than simply sticking an upper cowling over the engine. You still need the basic engine block to provide a prop shaft and a place to install the exhaust. The exhaust is six separate pipes on each side of the engine. I would have liked to have seen a single mold option.
Since there is no photo etch, there is no detail on the oil cooler and on the radiator faces. As these can be visible, you may well want to look for something that can be used to add some detail here. The kit includes separate flaps so these can be modeled in the lowered position. It would have been nice if the elevators were separate as well, but these should be pretty easy to cut and reglue lowered if you wish. Landing gear is nicely done and the wheels are three parts with separate inner and outer wheels as well as a separate tire. The clear bits are crisply done with separate windscreen, canopy and backlight. The instructions show an armor plate being installed in the canopy while the box art shows the aircraft without one. It was not until the Battle of Britain that most 109s added head armor so the choice is yours.
| CONSTRUCTION |
This will be the third Bf-109E-1 I have built with the other
two by Hobbycraft and Hasegawa being done quite a few years back. I has been a
very long time since I built an Eduard kit, the last one I did was their P-39
shortly after it was released. Not sure why t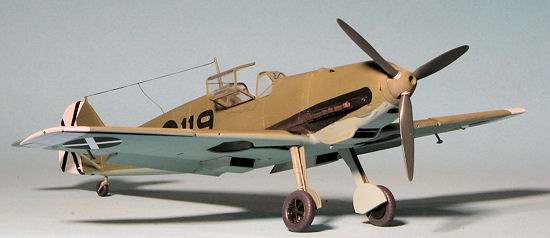 he long delay, but there it is.
Seeing this kit new on the dealer's shelves, I decided to give it a go.
he long delay, but there it is.
Seeing this kit new on the dealer's shelves, I decided to give it a go.
Since Eduard kits seem to be rather fiddly, I thought it best to follow the instructions somewhat on this one. It means I began with the interior. This starts with putting in a couple of small frames on either side of the cockpit, then building up the interior. According to Eduard, just about everything on the inside is RLM 02. I did find that Eduard uses multiple pieces for an assembly where others would be able to get by with one. I assembled all the inside parts aside from the seat. For this, I used my handy Eduard Luftwaffe seat belt set; 49002, which includes belts for an early 109. To use them, I needed to drill a slot in the back of the seat so that was done and the belts were glued in place. The seat was then cemented into the cockpit. For the instrument panels (Eduard divides them into upper and lower panels), I used an old ProModeler decal sheet that does 109 and 190 instruments. Easier than painting them and they are a pretty good match.
The upper instrument panel fits onto the section that holds the guns. This, in turn, fits atop a bulkhead that includes the two ammo cans for the nose machine guns. You really do have to build this up, even if you will be keeping the cowling closed. I then built up the engine. Eduard has a list of bits not needed if you are doing a closed cowling model. As that is what I was doing, I did the minimum build. Then painted the engine black before attaching the motor mounts. These fit into very small slots on the gun section. It is not exactly a firm fit, something I found throughout the build.
 Where one kit
would use slots or holes, Eduard uses depressions. This is the case when
installing the oil cooler radiator and its surrounds. Eventually, I got the
major interior bits together and glued them into the right fuselage half. This
includes the separate rear deck piece. You need to be very sure all of the bits
are properly aligned or you will not be able to install the engine exhaust
stubs. Once all those pieces were in place, I painted and glued in the tail
strut then cemented the fuselage halves together.
Where one kit
would use slots or holes, Eduard uses depressions. This is the case when
installing the oil cooler radiator and its surrounds. Eventually, I got the
major interior bits together and glued them into the right fuselage half. This
includes the separate rear deck piece. You need to be very sure all of the bits
are properly aligned or you will not be able to install the engine exhaust
stubs. Once all those pieces were in place, I painted and glued in the tail
strut then cemented the fuselage halves together.
While that was setting, I turned to the wings. First, the wheel wells were glued in place. Again, these fit into rather wide depressions with lots of slop room. There are small indentations in the top of each wheel well section that needs to have the rib detail in the upper wing fit through them. Be sure this happens before the cement sets by dry fitting and taping the upper wing during this process. While with the wing, I painted the radiator sections and glued the housings in place. I also glued on the small curved sections to the underside of the flap pieces.
The wings were then attached to the fuselage. The fit is really very good; not perfect, but quite good. Filler was needed at the front and rear wing/fuselage join. I also found the the root on one side had a step in it. Not sure if I am going to fix it or not.
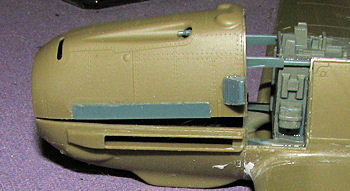 Then the real
mess. Eduard gives instructions on building the kit with the cowlings closed. It
is basically a list of what parts are not required. What it does not say speaks
volumes and makes this a nearly impossible task. I can tell you that it sure
seems that Eduard did
not bother trying to see if the kit could be built with the cowlings closed or
they would have spotted the problems right away. First of all, even with the
engine at bare bones, the cowling will not fit. If you look at the image with
the cowling simply placed atop the nose, you can see an issue with fit. So,
still wanting to build this as the instructions stated, I pressed down on the
cowling and used super glue and accelerator to hold it in place. The first time,
it broke free to the pressure. The second time, I got it on pretty well. You can
see the small elongation just under the gun trough where the engine stressed the
plastic on the cowl.
Then the real
mess. Eduard gives instructions on building the kit with the cowlings closed. It
is basically a list of what parts are not required. What it does not say speaks
volumes and makes this a nearly impossible task. I can tell you that it sure
seems that Eduard did
not bother trying to see if the kit could be built with the cowlings closed or
they would have spotted the problems right away. First of all, even with the
engine at bare bones, the cowling will not fit. If you look at the image with
the cowling simply placed atop the nose, you can see an issue with fit. So,
still wanting to build this as the instructions stated, I pressed down on the
cowling and used super glue and accelerator to hold it in place. The first time,
it broke free to the pressure. The second time, I got it on pretty well. You can
see the small elongation just under the gun trough where the engine stressed the
plastic on the cowl.
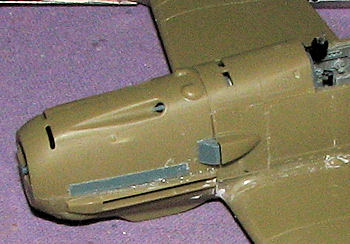 Getting the
other three parts to fit was also a mess. All that detail you see in the gun
compartment had to be removed and I even tried sanding down the motor mount to
get the upper and side panels to fit. Gaps galore and a major step on the right
side. The left side, poor fitting though it is, is the good side. Once this was
glued, I broke out the filler to take care of the gaps and the major step. I
managed to sand away a small intake on the right side and thanks to the
large gap, I have concerns about the windscreen fitting properly.
Getting the
other three parts to fit was also a mess. All that detail you see in the gun
compartment had to be removed and I even tried sanding down the motor mount to
get the upper and side panels to fit. Gaps galore and a major step on the right
side. The left side, poor fitting though it is, is the good side. Once this was
glued, I broke out the filler to take care of the gaps and the major step. I
managed to sand away a small intake on the right side and thanks to the
large gap, I have concerns about the windscreen fitting properly.
So, how to fix this. Several theories here. You need the upper
gun piece as it holds the instrument panel. Sand that puppy flat before gluing
it to anything. Do not install the ammo cans. Do not install the engine or the
motor mounts. Instead, get a piece of plastic card and glue it to the lower
front. Trim it so the upper cowling will fit.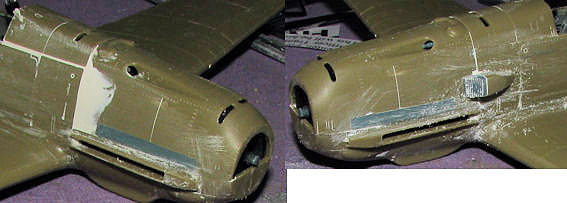 Drill a hole in it for the
prop. Glue the prop shaft to the prop itself for later attachment or do what I
eventually did and glue it to the lower forward section. Use plastic
card in the exhaust area so you have something to attach the six separate
exhaust. It was suggested by a reader than you use an Epoxy Putty like Milliput
or Apoxie Sculpt for these areas. You can then set up the exhaust and it will
leave depressions to which you can later attach the stubs when the putty is dry.
Another possibility is to glue all the separate panels at the same time and then
install them as one piece. Or you can get some aftermarket exhaust and adapt
them, which would be my choice were I ever to build another of these.
Drill a hole in it for the
prop. Glue the prop shaft to the prop itself for later attachment or do what I
eventually did and glue it to the lower forward section. Use plastic
card in the exhaust area so you have something to attach the six separate
exhaust. It was suggested by a reader than you use an Epoxy Putty like Milliput
or Apoxie Sculpt for these areas. You can then set up the exhaust and it will
leave depressions to which you can later attach the stubs when the putty is dry.
Another possibility is to glue all the separate panels at the same time and then
install them as one piece. Or you can get some aftermarket exhaust and adapt
them, which would be my choice were I ever to build another of these.
OK, moving on, once the cowling was taken care of, the flaps and the ailerons were installed. No problems here. I then decided to install the rear backlight and the windscreen. Thanks to the rather thick clear plastic, the backlight piece did not fit as well as I would have hoped. Despite the additional clearance from the filler on the windscreen area, the windscreen did fit well. I thought it would be too short. Those were covered with tape and I headed for the paint shop.
| COLORS & MARKINGS |
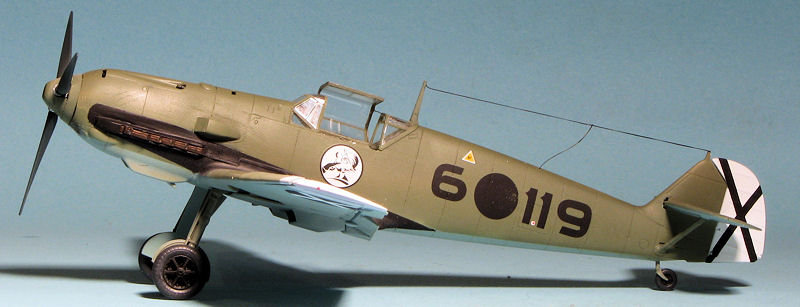
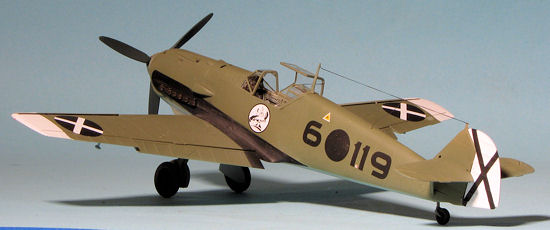
Since I was choosing a Spanish Civil War plane, the scheme is
pretty simple. First, the rudder and wing tips were painted white Using Tamiya
X-1 as were the end of the slats. These cannot be posed closed, unfortunately,
which meant I just had to paint them as they were. Once that was dry, I taped on
the slats when I masked off the tips. The separate rudder makes painting easy.
Then I
 used RLM 65 for the underside and the outside of the gear doors using
Model Master Enamel. When dry, the underside of the horizontal stabs were
masked. The rest of the airframe was then painted RLM 63 using Agama enamels.
This is a pretty dark grey-green which is not the exact shade as RLM 02, being a
bit browner. I also painted the spinner and backing plate as well as the
tailplane struts at this time. The prop was painted RLM 70 using Model Master
enamels. I then masked the clear bits and tacked on the canopy section as well
as glued on the radio mast. The lower demarcation line was masked and the areas
were again sprayed with RLM 63. When that had dried, I masked off the exhaust
areas and painted that with black.
used RLM 65 for the underside and the outside of the gear doors using
Model Master Enamel. When dry, the underside of the horizontal stabs were
masked. The rest of the airframe was then painted RLM 63 using Agama enamels.
This is a pretty dark grey-green which is not the exact shade as RLM 02, being a
bit browner. I also painted the spinner and backing plate as well as the
tailplane struts at this time. The prop was painted RLM 70 using Model Master
enamels. I then masked the clear bits and tacked on the canopy section as well
as glued on the radio mast. The lower demarcation line was masked and the areas
were again sprayed with RLM 63. When that had dried, I masked off the exhaust
areas and painted that with black.
Once all the back and forth was done, I attached the tailplane struts and brush painted the gear wells. The main landing gear was then glued in place. Fit is not tight at all as Eduard has shallow depressions rather than good hefty pin and sockets for the gear placement. After it had dried, the airframe was given a coat or two or three (the Agama paint really sucks up the clear) of Future in preparation for the decals.
Over the last few years, we have had a very nice selection of markings produced for the E-1 by a variety of companies. For this one, I chose a Spanish Civil War version, hence the solid RLM 63 upper surface, from one of Kagero's Mini-Top Cover sets, #30, to be exact. It has the aircraft of Hptm. Siebelt Reents who was the Stafflekaptain of 1./JG 88 in very early 1939, just before the war ended. The sheet includes only the unique markings so the data markings will have to come from another source, in this case, the Eduard kit decals, which surprisingly, only provided two data markings.
| FINAL CONSTRUCTION |
With all the markings in place (and there really are not that
many), it was time to take care of the myriad of small fiddly bits. This
included gluing on the left tail wheel fork and the tail wheel, attaching the
brake lines to the front of the gear legs, knocking off the aileron mass
balances and reattaching them, cementing the slats in place, and gluing on the
12 individual exhaust stacks. No pitot on this one as I broke it trying to
remove it from the sprue. I also glued on the tailplane struts and attached the
rudder. 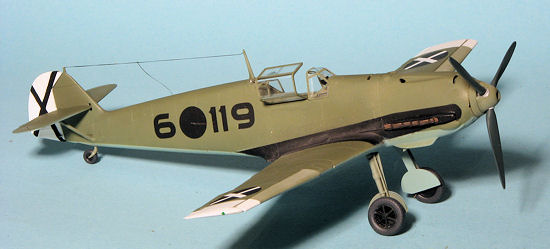 Installing
the individual exhaust stacks was a real pain in the pattotie. They were an
incredibly tight fit and there was no positive attachment for each one so
getting them properly aligned was very difficult. Equally difficult if not
impossible was attaching the very front ones which are a 'no glue required' fit.
Well, none of the stacks needed glue they were so tight. When it came time to
attaching the prop, all the squeezing to get the cowling in place had caused the
engine to shift off center so when the prop was attached, it was also off
center. I cut the shaft away from the engine and glued on the prop.
Installing
the individual exhaust stacks was a real pain in the pattotie. They were an
incredibly tight fit and there was no positive attachment for each one so
getting them properly aligned was very difficult. Equally difficult if not
impossible was attaching the very front ones which are a 'no glue required' fit.
Well, none of the stacks needed glue they were so tight. When it came time to
attaching the prop, all the squeezing to get the cowling in place had caused the
engine to shift off center so when the prop was attached, it was also off
center. I cut the shaft away from the engine and glued on the prop.
I then gave the entire airframe a coating of matte clear. The masking was removed and the canopy section popped off for display in the open position. I used EZ-line for the antenna after drilling a hole in the fuselage for the lead. I only attached the end of the line to the long wire, simply stuffing the rest into the hole. Down side s that it has a curve to it. However, if I glued in the lower hole and tugged on the wire to make it straight, it would produce a slight 'vee' in the long wire. Perhaps next time I will use a section of more solid material for the lead-in wire. A section of the line was used to simulate the canopy cable. A tad bit of painting was followed by some pastel exhaust staining and the kit completed its transformation into a model.
| CONCLUSIONS |
Let me begin this by stating that if you want to build the kit
with everything open and showing, I am sure it will be a much easier build. I
was quite disappointed by the poor fit of all the cowling pieces as well as the
lack of really positive locators for many of the parts. I am sure that for
Eduard, shallow depressions are easier to tool, but for the builder, they are
just a real pain. I appreciate
 that this is
probably the only really accurate E-1 in this scale as other kit makers do not
bother to do the small change in the wing gun placement. I also liked the detail
that the kit offers, though you really have to work at it to keep it intact. I
was bummed out by the lack of wing radiator detail as a kit of this level needs
more than just a flat blank plate.
that this is
probably the only really accurate E-1 in this scale as other kit makers do not
bother to do the small change in the wing gun placement. I also liked the detail
that the kit offers, though you really have to work at it to keep it intact. I
was bummed out by the lack of wing radiator detail as a kit of this level needs
more than just a flat blank plate.
In short, the kit was a disappointment to me and one that I really cannot recommend to those who want a relatively simple and hassle free build. I am glad I found out about this one before jumping in and buying others in the series that were on sale. It is a kit that is much more appropriate for those who want everything open for inspection. Those who want a closed cowing kit with easier to install exhaust and more positive parts locators should gravitate towards the Hasegawa or Tamiya, or even the new Airfix 109Es. Those are much less fiddly and though they do sacrifice some detail to the Eduard kit, they are kits that will go together with greater ease. Not only that, but they will probably look just as nice as this one sitting on your shelves.
January 2013
Thanks to me for picking up this the review kit.
If you would like your product reviewed fairly and fairly quickly, please contact the editor or see other details in the Note to Contributors.