Fine Molds 1/72 Bf-109G-10
| KIT #: | FL 11 |
| PRICE: | $33.95 MSRP |
| DECALS: | One option |
| REVIEWER: | Scott Van Aken |
| NOTES: | New mold (2006) |
| HISTORY |
 Though really too late to do anything worthwhile against the Allied air
juggernaut, the Bf-109G-10 was really the last of the 109 versions, the K-4
actually reaching units a bit before the G-10. In reality, there was little to
choose between the K-4 and the G-10 aside from a few minor things. Both had the
latest DB.605D engine, upgraded airframe components and pretty much the same
armament, though that varied with the 30mm central cannon standard on the K-4.
Though really too late to do anything worthwhile against the Allied air
juggernaut, the Bf-109G-10 was really the last of the 109 versions, the K-4
actually reaching units a bit before the G-10. In reality, there was little to
choose between the K-4 and the G-10 aside from a few minor things. Both had the
latest DB.605D engine, upgraded airframe components and pretty much the same
armament, though that varied with the 30mm central cannon standard on the K-4.
109 variant history is still rather muddled as what one believes at one period of time is often shown to be incorrect just a little while later due to new or possibly conflicting research. At one time, it was thought that all G-10 versions were rebuilds of older airframes. It seems that is not entirely the case. One thing for sure, it is often difficult to differentiate between the G-10 and some later G-6 and G-14 variants. Serial number is often the only clue.
| THE KIT |
Prior to this kit, your sole option in standard 1/72 injection molded kits was one by Revell AG that had some rather odd anomalies in terms of what it offered. The greatest of these were the molded in, two piece head armor and the filled in supercharger intake. I know these prevented me from building the kit.
Well, the folks at Fine Molds are nothing if not
fanatics about accuracy. Despite the seemingly high price of this kit, your only
other options are some even more expensive resin ones. Fine Molds has provided
sprues that offer all of the options that can be found on the G-10. There are
two types of wooden rudder, the extended tail wheel, large and small upper wing
wheel fairings,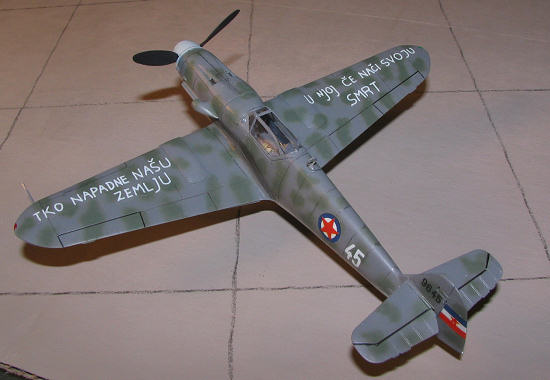 deeper oil cooler, larger paddle bladed prop, Erla Haube canopy
and the correct fuselage with the more common improved upper engine cowling.
This has the later 'Type 120' version and not the much more rare 'Type 110'
cowling.
deeper oil cooler, larger paddle bladed prop, Erla Haube canopy
and the correct fuselage with the more common improved upper engine cowling.
This has the later 'Type 120' version and not the much more rare 'Type 110'
cowling.
The sprue with the wings is the same as in all the 109F/G kits so I've not shown that one. Instead, you will see the sprues with the fuselage and the other optional bits. Not all of these will be used for it seems that the majority of G-10 airframes did not have the super wide wheels and so the large wheel fairings will not be used if you are planning on doing the aircraft shown on the box art. The kit as shown will use the tall tail wheel and the rudder with two trim tabs. There is even the little box fairing for the back of the interior that provides clearance for the MW 50 water/alcohol injection system, one of the key visual clues for the G-10.
With all the additional bits, you can really do any of the G-10s built if you have the decals and some sort of reference. Many were built with wider wheels and using the shorter tail wheel; especially if rebuilt from a G-6/14 airframe.
Instructions are like all Fine Molds kits and in Japanese with minimal English. They are well drawn with lots of good info and excellent construction sequences. Colors given are in generic, Gunze and Tamiya paints. The lone decal option is for Blue 4 from 8./JG 3 during 1945 as flown by Oblt. Gunther Grossjohan. It is in RLM 81/83 over RLM 76 with 81/83 mottling. The two standard insignia/stencil decal sheets are provided along with one for the specific aircraft. Printing in very good and these should work quite well with setting solutions.
| CONSTRUCTION |
 As many
of you know, I'm a subassembly sort of builder. This being the case, I started
by gluing bits such as the drop tank halves, wing halves, fuselage halves
(interior fits from underneath), and interior bits. Prior to doing any actual
gluing on the wings, I opened up the rather large holes for the upper wing
fairings, drop tank mount, and lower radio antenna. I also test fit these parts
to make sure they'd not give me trouble later on when they were attached.
As many
of you know, I'm a subassembly sort of builder. This being the case, I started
by gluing bits such as the drop tank halves, wing halves, fuselage halves
(interior fits from underneath), and interior bits. Prior to doing any actual
gluing on the wings, I opened up the rather large holes for the upper wing
fairings, drop tank mount, and lower radio antenna. I also test fit these parts
to make sure they'd not give me trouble later on when they were attached.
I found the fit to be good, though all the joins did
need some filler. I've built darn few kits where this wasn't needed. I then
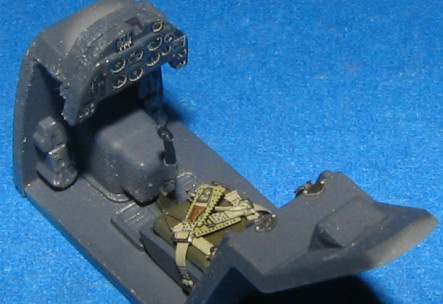
painted some of the parts such as the wheel wells and the two interior sections.
The interior has a forward half which contains the molded in rudder pedals and
onto which fits the instrument panel of the version being built. The other
section has the seat, pad, control column, and in the case of the G-10, a hold
needs drilled for the cover of the MW 50 tank that goes behind the cockpit. I
also 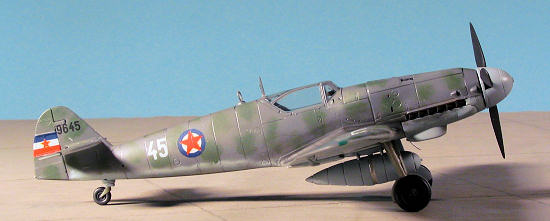 installed a set of Eduard pre-painted seat belts. These are well done and
quite detailed. An instrument panel decal fits onto the panel and Solvaset was
used to get it to snuggle down. It is a good fit and really enhances the look of
things. I then glued the front and rear cockpit sections together. This will be
installed later and the gun sight added prior to the canopy going on.
installed a set of Eduard pre-painted seat belts. These are well done and
quite detailed. An instrument panel decal fits onto the panel and Solvaset was
used to get it to snuggle down. It is a good fit and really enhances the look of
things. I then glued the front and rear cockpit sections together. This will be
installed later and the gun sight added prior to the canopy going on.
Back at the wings. I sanded off the filler (and in this case I used Mr. Surfacer as the seams were not very large). I then attached the wide wheel fairings to the upper wing. Back at the fuselage, the second application of filler was removed and the interior installed through the opening in the bottom. The only real place to glue this is the back section of the cockpit and that was done.
Then it was time to glue on the wings. Easy this was not. The way the kit is designed, on the back of the wings, there are little slots into which tabs are fit. I should mention all this is on a horizontal plane and not vertical. Some trimming is needed to get all to fit and even as tight as it is, there will be a need for filler. The front is quite snug with no gaps. I had to tape up one wing as they were not level when everything was properly placed on the aft connection. When that had dried, I had to use filler on the lower aft wing/fuselage join. Actually it took two sessions.
Meanwhile the tail planes were removed from the sprue
and glued in place. It was a very snug fit. Same can be said of the engine
cowlings. I first glued in the guns after painting them black. One the left
upper cowling half, I glued the supercharger intake, itself made of two halves.
When dry, I sanded down the seam and sprue stubs (much easier to do when
attached to the cowling half). Then I used a lot of 'grunt' to get the cowling
in place. It is an extremely tight fit and not a perfect one as it sticks up a
bit at the top 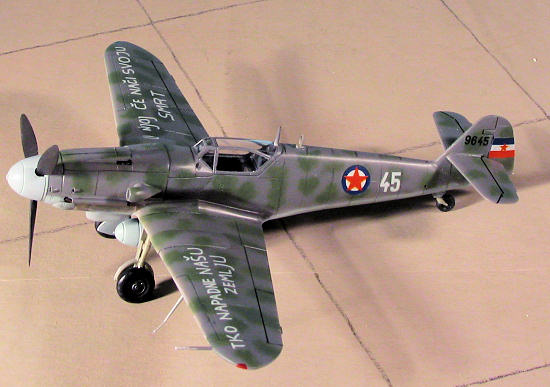 in the front and the rear. That being the case, I glued the upper
hinge line to get it properly positioned, and once dry, removed it and sanded a
tad from the bottom. That took care of it sitting too high.
in the front and the rear. That being the case, I glued the upper
hinge line to get it properly positioned, and once dry, removed it and sanded a
tad from the bottom. That took care of it sitting too high.
Things were starting to look like an airplane now and a few test flights were performed to ensure proper operation of systems!
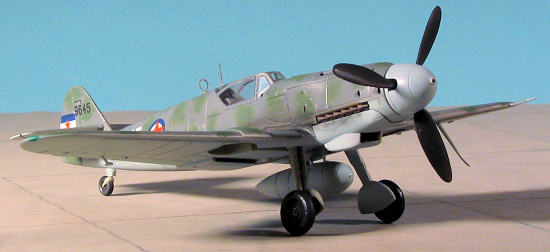
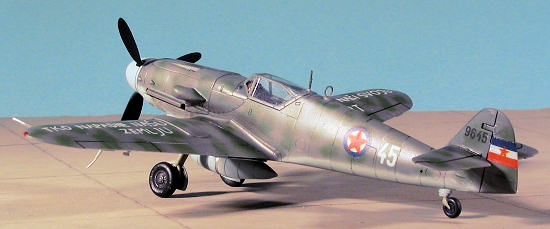
Then it was time to make some decisions regarding the airframe. I looked over the photo that accompanied the article in 'Insignia' magazine to determine just what other bits this aircraft had. I was able to determine that, despite what was shown in the drawing, that this aircraft had the shorter tail wheel strut from a G-6/14. That part was then cemented into place, though it was a bit loose. Apparently the G-10 kit is not designed for the shorter strut. I then made sure that the DF loop and antenna were shown. I couldn't see the end of the rudder so chose the one without the additional trim tabs. I also couldn't see any head armor so left that out of the canopy.
The canopy was masked and the gun sight was installed. This Erla Haube canopy will only fit the later G-10/K-4 aircraft as it includes the lower windscreen quarter panels. These are wider than the norm to blend in with the revised gun fairing. Means it won't fit a G-6/G-14. It was glued in place after drilling out the antenna mast attachment hole. I also installed the drop tank rack after drilling out the forward hole. It is properly off center. The tiny aileron mass balances were also glued in. The holes for these are about twice the diameter as is really needed, but the fit isn't bad at all. With most of the airframe together, it was time to consider paint.
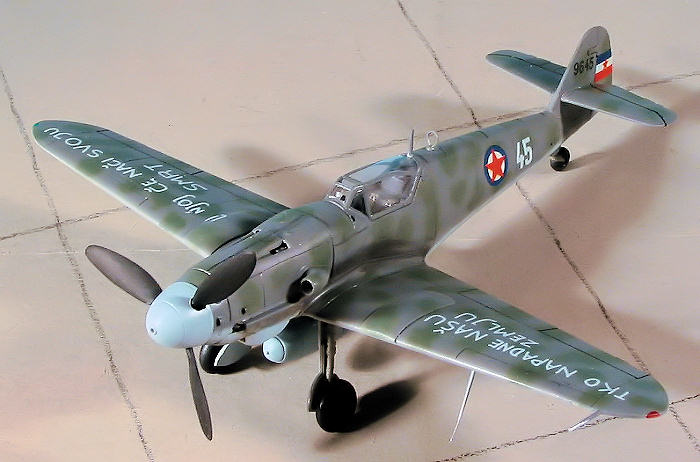
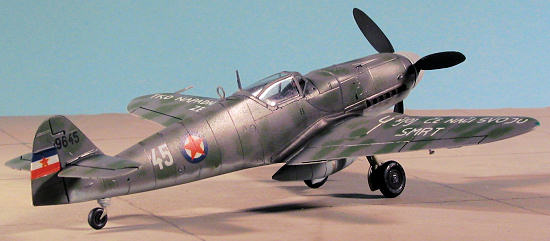
| COLORS & MARKINGS |
 The information supplied in Insignia magazine (#2 for
those interested) is "...light blue lower fuselage and wing undersurfaces with
gull grey on the upper surfaces and and olive green patches." Somewhat vague,
but I get the feeling that perhaps these are not RLM shades. It is obvious that
by 1950 these aircraft would have been repainted at least once during overhaul.
This is shown by having a black prop and light blue spinner (a shade different
from the underside according to the drawing). However, one can consider that
perhaps they ARE RLM shades. One could easily use RLM 76 for the underside and
RLM 74 or 75 for the grey and an RLM 83 or 82 for the green. On the other
hand, these could be Soviet colors. One just doesn't know for sure.
The information supplied in Insignia magazine (#2 for
those interested) is "...light blue lower fuselage and wing undersurfaces with
gull grey on the upper surfaces and and olive green patches." Somewhat vague,
but I get the feeling that perhaps these are not RLM shades. It is obvious that
by 1950 these aircraft would have been repainted at least once during overhaul.
This is shown by having a black prop and light blue spinner (a shade different
from the underside according to the drawing). However, one can consider that
perhaps they ARE RLM shades. One could easily use RLM 76 for the underside and
RLM 74 or 75 for the grey and an RLM 83 or 82 for the green. On the other
hand, these could be Soviet colors. One just doesn't know for sure.
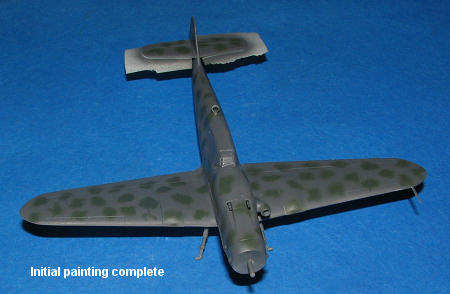
This is where a good dose of laziness comes into play. I already had RLM 76 and RLM 74 mixed up so why not use them? I also used RLM 82 for the dark green. I used a new airbrush for the detail stuff. It is a Skybow AB-100 with a .18mm tip and .5 cc capacity. Doesn't sound like a lot, but it was more than enough to paint all the green bits on the upper surface. I simply thinned it more than the norm and turned down the air pressure to around 10 psi. Worked like a charm. What's more, it is able to spray larger areas if need be. It was most handy in touching up areas that needed it and made doing this one a breeze. I'm very much looking forward to doing a more complex scheme with it.
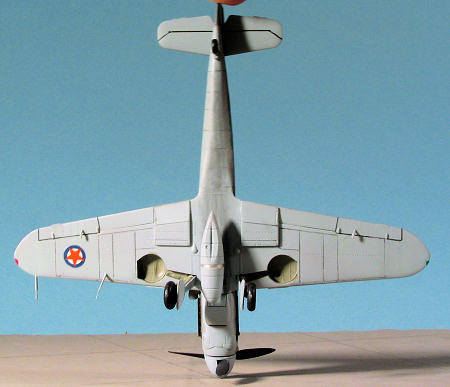
Once the colors were on, I brush painted the gear wells
with RLM 02 to take care of any overspray and installed the landing gear. These
are a bit loose, but once dry were perfect. I glued on the main wheels at this
time, after wrapping the oleos with chrome Bare Metal Foil, and assembled the exhaust bits. I had to sand down the left side shield
piece as the ejector mark was a bit proud of the surface. That was basically
laid in place and the exhaust section atop it. Then a touch of cement and it was
done. The exhaust had been painted black then burnt iron prior to installation.
The other side was glued in and then the lower cowling. Fit here was quite
 good.
Due to the design of the cowling, the front isn't as smoothly integrated as I'd
like, but it is still quite good.
good.
Due to the design of the cowling, the front isn't as smoothly integrated as I'd
like, but it is still quite good.
Then it was an application of gloss clear in preparation for the decals.
On this kit I used Blue Rider decals that came with Insignia magazine issue #2 (1996). I'd wanted to use these for years but never really got around to it. This was as much due to the rather disappointing Revell AG 109G-10 as anything. Just couldn't see using them on a kit that required the sort of work and spare bits the Revell kit needed. Now, thanks to Fine Molds, I have a bunch of spare pieces that will probably help out the Revell kit.
These decals are quite reminiscent of Modeldecals in terms of clarity and thickness. They go down with no trouble and though are pretty resistant to Solvaset, it doesn't hurt to use it as it does help out. I found that the white was off register so when I placed on the roundels, I had to take a sharp scalpel blade and trim them before they'd completely dried. I didn't use any of the kit markings as it seemed pretty obvious that the German stenciling was over-painted and besides, wouldn't have been appropriate. Once the markings were on and fully dry, the kit was given a coat or two of satin clear to seal things in place.
Any commentary on any possible inaccuracy of the markings should be directed to Blue Rider as I just used what they provided. The only reason I'm even putting this in is due to several very nasty e-mails I got from Serbia after a MiG-21 build I did.
| FINAL CONSTRUCTION |
 The last bits were the various antennas, wheel well
doors and the prop. I'd painted the spinner with intermediate blue in hopes that
it would be a slightly different shade from the RLM 76 of the underside. To me,
it looks almost the same! The prop had been painted black then with the insert
in place, trapped between the spinner and back plate. This was then pressed on.
The drop tank had the strap covered with some bare metal foil and the anti-sway
arm touch plates painted with aluminum. The drop tank isn't a perfect fit and
sits up a touch more than one would like. I'm sure that carving a bit on the
attachment opening would provide a better sit, but I left it as it was. A bit
more touch-up painting, highlighting of the control surfaces, and some pencil
work for panel lines followed by some pastel exhaust and that was it.
The last bits were the various antennas, wheel well
doors and the prop. I'd painted the spinner with intermediate blue in hopes that
it would be a slightly different shade from the RLM 76 of the underside. To me,
it looks almost the same! The prop had been painted black then with the insert
in place, trapped between the spinner and back plate. This was then pressed on.
The drop tank had the strap covered with some bare metal foil and the anti-sway
arm touch plates painted with aluminum. The drop tank isn't a perfect fit and
sits up a touch more than one would like. I'm sure that carving a bit on the
attachment opening would provide a better sit, but I left it as it was. A bit
more touch-up painting, highlighting of the control surfaces, and some pencil
work for panel lines followed by some pastel exhaust and that was it.
| CONCLUSIONS |
 It is no secret that I like 109s and no secret that I don't build as many as
I'd like. This one ranks right up there with the best 1/72 109 kits on the
market. While I don't doubt that the 109 boffins can find a mistake or two,
they'd have to be really minor as I saw basically none at all. While this one
isn't cheap, it is also, in my opinion, the one to have.
It is no secret that I like 109s and no secret that I don't build as many as
I'd like. This one ranks right up there with the best 1/72 109 kits on the
market. While I don't doubt that the 109 boffins can find a mistake or two,
they'd have to be really minor as I saw basically none at all. While this one
isn't cheap, it is also, in my opinion, the one to have.
July 2006
#1424 in a series
Copyright ModelingMadness.com. All rights reserved. If you would like your product reviewed fairly and fairly quickly, please contact the editor or see other details in the
Note to
Contributors.