
Hasegawa 1/48 Bf-109E "Bulgarian Air Force"
Kit Number: Jt 123
Price: $19.98 retail
Decals: Two versions: E-4 Bulgarian AF 1943; E-4 Rumanian AF 1942
Date of Review: 28 May 1998
Review and Photos by: Scott Van Aken

There are probably few modelers who don't know about the Bf-109. Suffice it to say this is the version that was used in the Battle of Britain and exported to a number of friendly countries.
 Hasegawa's 109E is in dark grey plastic that is hard and a bit brittle.
Allegedly there were two versions of Hasegawa's 109E; a second tooling
to take care of some sort of shape inaccuracy. I have no idea which
this is as it looks OK to me. This is basically a reboxing of the 'Galland'
kit and comes complete with all the goodies and instructions for that version.
What you don't get are the Galland decals and a set of Aeromaster ones
instead. If you have Aeromaster's "Foreign Emils" decal sheet, then
you have the two subjects of this kit.
Hasegawa's 109E is in dark grey plastic that is hard and a bit brittle.
Allegedly there were two versions of Hasegawa's 109E; a second tooling
to take care of some sort of shape inaccuracy. I have no idea which
this is as it looks OK to me. This is basically a reboxing of the 'Galland'
kit and comes complete with all the goodies and instructions for that version.
What you don't get are the Galland decals and a set of Aeromaster ones
instead. If you have Aeromaster's "Foreign Emils" decal sheet, then
you have the two subjects of this kit.
I got mine on sale from Squadron and planned to do a German Bf-109E, for which I bought an Aeromaster sheet "Marauding Emils" that have five really nice schemes for this aircraft. Anyway, back to the kit. It has a small steel etched sheet that include radiators and canopy armor. The parts cut out easily and really add to the kit. There are no plastic duplicates as on Czech kits so if you are not comfortable with etched metal parts, then skip the Hasegawa 109Es.
 The cockpit is the first to be built. It looks like the fuselage could be
glued together first and then the completed interior installed. Probably,
but it is a very tight fit so I went as per the instructions. The cockpit
is pretty complete and a resin replacement is really not needed, but many
will want the slightly crisper and higher detail level of the resin cockpit.
I used the kit parts. They include the now obligatory seat, stick,
instrument panel, rudder pedals, gun sight, and sidewalls with good detailing
and trim wheels. All are quite good except the rudder pedals which are totally
inaccurate and do need replaced if you have some spares. These were
painted RLM 02 Grey as per the standards of the time (RLM 66 was not mandated
until very late in 1941). Various boxes and the instruments were painted
black with a few handles and the instrument dials painted white. This
was then washed with black and drybrushed with light grey and then steel.
Makes the cockpit look used.
The cockpit is the first to be built. It looks like the fuselage could be
glued together first and then the completed interior installed. Probably,
but it is a very tight fit so I went as per the instructions. The cockpit
is pretty complete and a resin replacement is really not needed, but many
will want the slightly crisper and higher detail level of the resin cockpit.
I used the kit parts. They include the now obligatory seat, stick,
instrument panel, rudder pedals, gun sight, and sidewalls with good detailing
and trim wheels. All are quite good except the rudder pedals which are totally
inaccurate and do need replaced if you have some spares. These were
painted RLM 02 Grey as per the standards of the time (RLM 66 was not mandated
until very late in 1941). Various boxes and the instruments were painted
black with a few handles and the instrument dials painted white. This
was then washed with black and drybrushed with light grey and then steel.
Makes the cockpit look used.
The fuselage was then assembled, trapping the cockpit but only after the oil cooler grill and splitter were installed. I'd recommend only gluing the bottom of the cockpit side panels. In this way you can make a few adjustments when installing the cockpit in the fuselage halves for a good fit. Then the seam in the area behind the cockpit was filled and that as well as the wing wheel wells sprayed RLM 02 using Tamiya paints.
 Next came the wings. After well painting, the etched radiator screens
were installed and then the upper wings attached to the lower. These
had some rather heavy mold lines and took more cleanup than I would have
liked. After the usual filling and filing of gaps in the leading edge,
the slat area was done in RLM 02 as were the undersides of the slats themselves.
The gun barrels were then drilled out on the wing and nose guns.
Attachment of the wing is a tight fit and was great in the front, but
the rear is a tricky fit and needed filler. The flaps and slats are
separate and were left off until final assembly.
Next came the wings. After well painting, the etched radiator screens
were installed and then the upper wings attached to the lower. These
had some rather heavy mold lines and took more cleanup than I would have
liked. After the usual filling and filing of gaps in the leading edge,
the slat area was done in RLM 02 as were the undersides of the slats themselves.
The gun barrels were then drilled out on the wing and nose guns.
Attachment of the wing is a tight fit and was great in the front, but
the rear is a tricky fit and needed filler. The flaps and slats are
separate and were left off until final assembly.
Assembly of the tailplanes was properly painless and the struts actually were a good fit, unlike other 109E's I have built. The canopy sections also fit quite well and the center section was tacked in place with white glue prior to masking and painting. I masked the canopy with Scotch tape, the flat panels getting the 811 lo-tack variety.
 Painting was done using Aeromaster Enamels. This was the first time I used
these paints and I am quite pleased with them. They are supposed to
be formulated to present a scale appearance in 1/48, which meant they were
lighter than other paints. The grain is very fine and it is a lovely
flat finish as well. Not great for decals, but I had no problems putting
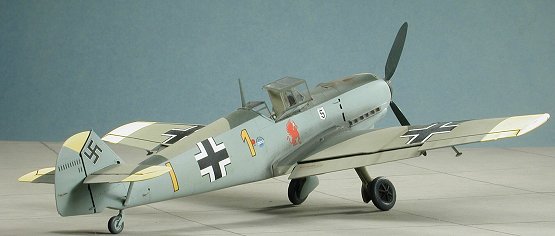
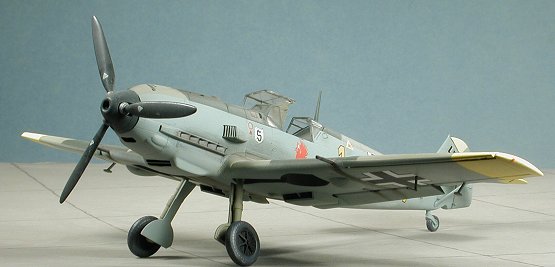
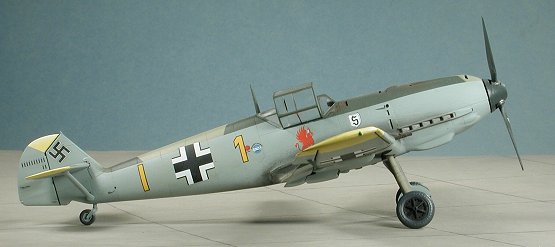
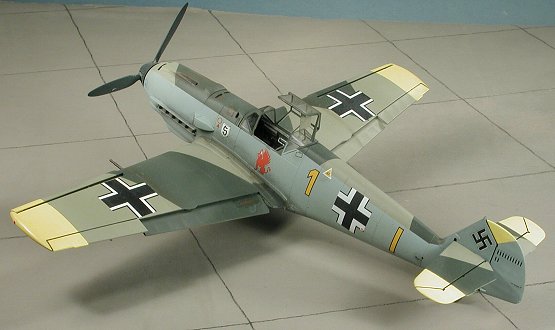
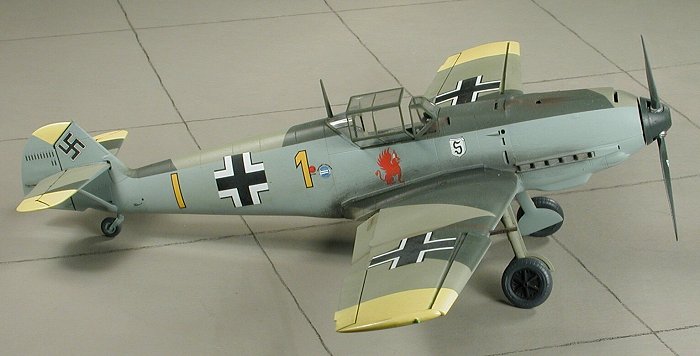
Future over it to gloss it up a bit. I chose the RLM 71/02 upper with
65 lower scheme of an aircraft from 9/JG 26 in France in 1940. This scheme
had yellow wing and stabilizer tips and a yellow triangle in the tail. The
yellow areas were first sprayed Testors White and then a lightened Testors
Yellow. When dry, they were masked and the upper colors of 71 and 02
were applied. I used lo-tack tape to mask the separate colors. Each
coat was given a full 24 hours to dry. Then the upper colors were
completely masked and the rest of the airframe was sprayed RLM 65. Once
that had dried, the landing gear and other bits and pieces added and the
airframe sprayed with Future where the decals would go.
Painting was done using Aeromaster Enamels. This was the first time I used
these paints and I am quite pleased with them. They are supposed to
be formulated to present a scale appearance in 1/48, which meant they were
lighter than other paints. The grain is very fine and it is a lovely
flat finish as well. Not great for decals, but I had no problems putting
Future over it to gloss it up a bit. I chose the RLM 71/02 upper with
65 lower scheme of an aircraft from 9/JG 26 in France in 1940. This scheme
had yellow wing and stabilizer tips and a yellow triangle in the tail. The
yellow areas were first sprayed Testors White and then a lightened Testors
Yellow. When dry, they were masked and the upper colors of 71 and 02
were applied. I used lo-tack tape to mask the separate colors. Each
coat was given a full 24 hours to dry. Then the upper colors were
completely masked and the rest of the airframe was sprayed RLM 65. Once
that had dried, the landing gear and other bits and pieces added and the
airframe sprayed with Future where the decals would go.
I used a set of decals by Aeromaster called 'Marauding Emils Pt IV' sheet # 48-249. All the schemes are quite nice and it was difficult to pick one, however I wanted a BoB 109E without any fuselage mottling and that left just the one choice. The decals went on without any problems and reacted well to the Microscale System. Finally, the airframe was sprayed with a semi-matte overcoat and the final details were brush painted and pastels were applied. I did have a major hassle getting the etched armor plating to fit the canopy. Guess this type of deal is just too much for me. My fault.
Overall, an excellent kit that I know I will build again. The etched bits were just perfect and added to the kit. While not recommended to beginners, the average builder will have no problems with the kit at all.
Copyright ModelingMadness.com
Back to Reviews Page 2020