Hasegawa 1/48 Bf-109F-2
|
KIT # |
|
|
PRICE: |
$10.00 at a swap meet |
|
DECALS: |
None |
|
REVIEWER: |
|
|
NOTES: |
Kit bought sans decals/instructions. |
|
THE KIT |
You will have noticed that there isn't any historical section. What's the point? Most of you know about the 109 already and there are lots of other reviews and previews to tell you what you need. This is about this particular kit. I bought it at a swap meet and it's a 109G-2 kit. What I really wanted was a 109F, but they seem to be quite difficult to find in Hasegawa boxes. Besides, I figured that for 10 bucks, I could backdate this kit.
You see, the Hasegawa Bf-109 series (at least the F and G ones) are all
basically a 109F onto which to add the required 'stuff' to make the appropriate
subtype that is being kitted. Very much in the same way that Willy Messerschmitt
did the real plane, though not in plastic. There are extra sprues in those kits
for the broader props, deeper oil coolers, different windscreens, different
wheels and so on. The G-2 kit has many of the parts that one needs to do an F,
but not all. This is where the spare parts bin comes in so handy. What may
be needed (depending on the F subtype) are a shallower oil
 cooler, smaller
supercharger intake, thinner prop blades, smaller tail wheel, E-type spoked
wheels and a different windscreen with the clear lower section.
cooler, smaller
supercharger intake, thinner prop blades, smaller tail wheel, E-type spoked
wheels and a different windscreen with the clear lower section.
The kit comes with the spoked wheels and smaller tail wheel. The shallower oil cooler and smaller supercharger intake came from the spares box as did the different windscreen (courtesy of a 109E kit). The thinner prop blades came courtesy of Robert Stephenson who answered a plea on the web. Now all I had to do was to figure out which subtype of F model I was going to do. You see, the later F-4 had the deeper oil cooler of the G type as well as the larger supercharger intake. It also had a broader prop blade as comes in the kit. But none of that is absolutely needed until about half way through construction so I did my usual procrastination.
|
CONSTRUCTION |
You may not believe it, but this is only the third Hasegawa 1/48 Bf-109F/G kit that I have built. I know, for some of you that is too many, but for the rest of us that is a bit of a shock as Hasegawa's F and G are considered to be the best available. For this kit, I decided to do most of it straight out of the box. No resin interior or separate engine for this kid. I kept the aftermarket pretty simple with just the prop, some Ultracast resin exhaust and aftermarket decals (if you recall, this kit came with none so that was a no-brainer).
 Step one was to glue together some subassemblies.
This meant the main interior and the fuselage. Once those were together, the
interior parts were painted RLM 66 grey (they could have been RLM 02 as the
requirement for RLM 66 wasn't formalized until near the end of 109F production,
but Messerschmitt allegedly started using it much earlier than Nov 1941). The
inner wheel wells were painted RLM 02 along with the gear legs and gear door
interiors. Oil cooler grilles were painted flat black and then drybrushed. The
interior sidewalls and such also had some details picked out in black and
drybrushed. I used a ProModeler Decal sheet for the instrument panel and while
the decal looks fine, it does not match the kit instruments perfectly.
Step one was to glue together some subassemblies.
This meant the main interior and the fuselage. Once those were together, the
interior parts were painted RLM 66 grey (they could have been RLM 02 as the
requirement for RLM 66 wasn't formalized until near the end of 109F production,
but Messerschmitt allegedly started using it much earlier than Nov 1941). The
inner wheel wells were painted RLM 02 along with the gear legs and gear door
interiors. Oil cooler grilles were painted flat black and then drybrushed. The
interior sidewalls and such also had some details picked out in black and
drybrushed. I used a ProModeler Decal sheet for the instrument panel and while
the decal looks fine, it does not match the kit instruments perfectly.
The instrument panel was then glued to the inside of the fuselage, the interior sidewalls glued to the interior floor and the interior glued into the fuselage from the bottom. All in all a very tidy arrangement.
At this time the wing radiators were glued in and the wings assembled. They were then glued in place on the lower fuselage. The fit is good, but really, not perfect. I ended up with one wing higher than its adjacent root so had to use some filler on that particular join. Some filler was also needed at the aft underside meeting place. Then I moved on to the cowling.
 First thing one has to do is to install the machine guns. These
fit on the back wall of the interior. Over this, one is supposed to place each
of the upper cowl halves. I tried to glue the cowl halves first, but no way
would the cooperate regarding the guns. I also found that this part did not fit
as well as I'd have wished. They were very tight at the bottom and very loose at
the top front. In fact, I ended up with a sizeable gap on the top front that was
eventually filled with superglue and sanded smooth. The fit on the back side
wasn't that great either. Fortunately, the fit of this on the real plane wasn't
perfect either, but that won't stop judges at contests for taking off for it!!
After all, modeling isn't about reality when it comes to parts fit. I can
remember being docked for not having the drop tank perfectly aligned with the
centerline on a 109 kit. On the real aircraft it is offset to one side! Go
figure!
First thing one has to do is to install the machine guns. These
fit on the back wall of the interior. Over this, one is supposed to place each
of the upper cowl halves. I tried to glue the cowl halves first, but no way
would the cooperate regarding the guns. I also found that this part did not fit
as well as I'd have wished. They were very tight at the bottom and very loose at
the top front. In fact, I ended up with a sizeable gap on the top front that was
eventually filled with superglue and sanded smooth. The fit on the back side
wasn't that great either. Fortunately, the fit of this on the real plane wasn't
perfect either, but that won't stop judges at contests for taking off for it!!
After all, modeling isn't about reality when it comes to parts fit. I can
remember being docked for not having the drop tank perfectly aligned with the
centerline on a 109 kit. On the real aircraft it is offset to one side! Go
figure!
Anyway, the next bits to be attached were the tail planes. No problem there. Equally easy was the installation of the shallower F style chin cooler. Then it was on to the supercharger intake. The F model had a rather surprising array of different designs of this item, however, Hasegawa only provides one so it was glued together and installed. Missing from the Hasegawa part is the rather prominent seam that runs on the outside of the real part. You can duplicate it with a section of thin stretched sprue or just ignore it as I did.
 With the airframe complete, a few test flights were conducted
with the usual strafing attacks and very loud engine noises. Then it was back
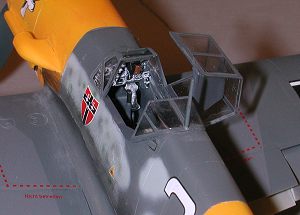
for some more work, this time concentrating on the cockpit area. Since I was
doing an F model, the G windscreen part would not be usable as it has no lower
windows and some air intake scoops there. I was lucky enough to have a full set
of E model windscreens to use. One of these was then glued in place. I then
tried to fit the back section from the same E sprue. It was too short. Hmmm...
Ok, so I put in the G part (which I really didn't want to use as it was rather
badly scratched. Next went the E center section. It was a bit too long and a bit
too short! Hmmm again.... The G part fit well but is taller than the windscreen
part. This tells me that while the E and G parts were interchangeable on the
real plane, they are not totally compatible on the plastic version, even though
both kits were designed by the same company! It is a good thing this kit will be
displayed with the canopy open!
With the airframe complete, a few test flights were conducted
with the usual strafing attacks and very loud engine noises. Then it was back
for some more work, this time concentrating on the cockpit area. Since I was
doing an F model, the G windscreen part would not be usable as it has no lower
windows and some air intake scoops there. I was lucky enough to have a full set
of E model windscreens to use. One of these was then glued in place. I then
tried to fit the back section from the same E sprue. It was too short. Hmmm...
Ok, so I put in the G part (which I really didn't want to use as it was rather
badly scratched. Next went the E center section. It was a bit too long and a bit
too short! Hmmm again.... The G part fit well but is taller than the windscreen
part. This tells me that while the E and G parts were interchangeable on the
real plane, they are not totally compatible on the plastic version, even though
both kits were designed by the same company! It is a good thing this kit will be
displayed with the canopy open!
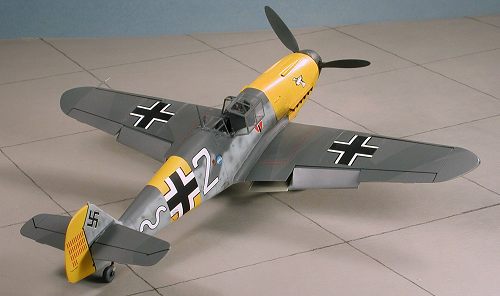
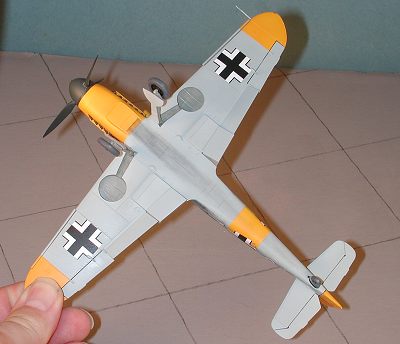
I next installed the flaps and the oil cooler doors. It is good of Hasegawa to provide these parts separately. There are a wide variety of positions that these can be placed in. I looked at a rather large sampling of photos before gluing these parts on. There is no set or standard positioning of these items. The only thing I saw more often than not was that the lower aft oil cooler door was usually down. With that info in mind, I glued the flaps down, the upper cooler door level with the wing and the lower section will be added after all the painting is done.
|
CAMOUFLAGE MARKINGS |
 I masked the clear bits with Tamiya tape and the first painting was done. This
consisted of painting the nose, rudder, fuselage center section and lower wing
tips with Floquil Reefer White. When it was dry, I used RLM 04 Yellow from
Aeromaster over all of the same areas. Allowing some time for the paint to fully
dry, these areas were then masked off and the underside painted RLM 76, again,
using Aeromaster paints. The underside of the tail planes were masked and
then the upper surface was painted RLM 74. You'll get more info on this scheme
in the Decals section below.
I masked the clear bits with Tamiya tape and the first painting was done. This
consisted of painting the nose, rudder, fuselage center section and lower wing
tips with Floquil Reefer White. When it was dry, I used RLM 04 Yellow from
Aeromaster over all of the same areas. Allowing some time for the paint to fully
dry, these areas were then masked off and the underside painted RLM 76, again,
using Aeromaster paints. The underside of the tail planes were masked and
then the upper surface was painted RLM 74. You'll get more info on this scheme
in the Decals section below.
The next step was to mask off
the RLM 74 I wanted to keep and then paint the rest of the upper surfaces with
RLM 75. The whole thing was set aside to do some quality drying. Meanwhile, I
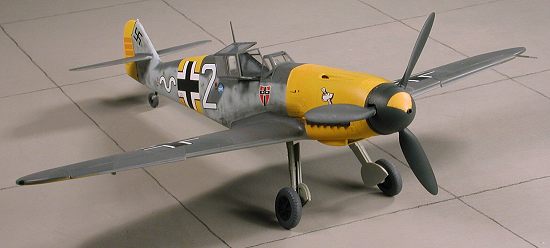
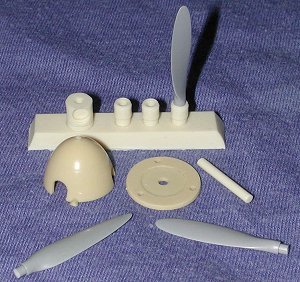
got to work on the prop. This particular bit was sent to me
by Robert Stephenson after a plea was
made on the DG. It is basically the kit spinner and
 back
plate with a new hub and prop blades as the kit ones are too fat. As you can see
from the picture, the blades just slot very firmly into their holders. These
parts will then fit into the hub. There is a shaft supplied to hold the whole
assembly onto the nose of the plane. The really nice thing about this is that
you won't have any trouble painting the various bits. The hub was assembled and
painted aluminum. The nose was painted white, then a small section painted
yellow and the yellow masked. The blades, hub and backing were then painted RLM
70.
back
plate with a new hub and prop blades as the kit ones are too fat. As you can see
from the picture, the blades just slot very firmly into their holders. These
parts will then fit into the hub. There is a shaft supplied to hold the whole
assembly onto the nose of the plane. The really nice thing about this is that
you won't have any trouble painting the various bits. The hub was assembled and
painted aluminum. The nose was painted white, then a small section painted
yellow and the yellow masked. The blades, hub and backing were then painted RLM
70.
Meanwhile back at the rest of the kit, the wings were completely covered as were the tail planes. Then I sprayed RLM 76 again to cover up all the overspray. Once that was on, I thinned some RLM 74 and 75 and started with the fine stuff. This was the mottling and the touchups of the spine area of the fuselage. The decal sheet showed some green specs in there so I used some RLM 83 for a few areas. I know that color wasn't around at this time. The unit probably used some tractor paint grabbed from a farmer's barn, but it looks nice. When all of that was dry, the kit was given a coat or two of Future in preparation for decals.
|
CONSTRUCTION CONTINUES |
Before we can apply decals, there has to be a bit more construction work. This mainly entailed putting the plane up on its landing gear and attaching a few of the easily broken off pieces. I painted the wheel wells on this plane in RLM 02 grey. I know that later war planes were probably painted the same color as the underside, but 1942 isn't later war so they were more than likely the RLM 02. The strut oleos were covered with Bare Metal Foil, the oleo scissors and wheels were then glued on. I was going to use True Details wheels, but those are quite difficult to come by at the moment. The tail wheel was also glued on at this time. Be sure to use the smaller of the two as the bigger one wasn't used until the G. This was enough for me to start on the decals.
|
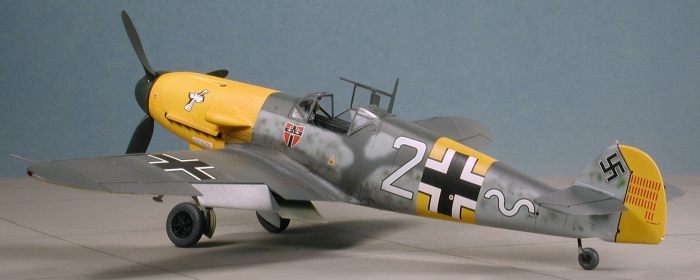
DECALS |
 After much deliberation (choosing markings for a kit is one of the more
difficult decisions I have to make in modeling), I chose to use
Aeromaster 48-460, Augsburg
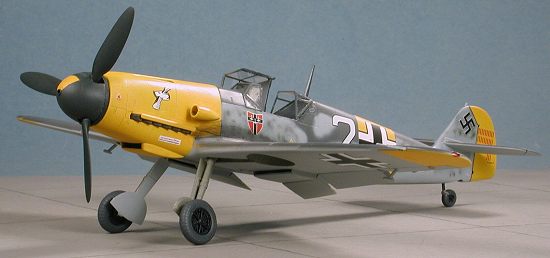
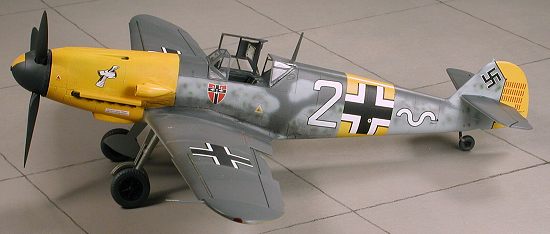
Eagles Pt X. The initial scheme is that of Max Ostermann of JG 54 in 1941. It
has full Eastern Front markings and goes one better by having a nice yellow nose
and wide fuselage band under the fuselage insignia. I've not done a whole lot of
Eastern Front aircraft, and I really don't know why, but there it is. The decals
themselves are superbly printed as are most Aeromaster decals. I did find that
the number and staffel 'squiggle' appear larger on the plane than shown on the
drawings, yet the Hasegawa kit is the recommended one. The yellow also managed
to bleed through a bit on the fuselage insignia, though since it is uniform, it
doesn't detract from the kit. I used a number of the data markings that are also
supplied. For me, applying decals is generally a several day job as I do a
section of the plane, let it dry, clean the solvent/glue and then move on to
another part. For solvents, I used Solvaset with no problems at all.
After much deliberation (choosing markings for a kit is one of the more
difficult decisions I have to make in modeling), I chose to use
Aeromaster 48-460, Augsburg
Eagles Pt X. The initial scheme is that of Max Ostermann of JG 54 in 1941. It
has full Eastern Front markings and goes one better by having a nice yellow nose
and wide fuselage band under the fuselage insignia. I've not done a whole lot of
Eastern Front aircraft, and I really don't know why, but there it is. The decals
themselves are superbly printed as are most Aeromaster decals. I did find that
the number and staffel 'squiggle' appear larger on the plane than shown on the
drawings, yet the Hasegawa kit is the recommended one. The yellow also managed
to bleed through a bit on the fuselage insignia, though since it is uniform, it
doesn't detract from the kit. I used a number of the data markings that are also
supplied. For me, applying decals is generally a several day job as I do a
section of the plane, let it dry, clean the solvent/glue and then move on to
another part. For solvents, I used Solvaset with no problems at all.
|
FINAL BITS |
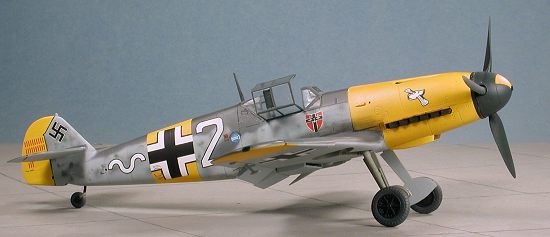
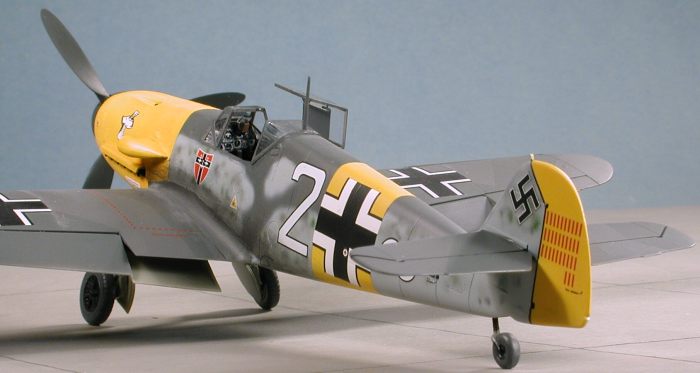
With the decals on and dry, I added all the bits that are easily broken. This included the pitot tube, the aileron mass balances, the gear doors and the radio mast. The prop was also put on at this time as were the exhausts and the exhaust shields. For exhausts I used Ultracast 48-078 for the 109F/K. These had been painted with Burnt Iron. Getting them and the shrouds was a bit of a struggle as they were a tight fit. A touch of trimming took care of that and they slid into place. A bit of touchup painting on some of the bits and the kit was then given an overall coat of clear matte using a mixture of Tamiya Flat Base and Future. The formation lights were painted and the canopy mask removed. Then the disaster happened.
 The model was knocked of its perch onto the floor. Prop blades and spinner
went flying at it hit on its nose and the aft canopy section with mast also came
adrift. Miraculously, nothing else was damaged. Having gone through this before,
the broken blades and hub were drilled out and a short section of paper clip
used to hold the pieces together as they were superglued back in place. 'sigh'.
The aft canopy section was glued back on and the center part was glued in the
open position. Pastels were then applied to show some exhaust stains. I also
took this time to pop off the leading edge slats that had been pressed into the
wing leading edge prior to painting. These were then glued slightly deployed as
one often sees them in pictures. I blew off doing the antenna on this one,
though it may be added on later. I just couldn't take the chance on screwing it
up again until after I had gotten photos.
The model was knocked of its perch onto the floor. Prop blades and spinner
went flying at it hit on its nose and the aft canopy section with mast also came
adrift. Miraculously, nothing else was damaged. Having gone through this before,
the broken blades and hub were drilled out and a short section of paper clip
used to hold the pieces together as they were superglued back in place. 'sigh'.
The aft canopy section was glued back on and the center part was glued in the
open position. Pastels were then applied to show some exhaust stains. I also
took this time to pop off the leading edge slats that had been pressed into the
wing leading edge prior to painting. These were then glued slightly deployed as
one often sees them in pictures. I blew off doing the antenna on this one,
though it may be added on later. I just couldn't take the chance on screwing it
up again until after I had gotten photos.
|
CONCLUSIONS |
Once again, I managed to have a kit almost complete when I messed something up. Seems to happen all the time. Well, it is not the kit's fault and the end result is a very nice looking model. I do have to admit that the Hasegawa kit is a bit more fiddly than some others, but the completed model always is one that looks just great on the shelf. One thing that I didn't do to this kit was to add the external reinforcement braces to the fuselage/tail junction. Just about all the F-2s and early F-4s had this done to them, but I forgot about it until the kit was well into the painting stage. Overall it looks great and I'm glad that I built it.
June 2002
|
REFERENCES |
Messerschmitt Me-109 Pt 2, by Robert Michulec, AJ Press, 2001
Copyright ModelingMadness.com. All rights reserved.
If you would like your product reviewed fairly and fairly quickly , please contact the editor or see other details in the Note to Contributors.
Back to Reviews Page 2020