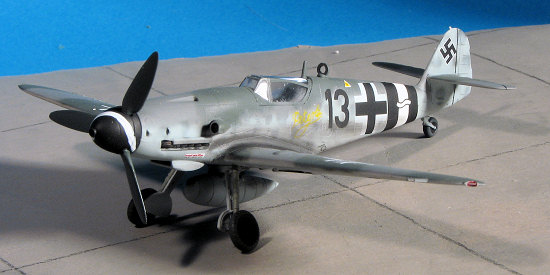
Hobby Boss 1/72 Bf-109G-10
| KIT #: | 80227 |
| PRICE: | $8.00 from www.wingsntreads.com |
| DECALS: | Two options |
| REVIEWER: | Scott Van Aken |
| NOTES: | Sort of a snap kit |
| HISTORY |
 Though really too late to do anything worthwhile against the Allied air
juggernaut, the Bf-109G-10 was really the last of the 109 versions, the K-4
actually reaching units a bit before the G-10. In reality, there was little to
choose between the K-4 and the G-10 aside from a few minor things. Both had the
latest DB.605D engine, upgraded airframe components and pretty much the same
armament, though that varied with the 30mm central cannon standard on the K-4.
Though really too late to do anything worthwhile against the Allied air
juggernaut, the Bf-109G-10 was really the last of the 109 versions, the K-4
actually reaching units a bit before the G-10. In reality, there was little to
choose between the K-4 and the G-10 aside from a few minor things. Both had the
latest DB.605D engine, upgraded airframe components and pretty much the same
armament, though that varied with the 30mm central cannon standard on the K-4.
109 variant history is still rather muddled as what one believes at one period of time is often shown to be incorrect just a little while later due to new or possibly conflicting research. At one time, it was thought that all G-10 versions were rebuilds of older airframes. It seems that is not entirely the case. One thing for sure, it is often difficult to differentiate between the G-10 and some later G-6 and G-14 variants. Serial number is often the only clue.
| THE KIT |
I have heard of these latest semi-snap kits from Hobby Boss. There have been a wide range of responses regarding them so it was with some curiosity that I approached this one. It is packaged in a vacuformed tray with the various parts held in place with little ledges to keep the bits from shuffling around in a box that is really much larger than would normally be needed.
The grey plastic is nicely molded and I did not find
any distinct molding flaws, like unwanted ejector pin marks or sink areas, and
certainly no flash. There are two normal sprues of parts, two clear sprues for a
closed and open canopy, a full fuselage with interior and two full wing
assemblies. the wing assemblies are for the wide wheel bulges or the narrow
ones. Both have the  'cheek' bulges for the larger oil cooler piping, so are
pretty much only for the G-10/K-4 or some late G-14/G-6s. I should mention that
both canopy options are the later clear vision 'Erla Haube' variety.
'cheek' bulges for the larger oil cooler piping, so are
pretty much only for the G-10/K-4 or some late G-14/G-6s. I should mention that
both canopy options are the later clear vision 'Erla Haube' variety.
Parts are nicely engraved and parts attachments are large. The lower wing radiators are molded in place and there are large attachment points for the oil cooler, under wing gun pods, and the drop tank mount. The one-piece fuselage has a seat, instrument panel and control stick molded in place. Because of the molding process, there is no instrument panel detail and nothing recessed where the rudder pedals would go. There is also no bulge for the MW 50 system on the aft bulkhead so that will need to be added, though there is the hatch on other 109 versions. There is also a mold seam that will have to be sanded down. I noticed that the 'fabric' representation was little more than some small raised lines.
Optional short and long tail wheel legs are provided as
are three wheel styles, and a standard or sand filter supercharger intake. There
are three sets of wheels provided so I get the feeling that the two standard
sprues are common to all the 109 kits that they will be producing. Of course,
I'm not psychic, but the inclusion of
 spoked wheels and the G-5 style upper
cowling bulges is a bit of a
giveaway. I also noted that the mounting holes for the gear doors to the legs go
all the way though the doors.
spoked wheels and the G-5 style upper
cowling bulges is a bit of a
giveaway. I also noted that the mounting holes for the gear doors to the legs go
all the way though the doors.
Instructions are well done with five construction steps that oddly miss the installation of the tail gear. No indication of which set of wings are to be used for which markings option, though looking at the painting and decal guide will clear that up. No detail color information is provided. The markings are for the box art aircraft from the Croatian staffel with the small wheels in 1945 painted in 'RLM 8' brown violet and RLM 82 light green over 'RLM 66 Black Grey'. The other option is red 22 in similar colors with RLM 83 Dark Green replacing the light green. Both have yellow nose rings and rudders. Needless to say, the color callouts are in real need of correction! Decals are very well printed and provide full stencils, but no swastikas as the Chinese don't want to include the symbol of any repressive governments!
| CONSTRUCTION |
With as few parts as this kit has, you would think that construction would be very quick. Well, it really depends on just what you want in terms of a finished product. Because of the semi-snap fit nature of the kit, there are some pretty good seams and sink areas that one must deal with. One must also be very careful when sanding this kit as the plastic is softer than usual and is quickly eroded away even with the finer grades of sandpaper. Makes it easier to rescribe lost panel lines, though.
 I started this kit by choosing which options I wanted
on it. First I'd decided that I wanted the smaller wheel fairings, so the other
wing went into the spare parts bit. The fit of the wing section is quite good
and tight. however, there are some pretty hefty gaps to be filled and there are
sink areas at the aft wing/fuselage join. All of the parts have flash at every
opening and join. This has to be removed carefully to prevent damage. Since one
has to install the exhaust section prior to attaching the wing, that is one more
area to worry about. I found that the closeness of the lower cowling join to the
small intake scoops on the nose prevents proper clean-up in this area. I also
found the installation of the supercharger intake to be less than optimal. Next
time, I'll trim things a bit more.
I started this kit by choosing which options I wanted
on it. First I'd decided that I wanted the smaller wheel fairings, so the other
wing went into the spare parts bit. The fit of the wing section is quite good
and tight. however, there are some pretty hefty gaps to be filled and there are
sink areas at the aft wing/fuselage join. All of the parts have flash at every
opening and join. This has to be removed carefully to prevent damage. Since one
has to install the exhaust section prior to attaching the wing, that is one more
area to worry about. I found that the closeness of the lower cowling join to the
small intake scoops on the nose prevents proper clean-up in this area. I also
found the installation of the supercharger intake to be less than optimal. Next
time, I'll trim things a bit more.
Putting on the tail planes was easy as they are keyed. These have no trim tabs on them and when you really look closely at things, you'll find a number of short cuts. For instance, the oil cooler is quite shallow and more like an F model than the deeper one of a late war G-10. There are also no mass balances for the ailerons and the radio mast is ridiculously thick and attached to the back of the canopy. As I had no decals or any detail items for the cockpit, I simply painted it RLM 66 and after masking the canopy and trimming the cockpit opening near the front to remove some plastic, I glued it in place. I wasn't sure just how I was going to deal with the drop tank and wing cannon deal, so while waiting, I sprayed the RLM 76 on the underside and both sides of the gear doors. I'll have to wait until the gear are attached to deal with the holes in the doors.
 Meanwhile,
I cleaned up the two spinner parts and trapped the prop in between them. The
prop was painted RLM 70 and then the blades were masked off. Later, the spinner
was painted matte black. The gap between the spinner sections is quite
noticeable and I was too lazy to fill it. I then cut off the attachment
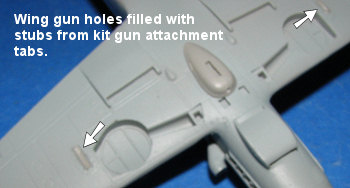
tabs for the wing guns and glued those into the holes in the bottom of the wing.
This was because I found few images of these variants with the under wing guns.
The mount for the drop tank was glued in at this time and I applied filler to
the gun hole areas and sanded it smooth.
Meanwhile,
I cleaned up the two spinner parts and trapped the prop in between them. The
prop was painted RLM 70 and then the blades were masked off. Later, the spinner
was painted matte black. The gap between the spinner sections is quite
noticeable and I was too lazy to fill it. I then cut off the attachment
tabs for the wing guns and glued those into the holes in the bottom of the wing.
This was because I found few images of these variants with the under wing guns.
The mount for the drop tank was glued in at this time and I applied filler to
the gun hole areas and sanded it smooth.
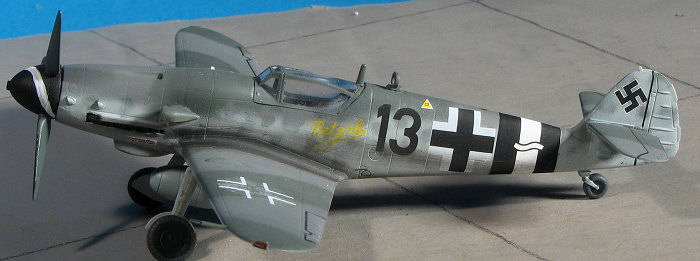
| COLORS & MARKINGS |
I still wasn't 100% sure of which aircraft I was going
to build. I have a nice set of Ventura decals with two G-10s and a G-14. I
thought of doing the G-14 as it was one of the rare G-14/AS variants with the
type 120 cowling. The decal sheet had a black/white/black tail band, but I had
to paint the white portion of the band. This I did and masked it. I then painted
the upper  surface RLM 74/75 using thinned Model Master enamel paints. Doing the
upper surface camouflage and mottling was made a snap using my Skybow AB-100
airbrush with water-thin paint and an air pressure of about 5-7 psi. I then
removed the masking from the rear white band area and sprayed the model with
clear gloss acrylic (Future/Kleer).
surface RLM 74/75 using thinned Model Master enamel paints. Doing the
upper surface camouflage and mottling was made a snap using my Skybow AB-100
airbrush with water-thin paint and an air pressure of about 5-7 psi. I then
removed the masking from the rear white band area and sprayed the model with
clear gloss acrylic (Future/Kleer).
Once that was done, I started applying the decals. I started with the rear fuselage band. I figured that if this turned out to be a disaster, I could follow plan B after some minor repainting. The Ventura decals are on a solid carrier so each decals needs to be cut out before use. The decals are somewhat resistant to setting solutions and even Solvaset had little effect on them. I also found out that they have a huge tendency to silver, as every marking I used that had clear areas silvered badly.
I should also mention that the G-14/AS does not have the lower forward cowling bumps, so those were sanded off and the area repainted. Those wondering about the wings, well, I've seen references that show both the 'normal' and wider wheels on this same aircraft so I'm not sure what is correct. Besides, I already had the narrow ones installed so went with that. I did use the kit decals for the stencil and data markings. Those seemed to work well, though there are a few errors. One is that the lower step markings should be handed with the writing aimed aft. These later aircraft also used 100 octane fuel so the C3 badge for the fuel filler isn't correct.
| FINAL CONSTRUCTION |
 With
the aircraft painted, I glued on the tail wheel and main gear. Main gear were a
rather sloppy fit and no matter how I tried, it seemed that they ended up too
wide for my tastes. The oleos were wrapped with Bare Metal Foil and the gear
doors glued on. No easy way to handle the hole in the door and though I could
have filled and sanded it, at this stage I didn't think it worth the additional
work. Wheels were glued on with no trauma. I assembled the prop, painted the
spinner black with RLM 70 blades. To my eye, these are a bit too narrow and
should be more paddle-bladed for the later versions. There is no spiral included
in the decal sheet so this was crudely hand painted. I then glued on the drop
tank after trimming back the mounting lug as it is a bit too long. Then a coat
of matte clear was applied and the masking removed. A bit of touch up painting
and then I applied the exhaust staining using Tamiya's weathering set. The brush
in these sets is useless, but the sponge applicator works very well. I also put
a bit of 'mud' on the wheels and splashed a bit on the underside of the wing.
Looks a bit overdone, but we all learn. The prop was glued in place and I was
done.
With
the aircraft painted, I glued on the tail wheel and main gear. Main gear were a
rather sloppy fit and no matter how I tried, it seemed that they ended up too
wide for my tastes. The oleos were wrapped with Bare Metal Foil and the gear
doors glued on. No easy way to handle the hole in the door and though I could
have filled and sanded it, at this stage I didn't think it worth the additional
work. Wheels were glued on with no trauma. I assembled the prop, painted the
spinner black with RLM 70 blades. To my eye, these are a bit too narrow and
should be more paddle-bladed for the later versions. There is no spiral included
in the decal sheet so this was crudely hand painted. I then glued on the drop
tank after trimming back the mounting lug as it is a bit too long. Then a coat
of matte clear was applied and the masking removed. A bit of touch up painting
and then I applied the exhaust staining using Tamiya's weathering set. The brush
in these sets is useless, but the sponge applicator works very well. I also put
a bit of 'mud' on the wheels and splashed a bit on the underside of the wing.
Looks a bit overdone, but we all learn. The prop was glued in place and I was
done.
| CONCLUSIONS |
 Well,
this may be a semi-snap kit and designed to be done in a day, but it seems like
all kits take me two weeks and so it was with this one. Of course, most of that
was taken up with painting as I give each coat a day to dry. The end result is
pleasing though a die-hard 109 fan will start rattling off a list of things
wrong with it, starting with no lower wing antenna mast and no aileron balances.
However, those items would soon disappear in the hands of the intended market so
what Hobby Boss has done with this kit and others in the line-up is quite
appropriate. Your average youngster doesn't care about the differences in
variants or the lack of cockpit detail or the oversize bits, and those of
us who do generally won't buy kits like this.
Well,
this may be a semi-snap kit and designed to be done in a day, but it seems like
all kits take me two weeks and so it was with this one. Of course, most of that
was taken up with painting as I give each coat a day to dry. The end result is
pleasing though a die-hard 109 fan will start rattling off a list of things
wrong with it, starting with no lower wing antenna mast and no aileron balances.
However, those items would soon disappear in the hands of the intended market so
what Hobby Boss has done with this kit and others in the line-up is quite
appropriate. Your average youngster doesn't care about the differences in
variants or the lack of cockpit detail or the oversize bits, and those of
us who do generally won't buy kits like this.
Overall, this is a fine kit that has much to recommend it for both the younger modeler and those of us who sometimes don't want to fuss with all the details and just want an uncomplicated build every once in a while. If you see one, buy one. You'll be glad you did.
April 2007
#1462 in a series.
My thanks to www.wingsntreads.com for the review kit.
If you would like your product reviewed fairly and fairly quickly, please contact the editor or see other details in the Note to Contributors.