| KIT: | ICM 1/48 Bf-109F-4 |
| KIT #: | 48103 |
| PRICE: | $15.98 |
| DECALS: | four options |
| REVIEWER: | Scott Van Aken |
| NOTES: | New mold kit and not a copy of anyone else's work. |
| HISTORY |
Acknowledged by those who flew it as the best of the 109 series, the Bf-109F was the result of trying to smooth out the edges of the earlier variants. This meant a refined forward cowling for the DB601 engine and more smooth and rounded wing tips along with shorter ailerons, the result of the increased size of the coolant radiators under the wings and the need to exhaust them at the trailing edge.
The F model also did away with the wing guns, relying on two 7.7mm nose machine guns and a 15, later 20mm nose cannon, though most pilots thought the plane was underarmed, but did like the additional maneuverability afforded by not having the weight of guns and ammunition in the wings.
 The aircraft first started coming off the assembly line
in late 1940, entering service in early 1941, where it was an unpleasant
surprise to the British as this new Messerschmitt was pretty well superior to
the Spitfire V then in service in most regimes. The best variant, the 109F-4
entered unit service in early 1942 where it gave sterling service until pretty
well supplanted in most units by the G model by the end of the year.
The aircraft first started coming off the assembly line
in late 1940, entering service in early 1941, where it was an unpleasant
surprise to the British as this new Messerschmitt was pretty well superior to
the Spitfire V then in service in most regimes. The best variant, the 109F-4
entered unit service in early 1942 where it gave sterling service until pretty
well supplanted in most units by the G model by the end of the year.
Hannes Trautloft
Hannes Trautloft (3 March 1912 - 11 January 1995) served in the Luftwaffe from 1932 until the end of the war. He flew 560 combat sorties and was credited with 58 victories. He was regarded as a very competent leader, and much respected from those serving beneath him. He also was known as the father of JG 54.
On 7 April 1931, he began his pilot training at the Deutsche Verkehrfliegerschule (German Air Transport School) at Schleißheim. The course he and 29 other trainees attended was called Kameradschaft 31, abbreviated "K 31". Among the members of K 31 were men like Wolfgang Falck and Günther Lützow. Trautloft graduated from the Deutsche Verkehrfliegerschule 19 February 1932. From K 31 Trautloft and 9 others were recommended for Sonderausbildung (special training). These 10 men were the privileged few and were allowed to attend fighter pilot training. During this training, he spent four months in the Soviet Union, at the secret training facility Lipetsk. Upon returning to Germany Trautloft was promoted to Leutnant. With the outbreak of the Spanish Civil War, Trautloft was one of six pilots sent aboard the Ursaramo to Cadiz to secretly aid General Franco. With them, the pilots had six crated Heinkel He 51 biplane fighters.
The men and machines arrived in Spain on 7 August 1936. Originally, they were intended to act as instructors, but the Spanish pilots struggled with learning to fly the He-51, so the German pilots soon took up combat duties. On 25 August Trautloft scored his first victory, shooting down a Republican fighter. A few days later, shortly after scoring his second victory, Trautloft was himself shot down. This was the first Luftwaffe pilot to be shot down in Spain. Trautloft escaped capture, however, and continued flying combat missions.
 As the war dragged on, the Soviets sent better planes
to aid the Republicans. Among these were the agile monoplane Polikarpov I-15 and
Polikarpov I-16 fighters. The He-51 proved no match for these new aircraft, and
after pressure from the German pilots, four of the new prototype Bf-109V3 were
dispatched to the theater. Trautloft flew one of these new fighters, and scored
a further three victories in Spain. Trautloft had the green heart symbolizing
Thüringen painted on his plane. This symbol would later be the symbol of JG 54
once he assumed command.
As the war dragged on, the Soviets sent better planes
to aid the Republicans. Among these were the agile monoplane Polikarpov I-15 and
Polikarpov I-16 fighters. The He-51 proved no match for these new aircraft, and
after pressure from the German pilots, four of the new prototype Bf-109V3 were
dispatched to the theater. Trautloft flew one of these new fighters, and scored
a further three victories in Spain. Trautloft had the green heart symbolizing
Thüringen painted on his plane. This symbol would later be the symbol of JG 54
once he assumed command.
Following his service in Spain, Trautloft held various Staffelkapitän positions, and at the outbreak of World War 2 on 1 September 1939 he was the commander of 2./JG 77. He commanded this squadron during the Invasion of Poland, in which he got one victory. Trautloft was promoted to Hauptmann and appointed Gruppenkommandeur of I./JG 20 on 19 September.
Trautloft got a further two victories during the Battle of France in May 1940. On 4 July I./JG 20 was redesignated III./JG 51. During the Battle of Britain Trautloft got a further two victories with JG 51, bringing his total to 10. In late August it was becoming apparent to the German High Command that the battle of Britain was not going as planned. A frustrated Göring relieved several Geschwaderkommodoren of their commands, and appointed younger, more aggressive men in their place. Adolf Galland was given command of JG 26 on 22 August, and Trautloft was given command of JG 54 on 25 August and promoted to Major. Trautloft flew over 120 combat sorties over the English Channel with JG 54, and the Geschwader earned a positive reputation among the German bomber crews. During this period Trautloft scored three more victories, bringing his total to 13.
In 1941 the Geschwader saw action in the East.
First JG 54 took part in the Balkans Campaign, then Operation Barbarossa, the
invasion of the Soviet Union on 22 June. On 27 June Trautloft was awarded the
Ritterkreuz for 20 confirmed victories and
 outstanding leadership. On 4
December Trautloft ordered that all the aircraft of JG 54 would wear the Green
Heart symbol of Thüringen that he himself had on his aircraft in Spain. From
this date forth JG 54 became known as the Grünherz-Geschwader.
outstanding leadership. On 4
December Trautloft ordered that all the aircraft of JG 54 would wear the Green
Heart symbol of Thüringen that he himself had on his aircraft in Spain. From
this date forth JG 54 became known as the Grünherz-Geschwader.
During 1942 and 1943 Trautloft proved a popular leader, and his tally rose to 58.[On 6 July 1943 Trautloft was appointed as Jagdflieger Inspizient Ost, serving with the General der Jagflieger office. This position put him in overall charge as Inspector of all the Fighter aircraft units fighting on the Eastern Front. In November he became Inspekteur der Tagjäger, giving him overall responsibilities for all day-fighters.
In early 1945 Trautloft joined other high-ranking pilots in the "Fighter Pilots Revolt", protesting the squandering of the precious Luftwaffe fighters and pilots in high-loss operations like Operation Bodenplatte. Following this revolt Trautloft was relieved of his position and sent to command the 4 Flieger-Schule Division(4th Pilot School Division) in Strassburg. He spent the remainder of the war there. Trautloft ended the war as an Oberst.
After the war Trautloft joined the new Bundesluftwaffe on 1 October 1957, now with the rank of Brigadegeneral. He served throughout the 1960s as Inspector General of the Bundesluftwaffe, and retired in 1970 as a Generalleutnant. He was an active member of many veteran organizations until his death on 11 January 1995 at Bad Wiessee.
| THE KIT |
 This
is, I believe, the third boxing of the 109F done by ICM since this kit was
originally issued about a year or so ago, but the first time I've seen it. There
has been much talk about ICM copying other kits and many may think that this one
is little more than a copy of the Hasegawa kit. That is definitely not the case.
While there are similarities between all kits of similar aircraft, this one
bears little that appears to be in common with the Japanese offering. I should
also mention that this kit has been selling very well in the US, selling out
quickly whenever it appears on store shelves.
This
is, I believe, the third boxing of the 109F done by ICM since this kit was
originally issued about a year or so ago, but the first time I've seen it. There
has been much talk about ICM copying other kits and many may think that this one
is little more than a copy of the Hasegawa kit. That is definitely not the case.
While there are similarities between all kits of similar aircraft, this one
bears little that appears to be in common with the Japanese offering. I should
also mention that this kit has been selling very well in the US, selling out
quickly whenever it appears on store shelves.
First thing I noticed is that ICM has started using resealable parts bags and I find this to be a huge boon to keeping all the bits around once the box is opened. Once open, one finds four sprues. Two light grey, one darkish grey and one clear. The clear sprue contains the three canopy sections and an armored windscreen addition and gun sight. These are very well molded though I do admit to seeing stress marks in all the panes.
The rest of the kit is well molded with nicely done engraved plastic. Perhaps not as thin and crisply done as Hasegawa, but certainly darn close to it and enough to please all but the most fastidious of builders. I did find that some of the parts had a bit of flash, some had openings flashed over and the wheels had some very minor sink areas on the back. Some parts have ejector pin marks on them, but from what I've noticed, they are all on the 'inside' and can be easily removed if one wishes. The surface is also a bit on the 'pebbly' side, especially with the wings. This is generally not a problem and disappears under paint.
 OK, so what sets this one apart from other 1/48th 109s,
besides price.
Well, the biggie is the engine. As with their Spitfires, ICM has provided a full
engine with this kit. It is fairly well done and while not at the detail level
of a resin replacement, is nevertheless a nicely detailed one. This means that
the forward fuselage is in several sections, complicating construction somewhat.
Most of us will probably not build it with the cowling off and from what I have
heard, closing the cowling is not an easy task. Perhaps just installing the
block as a mount for the exhaust and prop will be the fix as it was with the
Spitfire.
OK, so what sets this one apart from other 1/48th 109s,
besides price.
Well, the biggie is the engine. As with their Spitfires, ICM has provided a full
engine with this kit. It is fairly well done and while not at the detail level
of a resin replacement, is nevertheless a nicely detailed one. This means that
the forward fuselage is in several sections, complicating construction somewhat.
Most of us will probably not build it with the cowling off and from what I have
heard, closing the cowling is not an easy task. Perhaps just installing the
block as a mount for the exhaust and prop will be the fix as it was with the
Spitfire.
The kit provides a complete interior with seat, stick, rudder pedals and so on. There is also side panel detail . A separate rudder is provided, though it appears that it cannot really be made to sit at an angle without some additional work. the kit also provides separate wing tips. Not sure what is to be gained from this as I'd personally prefer them to be part of one of the wing sections to keep there from being alignment problems. Flaps are separate, though again, it appears they are designed to be in the neutral position. One also has separate upper and lower radiator coolant doors. Again, it seems these can only be mounted in the neutral position. I'm not sure of the reason for offering these bits separately if one cannot have them in different positions. But I've not built it to find if this is true. Slats are also separate and since the travel of these is so small, putting them 'down' shouldn't be a problem.
There are several additional bits on the sprues that are not used, such as a spare prop of broader chord and another set of exhausts. There is also an unused 'trop' sand filter, though you could use them on some of the Russian Front options as they did have them installed on occasion.
 Instructions
are well done with 8 construction steps and colors by generic and Model
Master references. On the back of the box is one painting option in full color,
that being of the box art plane of Yellow 4 from 9./JG 3. There is also a
winter camo I./JG 54 plane from Leningrad front in March 1942, a yellow nosed
9./JG 52 plane from Ukraine in mid 1942, and a 6./JG 5 plane from Finland in
July 1942. While I have to admit that all with have RLM 76 undersides,
deciphering some of the other shades will be difficult as the JG 5 plane is
listed as having Intermediate Blue as one of the upper surface colors and I
seriously doubt this to be the case. ICM should also provide RLM shades where
they are appropriate. Decals are well printed though there is a bit of
registration shift with the white parts of the multi-color markings so some
trimming will be needed prior to use. There are also a ton of aftermarket decals
for the 109F so replacements shouldn't be a problem.
Instructions
are well done with 8 construction steps and colors by generic and Model
Master references. On the back of the box is one painting option in full color,
that being of the box art plane of Yellow 4 from 9./JG 3. There is also a
winter camo I./JG 54 plane from Leningrad front in March 1942, a yellow nosed
9./JG 52 plane from Ukraine in mid 1942, and a 6./JG 5 plane from Finland in
July 1942. While I have to admit that all with have RLM 76 undersides,
deciphering some of the other shades will be difficult as the JG 5 plane is
listed as having Intermediate Blue as one of the upper surface colors and I
seriously doubt this to be the case. ICM should also provide RLM shades where
they are appropriate. Decals are well printed though there is a bit of
registration shift with the white parts of the multi-color markings so some
trimming will be needed prior to use. There are also a ton of aftermarket decals
for the 109F so replacements shouldn't be a problem.
| CONSTRUCTION |
Over the years I've built quite a few 1/48 109s and though this is a first for the ICM kit, there are a lot of similarities between them all. I started, as one usually done, with the cockpit. ICM has tried to be different in parts and such, but it still boils down to a floor on which one puts a seat, control stick, rudder pedals and some sort of cannon breech. These were all glued together and then painted RLM 66 using Agama's enamels. These paints not only go on well, they dry very fast. I used Agama's thinners for all their paints. I should mention that the interior detailing is basically adequate. It is a far cry from the detail one gets with a Hasegawa, Tamiya or even Fujimi 48th 109 with shallow sidewall detail and a rather blocky gun breech housing. However, if one is not concerned about all that detail, it is quite adequate. Once the paint on the interior bits had dried, some areas were painted in black or picked out in other colors. I dry brushed it all with a light grey.
Backing up a tad, I realized that I needed to install
at least the basic engine block. I'd been told that there was no way to get the
engine cowlings to fit well if the full engine was built. So I did the basic
 block
and attached it to the cockpit section with the motor mounts provided. The lower
mount braces seemed to me to be a tad shorter than what would be needed, and
since they later broke loose, that pretty well confirms it. I used the engine to
hold most of the interior bits while painting, making it quite handy in that
regard.
block
and attached it to the cockpit section with the motor mounts provided. The lower
mount braces seemed to me to be a tad shorter than what would be needed, and
since they later broke loose, that pretty well confirms it. I used the engine to
hold most of the interior bits while painting, making it quite handy in that
regard.
Then I glued the fuselage halves together. It was obvious that I'd be able to fit the interior from the underside with no worries and that makes it easier to glue the fuselage. A few things I noticed. One is that there is a definite 'keel' on the underside that will have to be sanded down. Another is that the lower access door near the wing root isn't there (but perhaps that was not a feature of the F model). I also noticed several sink areas in the back of the cockpit section that needed filler.
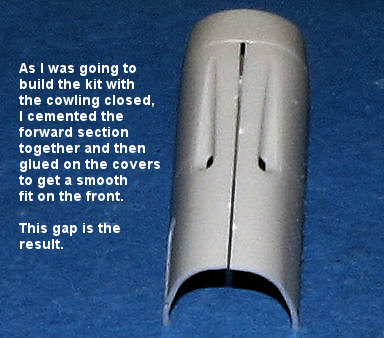 Since
I wasn't going to have the engine bared, I glued the forward pieces together,
and when dry, matched the cowlings up to them to make a smooth join. This showed
that either the forward nose is too big or the cowlings a bit too small as there
was a considerable gap. I thought of filling it with card, but decided to wait
until it was glued in place first; a decision that turned out to be a wise one.
Since
I wasn't going to have the engine bared, I glued the forward pieces together,
and when dry, matched the cowlings up to them to make a smooth join. This showed
that either the forward nose is too big or the cowlings a bit too small as there
was a considerable gap. I thought of filling it with card, but decided to wait
until it was glued in place first; a decision that turned out to be a wise one.
While all of that was drying, I turned to the wings. My
left upper wing was deeply pitted by something and there was no option but to
slather on the filler and then sand it down. Once that was done, I glued the
upper wings to the lower wing section. I found that the wheel wells on the
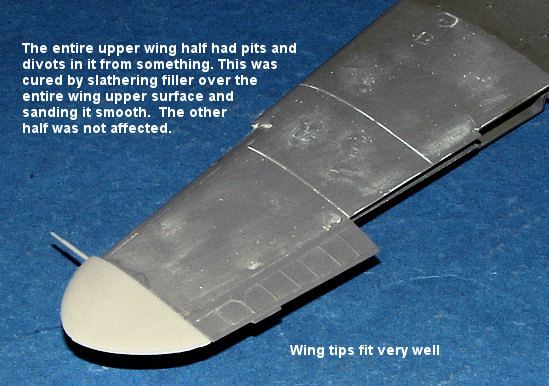 lower
wing needed trimmed to get a good fit. Many of the parts had flash of some
amount and so trimming was an on-going practice. I then installed the separate
wing tips. I'm not really sure why these were separate as all 109s after the F
had the same tips and it would have eliminated a possible error-making step.
However, the tips fit very well indeed and I was pleasantly surprised.
lower
wing needed trimmed to get a good fit. Many of the parts had flash of some
amount and so trimming was an on-going practice. I then installed the separate
wing tips. I'm not really sure why these were separate as all 109s after the F
had the same tips and it would have eliminated a possible error-making step.
However, the tips fit very well indeed and I was pleasantly surprised.
I then glued in the cockpit, which required a bunch of
moving around to get properly positioned. There are not any alignment guides or
pins for the cockpit and I think that having some may have been a benefit.
Regardless, it was in and properly glued. Then I attached the wing. Test fitting
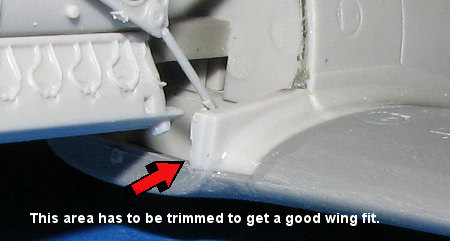 showed
that at the very front of the wing where the fuselage fit, the fuselage needed
to be trimmed to fit all the way into a slot that was there. It took but a few
scrapes to get this down to size and the wing went on. Fit of the wing is also
very good and one is able to adjust things so that the upper wings match the
roots perfectly.
showed
that at the very front of the wing where the fuselage fit, the fuselage needed
to be trimmed to fit all the way into a slot that was there. It took but a few
scrapes to get this down to size and the wing went on. Fit of the wing is also
very good and one is able to adjust things so that the upper wings match the
roots perfectly.
Next step was to attach the cowling. I ran into a bit of trouble as the cowling wouldn't go on all the way. My hasty engine block construction resulted in the prop reduction gear sticking too far out so that was cut off the block, trimmed in the back and the shaft glued to the forward cowling. While that dried, I glued the bits into the lower oil cooler radiator section. The radiator grilles have no detail and are just flat pieces of plastic. Though they will not be easily seen, it would have been nice to have had some detail.
With the bits dry, I installed the cowling and the
lower oil cooler radiator at the same time. Fit wasn't perfect and some fussing
and fudging were required. I highly recommend a somewhat slower setting glue
like Tamiya or Agama cement for these parts to take advantage of their slower
drying time. I used Agama for this and the wings. Once in place and the cement
dry, I used super glue to fill the gap atop the cowling. It turned out that this
gap was wider at the front than back towards the windsc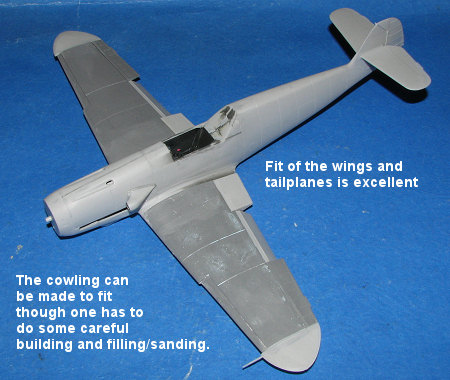 reen
so putting in card would have resulted in a poor aft fit.
reen
so putting in card would have resulted in a poor aft fit.
Naturally, some filler was needed as it was on nearly
all the joins. During this time, I attached the tail planes. No problems there.
I also glued on the rudder. This is wider at the base than the fuselage where it
attaches, but I didn't discover that until the cement had dried. In hindsight,
I'd have test fit it and sanded the sides of it down a bit first.
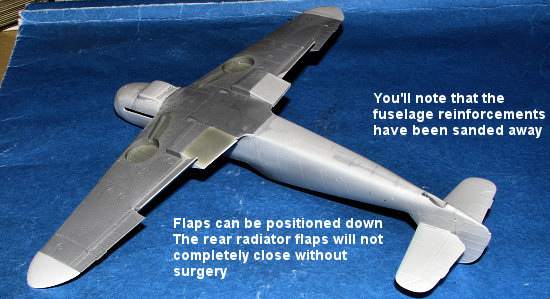
Then it was time for the things on the rear of the wings. The radiator cooling flaps cannot be assembled in any other way than 'almost' closed. They won't fit closed tight and if you decide to cut them off and display them any other way, there won't be anything in there to see. Again, the radiator blanks are just that and have no detail. Fit of these is fairly good so no real worries there. The flaps are not intended to be dropped, but then it isn't that difficult to cement them in a lowered position and that is what I did to mine. I also took this opportunity to glue on the supercharger intake. One half of mine had a lot of flash and the other half was slightly short shot so I just sanded the opening down once it was glued. Like lots of kits, it does not have the flange that runs the length of the outer portion.
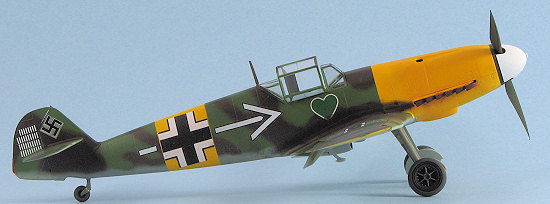
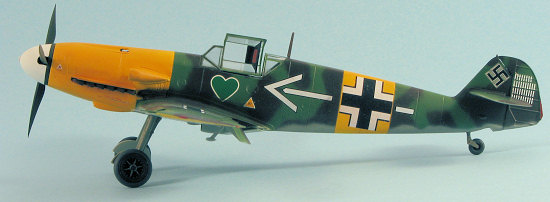
I then masked all the clear bits. The clear parts are well done with easy to follow frame lines so masking is a cinch. I chose not to use the armored windscreen. I also decided to backdate mine a bit to an F-2 variant. This was accomplished simply by removing the braces on the tail section. Thanks to the soft plastic, these are easily removed first with a hobby knife and then some gentle sanding. My next task was to glue the windscreen and aft canopy in place. Then the canopy section was tacked on with some white glue in preparation for painting.
| COLORS & MARKINGS |
 I've been snake-bitten by ICM decals in the past and
the fact that these had a bit of registration problems with the insignia and
white bits made it easy to choose aftermarket. For this one, I picked an old
Aeromaster sheet, # 48-460;
Augsburg Eagles pt X, a sheet that is going to be difficult to find. I'd
already used one of the markings from it and liked the way the yellow fuselage
band goes through the fuselage insignia so picked another from the sheet. This
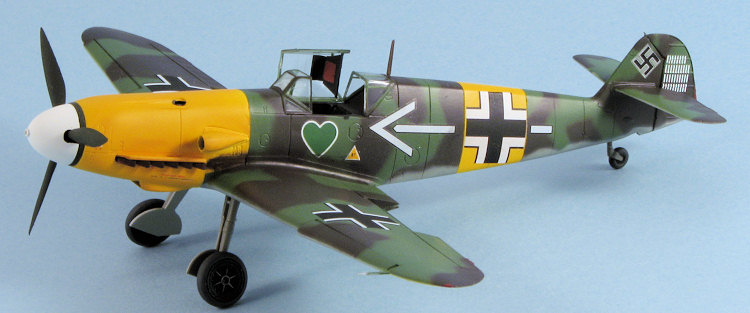
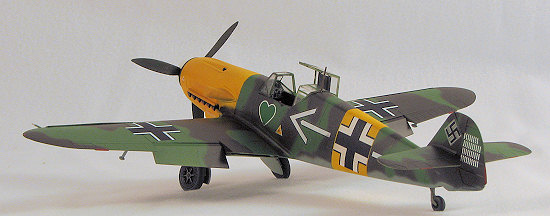
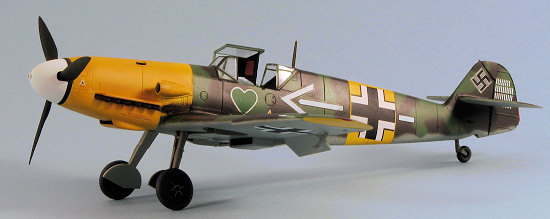
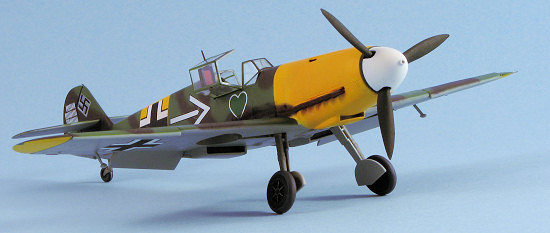
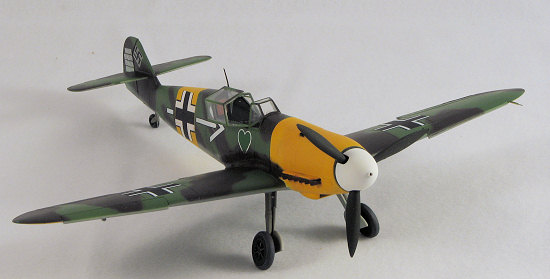
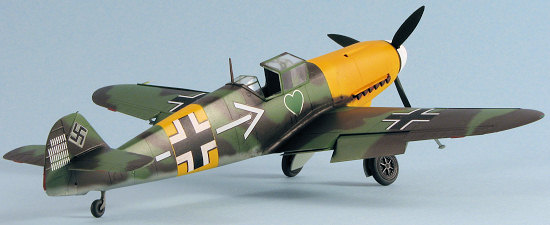
time a JG 54 'Green Hearts' plane in one of their home-made paint schemes. The
pilot for this was Hannes Trautloft one of the top scoring aces of the war.
I've been snake-bitten by ICM decals in the past and
the fact that these had a bit of registration problems with the insignia and
white bits made it easy to choose aftermarket. For this one, I picked an old
Aeromaster sheet, # 48-460;
Augsburg Eagles pt X, a sheet that is going to be difficult to find. I'd
already used one of the markings from it and liked the way the yellow fuselage
band goes through the fuselage insignia so picked another from the sheet. This
time a JG 54 'Green Hearts' plane in one of their home-made paint schemes. The
pilot for this was Hannes Trautloft one of the top scoring aces of the war.
First job on this was to paint the spinner, entire nose, fuselage band and lower wing tips in white using Floquil Reefer White. Then I set aside the spinner and used Agama's RLM 04 yellow to paint over the areas that had been done in white. It is important that translucent colors like red, yellow and orange have a white backing.
 A
bit later, the yellow areas were all masked off and I used Agama's RLM 76 for
the underside and for the fin. Again, I'm quite impressed with how well this
paint goes on and how quickly it dries. No lacquer thinner here. I then masked
off the underside of the tail planes and the spot where the swastika would go.
The nice thing about having a yellow nose is it provides a place to hold the
model!
A
bit later, the yellow areas were all masked off and I used Agama's RLM 76 for
the underside and for the fin. Again, I'm quite impressed with how well this
paint goes on and how quickly it dries. No lacquer thinner here. I then masked
off the underside of the tail planes and the spot where the swastika would go.
The nice thing about having a yellow nose is it provides a place to hold the
model!
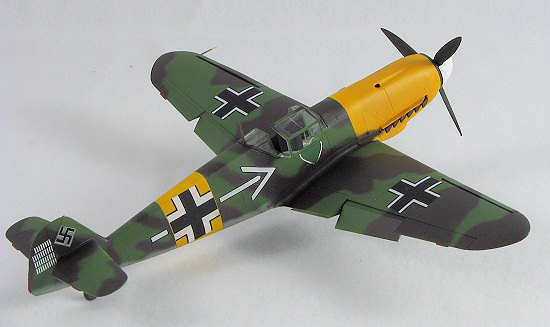
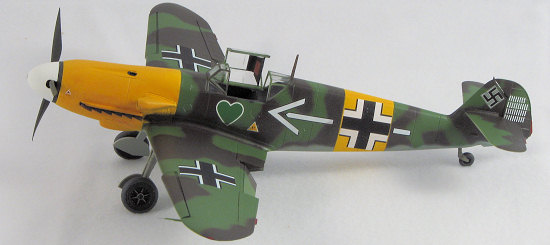
Now the upper colors are a rather brightish green and a
dark brownish green color. I thought of using late war colors, but most of what
I had was too dark. I then stumbled across an old tin of Xtracolor RLM 83, which
is a rather bright green so mixed some of that up and sprayed the entire
airframe with it (save the underside, of course). When it had dried four
hours later, I sprayed on
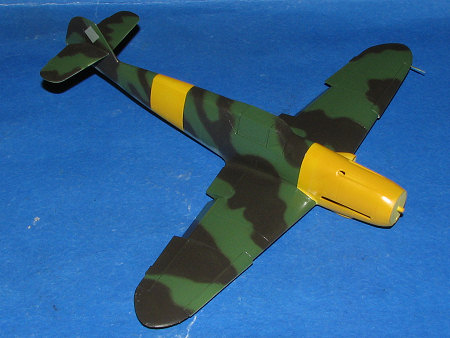 the other shade. I used RLM 61 from the Agama line of
enamels as it looked to be about the right shade. To get the fine lines, I used
my Skybow AB-100 detail air brush and within 45 minutes, had the upper pattern
complete. The model was left overnight to allow the paint to fully cure.
the other shade. I used RLM 61 from the Agama line of
enamels as it looked to be about the right shade. To get the fine lines, I used
my Skybow AB-100 detail air brush and within 45 minutes, had the upper pattern
complete. The model was left overnight to allow the paint to fully cure.
I then went back over the underside pattern and did some touchup. Then I sprayed the upper side with Future clear gloss acrylic and when dry, I removed the tape from the yellow bits and searched for glitches. Found a spot where the tape hadn't fully covered so that was sprayed white, then yellow then Future. I now had a fully gloss airplane, ready for the decals.
Since these planes were field painted, they carried very little in the way of standard stencils, but they did have a few for oil and fuel filler, for instance. For these I used the ICM decal sheet and while they went on pretty well, they did silver and needed several applications of Solvaset. I didn't try any of the larger ones, but they did seem better than those I'd used on the P-51B, for example. I also found that the fuselage insignia were a bit smaller than the area between the fuselage frames that I'd painted yellow. This may be due to too wide a band or that the decals are made for the Hasegawa kit and this is one difference with the ICM version.
| FINAL CONSTRUCTION |
Now that the markings were on I took the time to install the landing gear, after first repainting the wheel wells in RLM 02. The main gear fit superbly. They are tight and at the correct angle. I found the fit of the tail wheel gear to be equally as snug. The main gear had the oleos wrapped with Bare Metal Foil Chrome as I often do with kits. Since the wheels were black, I painted the wheels using Testors Model Master enamel's RLM 66. This is a lighter shade than the Agama RLM 66 which is closer to black, and so gives a better contrast.
 When attempting to install the exhaust (and be careful
here as the instructions and parts layout do not completely match), I found that
I had to enlarge the opening to fit in both the exhaust and the heat shields.
Nothing major, just some quality time with a small flat file and a bit of
scraping took care of it. I did have to be quite careful when gluing things.
Basically it turned out that I glued the exhaust to the shield and the shield to
the upper cowl opening. This was because the engine block was moving around too
much after I'd cut off the prop shaft/reduction gear area.
When attempting to install the exhaust (and be careful
here as the instructions and parts layout do not completely match), I found that
I had to enlarge the opening to fit in both the exhaust and the heat shields.
Nothing major, just some quality time with a small flat file and a bit of
scraping took care of it. I did have to be quite careful when gluing things.
Basically it turned out that I glued the exhaust to the shield and the shield to
the upper cowl opening. This was because the engine block was moving around too
much after I'd cut off the prop shaft/reduction gear area.
With the exhaust in place, I glued on the main wheels, after enlarging the mounting holes so they'd fit on the axles. I also trapped the prop between the spinner and backing plate and let that dry. Once the wheels were dry, the main gear doors and the small aileron balances were attached. I had to enlarge the hole for the radio mast to get it to fit properly.
Last things were the removal of the masking on the clear bits after some matte clear was sprayed on. Actually, semi-matte as it seems many of these planes were waxed or polished to improve speed. I can also assume that the boss' bird would be cleaner than others. I then went to attach the gun sight, when it went flying off into who knows where. I'm sure I'll find it one of these days. I also attached the head armor with clear gloss paint. This fit very well and is nearly a snap fit. The canopy was then glued to the sill in the open position. A bit of touch up painting was done, and I used some of Marmo's Magic Dust to add some exhaust staining to the model. This stuff is pretty good and a little goes a long way. It sticks more than normal pastels so one has to be careful about where it is placed as removing it is difficult.
| CONCLUSIONS |
 So, what we have here is a kit that is not Hasegawa or
Tamiya, but is also half the price. I'd equate it more to the Hobbycraft 109
crowd, though I find the fit of the parts to be better than HC, despite the mods
I had to do. Detail level is about the same if not a bit better and the canopy
is not only in three parts vice one, but fits a heck of a lot better!
So, what we have here is a kit that is not Hasegawa or
Tamiya, but is also half the price. I'd equate it more to the Hobbycraft 109
crowd, though I find the fit of the parts to be better than HC, despite the mods
I had to do. Detail level is about the same if not a bit better and the canopy
is not only in three parts vice one, but fits a heck of a lot better!
Unless you are a real stickler for having every knob and switch and vent (there are no shell ejector chutes on the underside, nor is there a drop tank), then I'd have to say that this is one of the better values out on the market today. A kit I can recommend to you, but you'll have to work a bit for it. What's more, it is something that one can finish is a relative short time if one doesn't get carried away with aftermarket.
| REFERENCES |
July 2007
#1478 in a series
Thanks to www.dragonmodelsusa.com for the review kit. Get yours either at the website or from your local retailer.
If you would like your product reviewed fairly and quickly by a site that has nearly 400,000 visitors a month, please contact me or see other details in the Note to Contributors.