
| KIT #: | 5225 |
| PRICE: | $6.00 at a swap meet |
| DECALS: | One option |
| REVIEWER: | Scott Van Aken |
| NOTES: | Loon models LO 48233 wing upgrade set and Ultracast 48166 109G-5/14 wheels (smooth tires) used. |
| HISTORY |
The 109G-10 was actually the last 'production' Bf-109 built. The plane first flew a few months after the K-4, using airframes currently on the assembly line. In the past it had been thought that the G-10 was made of rebuilt airframes, but this has since been shown to not be the case. These airframes were brought up to as close to K-4 standards as possible.
 The result for researchers is that the plane is as difficult to
identify from photos as just about any 109 variant. Early G-10s did not have the
DB.605D engine in them and had to rely on the earlier DB.605AS engine. These
109G-10/AS airframes can be distinguished by the absence of two small 'bumps'
under the forward cowling as on the later aircraft. Early G-10s also had the
narrower 660x160 wheels and tires so didn't have the long wheel fairings in the
upper wing. Those with the 660x190 wheels and tires had the longer fairings.
The result for researchers is that the plane is as difficult to
identify from photos as just about any 109 variant. Early G-10s did not have the
DB.605D engine in them and had to rely on the earlier DB.605AS engine. These
109G-10/AS airframes can be distinguished by the absence of two small 'bumps'
under the forward cowling as on the later aircraft. Early G-10s also had the
narrower 660x160 wheels and tires so didn't have the long wheel fairings in the
upper wing. Those with the 660x190 wheels and tires had the longer fairings.
All G-10s had the Erla Haube canopy and tall wooden fin and rudder. Some had a short tail wheel strut and others the longer version. There were also two different rudders, one with two additional external trim tabs. In addition, there were two upper cowling designs, the type 100 with a smooth upsweep on the left side and the type 110 with a flat plate fairing instead. While many G-10s had a deeper oil cooler than the earlier G-14, this was not always the case. A final difference was that some had a short antenna mast and some had none at all with the antenna lead going right into the fuselage spine aft of the cockpit.
WHEW! That makes for a lot of different variations. Unfortunately, most profiles will not show the upper wing fairings and many photos are such that this feature is not visible. This makes it almost impossible to determine if an airframe is a G-10 or a G-14 or even a later G-6, especially if it had the 605AS engine. Only serials could tell. This has led to several aircraft being identified as a G-14 in one book and a G-10 in another!
| THE KIT |
This kit is probably the first really accurate Bf-109 that was created,
though you may get an argument from some on this. First released in the early
1980s, it has engraved panel lines, cockpit sidewall detail and pretty accurate
outline. The kit is undoubtedly based on the 109G-10 that has been at Planes of
Fame for decades. That aircraft is somewhat unusual for a G-10 in that it has a
 short tail wheel strut, the wider wheels and corresponding wider upper wing
wheel clearance fairings. After having done a lot of 109 reading over the years,
I've realized that the tall tail wheel and the smaller upper wing wheel fairings
were more the norm for the G-10.
short tail wheel strut, the wider wheels and corresponding wider upper wing
wheel clearance fairings. After having done a lot of 109 reading over the years,
I've realized that the tall tail wheel and the smaller upper wing wheel fairings
were more the norm for the G-10.
There really isn't all that much more to comment about on the kit. It is devoid of the myriad of inserts one finds in today's more modern 109 kits and while it has a reasonable interior, it is not totally accurate as it has a separate seat and the nose cannon housing is the wrong shape. There are aftermarket sets available to spruce up the interior and fix some of the glitches found within. The exterior is pretty good. I found in previous builds that the drop tank rack is a bit too small compared to those found in Hasegawa kits.
On to the more mundane stuff; the instructions are well done with generic color information and the decal sheet provides insignia (no swastika) a Reich Defense band in blue and white and a yellow number 7. The date on the box is 1990 so this isn't the initial release.
| CONSTRUCTION |
This kit is basically being built to showcase the Loon Models conversion
wings so is not getting much else in the way of upgrades. First thing I did was
to see if the wings actually fit. They do, with a bit of fudging. It is not
uncommon for resin parts to be different sizes depending on the temperature and
humidity present on the day they were molded. In this case, the resin wings
 are
a teeny bit undersize as the alignment holes don't match up. By removing the
inboard pins, that situation was taken care of. I also found the the right
wing's leading edge around the wheel well wouldn't match up. This was cured by
sanding down the lower wing wheel well section until a satisfactory match was
made. I found it odd that this didn't fit as the left wing was fine in this
regard. Both looked to be the same in terms of the height of the wing. At this
time, I also cleaned up the resin tail wheel.
are
a teeny bit undersize as the alignment holes don't match up. By removing the
inboard pins, that situation was taken care of. I also found the the right
wing's leading edge around the wheel well wouldn't match up. This was cured by
sanding down the lower wing wheel well section until a satisfactory match was
made. I found it odd that this didn't fit as the left wing was fine in this
regard. Both looked to be the same in terms of the height of the wing. At this
time, I also cleaned up the resin tail wheel.
Naturally, no seam shall go without filler and so filler was used on the
leading edge. Meanwhile, I assembled the cockpit parts. I used RLM 66 and Black
for most of the painting (handy brush, of course), using Testors enamel for the
RLM 66 and Citadel acrylic for the black. The drop tank fuel line was painted
yellow with an unpainted section to represent the clear window used to check
fuel flow. Though the 109G series doesn't use a separate seat back, Monogram
provides a full seat. Not accurate, but there you have it. The forward oil
cooler radiator was glued into one half of the fuselage and I also assembled the
drop tank and supercharger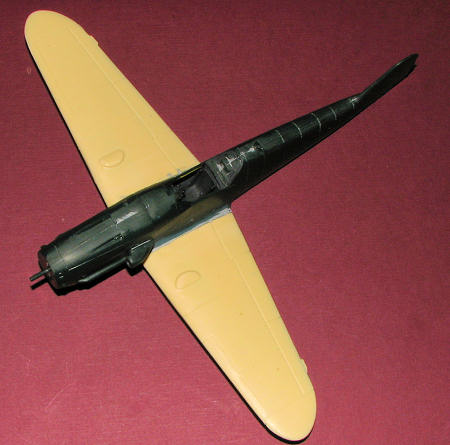 intake. The intake should have a raised seam and
those who want to replicate that with a piece of stretched sprue are welcome to
do so. I didn't and once dry, attached it. The exhaust were then painted using Vallejo Tinny Tin acrylics
and set aside to dry.
intake. The intake should have a raised seam and
those who want to replicate that with a piece of stretched sprue are welcome to
do so. I didn't and once dry, attached it. The exhaust were then painted using Vallejo Tinny Tin acrylics
and set aside to dry.
Then the exhaust and interior were glued in place. When dry, the fuselage halves were cemented together. Going off track a bit, I have to comment on the 'problem' with water thin glue and engraved panel lines. It seems that no kit with engraved panel lines goes unbuilt without the glue seeping through the panel lines and under my fingers at least once during the build. It is something I don't think about until it happens, then I data dump that bit of info and do it again the next kit. Anyway, with the fuselage dry, I glued on the lower wing. There was a considerable gap between the fuselage wing root and the upper wing. Normally, I'd fill this with stretched sprue, but as the wing had little dihedral and it needed some, I used Gorilla brand super glue. This is rather thick glue that takes a bit to set. Doing one wing at a time, I filled the gap with glue, then, using tape from the wing tip over the fuselage, I set the dihedral where I thought it should be. With that dry, I did the other side and it turned out perfect. I didn't worry about the superglue bond breaking as all the stress is in one plane and that is the way super glue works best. I did need a second application of glue and followed that by some regular Tamiya putty. The putty was put to good use on the rest of the fuselage as well and eventually sanded down.
The next step was to add the tailplanes. I found that I had to slightly trim the small tabs to get them to fit fully. The tailplanes are keyed to keep you from installing them on the wrong side. At this time, I cut off the kit tail wheel assembly in preparation for the Loon Models replacement. That was then sanded smooth and a new hole drilled for the resin tail wheel strut.
Back in the cockpit, I installed a set of Eduard color photo etch belts from set 49002. The armored head piece was masked and painted, then installed. I then glued in a replacement gun site from QuickBoost as the original went flying off into the unknown after painting it and cutting it from the sprue. Next, the windscreen was masked and glued into position. I had to trim the bottom of the head armor piece to get the canopy to fit as the etched bits from the seat harness interferred. That was glued in place and it was off to the paint shop.
| COLORS & MARKINGS |
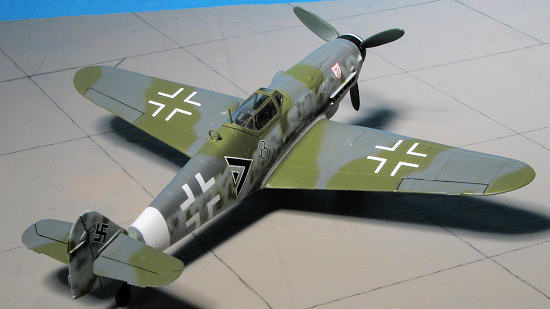
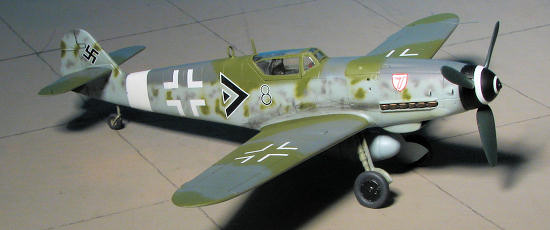
For this one, I chose a scheme from Eagle Strike 48055
"Augsburg's Flyers part III'. It is a 109G-10 of Oblt Seidl of I./JG 3 in RLM
83/75/76. For paints, I chose Testors Model Master for the RLM 75/76 and Agama
for the RLM 83. All are enamels and all were t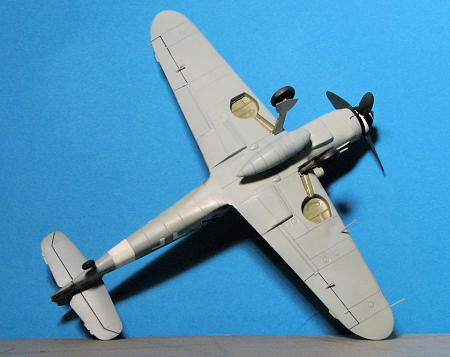 hinned
with lacquer thinner. The RLM 76 was painted on first, then the underside of the
tailplanes was masked off the the upper surface sprayed with the RLM 83. Once
that was done, the RLM 75 as painted in place. There was a lot of overspray, but
going back over with RLM 76 after masking the upper surfaces of the flight
surfaces took care of that. Then I went back and did the motting in RLM 75 and
83 in a pattern similar to what was in the kit instructions.
hinned
with lacquer thinner. The RLM 76 was painted on first, then the underside of the
tailplanes was masked off the the upper surface sprayed with the RLM 83. Once
that was done, the RLM 75 as painted in place. There was a lot of overspray, but
going back over with RLM 76 after masking the upper surfaces of the flight
surfaces took care of that. Then I went back and did the motting in RLM 75 and
83 in a pattern similar to what was in the kit instructions.
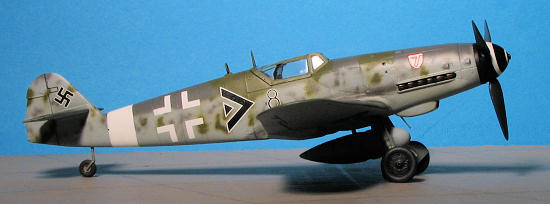
I then attached the main landing gear and the tail gear before giving the airframe a coat of Future in preparation for the decals. I should mention that there are rather large ejector pin towers on the gear pieces that will need to be cleaned up. These were then painted RLM 02 along with the wheel wells. Bare Metal Foil Chrome tape was used for the oleos.
Despite the 8 year age of the decals, they went on without a problem. I used Solvaset to help them snuggle down. It was then that I realized I'd forgotten the white fuselage band. Major dumm scheiße on that one. Carefully masking off the area, I sprayed on the white and only slightly tore one of the insignia when removing the masking. By the way, this plane had no underwing insignia so it is proper for them to be missing.
| FINAL CONSTRUCTION |
With the airframe close to done, I added on the
antenna post, the DF loop, Morane antenna, pitot tube and the mass balances.
Some careful paint touch up was done on those bit. Though not prototypical, I
like the large mounting areas for the underwing
 bits.
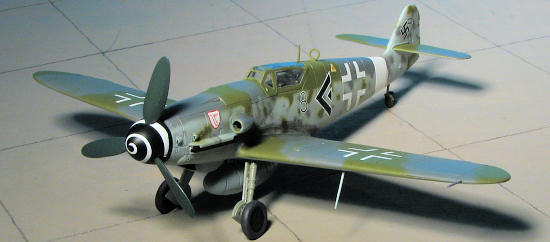
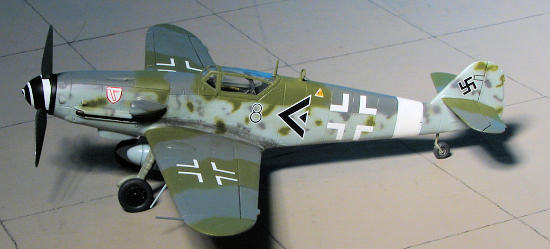
The spiral decal was put on the spinner and when dry, the prop assembly was done
and attached. I then painted the exhaust using Vallejo 'Tinny Tin' and with a
Tamiya weathering kit, put on the pastels. The flight control surfaces were
outlined with a Rapidograph. The main gear doors were installed along with the
Ultracast wheels. These need the mounting holes opened up quite a bit for the
Revell axles. With all the bits in place, a coat of semi-matte clear (a mixture
of Future and Tamiya flat base) was applied. A bit more exhaust stain and the
tape was removed from the canopy. You can see the belts and whatever cockpit
painting you did rather well even though the canopy is closed.
bits.
The spiral decal was put on the spinner and when dry, the prop assembly was done
and attached. I then painted the exhaust using Vallejo 'Tinny Tin' and with a
Tamiya weathering kit, put on the pastels. The flight control surfaces were
outlined with a Rapidograph. The main gear doors were installed along with the
Ultracast wheels. These need the mounting holes opened up quite a bit for the
Revell axles. With all the bits in place, a coat of semi-matte clear (a mixture
of Future and Tamiya flat base) was applied. A bit more exhaust stain and the
tape was removed from the canopy. You can see the belts and whatever cockpit
painting you did rather well even though the canopy is closed.
| CONCLUSIONS |
 I
often wonder why I gravitate to this particular kit when it comes to G-10s.
This is the third one I've built ofer the last ten years or so. True, this build
was more to highlight the Loon Models upgrade set for this kit than anything,
but I find the old tried and true Monogram 109G-10 to still be an excellent kit
and a good value for the money, even at its freshly reissued price of $14.95.
I
often wonder why I gravitate to this particular kit when it comes to G-10s.
This is the third one I've built ofer the last ten years or so. True, this build
was more to highlight the Loon Models upgrade set for this kit than anything,
but I find the old tried and true Monogram 109G-10 to still be an excellent kit
and a good value for the money, even at its freshly reissued price of $14.95.
Good thing is for those that are frugal, you can find this kit between $5 and $10 at just about any model swap meet. It isn't fiddly, and while not cutting edge, builds into an excellent replica, as you can see.
| REFERENCES |
Messerschmitt Bf-109G, Robert Peczkowski, 2000
Warpaint Special #2: Bf-109, edited by Alan Hall, 2001
 German Aircraft of the Second World War, Smith & Kay,
1978
German Aircraft of the Second World War, Smith & Kay,
1978
October 2010
Thanks to me for the kit and to www.rollmodels.com for the Loon conversion set.
If you would like your product reviewed fairly and quickly, please contact me or see other details in the Note to Contributors.