Zvezda 1/48 Bf-109F-4
| KIT #: | 4806 |
| PRICE: | $23.50 SRP |
| DECALS: | Two options |
| REVIEWER: | Scott Van Aken |
| NOTES: |
| HISTORY |
 of Bf 109Fs were used late in the Battle of Britain
in 1940, but the variant only came into wide use in the first half of
1941.
of Bf 109Fs were used late in the Battle of Britain
in 1940, but the variant only came into wide use in the first half of
1941.The 1,350 PS (1,332 hp, 993 kW) DB 601 E was used in the F-3 and F-4 model together with a VDM 9-12010 propeller with broader blades for improved altitude performance. The DB 601 E was initially restricted to 1,200 PS (1,184 hp, 883 kW) at 2,500 rpm; however, the full rating of 1,350 PS at 2,500 rpm was cleared for service use by February 1942. The DB 601 E ran on standard 87 octane "B-4" aviation fuel, despite its increased performance; while the earlier DB 601 N required 100 octane "C-3" fuel.
Only 15 examples of the F-3 are believed to have been produced by Messerschmitt Regensburg between October 1940 and January 1941. Like the F-1, the F-3 was armed with the 20 mm MG-FF/M and two 7.92 mm (.312 in) MG 17s.
From the F-4 onward, the new 20 mm Mauser MG 151/20 with 200 rounds was used as the Motorkanone. The first F-4s reached frontline units in June 1941. Production lasted exactly a year between May 1941 and May 1942, with 1,841 of all F-4 variants produced. Some of the later models were capable of mounting two 20 mm MG 151/20 cannons under the wing in faired gondolas with 135 rpg. These were designated F-4/R1 and 240 of them were produced by WNF in the first quarter of 1942. This optional additional armament was standardized as field kit for later G and K series. A special high-altitude variant, the F-4/Z featuring GM-1 boost, was also built with a production run of 544 in the first quarter of 1942 and saw extensive use. Finally, the Erla factory produced 576 tropicalized F-4 trop in the first half of 1942
| THE KIT |
 Molded
in a standard grey plastic, there are four grey sprues and one rather large
clear one. It is pretty obvious that Zvezda will be starting a rather large line
of later 109 as there are lots of inserts and it starts with a fuselage that is
in several parts. There is a center section, a separate tail section, and
separate nose section. The nose is so designed so that you can install a full
engine, which is included. Not only a full engine, but separate exhaust stubs
which means this is a kit for those who like to have everything opened up.
Additional pieces are included for a closed cowling option in case you have
bought the Zvezda stand and want to do an in-flight option or just do not want
to mess with all the engine detail. The cockpit is quite well detailed and
includes a pilot figure for those who wish to use it. Two instrument panels are
provided, one with raised detailing and the other a flat section on which to
place the decal. There is lots of sidewall detail including separate map pocket,
radio panel, fuel line, oxygen regulator and other bits.
Molded
in a standard grey plastic, there are four grey sprues and one rather large
clear one. It is pretty obvious that Zvezda will be starting a rather large line
of later 109 as there are lots of inserts and it starts with a fuselage that is
in several parts. There is a center section, a separate tail section, and
separate nose section. The nose is so designed so that you can install a full
engine, which is included. Not only a full engine, but separate exhaust stubs
which means this is a kit for those who like to have everything opened up.
Additional pieces are included for a closed cowling option in case you have
bought the Zvezda stand and want to do an in-flight option or just do not want
to mess with all the engine detail. The cockpit is quite well detailed and
includes a pilot figure for those who wish to use it. Two instrument panels are
provided, one with raised detailing and the other a flat section on which to
place the decal. There is lots of sidewall detail including separate map pocket,
radio panel, fuel line, oxygen regulator and other bits.
Moving along, the wheel wells are separate bits made up of several pieces that fit into the wings. There are even two different styles of wing tips, one with larger light lenses than the other. On the underside, there are different lower wing inserts and vent sections for just behind the engine. Of course, ailerons, flaps and slats are separate pieces, as are the rudder and elevators. Even the radiator openings have separate 'lips'. Several different windscreens are provided depending on the markings option chosen.
Where this kit differs is by adding some additional
bits to do the upgraded F-4 version. It includes a bunch of ord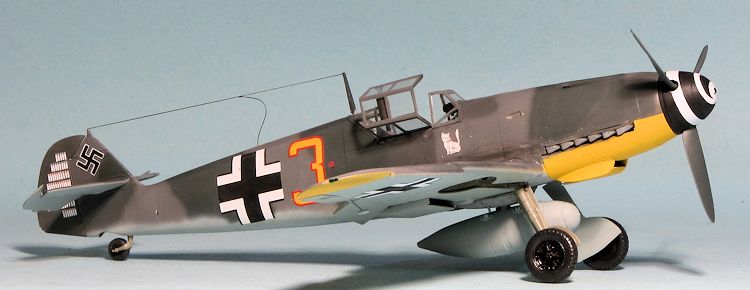 nance and bomb
racks for that ordnance, among them a pallet for four smaller bombs. It also has
a sprue that includes under wing cannon pods, as some F-4 versions carried these
guns. An additional tail section is also included with the external braces. I
found sink areas on the underside of both wing tips as well as near the tail
wheel well on both tail sections. These were also near the base of one side of
the supercharger intake. A sand filter is provided as well, so those with a lot
of North Africa aftermarket sheets will find this useful.
nance and bomb
racks for that ordnance, among them a pallet for four smaller bombs. It also has
a sprue that includes under wing cannon pods, as some F-4 versions carried these
guns. An additional tail section is also included with the external braces. I
found sink areas on the underside of both wing tips as well as near the tail
wheel well on both tail sections. These were also near the base of one side of
the supercharger intake. A sand filter is provided as well, so those with a lot
of North Africa aftermarket sheets will find this useful.
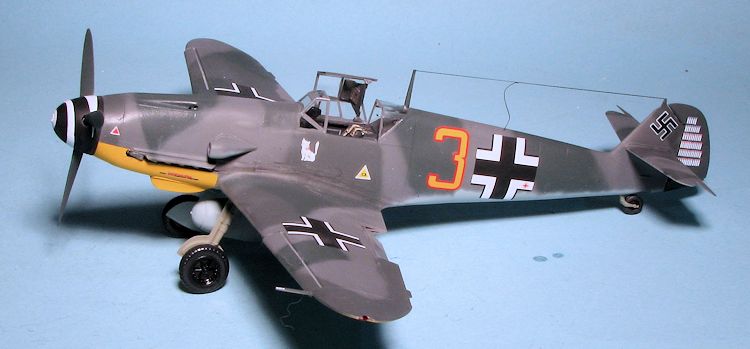
Instructions are very well done with generic and Humbrol paint references. Both markings options are for Ostermann's plane, one in winter wash and the other in standard RLM 74/75/76 paint with the usual yellow Russian Front markings. The decal sheet is well printed and having used Zvezda decals on other models, I can tell you they are opaque and work fairly well. Might want to get aftermarket swastikas unless you like putting together a small, four piece marking.
| CONSTRUCTION |
As much as has been touted over the last several years about how nice this kit is, I've not had the opportunity to build it and so I thought it was about time I took the plunge. One thing is sure, you are provided with a ton of options and so one needs to spend some time looking things over just to see how the kit will be built. Thanks to all these options, there are an equally large number of inserts, depending on how you are going to build your plane. I am not one to have engine covers and gun covers open so I knew I'd have to figure out a good way to build this one without having to add on a bunch of unneeded stuff. I also hoped that the parts shown open would work well enough to be closed without a lot of fuss.
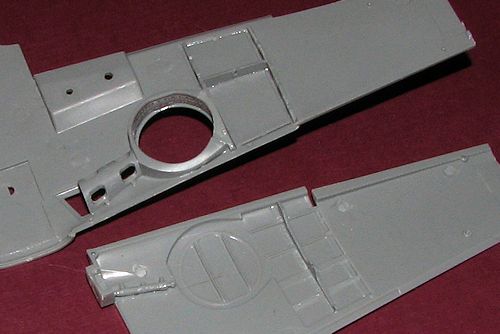 The first thing I decided on was to assembly the bits for the lower wing.
Without the inserts, this piece is quite flimsy and attaching the various
lower panels and wheel well bits would go a long way to making it rugged
enough to handle. The plastic on Zvezda kits is relatively soft so I had to
be careful not to oversand when it came time to remove sprue gate pips.
The first thing I decided on was to assembly the bits for the lower wing.
Without the inserts, this piece is quite flimsy and attaching the various
lower panels and wheel well bits would go a long way to making it rugged
enough to handle. The plastic on Zvezda kits is relatively soft so I had to
be careful not to oversand when it came time to remove sprue gate pips.
During the build up of the wing, I came to the conclusion that if the rest of the kit is like this, then the kit is overly complex when it doesn't have to be. You install a number of wing ribs and cross pieces that you will never see unless you are doing some sort of diorama that requires part or all of the separate panel to be removed.
Building up the wing is a slow process due to all the bits. So I thought I'd work on a few other subassemblies. One is the engine. If doing the kit with the cowling closed, there are several pieces that can be left off. In fact, the instructions show exactly what parts these are as apparently the cowling will not close if they are installed. I also decided to use a set of Quickboost exhaust I've had since I bought the kit. The exhaust on this one are separate so getting everything aligned is paramount, especially as one has to glue the heat shields to the stacks. One starts from the back when doing things like this or it will be just that much more difficult. The Quickboost bits do have the mounting holes drilled in the stacks so one has to pay attention to be sure they are in the right slots.
 I also started work on the interior. Zvezda has a rather odd looking
seat, that seems to be more for an E version. Looking at period photos, the
seat is definitely not the norm at all. In the F and later the seat was
simply a tub and there was armor plating on the rear bulkhead that had a
slight wraparound. There is just a tub provided for when one wants to use
the pilot figure, but it has a huge ejector hole in it, so I decided to use
the incorrect seat rather than worry over that hole. The instructions have
you build up several small interior subassemblies and then glue them in
place. I decided to deviate from this by first installing all the mounting
pieces first and then build up the rest of the bits. It kept me from
breaking things and provides a larger piece to hold while installing the
small pieces.
I also started work on the interior. Zvezda has a rather odd looking
seat, that seems to be more for an E version. Looking at period photos, the
seat is definitely not the norm at all. In the F and later the seat was
simply a tub and there was armor plating on the rear bulkhead that had a
slight wraparound. There is just a tub provided for when one wants to use
the pilot figure, but it has a huge ejector hole in it, so I decided to use
the incorrect seat rather than worry over that hole. The instructions have
you build up several small interior subassemblies and then glue them in
place. I decided to deviate from this by first installing all the mounting
pieces first and then build up the rest of the bits. It kept me from
breaking things and provides a larger piece to hold while installing the
small pieces.
Eventually I got all the inerior bits done and painted. The only item not included was the fuel line that runs along the right side of the cockpit. This piece broke into several sections removing it from the sprue and so I decided it wasn't worth the hassle of fixing it. There are several instrument panels provided, two of which have not engraved dials for which one installs a decal. I chose that route.
I then assembled the upper wings and while it took some fiddling about, was able to get them attached to the lower section. The lower wing radiator pieces were glued in and painted, followed by the radiator housing and the lower cooling flap. Unlike the Hasegawa kit, it seems that this can only be built in the closed position, which is fine as it means you don't have to fill the ejector pin marks.
Back at the engine assembly I built up much of the firewall and machine
gun area before attaching the engine to it using the included motor mounts.
These mounts are not to be installed if having the cowling closed as the
cowling bits won't fit. However, they do help to hold the engine while the
other rather flimsy mounts dry. These were later cut away.
At this time I felt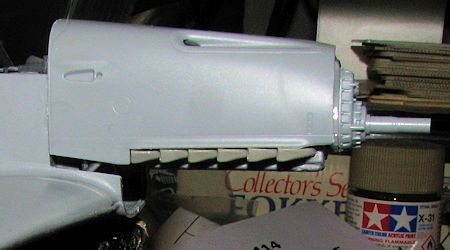 I was ready to glue the fuselage halves together. The
fit is fairly good, but one does have to pay special attention to how it all
fits. The area behind the seat is a separate piece as is the flat bit onto
which the harness would normally fit. I noticed that the seat was crooked so
yanked it out. This gave me an opportunity to add seat belts and when I
glued it back it, I was able to get better aligned.
I was ready to glue the fuselage halves together. The
fit is fairly good, but one does have to pay special attention to how it all
fits. The area behind the seat is a separate piece as is the flat bit onto
which the harness would normally fit. I noticed that the seat was crooked so
yanked it out. This gave me an opportunity to add seat belts and when I
glued it back it, I was able to get better aligned.
The next step was t o
install the engine assembly to the fuselage. I decided to glue on the wing
at the same time to be sure that things could be aligned up well. I first
placed the firewall piece where I thought it should go and then glued on the
wing. While the engine assembly was drying, I test fit one of the cowling
bits. It was far too high up, which meant I missed something. Indeed, the
very upper part of the engine assembly was above some horizontal tabs on the
fuselage sides. I pulled apart the glue, repositioned the firewall piece
under these tabs and reglued. A test fit of the cowling piece showed that
this was the right move.
o
install the engine assembly to the fuselage. I decided to glue on the wing
at the same time to be sure that things could be aligned up well. I first
placed the firewall piece where I thought it should go and then glued on the
wing. While the engine assembly was drying, I test fit one of the cowling
bits. It was far too high up, which meant I missed something. Indeed, the
very upper part of the engine assembly was above some horizontal tabs on the
fuselage sides. I pulled apart the glue, repositioned the firewall piece
under these tabs and reglued. A test fit of the cowling piece showed that
this was the right move.
While all that was drying, I glued on the fin piece. This fits well and is a bit larger than the area onto which it fits. An easy enough task to cure with some sandpaper. One thing for sure, had I needed to use the tail with the external braces, I'd have probably ended up sanding these off in the process.
I then attached the tail planes and also completed the wing radiator assembly by gluing the upper coolant flaps in place. I had to later clamp these to the lower section to prevent there from being a gap. I then installed the rear seat harness and the backlight. Next was the gun sight and I discovered that I had installed the instrument panel backwards and it was too late to get it fixed. The cowling machine guns had to have the rear portions of them cut off in order to get them to fit and point straight ahead. The upper exhaust shields were then attached.
Judging by how poorly the 'closed up' assembly was going, I thought I'd
have major issues getting the rest of the cowling to fit. To help alleviate
that issue, I thought that perhaps by gluing the upper cowling pieces to the
forward
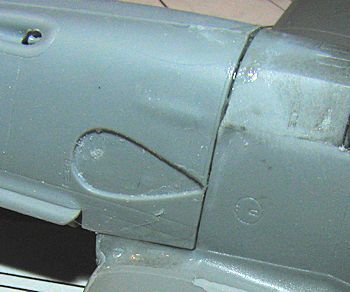 cowling section would make it easier to attach all these bits
without a ton of gaps. This worked out fairly well. Though I had to use
pressure, super glue and accelerator to get the cowling to fit over the
engine assembly, it limited the gaps and steps, large though they were, to the aft
portion of the cowling. The usual fill/sand/repeat got things down to
normal levels. One thing I was not expecting is that the exhaust do not
stick out far enough.
cowling section would make it easier to attach all these bits
without a ton of gaps. This worked out fairly well. Though I had to use
pressure, super glue and accelerator to get the cowling to fit over the
engine assembly, it limited the gaps and steps, large though they were, to the aft
portion of the cowling. The usual fill/sand/repeat got things down to
normal levels. One thing I was not expecting is that the exhaust do not
stick out far enough.
I then masked and attached the transparencies after gluing on the supercharger intake. There have been comments that the canopy section does not fit well between the windscreen and the backlight, and I did find it to be a very tight fit. However, this is good when it comes to painting and wanting the canopy to be free to pose in the open position.
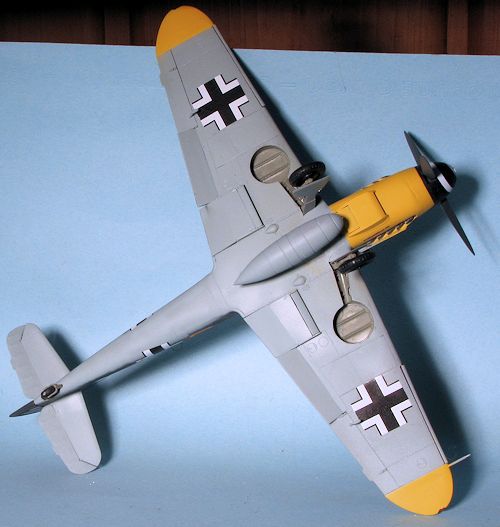
| COLORS & MARKINGS |
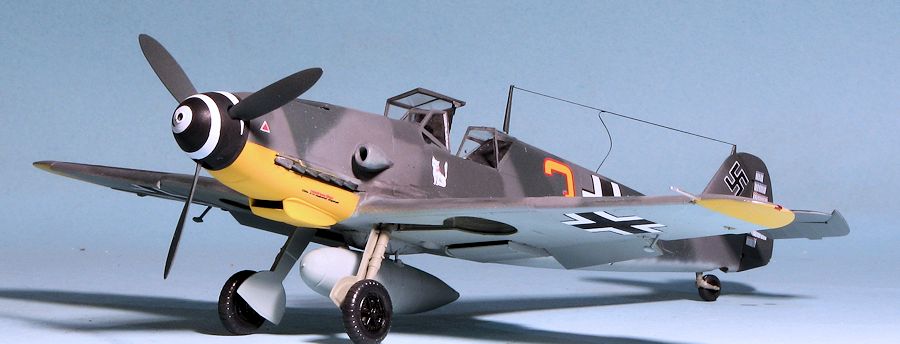
For this one, I chose a scheme from 6./JG 5 based at Petsamo, Finland (now
part of Russia). It was flown by Obfw. Rudolf Mueller who finished the war with
94 victories. This plane was in a rather unusual and non-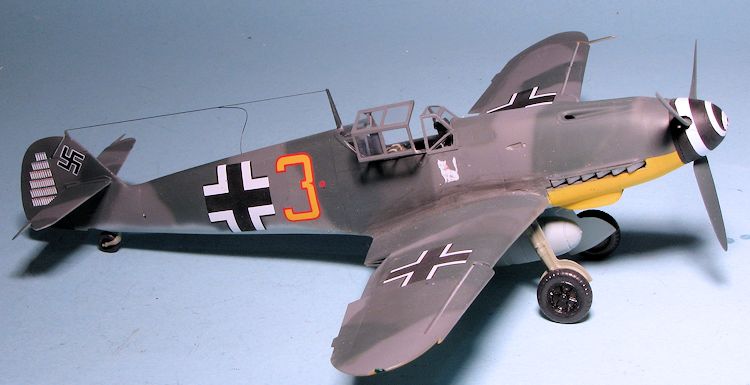 standard scheme of RLM
70/74/75 on the upper surfaces. The first step was to paint the lower cowling
and wing tips white, later adding the yellow and still later masking these off.
I then sprayed the underside with RLM 76 before moving to the upper surface
where I applied the lightest of the three colors, the RLM 75. I did all the
airbrushing free hand without masking as I'm sure these were painted in this
manner. Once the RLM 75 was on, I painted the RLM 74. Then the RLM 70. Perhaps
it is the Testors mixture as I used their enamels, but the RLM 70 and RLM 74
were about the same darkness and are somewhat difficult to differentiate from
each other.
standard scheme of RLM
70/74/75 on the upper surfaces. The first step was to paint the lower cowling
and wing tips white, later adding the yellow and still later masking these off.
I then sprayed the underside with RLM 76 before moving to the upper surface
where I applied the lightest of the three colors, the RLM 75. I did all the
airbrushing free hand without masking as I'm sure these were painted in this
manner. Once the RLM 75 was on, I painted the RLM 74. Then the RLM 70. Perhaps
it is the Testors mixture as I used their enamels, but the RLM 70 and RLM 74
were about the same darkness and are somewhat difficult to differentiate from
each other.
The profile in the decal sheet I used, Aeromaster 48-388, Augsburg Eagles Part IX, showed a very ragged lower fuselage with a lot of overspray. Once the paint was on, I clear coated the upper surface. Then I glued on the drop tank mount and the main landing gear legs. The main gear legs attach unlike any other 1/48 109 that I've built and seems quite positive. For the tail gear, which was difficult to get into place, I used the longer of the two as the shorter one seemed just too short. At this time, the underside was sprayed with the gloss clear.
The decals went on just fine, though the aircraft number decal was both
larger and thinner than what was shown in the instructions. As the entire
airframe had been repainted, I only used minimal stencil d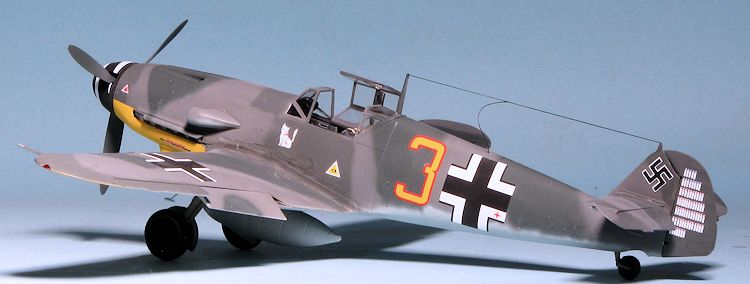 ecals. The decal
for the spinner was a bit tricky, but ended up fitting well.
ecals. The decal
for the spinner was a bit tricky, but ended up fitting well.
For the final assembly, I glued on the wheels and painted the oleos and the exhaust using Testors and Vallejo paints. The radio mast was installed and painted. I also attached the main gear doors and after trimming the too-large radiator exhaust door, that was glued on. I found that the fit of the drop tank was quite poor. I had to sand down most of the tank attachment piece to get it to fit on the rack. A coat of matte clear was applied, some touch up painting was done (such as the wing tip lights), the masking removed from the clear bits, the prop pushed on and a radio wire made from EZ-Line. I didn't attach the line where it goes into the fuselage and that was a mistake. I don't really weather things so only some exhaust stain and the canopy was glued open.
| CONCLUSIONS |
For many modelers, the Zvezda 109Fs are the best there are in this scale. I won't argue with that if you are one who likes to have all the panels open. If you like a clean airframe, it is a nightmare. The kit is obviously not designed to have the panels closed up. I got rid of the other Zvezda 109Fs I had in my collection and will continue to build the Hasegawa kits which may not be the same detail level, but at least will not cause one to stop building for several weeks out of frustration.
Not everyone wants an exploded model. If you do, then by all means, this is the one. If you don't, look elsewhere.
| REFERENCES |
https://en.wikipedia.org/wiki/Messerschmitt_Bf_109_variants#F
Thanks to me for the review kit. September 2015
If you would like your product reviewed fairly and fairly quickly, please contact the editor or see other details in the Note to Contributors.