Classic Resin 1/48 Me-309v2
Kit Number: 8003
Price: $69.00 (on sale for $30.00)
Decals: One version, the v2
Date of Review 17 December 1997
Review and Photos: Scott Van Aken
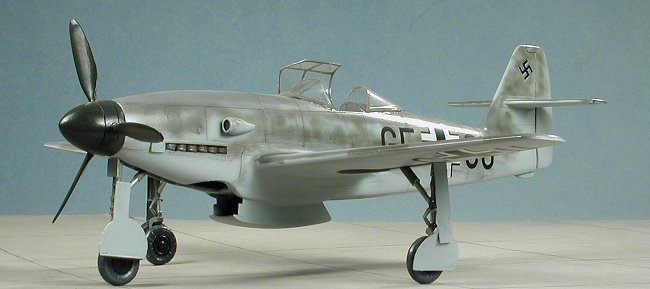
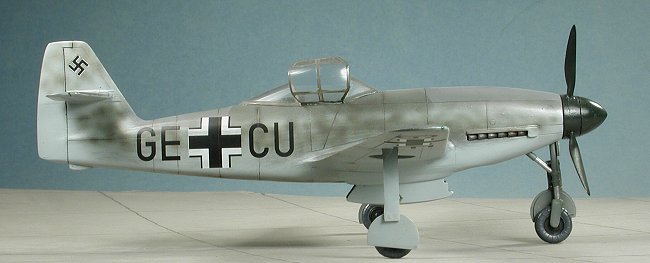
By 1942/43, the Bf-109 was in need of a replacement. Messerschmitt designed a rather radical tricycle landing geared aircraft, the Me-309, to replace it. Initially, there was little hurry to complete the prototype. Once they were built, they were plagued by a number of problems, the biggest one being instability. The tail section was redesigned several times in attempts to cure this. By the time the fighter was ready, it was not much better than what was currently available. In order not to lose production space for a new fighter, the prototype 309s were relegated to test duties.
 The Classic Resin 309 comes complete with everything needed to make a fine
Me-309. The workmanship of the individual parts is excellent as is
the Propagteam decal sheet. The vacuform transparency is not very clear.
The landing gear are made of metal to hold the weight of the completed kit.
A good move by Classic and something that should be standard in resin kits.
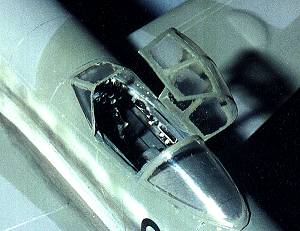
The interior parts are lovely and scale as are the gear doors. There
is room in the fuselage to pack in weight, but I found it was not enough
and had to glue weights in the nose gear well to keep it from tail-sitting.
The Classic Resin 309 comes complete with everything needed to make a fine
Me-309. The workmanship of the individual parts is excellent as is
the Propagteam decal sheet. The vacuform transparency is not very clear.
The landing gear are made of metal to hold the weight of the completed kit.
A good move by Classic and something that should be standard in resin kits.
The interior parts are lovely and scale as are the gear doors. There
is room in the fuselage to pack in weight, but I found it was not enough
and had to glue weights in the nose gear well to keep it from tail-sitting.
Step one is to wash all the parts to get them ready for painting. The interior is first and fit beautifully. Superglue was used for assembly. All that is needed is an etched harness, although those molded on the seat are very convincing. Next is the assembly of the fuselage. Here was my first challenge. The fuselages were rather warped. Even heating in water was not good enough to get all the warpage out. So I glued the fuselage in sections. It seemed to work rather well, although one side was larger than the other and needed sanding down. More about this later.
 Next the wings were attached. The wings are a single piece the fit
on the right and left side of the fuselage. Some trimming had to be
done at the root for a good fit. There are small protrusions on the
wing designed to fit into depressions in the fuselage, but they aren't even
close. I drilled holes and used small sections of paper clip. The
same was done with the stabilizers. Speaking of which, they fit well enough,
but the location on the right and left sides of the tail were off by about
an 1/8 inch in the vertical. This in spite of having the tail properly
aligned from top to bottom. I fudged both sides, raising one and lowering
the other, then filled in the gaps, but I shouldn't have had to.
Next the wings were attached. The wings are a single piece the fit
on the right and left side of the fuselage. Some trimming had to be
done at the root for a good fit. There are small protrusions on the
wing designed to fit into depressions in the fuselage, but they aren't even
close. I drilled holes and used small sections of paper clip. The
same was done with the stabilizers. Speaking of which, they fit well enough,
but the location on the right and left sides of the tail were off by about
an 1/8 inch in the vertical. This in spite of having the tail properly
aligned from top to bottom. I fudged both sides, raising one and lowering
the other, then filled in the gaps, but I shouldn't have had to.
There were some rough spots and a few pinholes that needed filling and sanding. I used superglue to fill the big spots and paint for the little ones. Here I ran into big trouble. As I mentioned, the fuselage halves were not the same size. I put the overhang on the bottom and started to sand. Sanding here and on the wings revealed millions of tiny pinholes just beneath the surface resin. I spent several weeks doing nothing but filling pinholes. A very frustrating experience that I will not soon repeat. Final big piece was the under fuselage radiator. Naturally, the bottom of this is flat while the fuselage is curved both fore/aft and port/starboard. No way could I file this down properly to fit. It should have been done during molding. All I could do was the port/starboard direction and use filler to take care of the rather large gaps. Another non-fun job.
 Once that was done, the canopy was cut open and the fore and aft sections
applied. Another problem area. The canopy is either 1/2 inch
too long or the cockpit section is 1/2 inch too short. This is something
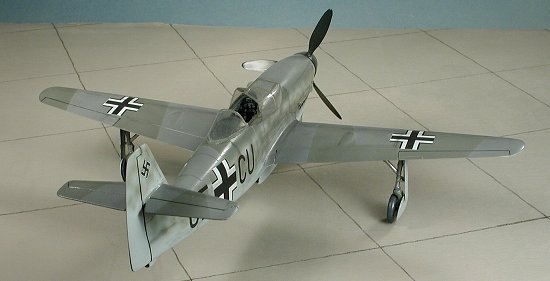
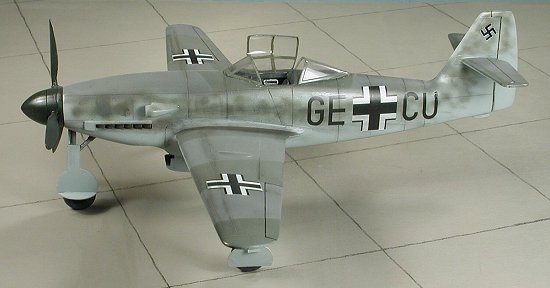
I could not fix so had to live with it. The landing gear were then
glued on (By the way, they are molded in the extended position so the gear
doors look too small when completed--trimming the gear would have made them
too short for the prop), extra weight added to the nose well and the aircraft
painted. On the primed surface, I used Xtracolor paints. They
worked beautifully. The Propagteam decals fit beautifully as well, although
they are a bit too large. Finally, a semi-matte was sprayed on and the exhaust
stains added with pastels.
Once that was done, the canopy was cut open and the fore and aft sections
applied. Another problem area. The canopy is either 1/2 inch
too long or the cockpit section is 1/2 inch too short. This is something
I could not fix so had to live with it. The landing gear were then
glued on (By the way, they are molded in the extended position so the gear
doors look too small when completed--trimming the gear would have made them
too short for the prop), extra weight added to the nose well and the aircraft
painted. On the primed surface, I used Xtracolor paints. They
worked beautifully. The Propagteam decals fit beautifully as well, although
they are a bit too large. Finally, a semi-matte was sprayed on and the exhaust
stains added with pastels.
Finally it was done. It looks very much like an Me-309, but that is about it. I would not recommend this kit to anyone but a masochist. There are just too many fit problems, and for a retail of $70.00, it shouldn't be this bad. I can deal with this in a Classic Airframes kit as they are less than half the price and injected plastic is easier to modify than resin. It will probably be a long, long time before I buy another Classic Resin kit, no matter how much it is discounted.
Copyright ModelingMadness.com. All rights reserved. No reproduction in part or in whole without express permission from the editor.
Back to Reviews Page 2023