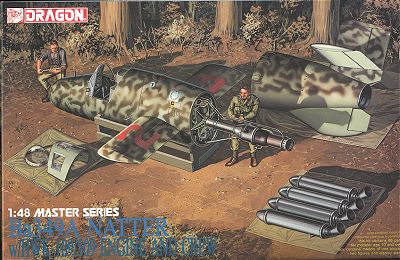
Dragon 1/48 Ba-349A 'Natter'
|
KIT # |
5525 |
|
PRICE: |
MSRP: $29.95 |
|
DECALS: |
One version, unit unknown |
|
REVIEW: |
|
|
NOTES: |
Includes crew and photoetched parts |
|
HISTORY |
Toward the end of WWII, things were getting a bit desperate in Germany. Constantly under bombardment by the Allies day and night; the Brits and Americans advancing from the West and the Russians from the East. Frankly, the Luftwaffe was totally incapable of stemming the onslaught of aircraft that were bombing its cities to rubble. Airfields were constantly under attack, making it even more difficult for defenders to rise to the attack. What was needed was a point defense interceptor that was fast, lethal and didn't need an airfield. Amongst several of the expendable fighters offered was the Bachem Ba-349A. Built mostly of non strategic material (wood and steel), the Natter was designed to fire a volley of rockets from it's nose and for the pilot to then bail out of his aircraft. He and the engine would then float to the ground to fight again. The Natter was launched vertically from a mobile tower by four solid rocket boosters, after which the liquid fuel rocket (same as used in the Me-163) would ignite for the rest of the sortie. Once the pilot bailed out, the motor separated from the nose and floated to earth to be used again.
The aircraft was quickly built and several successful unmanned launches were accomplished. However in late February 1945, when it came time for the manned launch, the canopy tore off the aircraft, it went over on its back and crashed, killing the pilot. No other manned launches are known and those Natters found by the Allies were taken and studied. I have recently found out that there are two surviving Natters. One is a prototype at the Deuches Museum and one is in storage at Silver Hill. There is also a replica at the Planes of Fame museum. Thanks to Peter A James for that information. The aircraft carried no national insignia or swastika. Since it was an expendable weapon (like a bullet or rocket), none was required.
|
THE KIT |
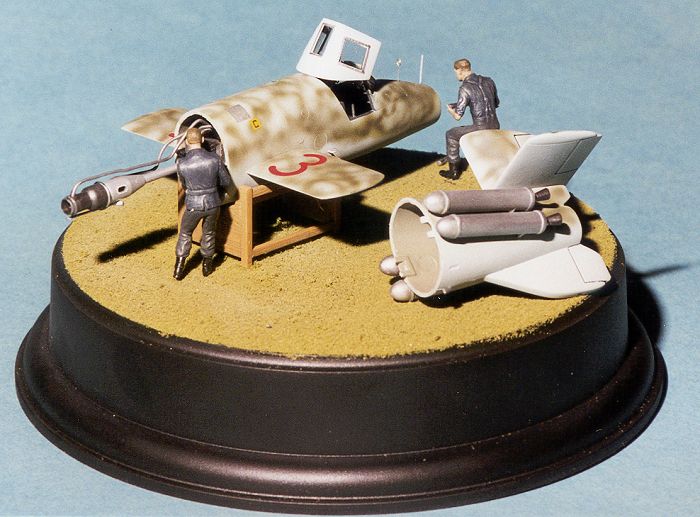
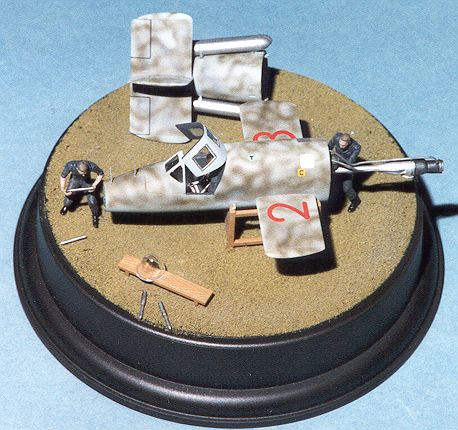
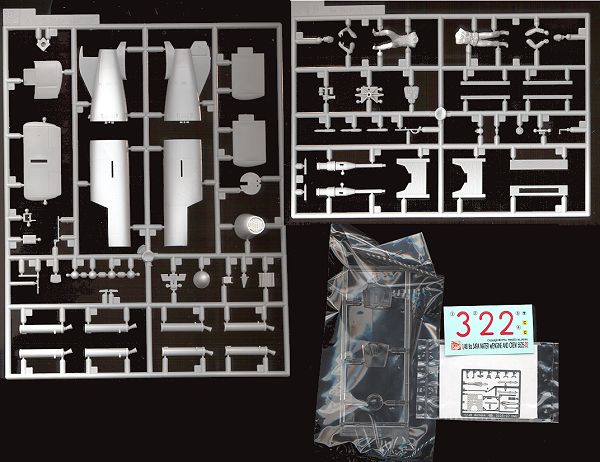 The DML/Dragon kit consists of a Natter, two crewmen, a handling trestle and a large circular base (which takes up a great deal of the box) for all this to be placed upon. All the plastic parts are very well detailed with no flash. The stainless etched parts are mostly for the interior and engine. There is a choice of nose cones; either a wooden or clear
Perspex one, or the nose cone can be left off altogether. There are also several extra rockets to be displayed along with the kit, though one would have to drill out some of the existing ones in the nose cone to have a diorama of them being loaded. A small decal sheet includes a few common markings as well as numbers.
The DML/Dragon kit consists of a Natter, two crewmen, a handling trestle and a large circular base (which takes up a great deal of the box) for all this to be placed upon. All the plastic parts are very well detailed with no flash. The stainless etched parts are mostly for the interior and engine. There is a choice of nose cones; either a wooden or clear
Perspex one, or the nose cone can be left off altogether. There are also several extra rockets to be displayed along with the kit, though one would have to drill out some of the existing ones in the nose cone to have a diorama of them being loaded. A small decal sheet includes a few common markings as well as numbers.
|
CONSTRUCTION |
As with most kits, I started by doing subassemblies. With the Natter, this means the rocket engine body, the work stand and the take-off rockets. The slightly soft plastic makes it easy to remove the parts with a fine toothed saw. Some of the parts are very delicate so using nippers may easily break the parts you are intending to remove!
The rocket packs fit very well as did the rocket body. The work stand, while comprising only a few parts was a bit fiddly to get together and very wobbly until all the pieces were glued solidly together. It is unfortunate that the wood grain of the work stand plastic is marred on one side by ejector pin marks because removing those marks also removes the wood grain.
Next part assembles was the forward section and the nose. There are four parts that fit to the back of the nose piece and those were glued in place. The forward section was first glued together and then had the etched throttle installed as well as the headrest and the rudder and aileron control rods. Test fit all the pieces before gluing as I had to trim a small bit from the pieces to get them to fit as they were a tiny bit too long. The nose was then test fit and I had to carve out a bit from the floor of the forward fuselage for a good fit. When doing the nosepiece, don't forget to fit the rudder bar as high as you can get it or it won't fit in the forward fuselage. Once the nose was glued to the rest of the forward fuselage the interior was painted RLM 66 Dark Grey using Aeromaster paints. The cockpit was then given a dark wash and a drybrushing. The seat parts were saved for installation later.
Then it was on to the rocket motor.
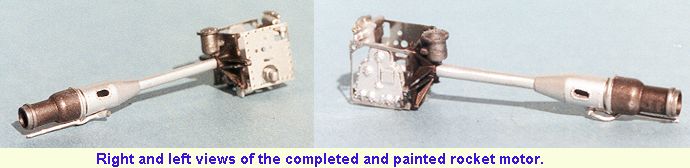
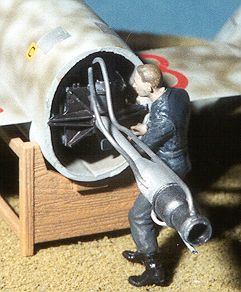
Most of the parts are some sort of metallic color so those were painted according to the instructions. The booster rockets were painted steel with burnt metal nozzles. Here is where I ran into a problem. The mount for the motor is an etched steel frame. Unfortunately, it is so strong and the bend areas so slim that getting a nice 90 degree bend was impossible. Were the parts made of etched brass then I don't think I would have had any real problems in this area. All of the bits and pieces were attached to the frame with superglue. Looking at the box art, it seems that there are a number of fuel lines and the like that also need to be added to the engine to make it 'busy' enough. Various bits were painted with various shades of Metallizer. The assembly was put aside

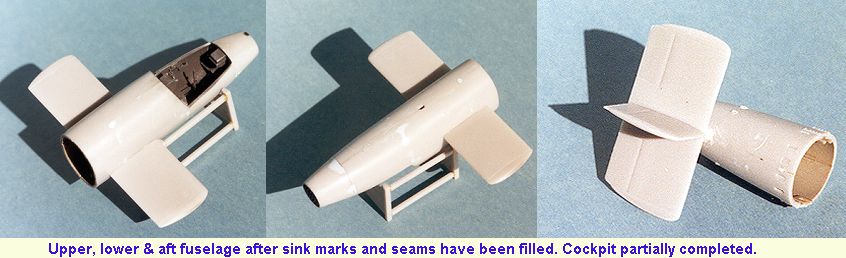
The rear fuselage was the next part to get attention. The interior is listed as being painted in RLM 79, a sandy brown. Undoubtedly this is used to simulate wood. I got out my wood paint and wide brush for this section. After it dried the center tabs used to glue the aft section to the cockpit section were removed otherwise the aft fuselage would not fit over the cockpit section when the engine was installed. After looking at the horrible paint job, I overpainted it with RLM 02 grey. Maybe not accurate, so sue me!! The aft sections were then glued together. At this time both the fore and aft sections had seams and sink marks filled. There really were quite a number of them on the nose section.
Once that was done to my satisfaction, the horizontal stab and rudder was glued on to the aft section and the wings to the forward section. The canopy sections were masked inside and out with tape and the interior parts sprayed with RLM 66 Dark Grey. Then the tape was removed from the inside and the brass etched bits installed along with the instrument panel. Naturally I was unable to bend and eventually lost the opening canopy grab handles. Grrr. However I did manage to install the hinge as well as the grab handles for the windscreen. Once these assemblies were dry, the rocket motor was glued to the aft of the forward section. Next the windscreen section had Reheat Instrument decals added to the instrument panel. Then the windscreen was glued to the forward section. It was then time to do some painting.
|
PAINT & DECALS |
The box art shows a Natter in an indeterminate scheme of light and dark greens. However the kit instructions show it to be light blue and green. I went with the kit instructions. The outside of the transparencies as well as the rest of the airframe was sprayed with RLM 76 light blue-grey. This is the standard of the time, though it is conceivable that it could have been the mysterious 'RLM 84' light green as well. While all that was drying, I started on the figures. Frankly, I'm terrible with figures, but since it is part and parcel of the kit, what the hey! Besides, I have to have something to stick on the base along with the kit. Turning back to the airframe, it was then sprayed with squiggles of RLM 81 green-brown and once that was dry it was given a gloss clear coat in preparation for the decals.
The decals are typical of DML. They are a bit thick, but very well printed. I used setting solutions on them with no ill effects to the decals or the paint scheme. After the decals had properly dried, the kit was given an overall spray of clear matte to seal the decals. There was almost no weathering done to this kit as it is supposed to be an expendable vehicle and so would not have had more than wear from transportation. Since the rocket motor was supposed to be saved and reused, it is possible that it and the boosters would show some wear as well.
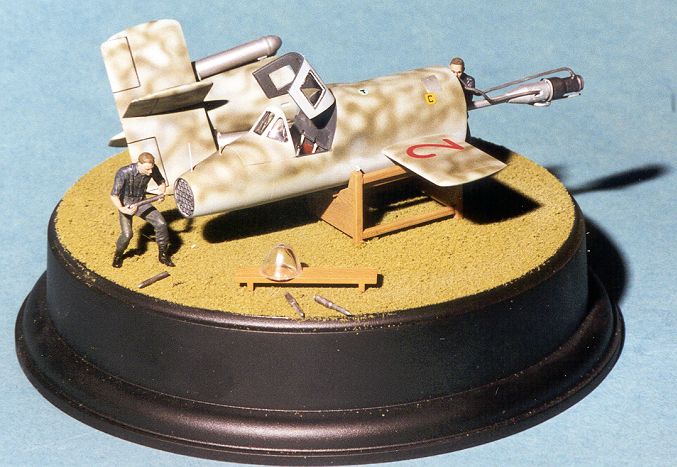
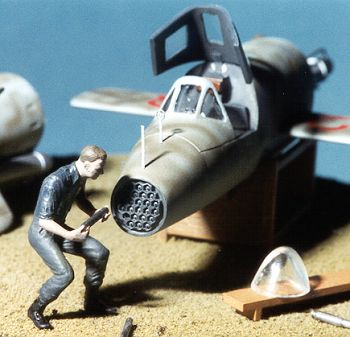
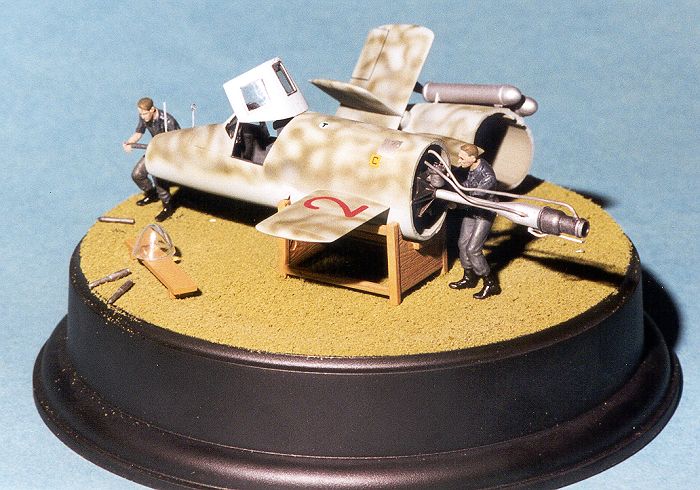
Once the kit was painted, the final etched bits were added, as well as the canopy, and then some thin solder was used to represent some lines shown on the box top. It was placed on the base that came with the kit. The base had some 'grass' from Woodland Scenics glued onto it to add some color to it. The figures then had a hole drilled in one heel and some wire inserted. Holes were then in the base and the figures placed in a manner similar to what is on the box top.
|
CONCLUSIONS |
I'd have to rank this as one of the nicest Dragon kits I have built. It went together with minimal fuss and just plain looks cool. It is unusual in that it comes with figures, a feature not found in most aircraft kits. Due to the photoetched parts, this kit is recommended to those who have some experience with the medium and not for the beginning modeler.
|
REFERENCES |
Warplanes of the Third Reich by William Green, Doubleday, 1970
Copyright ModelingMadness.com. All rights reserved.
Many thanks to :
Uncle Bill's HobbyBack to Reviews Page 2020