
|
KIT: |
Hasegawa 1/72 He-111P 'Old Camouflage' |
|
KIT # |
00847 |
|
PRICE: |
$34.80 from GreatModels |
|
DECALS: |
Three options |
|
REVIEWER: |
Scott Van Aken |
|
NOTES: |
First 'rebox' of the P model. |
|
HISTORY |
The He-111P was actually produced before the H model. The P was the major redesign of the earlier variants and introduced the streamlined nose so familiar to the aircraft for most enthusiasts. It was powered by Daimler Benz 601 engine, which gave excellent performance, but this engine was in heavy demand for use in fighters. As a result, the P was joined and later supplanted on the assembly line by the much more widely build H variant that used the somewhat heavier and lower powered Junkers Jumo 211 engine.
Despite this, many different variants were developed and the He-111 was in production for most of the war, until all bomber production stopped during late 1944 so that more fighters could be built to try to combat the Allied air onslaught. These planes were used as mine-sweepers, cargo aircraft, transports for high-ranking personnel, unit hacks and a number of other various and sundry duties. A few were exported and Spain developed a production line for them, though they had to switch to Merlin engines after their supply of Daimler-Benz engines ran out in the late 1940s.
|
THE KIT |
 So,
what is different in this kit as compared to the He-111H offering. In a word,
a single sprue. This sprue offers the different engine cowlings for the DB 601
engines. All the rest of the airframe is identical to the H kit. Something
that I'm sure Hasegawa appreciates as it means a bunch of new boxings for only
one measly engine sprue. I've left up the H sprues on the left and have shown
the P engine sprue on the right. The rest of the article is just what you read
last year or so when the H kit came out, aside from the markings bit.
So,
what is different in this kit as compared to the He-111H offering. In a word,
a single sprue. This sprue offers the different engine cowlings for the DB 601
engines. All the rest of the airframe is identical to the H kit. Something
that I'm sure Hasegawa appreciates as it means a bunch of new boxings for only
one measly engine sprue. I've left up the H sprues on the left and have shown
the P engine sprue on the right. The rest of the article is just what you read
last year or so when the H kit came out, aside from the markings bit.
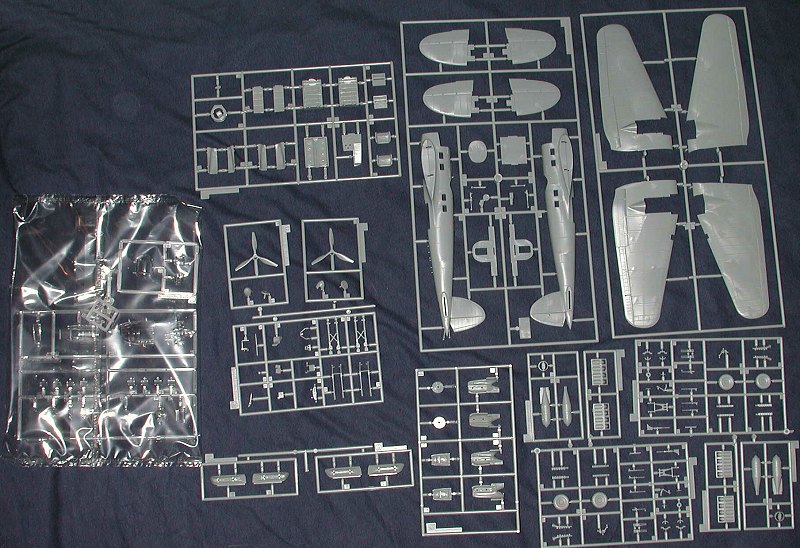
As usual, all the sprues save the clear bits are in one bag. This resulted in some damage to parts as they rubbed together during shipment. There are a LOT of sprues in this one and if you have built any of the Hasegawa twins, then you have a good idea of what you are in for. First thing that grabbed me is that this one actually has the interior bomb rack and you can pose the bomb bay doors open. A first as far as I know with regard to the bay doors in 111 kits. Thanks to the way the sprues are set up, you actually get two internal bomb racks so you can use the second on your Roden kit! You are also given external racks which were able to hold bigger bombs and pretty well negated the bomb bay. However, if the plane only had one external rack, the other side of the bay would be operable, making for some interesting possibilities. The cockpit is quite complete and provides an instrument decal only for the main instrument panel. On the inside of the rest of the interior is framing as you can see some of this through the various windows.
Depending on the aircraft you are building, you have the options of different exhaust, a choice of external bomb racks or the use of the standard bomb bay. You do have to drill a few holes for various bits as well. The engines use poly caps so you can just push on the props at the end of construction. I noticed a tiny bit of flash on the prop blades and the wing ejector marks almost punched through the wing, leaving visible marks on the outside of the wing. These may disappear under a coat of paint.
 The instructions are the usual excellent ones we have come to expect
from Hasegawa. Colors are given in generic and Gunze shades with RLM numbers
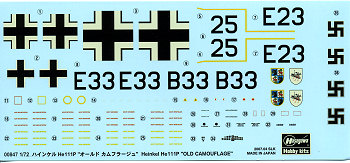
provided where needed. Markings are for three planes from KG 152 before
the war in the four color splinter scheme of RLM 61/62/63/65. The scheme that
Hasegawa shows on the box art and in the instructions is actually a bit
simplified when compared to the actual RLM color application charts. Many of
you will recall from reading that pre-war, there was a standard pattern. This
was quite large and allowed any sized aircraft to be fit into it. The only
differences is that there were differences in the way the colors fit into the
pattern with one starting with RLM 61 in one place while another had RLM 62 in
that spot and another RLM 63. Made for a number of possibilities, and was also
overly complex. Anyway, the scheme shown in the instructions looks like none
of that so the option is your own as to using it. The decals themselves cover
one of three aircraft which differ only in the last three code letters.
Naturally, you have to mix most of the colors as only RLM 65 is produced by
Gunze. The instructions substitute RLM 02 for the RLM 63 which is pretty close
though the 02 is a bit dark. The decals are old school where the white is a
bit on the ivory side, though it may be the blue background that is causing
that.
The instructions are the usual excellent ones we have come to expect
from Hasegawa. Colors are given in generic and Gunze shades with RLM numbers
provided where needed. Markings are for three planes from KG 152 before
the war in the four color splinter scheme of RLM 61/62/63/65. The scheme that
Hasegawa shows on the box art and in the instructions is actually a bit
simplified when compared to the actual RLM color application charts. Many of
you will recall from reading that pre-war, there was a standard pattern. This
was quite large and allowed any sized aircraft to be fit into it. The only
differences is that there were differences in the way the colors fit into the
pattern with one starting with RLM 61 in one place while another had RLM 62 in
that spot and another RLM 63. Made for a number of possibilities, and was also
overly complex. Anyway, the scheme shown in the instructions looks like none
of that so the option is your own as to using it. The decals themselves cover
one of three aircraft which differ only in the last three code letters.
Naturally, you have to mix most of the colors as only RLM 65 is produced by
Gunze. The instructions substitute RLM 02 for the RLM 63 which is pretty close
though the 02 is a bit dark. The decals are old school where the white is a
bit on the ivory side, though it may be the blue background that is causing
that.
|
CONCLUSIONS |
Well, another great excuse for adding to your German bomber
collection. Especially if you like the pre-war schemes. There are several
aftermarket sheets for a P variant out there, some reviewed right here in MM if
you don't like that scheme. One thing for sure, it builds very nicely as I
thoroughly enjoyed building the H version a while back. This kit and others can be found at discount by visiting
GreatModels If you would like your product reviewed fairly and quickly by a
site that has nearly 400,000 visitors a month, please contact
me or see other details in the
Note to
Contributors.