Being on a primer of the ways of
creating awesome and unforgettable models, bye ye olde model builder, Scott Van
Aken, proprietor of Modeling Madness, an internet production of
incredible foresight.
The Mystical Beginnings
When originally approached to pen
something on modeling techniques, it was difficult to determine what would be
the best subject to broach. Metal finishes, canopy masking, working with resin,
fillers, how to apply photo etch....these subjects all sped through my brain
(actually a pretty quick trip). However the one thing that I always look for
when peering at models, is how well does one do the basics. Frankly, for contest
models, this is step one in the 'how to judge contests' handbook.
There really is nothing more
basic than initial preparation. Once the shrink wrap has gleefully been rent
from the packaging and the inside bag torn asunder, step 1 should be a good
reading of the instruction sheet. "What!!" you think, "Read the
instructions?? How mundane, how plebian......" how necessary. Some kits,
such as most Accurate Miniatures products, require slavish attention to step by
step construction to prevent major screw-ups during construction. Others can be
pretty well ignored, especially if you have built a number of kits.
For sage wizards of plastic such
as myself, (stop that snickering back there!) reading the instructions lets me
know if I can build the kit in a number of subassemblies that can be brought
together later, or if I need to follow a specific sequence. It also is helpful
to know how many parts need to be prepainted and what colors are needed.
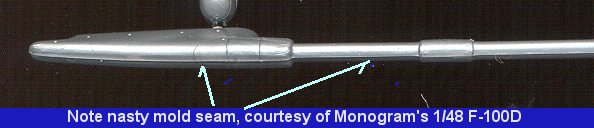 Once that is done, step #1 is to start
removing mold seams from the parts. Every kit has them, some more prominent than
others. To take these pesky buggers off your parts, you should have an array of
hobby knives, sandpaper and sanding sticks, a steady hand, and some sort of
magnification device. I use an Opti-visor, but there are a number of other fine
low power magnifiers on the market. These items are a real boon when it comes to
parts clean up.
Once that is done, step #1 is to start
removing mold seams from the parts. Every kit has them, some more prominent than
others. To take these pesky buggers off your parts, you should have an array of
hobby knives, sandpaper and sanding sticks, a steady hand, and some sort of
magnification device. I use an Opti-visor, but there are a number of other fine
low power magnifiers on the market. These items are a real boon when it comes to
parts clean up.
 Before removing parts from the sprues, clean up as many of these
mold seams as possible. It really is easier and keeps one from breaking the
parts or having them fall into the carpet where the carpet gnomes will scurry
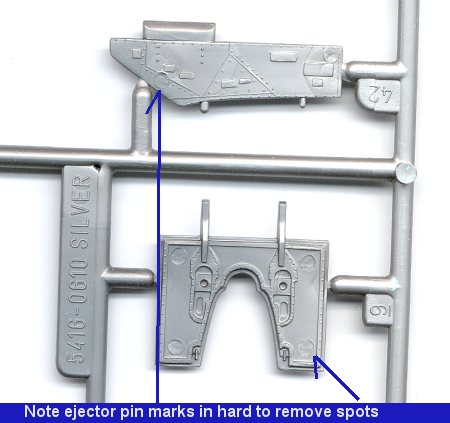
off with your part, never to be seen again. While removing molding seams, look
for ejector pin marks that may be visible once the model is built. Now is a good
time to either fill or sand them off. If removing these pin marks will trash
some detail, you will have to determine which is the greater evil; loss of
detail or big honking pin release mark.
Before removing parts from the sprues, clean up as many of these
mold seams as possible. It really is easier and keeps one from breaking the
parts or having them fall into the carpet where the carpet gnomes will scurry
off with your part, never to be seen again. While removing molding seams, look
for ejector pin marks that may be visible once the model is built. Now is a good
time to either fill or sand them off. If removing these pin marks will trash
some detail, you will have to determine which is the greater evil; loss of
detail or big honking pin release mark.
Once you have the parts cleaned
up as much as possible and maybe painted, it is time to remove the parts. There
are several methods. First is to just tear them off the sprue. Generally not
something one does after the first few models as it can damage the part.
More advanced modelers use some form of cutting device to remove them. You can
use an X-acto knife (down side is cutting yourself and possibly cutting a gouge
in the part). You can use sprue cutters like Xuron's (downside is their
inability to get into tight spots and cut fragile parts). You can also use a
fine-toothed saw (downside is that it sometimes can't get into tight corners and
you can also cut yourself and gouge the part if not careful). Seems like there
isn't a best way. Actually, I have been using the sprue cutters and saw more
than anything. The saw is thin enough to be able to cut off the most fragile
parts, but one has to be careful when using it.
Once the part is removed from the
sprue, it needs to be cleaned up even more using scraping and/or sanding to
remove any additional seams and sprue removal nubbins. The part may also need to
be repainted again, especially if it was prepainted before removing it from the
sprue. Any lost panel lines also need to be restored. Probably the most
difficult part to clean up after removal are clear parts, especially if there is
any damage done to the transparency while sanding off the nubbin. For this, I
recommend a fingernail buffing stick that can be found at any drug store. This
has a very soft and fine sanding medium that is perfect for clear bits. A dip in
Future floor wax will also help restore the clarity of the part.
Frankly, it is the most time
consuming part of the kit as just about all parts have mold lines and many have
ejector pin marks that need to be treated. Naturally you generally don't do the
whole kit at once, but only as you need the parts. The final step before gluing
the part is to remove any paint or chrome from the parts to be glued. This is
especially true if using superglue as the part will quickly disconnect itself at
the first bump.
Well, there you have it. A
beginning and probably one of the most overlooked parts of building models for
the beginning modeler. It is the one thing that takes very little in the way of
special tools. However, without good basic parts preparation, you cannot have a
really super kit, no matter how much time, effort or money that you spend on
other bits or painting.
Stay tuned for other bits and
pieces in this series.
My sister was once bitten by a
moose.
Scott
Van Aken