Taking Photos of your
Models
(an introduction)
There has been some
discussion recently on taking model photos. It really isn't as simple as it
initially seems. One would think that all that has to be done is to place the
model in front of the camera and then trip the shutter. Unfortunately, there are
a host of variables that come into play. These range from equipment to placement
to photographer knowledge. The purpose of this section is to help you to take
better photos.
We'll start with the camera.
Model photos can be taken by just about any SLR (Single Lens Reflex) camera as
well as several of the smaller 'pocket' cameras and by many digital cameras.
There are two key features that are paramount in having the right camera: Close
Focusing and Depth of Field.
CLOSE FOCUSING
The first is the camera's
ability to close focus. Many cameras that have a fixed lens are incapable of
focusing any closer than 5 or 6 feet from the subject. If photographing a 1/72
Hurricane, this means a teeny image on your film. Generally, an inexpensive
camera, either film or digital is not the answer. You are going to have to spend
money to get the quality and features that you need. There is no other option.
In the film world, just about any SLR with interchangeable lenses will have
lenses that will focus closely enough. Some of these lenses are listed as having
'macro' capabilities and these work just fine as long as you can get a clear
image of your subject. As with anything new, try before you buy is a good
watchword.
DEPTH OF FIELD
In addition to being able to
get close to the subject you need a lens that has good depth of field. This is
the amount of the subject in front of and behind the listing on your lens that
will be in focus. Your depth of field is determined by several factors. One is
the millimeter size of your lens. The other is the maximum f-stop of the lens or
camera.
Generally, the lower the
millimeter size of your lens (and the standard is 50mm), the greater the depth
of field you can get from it. Most model photographers will use a 35mm or 50mm
lens for their photos. (As an aside, When you hear of a 35mm camera, it
refers to the size of the film it can use, not the lens.)
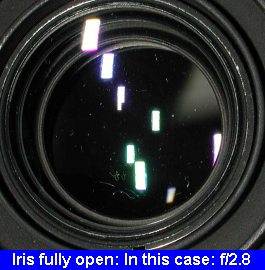 The f-stop is a number that
determines how large or small the opening of the lens iris is when taking a
photo. The lower the number, the more wide open the iris is and the more light
that is let in to the film. Conversely, the higher the f number, the more closed
the iris is and the less light that is let in. When you let in a lot of light in
a hurry, only those items that are close to the distance measured on the lens
are in focus. If you have your lens set at 10 feet to photograph something and
have the f-stop setting at a low number of say, 2.8, then only the parts of the
image close to 10 feet will be in focus. Things at perhaps 11 feet from camera
or 9 feet from the camera may start to be out of focus and the image gets
fuzzier the farther and closer you get from the camera.
The f-stop is a number that
determines how large or small the opening of the lens iris is when taking a
photo. The lower the number, the more wide open the iris is and the more light
that is let in to the film. Conversely, the higher the f number, the more closed
the iris is and the less light that is let in. When you let in a lot of light in
a hurry, only those items that are close to the distance measured on the lens
are in focus. If you have your lens set at 10 feet to photograph something and
have the f-stop setting at a low number of say, 2.8, then only the parts of the
image close to 10 feet will be in focus. Things at perhaps 11 feet from camera
or 9 feet from the camera may start to be out of focus and the image gets
fuzzier the farther and closer you get from the camera.
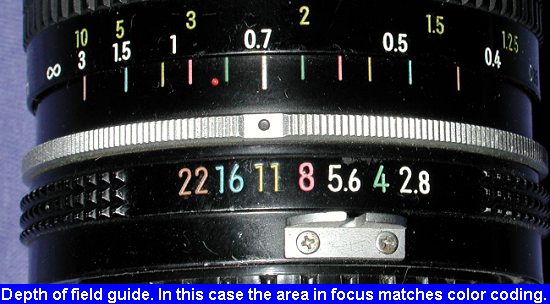
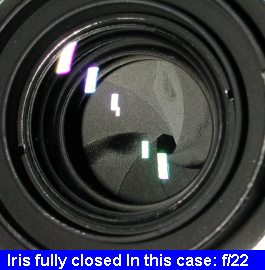 On the other hand, if you
have your f-stop set at f22 and your subject is 10 feet away, you will probably
have everything behind the subject out to infinity in focus and everything down
to perhaps just a couple of feet away from the camera in focus. This is because
it is taking longer for the light to come in through the lens. Several lenses
have depth of field indicators on them that help determine how much of the view
in in focus.
On the other hand, if you
have your f-stop set at f22 and your subject is 10 feet away, you will probably
have everything behind the subject out to infinity in focus and everything down
to perhaps just a couple of feet away from the camera in focus. This is because
it is taking longer for the light to come in through the lens. Several lenses
have depth of field indicators on them that help determine how much of the view
in in focus.
THE RELATIONSHIP BETWEEN
F-STOP AND SHUTTER SPEED
This brings into the
equation, the relationship between f-stop and shutter speed. Generally speaking,
you can manipulate either of them to get basically the same results. A photo
taken at 1/500 shutter speed and f/8 f-stop can also be shot at 1/250 and f/11
to get the same exposure. The benefit of the first setting is faster shutter
speed means that moving subject, like race cars will probably be in focus. The
benefit of the second is that you will have greater depth of field so more
of the subject or areas fore and aft of it will be in focus. When it comes to
models, you want your f-stop as large as possible, which means your shutter
speed will be quite slow. This generally means you cannot hand hold your camera
and must use a tripod or other steady support.
FILM SPEED
This is yet another part of
the formula for photography. (Didn't know there was so much to it, did you?)
Film also comes in various speeds. These are known as the ASA rating. The larger
the ASA or film speed, the faster the film accepts light. So you'd think that
800ASA film would be perfect. Maybe. The downside of fast film is that it is
much more grainy than slower film. The less grainy a film is the more sharp and
clear the image. Most model photographers I know use the slowest film they can
buy. For prints that is usually ASA 100 and for transparencies ASA 25 or 50.
Quality film also comes into play here. Cheap film generally produces inferior
results, so for your models, spend a bit more for the Kodak or Fuji film.
WHAT ABOUT DIGITALS?
Digital cameras work
basically the same as film cameras. They use the same language for shutter
speed, f/stop and film speed. However, most digitals don't look the same as SLRs.
Certainly there is no film. Digital cameras use a bank of detectors as what
gathers the light. The more detectors (which relates to pixels), the larger the
image and the higher the resolution of those images. There will be more on this
a bit later.
On most quality digitals, you
can treat all the controls just like those on an SLR. You can set shutter speed,
f/stop and adjust ASA settings. The ASA setting determines how much the
detectors enhance the incoming light. The higher the ASA setting on a
digital, the more noise you allow on the image. This noise appears as white and
black specs on your final image, much like the noise you see on older TVs when
you tune it to an empty channel, though not quite as much! For model pictures,
it is again best to use the lowest ASA setting you have.
Shutter speed and f/stop work
just the same as with a film camera. Often with a zoom lens on your digital, the
f/stop will change as you zoom. This is normal and several film lenses do the
same thing.
MANUAL VS AUTOMATIC
Many cameras, both digital
and film have the ability to operate in both manual and automatic modes. When
photographing models, you can use automatic if you wish, though in many cases,
the camera will go for the highest shutter speed to ensure an in-focus image,
when you really want a large f-stop. If your camera can be used in 'aperture
priority' mode of automatic, then by all means use it. The aperture is the
opening of the lens and is the same as f/stop. In this mode, you set the f/stop
where you want it and the camera will automatically adjust the shutter speed for
that setting. Many cameras also have a 'shutter priority' mode and this does the
opposite. You select the shutter speed and the camera alters the f/stop to fit.
Shutter priority is not normally used with photographing models.
LIGHTING
Lighting is key to a good
shot. The best way to get great lighting is to photograph your model outside on
a day with hazy sun. This means no harsh shadows, no large contrast between
light and dark (many digitals don't work well with a lot of contrast), and no
need to take up space in the house with extra lighting. However, not all people
can take pictures outside, so must shoot indoors.
When shooting indoors, you
have two options. One is to take the pictures in the brightest room of the house
when the sun in shining in it. Upside is no need for a flash. Downside is that
the lighting will take on the hues of the items in the room. If you have a lot
of natural wood in the room, you image will have a sort of brownish tinge. If
you have violet wallpaper, you'll get some of that in your image as well.
FLASHES
The other option is to use an
alternate lighting source. The first one that comes to mind is a flash. Flashes
are great and work well in many respects. However, the placement of the flash
becomes very important. If you mount it on your camera, you will get large
shadows directly behind the way your are shooting. For some angles of the model,
this will produce some rather unwanted results. Again, you want to use the
highest f/stop you can. Flashes will have a chart showing you what f/stop to use
depending on the distance of your subject. Some cameras will automatically set
the proper flash setting. Flashes can also be connected to your camera by a long
cord. This allows you to move the flash out of the direct line of the lens. This
gives you greater flexibility. With several flashes mounted around the subject,
your pictures improve even more. However, these sorts of arrangements can get
quite expensive and are beyond the scope of this article. One other thing, if
your subject is quite large, it may be that your flash is not able to cover the
entire model. Rather than spending the bucks on a bigger flash, take the model
outdoors to photograph it. I have found this to be particularly true if modeling
ships, as their size and shape is not usually good for indoor flash photography.
OTHER LIGHT SOURCES
You can also use regular
incandescent bulbs in reflectors for a lighting source. If you do that, you can
set up a 'studio' for as little as $30. Simply by cheap, clamp-on reflectors and
150-200 watt bulbs. Now these bulbs are usually much greater wattage that
recommended by the reflector makers so you need to keep them operating for a
minimal time each use. I have mine all hooked into a power strip and turn them
on and off at the same time. If using film, you need to get film that is made
for indoor lighting or you'll get odd color shifts in it. For digitals, there is
usually a 'white balance' that can be adjusted for indoor lighting. Often on a
quality digital, this is an automatic feature.
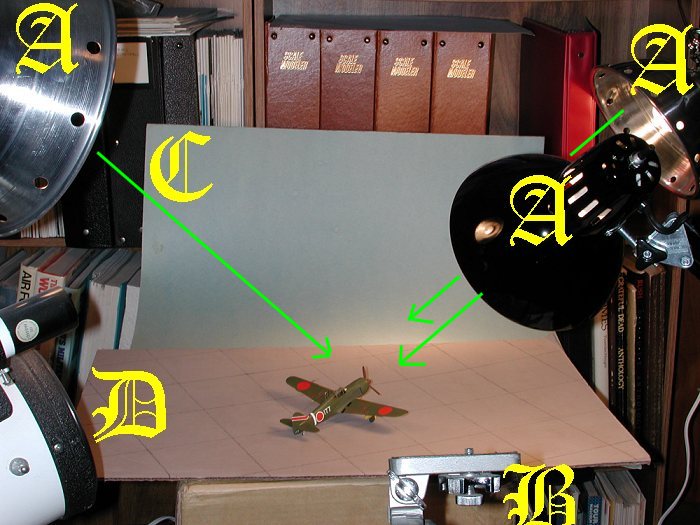
A CHEAP PHOTO SET-UP
OK, so let us say that you
have decided to go the indoor route. Here is how to do the set-up. First of all,
you need a space. A card table works quite well as does any other table of
similar size. Next, you need something to set your model on. You could just set
it on the table, but you really want a background for it. I recommend a sheet of
poster board. This can be set flat and curved up in the back. You may have to
tape the back part to the wall with temporary tape to keep it from sliding down.
When you get your poster board, you need to get a neutral color. Don't ever use
red, yellow, white, black, purple, etc. These bright or intense colors all look
cool to start with, but detract from your model by causing the viewers eye to be
attracted more the background. The best colors I have found are blues or medium
to light grey color. These will generally not clash with your model.
Another alternative is to
make a tarmac if you are doing aircraft models. This will give it a natural
setting for your plane. You can also buy photo backgrounds from a train shop if
you want to get even more realistic. If you want to buy tarmac pieces, I believe
that Verlinden does several. I have used a piece of cardboard sprayed with
'concrete' paint from Badger and then had the sections put in with a pencil.
Cheap, easy and it does the job.
Now you have a base for your
pictures. Head to the hardware store and buy three cheap, clamp on reflectors
and three 150-200 watt bulbs. If you can't find them, then get three-way bulbs.
The middle wattage is what what you'll get when you screw them into the
reflectors. The next thing is that you need to find things to clamp these
reflectors to. If you don't have anything that will work, you may want to
consider desk lamps with long necks rather than the clamp on reflectors. They
will do the job just as well.
You will need a tripod for
your camera. These can be found at any place that sells photo equipment. You
probably already have one in the house somewhere. As a final step, I raised the
height of the photo area by putting it on a box. That way I don't have to stoop
or bend down all the time when taking photos.
CONCLUSIONS
Well, there you have it. A
primer on taking model photos. You can see what is needed and what is not. You
can also see that you don't have to spend megabucks on a small 'studio' in which
to take photos. For web work, I highly recommend a digital camera. It may cost a
bit more than an equivalent film camera, but it produces images that are clear
and crisp. You also don't have to worry about losses to poor development and
poor scanning. Best of all, if the picture is too dark, you can use your photo
processing software to brighten it up and otherwise fix the image.
If you have any questions,
don't hesitate to contact me about it. I
can't promise to answer every e-mail, but I do read them all.
Scott Van Aken
Part II: Digital Cameras