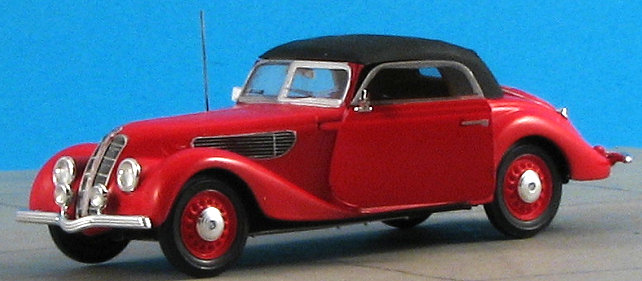
Hasegawa 1/48 BMW 327
| KIT #: | Included in kit 9755 "FW-190A-5 'Priller Special' |
| PRICE: | $ |
| DECALS: | one option |
| REVIEWER: | Scott Van Aken |
| NOTES: |
| HISTORY |
In November 1928 BMW acquired the Fahrzeugfabrik
Eisenach A.G. (Marke "Dixi") from the Gothaer Waggonfabrik bringing
the independent existence of Dixi to an end and the Eisenach factory became the
birthplace of car manufacturing by BMW. The Dixi continued briefly as the BMW
Dixi but the renamed BMW-Factory Eisenach soon started making an updated version
of the car 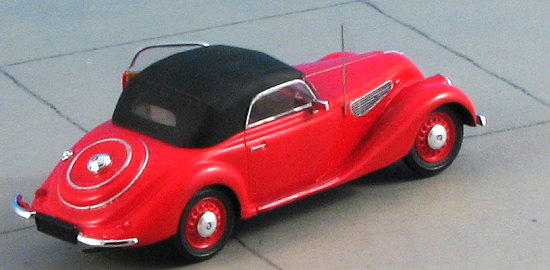 called the BMW 3/15PS dropping the Dixi name. By 1931, 25000
cars had been produced in a series going from DA 1 to DA 4. The DA-3, a sporting
version, saw a re-appearance of the Wartburg name. In 1932 a new small car, the
3/20 AM-1, was announced with independent suspension all round and an
enlarged 788cc (48ci) engine.
called the BMW 3/15PS dropping the Dixi name. By 1931, 25000
cars had been produced in a series going from DA 1 to DA 4. The DA-3, a sporting
version, saw a re-appearance of the Wartburg name. In 1932 a new small car, the
3/20 AM-1, was announced with independent suspension all round and an
enlarged 788cc (48ci) engine.
In 1933 BMW started to develop bigger cars with 6-cylinder engines. The first car of which was the BMW 303. Later successors were the BMW 315, BMW 319, BMW 327 and the elegant sports coupe BMW 328, of which 62,864 were produced. All of these cars were quite expensive so to own one was very much a status symbol.
In 1942 regular automobile production was stopped because of World War II. The BMW factory in Eisenach started to manufacture motorcycles for the Wehrmacht as well as aircraft engines for the Luftwaffe. By the end of the war about 60% of the factory was destroyed.
| THE KIT |
This car comes as part of Hasegawa's 1/48 FW-190A-5 'Priller' kit. You can read Tom Cleaver's preview of this if you wish to have more information on it. The 190 itself is a Dragon/Hasegawa mix and builds very much like the older DML/Dragon kits.
The subject of this article, the BMW 327 is new and judging from the number of pieces not shown as used in the building of this car, you can be assured that it will be issued later as a separate kit.
| CONSTRUCTION & PAINTING |
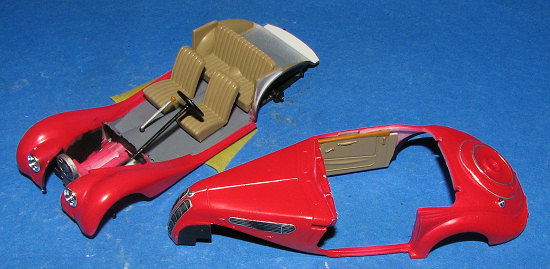
 Despite the small size of this kit, it is not one to be
rushed. I first gave all the external body parts a couple of coats of Tamiya
Red. This was also applied to the wheels and a few other pieces. Personally, I
don't think the paint turned out well as it is a bit on the splotchy side and
additional coats did not improve matters.
Despite the small size of this kit, it is not one to be
rushed. I first gave all the external body parts a couple of coats of Tamiya
Red. This was also applied to the wheels and a few other pieces. Personally, I
don't think the paint turned out well as it is a bit on the splotchy side and
additional coats did not improve matters.
I did follow the instructions as well as I could. One
has to be particularly careful of attaching the front suspension piece. I
thought I had it in place perfectly but when it came time to attach the wheels,
things were very much out of alignment. There are a myriad of colors used as you
might expect. One of them is a buff color for the interior. I basically mixed
some acrylics I had to get as close a match as I could. I also tried to paint
the black areas of the grille and the engine cooling vents, with limited
success. I then realized that there were decals the I could use for these and
those worked out well, though still not perfect. I put too much setting
 solution on them and it seemed to
have damaged the silver areas of the decal to some extent.
solution on them and it seemed to
have damaged the silver areas of the decal to some extent.
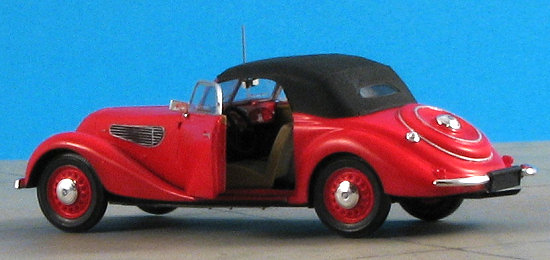
There are a considerable number of fiddly bits and to attach many of these, you need to open holes in the bodywork. Not all of this is readily pointed out until it is time to attach the bits. By which time, you've already attached the body and chassis. Builder beware in this case. One of these fiddly bits is a piece of wire to use as the antenna. This wire is about as large in diameter as the small base into which it needs to fit. No room to drill a hole so I cut it as required (this is strong stainless steel so be VERY careful when cutting it) and glued it in place with super glue.
There are two sets of front bumpers and two different
license plates. Only one of each is to be used and the rear plate and bumpers
are butt joins. This does not make for a good attachment. I'd recommend gluing
the rear plate onto the body prior to painting the body for a better fit. There
are also small chrome mirrors to attach. Again, most are butt joins and so one
has to be extremely careful about attaching these tiny parts. Having many of
them chrome plated makes attaching them doubly difficult and as for matching the
chrome to the areas you must clean up after removing them fro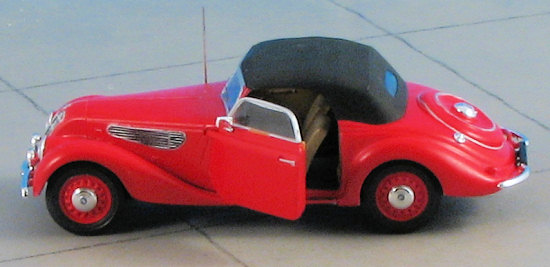 m
the sprue......
m
the sprue......
The kit comes with a choice of three tops; one fully stowed, one partially stowed and one in the up position. The third option is the one I chose as much to hide construction mistakes on the interior as any. The side curtains and windscreen fit fairly well, but not as well as I'd like. I had to trim the tabs on the side curtains in order to get them to fit. When using the 'up' top option, I dispensed with the sun shields that you'd use for the top down display. The car provides a separate driver's door. I was unable to get it to fit in the closed position so one is pretty well stuck with having it displayed open. Fortunately the fit is tight so no cementing was needed.
I attached all the chrome hub caps and the light lenses with clear paint. There seemed to be a lot more touchup on this kit than some others, but by this time, I'd come to expect it. The little BMW logos were put on the hub caps. I tried to cut out the thick vinyl that came with the kit for the hood straps, but just made a mess of things so left them off. Perhaps having these as decals would be a better idea. Conversely, one could use thin, brown detailing tape.
| CONCLUSIONS |
I have to frankly tell you that this little car kit was
a lot more work than I'd have originally thought from looking at the sprues. It
took me about as much time to build and fin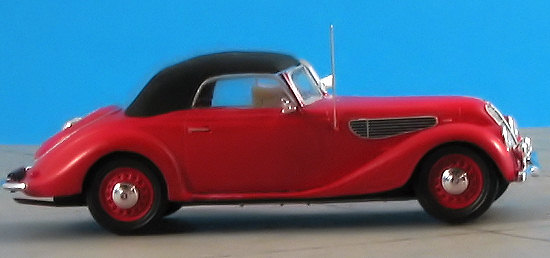 ish
this one as it would have the FW-190 itself. A lot of work for a model barely 3
inches long. I found it a lot more fiddly than the Tamiya Citroen, a similar car
in this scale. Having said all that, I am glad that I built it and it really
does look quite nice when it is finished. I'm sure that 1/48 cars won't be a
huge hit, but for those of us who like to add them to our model displays, it is
most welcome.
ish
this one as it would have the FW-190 itself. A lot of work for a model barely 3
inches long. I found it a lot more fiddly than the Tamiya Citroen, a similar car
in this scale. Having said all that, I am glad that I built it and it really
does look quite nice when it is finished. I'm sure that 1/48 cars won't be a
huge hit, but for those of us who like to add them to our model displays, it is
most welcome.
| REFERENCES |
http://en.wikipedia.org
October 2007
# 1489 in a series
Copyright ModelingMadness.com. All rights reserved. If you would like your product reviewed fairly and quickly, please
contact
me or see other details in the
Note to
Contributors.