| KIT #: | K 1649 |
| PRICE: | $ 37.00 |
| DECALS: | One option |
| REVIEWER: | Scott Van Aken |
| NOTES: | Resin and metal kit - Sebring 1970 |
| HISTORY |
The 908 was identical to the 907 both in long and short
tail form, except for the engine. The eight cylinder, three-liter 908 was
Porsche's first attempt to win The World Manufacturers' Championship. In 1967,
Hans Mezger, an employee of Porsche and an individual who would later design the
917 Type 912 12-cylinder, began the design and production of their power-plant
that would finally equal the competition and make it a contender for the overall
victory. The three-liter engine was a modified version of the four cam
six-cylinder engine that had been used in the Type 901 flat six used in the 911.
With dry sump lubrication, titanium rods
 and bolts, aluminum heads and
cylinders, and sodium filled valves, the engine was technologically advanced,
lightweight, and rugged. The bore was enlarged to 84 mm and fitted to the 907's
six-speed transaxle. However, from 1969 a new five-speed gearbox was used.
and bolts, aluminum heads and
cylinders, and sodium filled valves, the engine was technologically advanced,
lightweight, and rugged. The bore was enlarged to 84 mm and fitted to the 907's
six-speed transaxle. However, from 1969 a new five-speed gearbox was used.
The 908/3 engine produced 350 horsepower which was low when compared with the other Manufacturers engines. The reason the 908 was competitive was because it was light and its power-to-weight ratio was better than most.
The racing history for the 908 began at the 1968 Nueburging 1000km. The short-tail coupe driven by Vic Elford and Jo Stiffert won the event. Another race in Austria had Stiffert finishing first and Kurt Aherns finishing second. By now, the shortcomings of the 908 were evident. It suffered from crankshaft-induced torsion vibrations causing many of the engine components to fail, including the alternator. There where aerodynamic instabilities, wheel bearing failures, gearbox failures, and frame breakage. These issues were addressed in time by changing the firing order of the engine, adding fins and fifteen inch wheels, and using a new Type 916 transaxle.
The 908 was entered in the 1968 Le Mans 24 Hours where it finished third behind the second place 907.
For the 1969 season and with a years worth of 908 growing-pains realized, it was ready for victory. Unfortunately, the 908 was unable to capture the checkered flag at Daytona or Sebring. The 917 was debuted at the Geneva Auto Show and the 908 was becoming old news. The mechanical shortcomings in the 908 were once again addressed and the remainder of the season was positive. A win at Targa Florio along with many other victories earned Porsche with its initial FIA World Manufacturers Crown.
 The 908 had an illustrious career both on the race
track and as a movie star. Porsche 908.022 was used in Steve McQueen's film
about LeMans. The movie was to be a documentary of the of the 24 hour race. In
preparation for the movie and for LeMans, Steve raced the 908 during the 1970
season. The vehicle was DNF'ed at Riverside International Raceway due to a
gearbox failure. A first place finished was achieved at the Phoenix
International Raceway. At the Sebring International 12 Hour Endurance Race,
another amazing race, it was Ferrari with Mario Andretti behind the wheel who
would emerge victorious by a mere 22 seconds. The 908 place second overall and
first in the Sports Prototype class. 908.022 was entered in LeMans but Steve
McQueen was unable to race. The film's backers did not want to take the chance
of having their movie star injured or worse. So Herbert Linge and Jonathan
Williams drove 908.022 to a ninth place finish. The pit stops for 908.022 were
longer than most due to the additional duties involved such as changing the
camera film. McQueen's LeMans paid homage to the greatest endurance race in the
world, the greatest cars of the time, and the greatest drivers. It is an
excellent souvenir, documentary, and memento.
The 908 had an illustrious career both on the race
track and as a movie star. Porsche 908.022 was used in Steve McQueen's film
about LeMans. The movie was to be a documentary of the of the 24 hour race. In
preparation for the movie and for LeMans, Steve raced the 908 during the 1970
season. The vehicle was DNF'ed at Riverside International Raceway due to a
gearbox failure. A first place finished was achieved at the Phoenix
International Raceway. At the Sebring International 12 Hour Endurance Race,
another amazing race, it was Ferrari with Mario Andretti behind the wheel who
would emerge victorious by a mere 22 seconds. The 908 place second overall and
first in the Sports Prototype class. 908.022 was entered in LeMans but Steve
McQueen was unable to race. The film's backers did not want to take the chance
of having their movie star injured or worse. So Herbert Linge and Jonathan
Williams drove 908.022 to a ninth place finish. The pit stops for 908.022 were
longer than most due to the additional duties involved such as changing the
camera film. McQueen's LeMans paid homage to the greatest endurance race in the
world, the greatest cars of the time, and the greatest drivers. It is an
excellent souvenir, documentary, and memento.
The entire racing career for the 908 included eleven championship victories over a span of four years. One of the closest and memorable LeMans race was in 1969 where the 908 finished in second place. The 917 had been retired after hour 22 due to clutch failure. The race came down to a Ford GT 40 and the Porsche 908. The John Wyer's Ford GT 40 finished less than 70 yards in front of the 908. The LeMans race would ultimately become the one that would forever elude the 908.
The 908 is one of many great Porsches from the 1960's. The 904, 906, and 917 often overshadow the 908's success. The mechanical difficulties that plagued the 908 kept it from achieving some important victories but its accomplishments are undeniable and legendary.
| THE KIT |
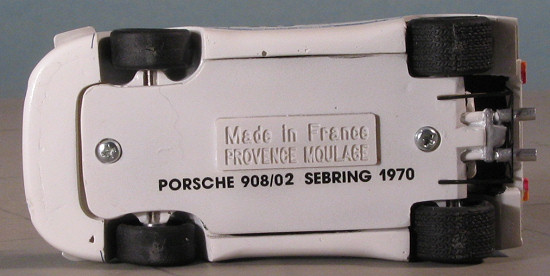
 I have never built a Provence
Moulage kit and neither have I seen one. Most of the 1/43 kits I've built have
had a lot of small bits and considerable cast metal. This one does not have a
plethora of parts nor does it have any cast metal ones. In fact, it doesn't
have a lot of parts at all. The overall quality of the resin moldings is first
rate. there are no surface glitches and I found only a few air bubbles on the
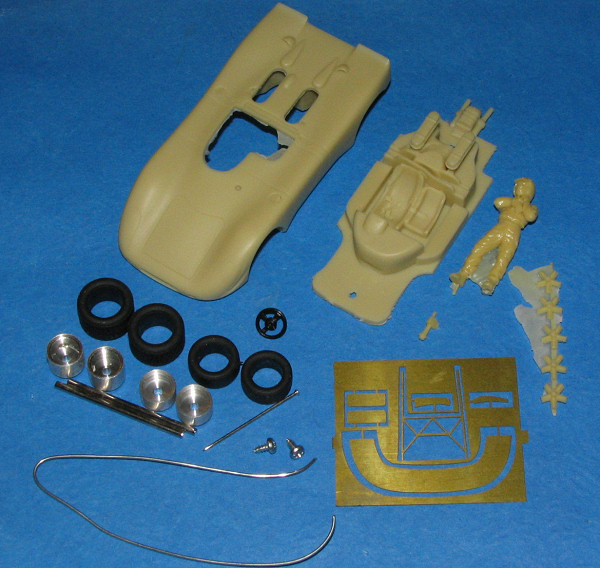
underside of the rocker panels and on the chassis engine molding. A resin driver's figure is included
(Steve McQueen) and the other resin parts are the wheel inserts and a rear
view mirror.
I have never built a Provence
Moulage kit and neither have I seen one. Most of the 1/43 kits I've built have
had a lot of small bits and considerable cast metal. This one does not have a
plethora of parts nor does it have any cast metal ones. In fact, it doesn't
have a lot of parts at all. The overall quality of the resin moldings is first
rate. there are no surface glitches and I found only a few air bubbles on the
underside of the rocker panels and on the chassis engine molding. A resin driver's figure is included
(Steve McQueen) and the other resin parts are the wheel inserts and a rear
view mirror.
 Tires are a rubber of soft vinyl
material and well molded. The four spun aluminum wheels are well done and are
actually different widths, unlike those on some kits I've built. The only
other metal is a piece of wire for the roll bar and a straight pin for the
stick shift. An injected plastic steering wheel is also part of the suite. Two
solid steel axles are also given. The etched brass fret is quite thick and
includes the various air dams and the rear engine brace work. A large lower
spoiler is not for this kit, but probably for another 908 variant. I tried to
test fit a piece of the etched brass into the grooves on the front but the
thickness is too great. This means either scraping a larger slot for it, or
transferring the shape over to thinner brass. I think the latter may well be
the way to go on this.
Tires are a rubber of soft vinyl
material and well molded. The four spun aluminum wheels are well done and are
actually different widths, unlike those on some kits I've built. The only
other metal is a piece of wire for the roll bar and a straight pin for the
stick shift. An injected plastic steering wheel is also part of the suite. Two
solid steel axles are also given. The etched brass fret is quite thick and
includes the various air dams and the rear engine brace work. A large lower
spoiler is not for this kit, but probably for another 908 variant. I tried to
test fit a piece of the etched brass into the grooves on the front but the
thickness is too great. This means either scraping a larger slot for it, or
transferring the shape over to thinner brass. I think the latter may well be
the way to go on this.
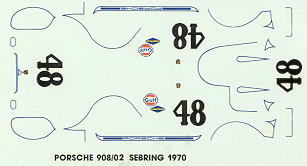
Instructions are really not much as there isn't much to the kit. They are in color and are basically a decal and painting guide. The small decal sheet included in the kit is very well printed and should pose no problems.
The two
major parts are the body and the chassis. The engine and interior are both
cast within the chassis section with little more to do than clean up the mold
lines and paint. A resin rear view mirror, five wheel inserts (a spare, no
doubt), and Steve McQueen figure round out the resin. There is an etched brass
fret made of some of the thickest etched bras I've ever seen. This is for
 spoilers and a rear body support brace work. The large spoiler piece is not
used on this kit, so can be used as a fishing weight. Frankly, it may not be a
bad idea to transfer the spoiler pieces over to some thinner sheet brass as
I'm not sure the forward ones will fit into the body slots.
spoilers and a rear body support brace work. The large spoiler piece is not
used on this kit, so can be used as a fishing weight. Frankly, it may not be a
bad idea to transfer the spoiler pieces over to some thinner sheet brass as
I'm not sure the forward ones will fit into the body slots.
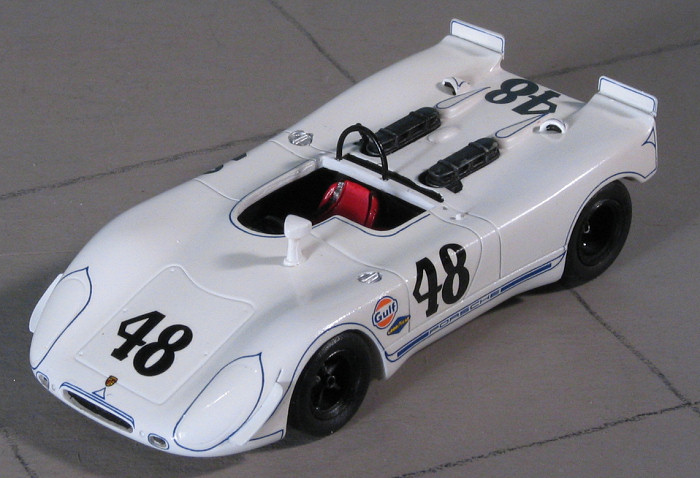
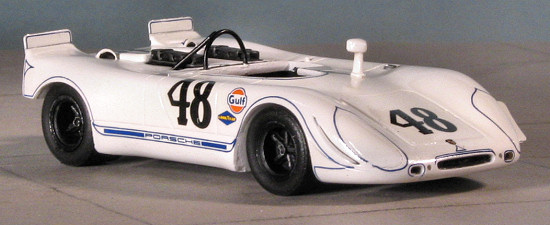
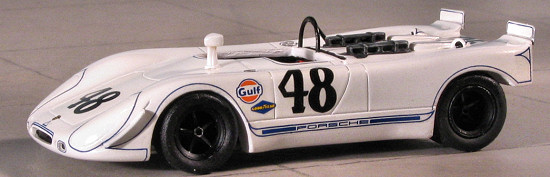
This kit is the 908 Spyder that was raced with some success by Steve McQueen and is shown as it was when it took 2nd place at the 1970 Sebring race, a mere 22 seconds behind the winning Ferrari as driven by Mario Andretti.
 You get four very nice turned aluminum
wheels into which the resin wheel detail inserts will fit. The tires seem to
be rubber or darn close to it. Oddly, the rear tires have tread while the
front ones are devoid of it entirely. Not exactly a perfect match and I don't
seem to recall if untreaded tires were in vogue yet. Two very nice polished
steel axles are also part of the kit. An injected plastic steering wheel is
provided.. Other pieces are a pin to be cut off for the shift knob, two body
mounting screws, and a section of rather thick wire to be bent for the roll
bar.
You get four very nice turned aluminum
wheels into which the resin wheel detail inserts will fit. The tires seem to
be rubber or darn close to it. Oddly, the rear tires have tread while the
front ones are devoid of it entirely. Not exactly a perfect match and I don't
seem to recall if untreaded tires were in vogue yet. Two very nice polished
steel axles are also part of the kit. An injected plastic steering wheel is
provided.. Other pieces are a pin to be cut off for the shift knob, two body
mounting screws, and a section of rather thick wire to be bent for the roll
bar.
Instructions are cursory at best and mostly have to do with painting and decals. This is in full color and the decal sheet is very nicely done. As with many racing cars, this one is white with some nice trim.
| CONSTRUCTION |
Step one with anything that has resin is
to clean it up. The amount of crud on this one is nearly non-existent, limited
to some very minor mold flash. The most difficult clean-up is removing the wheel
inserts from the half-round backing material. The figure also needs some flash
and attachment sprues removed, though a wise modeler will keep the long one
shown as a handle of sorts. The 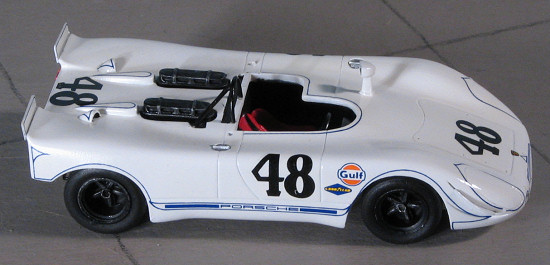 truth is that the mold seams on the sides are
less than great and one would end up scraping off much of the detail attending
to these.
truth is that the mold seams on the sides are
less than great and one would end up scraping off much of the detail attending
to these.
So I grabbed a few sanding sticks and had at the pour stubs on the underside and the light seams on the rest of the body and chassis section. I left the wheel inserts on their sprue until after they were painted. As this is a car kit, painting is an on-going process. I first painted the body using Testors gloss white thinned with lacquer thinner. It gave good coverage and within a day I had the entire body and chassis painted white. This is thanks to the quick drying that the lacquer thinner provides.
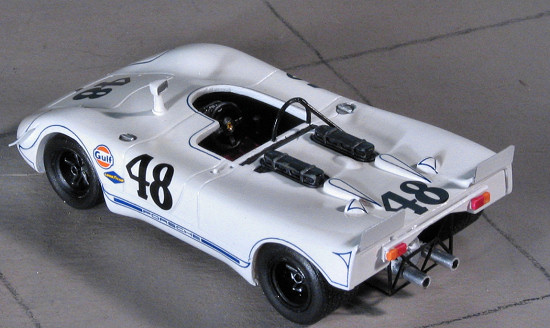
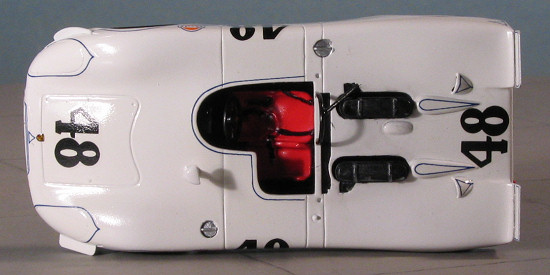
Next step was to paint the cockpit red as that is the color of the seats in this car. I used Tamiya red acrylics for that. This was followed by painting much of the rest of the interior, the engine intakes and surrounding area matte black. This was brush painted with Vallejo acrylics as masking the seat would have been a real pain. I painted the seat belts using a drafting pen and added on the silver bits with Metallizer. On the back of this part, the area around the transmission was left white and the flat areas painted matte black. The transmission itself was painted Aluminum. I drilled out the exhaust and painted the interior black. Thanks to some air bubbles on the tips, it just didn't look right so I thought about a fit for later on.
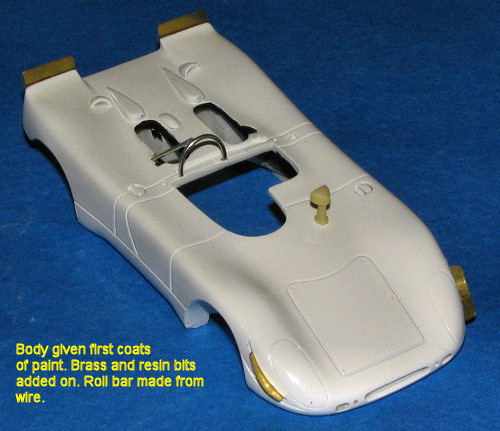 With
the body left to dry for a few days, I then glued on some of the additional
bits. The brass pieces I thought would be too thick were not and fit very well.
The front dams were too short for the grooves in the resin so I basically
centered them. No real problem with the spoilers in the rear though there wasn't
much for them to grab onto. The rear view mirror was an easy fit and I made the
roll bar out of some wire, after drilling out the attachment holes so they'd
fit. Be careful as there isn't a lot of slop room for this.
With
the body left to dry for a few days, I then glued on some of the additional
bits. The brass pieces I thought would be too thick were not and fit very well.
The front dams were too short for the grooves in the resin so I basically
centered them. No real problem with the spoilers in the rear though there wasn't
much for them to grab onto. The rear view mirror was an easy fit and I made the
roll bar out of some wire, after drilling out the attachment holes so they'd
fit. Be careful as there isn't a lot of slop room for this.
With all those pieces in place, several more coats of white were painted on.
During this time, I painted the wheels and inserts. Then I put the tires on. These are quite well formed. I found it odd that the rear tires had a tread, while the front's were slicks. Not sure if this was as it was or that P.M. only has one style of tire for each width. Sure looks odd once you notice it! I then glued one wheel on the end of each axle and glued in the insert. Then, I placed the wheel/axle combination into the slot so I could figure out how much to cut as the axles are too long as it.
Well, these are steel axles so I had to use a triangular file to cut part way through then snapped off the end with help of pliers. This done, the other wheel was attached and glued. Then set aside until after the body was decaled.
 Decals
for this kit are very well done. They take an age to come off the backing, but
are thin and well printed. I also found that either to size differences or my
application, they don't fit as precisely as one would want. The rocker panel
'Porsche' logo is almost too long as it butts right up against the edge of the
wheel well. It should be a bit shorter. As a result, the pin stripes on the side
aren't as perfect as I'd like. The rest of the decals went on well and it took
about three days to apply them all. They responded well to the usual setting
solutions. I found it odd that there were no tire lettering decals.
Decals
for this kit are very well done. They take an age to come off the backing, but
are thin and well printed. I also found that either to size differences or my
application, they don't fit as precisely as one would want. The rocker panel
'Porsche' logo is almost too long as it butts right up against the edge of the
wheel well. It should be a bit shorter. As a result, the pin stripes on the side
aren't as perfect as I'd like. The rest of the decals went on well and it took
about three days to apply them all. They responded well to the usual setting
solutions. I found it odd that there were no tire lettering decals.
Back at the interior, I glued in the
shifter after trimming it to length and installed the steering wheel. The
attachment hole needs to be enlarged a bit as it is a tad too small for an easy
fit. I also bent and painted the rear lattice work. The instructions aren't
super clear on how this fits and even after trimming, it hung down a tad too
low. This was left until the car was basically complete.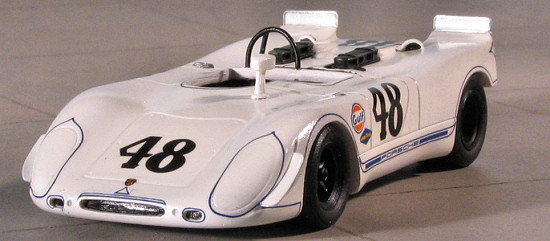
Once all the decaling was done, I did some minor painting of the fuel filler caps with aluminum. Then the body was given a coat of Metallizer sealer, which would hold in the decals, though it dulled the finish a bit. I then glued the axles in place, making sure that the car sit square as possible and that the mold attachment areas were on the bottom where you wouldn't see them.
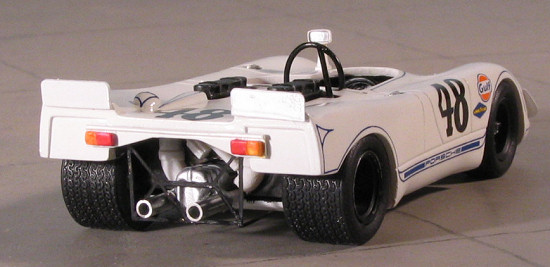
I then screwed on the chassis pan with the two screws provided. The lattice work was glued in place and the lower supports were fit outside of the pan. I doubt this is prototypical, but it was the only way I could get it to fit properly. I painted the tail lights at this time using Vallejo clear red and orange.
I was still concerned about the exhaust with their obvious air bubbles. I thought about cutting them off and replacing them with tubing, but instead, I found a short length of aluminum tubing that fit over the exhaust, and after cutting them, glued them in place. It seems to work OK and sure looks a lot better. Most will not notice the slightly larger diameter.
| CONCLUSIONS |
This was one of the easier kits to build. Not much in
the way of metal parts aside from the etched brass, which I liked. Much of the
detail was already in the resin parts and that detail was good. That cut down on
building time. The resin itself was good on the body, with all the air bubbles
on the b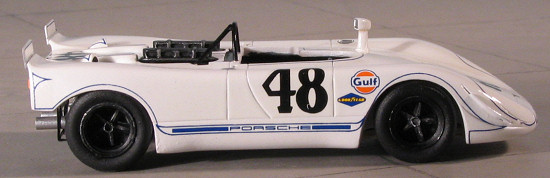 ottom where they won't be
seen. The chassis slab had some problems and the resin wheel inserts were not
the best molding as the nut detail was ragged. Fortunately, these are painted
black along with the wheels and won't be seen. I should also point out that
these cars are generally less than 4 inches long, so it isn't as if they take up
a lot of shelf space.
ottom where they won't be
seen. The chassis slab had some problems and the resin wheel inserts were not
the best molding as the nut detail was ragged. Fortunately, these are painted
black along with the wheels and won't be seen. I should also point out that
these cars are generally less than 4 inches long, so it isn't as if they take up
a lot of shelf space.
Decals are good and went on well aside from those things I noted above. It would have been very nice to have a few extra sections of the pin striping to fit glitches as I did screw one of the brake duct cooler surround decals. Since there is no windscreen on this car, that particular bug-a-boo isn't a concern.
Overall, I'd have to say that if one is getting started in doing 1/43 multimedia car kits, this one would be a great one with which to start. It sure looks good to me and I might even get around to doing the Steve McQueen driver figure!
| REFERENCES |
www.porsche.com
Y'all can thank me for buying this one.
March 2006
#1406 in a series
Copyright ModelingMadness.com. All rights reserved. If you would like your product reviewed fairly and fairly quickly, please
contact
the editor or see other details in the
Note to
Contributors.