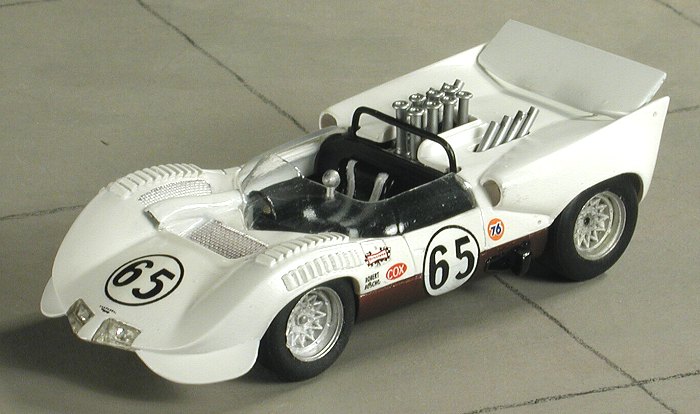
ESDO 1/43 Chaparral 2A
|
KIT # |
71B |
|
PRICE: |
£28.95 (about $40 US as of this writing) |
|
DECALS: |
two cars |
|
REVIEWER: |
|
|
NOTES: |
Resin multimedia kit |
|
BACKGROUND |
Please visit the preview
for a look at what comes in the box and a history of the car.
|
CONSTRUCTION |
As with any kit that has resin and metal bits, I started by
doing what clean-up was needed. In this case, it really wasn't much. I
sanded all the resin parts with fine sandpaper and used a sanding stick on
the various metal bits to remove the mold seams. The next step was to start
painting. Kinda early, I know, but one doesn't do these car kits like an
airplane. I painted the two 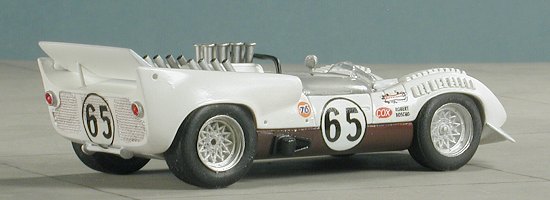 large resin body parts and the rear wing white
using Floquil Reefer White. The lower tub was masked off and the center
section painted using Tamiya Hull Red as a pretty good match for the brown
used by Chaparral cars on this section. I'm sure someone will eventually
write me to tell me of my error in using this shade, but it looks good to
me and it is done!
large resin body parts and the rear wing white
using Floquil Reefer White. The lower tub was masked off and the center
section painted using Tamiya Hull Red as a pretty good match for the brown
used by Chaparral cars on this section. I'm sure someone will eventually
write me to tell me of my error in using this shade, but it looks good to
me and it is done!
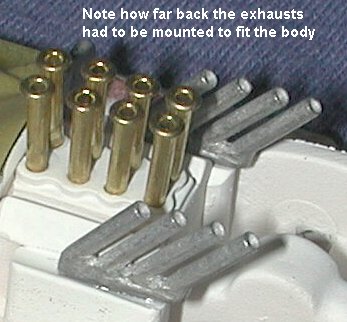
Next, the interior had the seat installed and that area was painted black. If you look at the photo in the preview, it appears to be that color on the inside. I then masked off this area when it was done and installed the injector stacks and exhaust. When gluing in the exhaust, I put the body on it to ensure that I didn't mess up and put them in the wrong place. A good move on my part as they ended up being well aft of where they 'should' go. This entire area was then painted aluminum. You won't see any of the back detail other than the injector stacks and exhaust so there is no need to go to any extra effort in painting/detailing it. After all, these kits are basically curbsides.
 Returning to the body, the
forward spoilers and the rear jack bar were glued on. The jack bar is
shorter than the mounting slots for it. The forward spoilers don't exactly
match the curvature of the body so the superglue I used to attach them was
used to fill in the gaps. The upper body bits then were painted white to
match the rest of the car. The wheels were then inserted into the tires.
The tires have no molding other than tread . They are soft rubber so it
will be of interest to see how long they will last without splitting. I've
several other kits with soft rubber tires that are going on 15 years
without any problems so it may not be an issue.
Returning to the body, the
forward spoilers and the rear jack bar were glued on. The jack bar is
shorter than the mounting slots for it. The forward spoilers don't exactly
match the curvature of the body so the superglue I used to attach them was
used to fill in the gaps. The upper body bits then were painted white to
match the rest of the car. The wheels were then inserted into the tires.
The tires have no molding other than tread . They are soft rubber so it
will be of interest to see how long they will last without splitting. I've
several other kits with soft rubber tires that are going on 15 years
without any problems so it may not be an issue.
I then grabbed the roll bar and fit it in place. It was too wide so I narrowed it and trimmed it down as it was too tall. It was glued in place and then the various bits were painted/repainted.
While all that repainting was drying, I cut out the windscreen. It is quite thin, so it is good that there are two of them. That will be about the last part of the kit glued in place. You need to pay special attention to the rear of the side windows as they are not square, but slightly angled back.
The next step was installation of the wheels and axles. It was obvious to me that this one wasn't going to do much rolling so after cutting the axles to a realistic length, I first installed them into one wheel and let it dry. Then it was threaded through the chassis and the other wheel glued in place on the axle and butted up against the chassis. I let this dry on a flat surface so all four wheels would touch. Naturally, I was foiled again as one wheel is slightly up in the air.
I did more detail
painting in the interior which meant the seat belts and painted the chassis
air scoops black. The steering wheel was glued in place and the gear
shift was painted. Meanwhile, the body had the rear spoiler attached.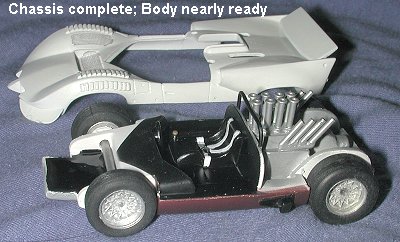 It was put in the full down position as the Chaparral's extra pedal for the
wing was to have it go to the full horizontal position when zooming down a
straight. The actuating arm provided in the kit was too fat, and too tall.
I substituted a piece of stretched sprue. Even then, the attachment
indentation in the wing and the slot in the rear body were not properly
aligned. The slot is too far inboard.
It was put in the full down position as the Chaparral's extra pedal for the
wing was to have it go to the full horizontal position when zooming down a
straight. The actuating arm provided in the kit was too fat, and too tall.
I substituted a piece of stretched sprue. Even then, the attachment
indentation in the wing and the slot in the rear body were not properly
aligned. The slot is too far inboard.
I put a bit of a wash in the various screens on the body and let that dry. I now had a fully built and painted chassis and a nearly complete body. I debated installing the vac windscreen at this time, but decided it would be easier later. I then put a line of superglue on the lower body line and slid the body onto the chassis. The glue dried in very little time and I didn't slop much of it around as I usually do!
At this time I ran clear paint
around the edges where the windscreen goes. I then installed the
windscreen, adding touches of clear paint as the vac windscreen settled
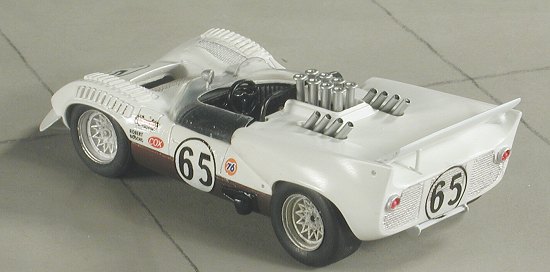
into place. It was then left for a while t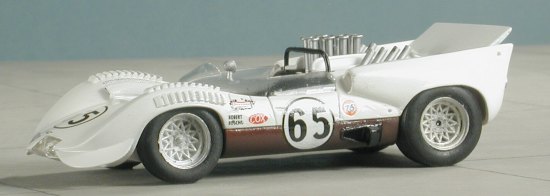 o dry. I then applied the decals.
These are on a small sheet and are obviously meant for ALL the different
Chaparrals as there are numbers and other decals not used on the 2A. Unlike
modern racing cars, there are not the plethora of sponsor decals festooned
on every square inch of the body and only a few are normally used. These
reacted fairly well to Solvaset, though I did find that I had difficulty
getting the rear ones to snuggle down into the various crevices of the
screen. The white was also a bit transparent and the brown of the lower
body bled through the white disc provided.
o dry. I then applied the decals.
These are on a small sheet and are obviously meant for ALL the different
Chaparrals as there are numbers and other decals not used on the 2A. Unlike
modern racing cars, there are not the plethora of sponsor decals festooned
on every square inch of the body and only a few are normally used. These
reacted fairly well to Solvaset, though I did find that I had difficulty
getting the rear ones to snuggle down into the various crevices of the
screen. The white was also a bit transparent and the brown of the lower
body bled through the white disc provided.
Getting pretty
near the end, I painted the backing for the headlights silver and then came
the biggest construction problem; the forward air scoop. This was added to
allow cool air to hit the driver in the face during the race. The problem
is that the white metal scoop just doesn't properly conform to all the
various nooks and crannies on the car. One sort of just has to fit it as
best as possible. Applying filler to the gaps wouldn't work as it would be
near impossible to get to it to clean things up.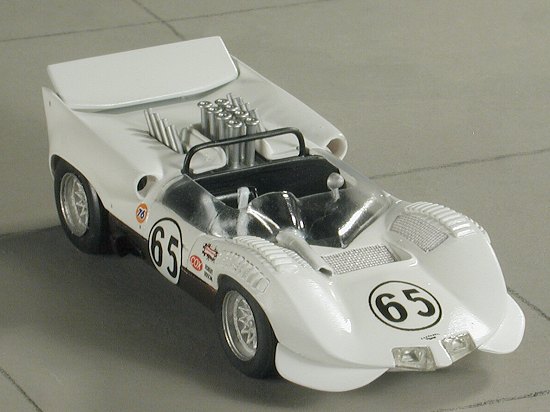
While pondering just what to do about it, I installed the clear headlights. These fit superbly with no fuss. I also drilled out a hole in the windscreen to accept the metal rear view mirror. This was left in bare metal and the face lightly sanded. Both the headlights and the mirror were attached using clear paint. I also took the opportunity to paint the tail lights red and the surrounding bezel with aluminum.
The intake problem was handled by first bending the intake until I got a pretty close approximation of how it would fit on the nose of the car. Thankfully the metal is soft enough so that it could handle the tweaking without too much problem. It was then tacked into place using clear paint once again. When it was thoroughly dry, I used more paint to build up the areas that had gaps in them. Once all that was done, I brush painted some Vallejo white acrylic in several thin coats to make things look a bit better. A final clear coat was applied to seal everything in place and the model was done.
|
CONCLUSIONS |
 I have to say that this
kit went together with a bit less trouble than my previous 1/43 racer. Much
of that has to do with the lack of etched metal (for which I'm thankful).
It also is not quite as well detailed, but that is a difference between the
two companies and in the end, it looks super. I do appreciate the extra
windscreen and wish that was standard. I also think that using rivets for
injector stacks is one way of handling the situation, but for the
Chaparral, they need to be flat on the top and without that 'curved'
intake. On my next early Chaparral, I'll either cut those off or replace
them with straight tubing.
I have to say that this
kit went together with a bit less trouble than my previous 1/43 racer. Much
of that has to do with the lack of etched metal (for which I'm thankful).
It also is not quite as well detailed, but that is a difference between the
two companies and in the end, it looks super. I do appreciate the extra
windscreen and wish that was standard. I also think that using rivets for
injector stacks is one way of handling the situation, but for the
Chaparral, they need to be flat on the top and without that 'curved'
intake. On my next early Chaparral, I'll either cut those off or replace
them with straight tubing.
Overall, I'm quite pleased with the resulting model. I think it is the best I've done so far and it looks very nice in with my small, but growing collection of 1/43 racers.
|
REFERENCES |
Chaparral by Richard Falconer, 1992, Motorbooks International, $39.95
September 2003
#1283 in a series
Copyright ModelingMadness.com. All rights reserved.
If you would like your product reviewed fairly and fairly quickly, please contact the editor or see other details in the Note to Contributors.