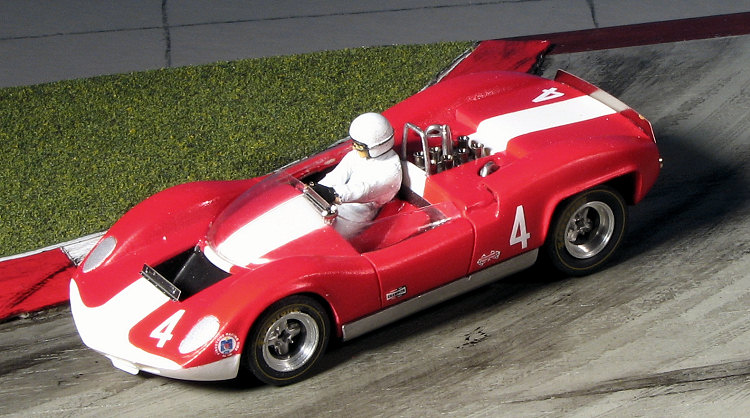
Marsh Models 1/43 McLaren M.1A
| KIT #: | MM-65 |
| PRICE: | Around $55.00 |
| DECALS: | One option |
| REVIEWER: | Scott Van Aken |
| NOTES: | Multimedia kit with metal, photo etch, resin and vacuformed parts. |
| HISTORY |
The copyright date on this box is 2001 so I'll assume that is when the McLaren 1A kits were produced. This kit is configured and in the markings for the LA Times GP at Riverside in 1965. At that time, McLaren wasn't the most successful driver around and his cars were getting beaten rather frequently by Lolas and Chaparrals amongst others. However, Bruce McLaren was nothing if not determined and eventually his cars went on to dominate Group 7 racing and the Can-Am to the near exclusion of everyone else.
One thing that McLaren did do was to build cars for customers who also wanted to go racing in big time sports cars. In the beginning, big time meant a V-8 of some sort and most displacements were around 5 liters. Eventually the engines got larger and larger to produce more and more horsepower, but for the M1A this usually meant a smaller engine down around the 300 cubic inch area. McLaren raced for quite some time using an Oldsmobile V-8.
| THE KIT |
This kit has a resin body and all the rest of the parts
are metal of some sort aside from the vacformed windscreen and plastic tires.
The resin body is well cast with no air pocket and only some gunk on the bottom
to remove so that the metal chassis plate will fit properly. This plate and
several of the various bits are made from cast m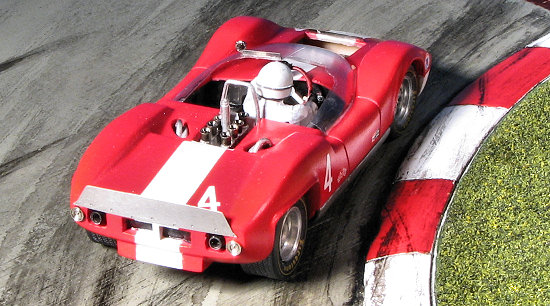 etal.
This includes the seat, instrument panel, outer lower body panels,
engine/transmission block and the downdraft carburetors.
etal.
This includes the seat, instrument panel, outer lower body panels,
engine/transmission block and the downdraft carburetors.
Most of the interior itself is photo-etch as are the various spoilers and some other bits and pieces. The wheels and velocity stacks for the carbs are machined aluminum. Exhaust are cast as are the wheel inserts and the steering wheel and the exhaust. Frankly, the thought of fitting the photo etch spokes into the cast metal steering wheel is a bit daunting. Tires are a somewhat hard plastic. You'll find some parts not used as the photo-etch in particular has little badges for four different versions and a number of other bits that are not shown in the instructions.
The instructions are a single sheet with one side showing color photos of the completed kit (though not the back view). The other side has a parts listing with a paint chip (Rover Blaze so you can pop down to the parts store and pick some up), and an exploded view showing where everything goes. There is a single decal sheet for the #4 car and I've had good luck with Marsh Models decals. You may want to paint the large white racing stripe and nose instead of relying on the decal and save the decal for touch-ups. The decal also includes the tire markings.
| CONSTRUCTION |
As with all short run kits, cleanup is the first thing to do. The metal and resin castings are really very well done with only a minimum of work required to remove seams and other stuff. It is important to take one's time in doing this, especially the body as it will make all the difference in the final product.
 While doing this, it was only natural to start doing
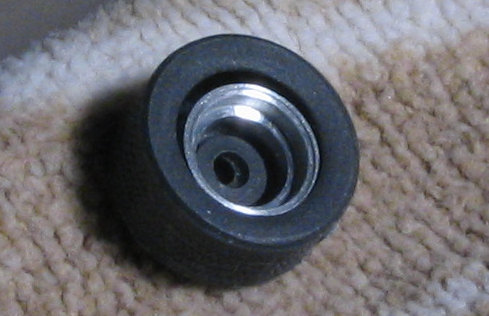
some subassemblies. First thing I did was to install the wheels into the tires.
The wheels are superbly machined and fit very well in the front wheels. The back
wheels were another story as they were obviously too small in diameter and left
a considerable gap. I e-mailed Marsh Models to see what they could do about it.
In just a couple of weeks a new set of smaller rear tires arrived that fit the
wheels just fine. Great customer service.
While doing this, it was only natural to start doing
some subassemblies. First thing I did was to install the wheels into the tires.
The wheels are superbly machined and fit very well in the front wheels. The back
wheels were another story as they were obviously too small in diameter and left
a considerable gap. I e-mailed Marsh Models to see what they could do about it.
In just a couple of weeks a new set of smaller rear tires arrived that fit the
wheels just fine. Great customer service.
With that done, I then glued on the little velocity
stacks onto the downdraft Webers. These fit very well over small pins atop the
carbs. I also test fit the exhaust section atop the intake/transmission piece. I
had thought that it might be designed to nestle into this piece, but that is not
the case and there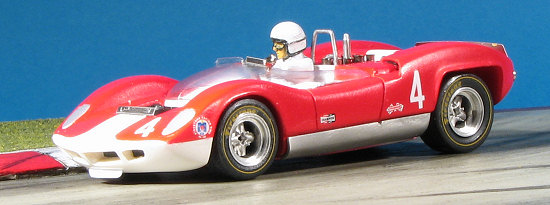 is a gap
between the two when they are mounted. I used tape to hold the bits in place
while I made sure. Though major fit problems are rarely something has to worry
about with Marsh kits, it never hurts to be sure
is a gap
between the two when they are mounted. I used tape to hold the bits in place
while I made sure. Though major fit problems are rarely something has to worry
about with Marsh kits, it never hurts to be sure
Meanwhile, I glued the metal instrument panel into the space on the body. There is a p-e panel, but it is obviously not for this particular car as it doesn't even come close to matching the opening. I also bent the p-e interior pan and glued in several pieces. One was a plate on the left side to cover an opening. The foot pedal piece and gear shift was also glued in. A section of thin metal for the shift linkage was attached at this time as well. Then I test fit it into the body section. I found that the chassis plate would not fit properly, leaving a gap. It seems that the bottom sections of the instrument panel that I'd glued into the body was keeping things from fitting tightly. This took a bit of additional work with files and a motor tool to carefully remove the excess metal from the bottom of the panel. If you are contemplating building this kit, you may want to remove a small amount prior to installation as it would be MUCH easier that way.
With that out of the way, I glued the engine/transmission bit onto the chassis. I also glued on the back of the radiator piece, a photo etch part, after bending it to fit.
| COLORS & MARKINGS |
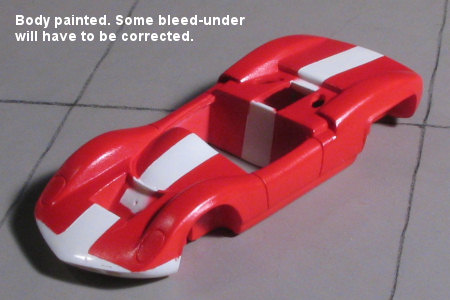 Time
to do some painting. After first painting the body and seats white, I masked off
all the areas that would be wh
Time
to do some painting. After first painting the body and seats white, I masked off
all the areas that would be wh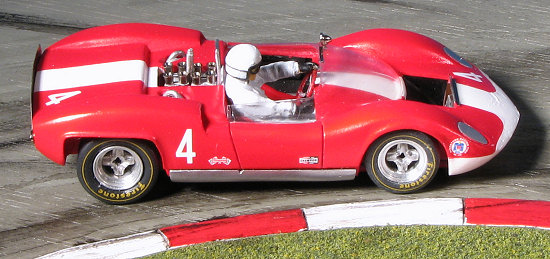 ite
and then gave the body another spray with white, hopefully to prevent any
bleed-under. I then sprayed it with a Gunze red acrylic that I had already mixed
up as it seemed pretty close to McLaren red on both the body and the seats. This
dried very fast and so I pulled up the tape to see if anything bled under. Well,
yes, but not as much as I'd have thought. I scraped off as much as I could with
a new knife blade and then brush painted the rest to neaten things up. Then
several coats of clear acrylic gloss (Future/Kleer) to seal it in. I also
painted the lower pan with white then red as well. The transmission case was
painted steel. That was basically it for major painting. As you know, with car
kits one paints just about all the time when doing detail stuff.
ite
and then gave the body another spray with white, hopefully to prevent any
bleed-under. I then sprayed it with a Gunze red acrylic that I had already mixed
up as it seemed pretty close to McLaren red on both the body and the seats. This
dried very fast and so I pulled up the tape to see if anything bled under. Well,
yes, but not as much as I'd have thought. I scraped off as much as I could with
a new knife blade and then brush painted the rest to neaten things up. Then
several coats of clear acrylic gloss (Future/Kleer) to seal it in. I also
painted the lower pan with white then red as well. The transmission case was
painted steel. That was basically it for major painting. As you know, with car
kits one paints just about all the time when doing detail stuff.
| MORE CONSTRUCTION |
Back at the body, I attached the small lower chin spoiler and one just in front of the radiator exhaust. The rear spoiler was glued on as well. There are two cast metal bits for the lower body panels that were cemented in place as was a metal bit that goes behind the seat area. Marsh provided black decals for the inside of the radiator exhaust and those were put in place. They don't fit perfectly so the visible areas were painted matte black. The holes for the tail lights had to be drilled deeper for those to fit. I also painted the exhaust with burnt iron and glued those in after drilling them out.
 With
the wheels assembled. I glued the axles into one wheel so it could dry. Then I
started snipping off the end until it was short enough to attach to the other
wheel and set that aside to dry. I glued the seat into the interior and after
painting the inner door panels and the surrounding interior with matte black,
the panels were glued in place. Next was to glue in the roll bar, making sure
that I could fit the chassis/engine section in place. One I was sure there were
no problems there, I attached the other wheel to the axle after threading it
through the chassis slots. Then the chassis was attached to the underside of the
body. Marsh provides screws for this but they are really too large to screw in
all the way as the screw heads are far too large. I did use them to hold the
plate on while the super glue dried.
With
the wheels assembled. I glued the axles into one wheel so it could dry. Then I
started snipping off the end until it was short enough to attach to the other
wheel and set that aside to dry. I glued the seat into the interior and after
painting the inner door panels and the surrounding interior with matte black,
the panels were glued in place. Next was to glue in the roll bar, making sure
that I could fit the chassis/engine section in place. One I was sure there were
no problems there, I attached the other wheel to the axle after threading it
through the chassis slots. Then the chassis was attached to the underside of the
body. Marsh provides screws for this but they are really too large to screw in
all the way as the screw heads are far too large. I did use them to hold the
plate on while the super glue dried.
Next was to cut out the windscreen. While not the most clear vacuformed plastic in the world, it isn't that bad. Much test fitting has to be done to be sure of a proper fit. I left the rear portion of the windscreen a bit long to be sure I could get a good fit. The hole for the rear view mirror was opened up and the mirror held in place with a drop of super glue. Same for the small etched wind deflector. I then attached the windscreen with white glue.
Now for the first of two errors. Actually this was the
smaller of the two. I wasn't happy with the shape of the forward white section
so decided to cut the kit decal and use it. I put it on and after it had dried I
noticed that it hadn't stuck that well. So I applied some Solvaset. That did two
things. One is it caused a permanent wrinkle. The other is that it seeped
between my finger and the forward
 fender, causing it to eat the
paint and leave a real mess. I brush painted on more red, though it didn't look
very good. I decided to put a decal over it to hide it as much as I could so
that was done when I applied the rest of the markings.
fender, causing it to eat the
paint and leave a real mess. I brush painted on more red, though it didn't look
very good. I decided to put a decal over it to hide it as much as I could so
that was done when I applied the rest of the markings.
Next was the driver. The kit doesn't come with one so I built up a Denizen driver as I'd done for the Honker II. I assembled the steering wheel, making a real mess of things but finally had it together and stuck it in the driver's hands. I'd test fit the driver into the seat prior to putting in the interior and found that it wasn't the best fit, but it fit. So I applied super glue to the driver and slid him down into the seat. UhOh! The driver's arms were too long and I couldn't get the driver all the way down! The glue had stuck almost immediately and pulling up the driver pulled paint off either the seat or the driver, making the seats a mess.
Well DANG! What to do? In all the fussing with the
driver, the windscreen and rear spoiler had also popped free. Alright, a time
out to think things over. The next day, I decided to shorten the driver's arms
to get things to fit. Peeling the steering wheel out of their cold, metal hands
(and bending the heck out of it in the process), I took about 1/8 inch out of
the arms just behind the gloves. Pin
 holes were drilled and
sections of wire put in there to hold the hands on the ends of the arms. I then
reattached the hands and glued the wheel back on.
holes were drilled and
sections of wire put in there to hold the hands on the ends of the arms. I then
reattached the hands and glued the wheel back on.
I put the driver back into the seat (without glue this time) and while it is now the right length, the steering wheel is too high up and sticks above the dash. In fact, the whole driver sits up too high, but I got all the bits back in place and that is the way it is going to stay. I'll chalk a lot of this up to learning and next time will plan ahead more. Perhaps removing the driver's side of the two seats would have been the way to go instead of trying to grind down the figure to fit. Anyway, a bit of clear gloss on the windscreen and in the join areas and this one was ready for the display case. If anyone knows of a driver figure that will fit the Marsh kits, please let me know.
| CONCLUSIONS |
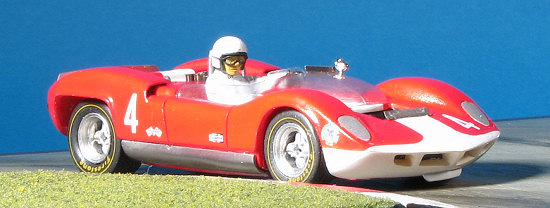
Despite my screw-ups, the finished model looks very nice. It really wasn't difficult to build and I'm sure that those more talented than I would be able to have it done in half the time. The engineering is first rate as is the quality of the parts. I can recommend these kits to all who have an interest and are ready for something a bit different.
Thanks to me and my love of big block sports racers for this one.
March 2007
#1458 in a series
Copyright ModelingMadness.com. All rights reserved.
If you would like your product reviewed fairly and fairly quickly, please contact the editor or see other details in the Note to Contributors.
Back to the Review Index Page 2019