Atlantis 1/24 Talbot-Lago F.1
| KIT #: | AMC-6001 |
| PRICE: | $39.95 SRP |
| DECALS: | One option |
| REVIEWER: | Scott Van Aken |
| NOTES: | Reboxed SMER kit which is a reboxed Merit kit. |
| HISTORY |
Italian born Anthony F.
Lago took control of the ailing SA Automobiles Talbot in 1935 after the joint
venture between Sunbeam, Talbot and Darracq had failed. Lago was a big fan of
motor racing and believed that success on the track was the best marketing tool
for the company's road going products. Using the existing three litre six
cylinder Talbot as a base, Lago and ex-Fiat designer Walter Becchia developed a
new four litre competition engine. The engine used Talbot's patented valvetrain,
which used a single camshaft to operate the 60-degree inclined valves through 12
unequal length pushrods. The four litre engine debuted in a roadster bodied
racer in 1936, and would also go on to power the legendary Figoni & Falashi
teardrop-coupes. Excelling in reliability these racers scored several sportscar
and Grand Prix victories.
 After a seven year hiatus production recommenced in Suresnes in 1947. Helped by
a new designer, Carlo Marchetti, Lago developed a 4.5 litre version of the
familiar six cylinder engine, which was first raced in the late 1930s. One of
the incentives to increase the engine's displacement was to meet the
displacement limit for unblown Grand Prix engines; blown engines were limited to
1.5 litres. With 165 bhp the 4.5 litre 'six' was not going to be a match for the
300+ bhp supercharged engines used in the German and Italian single seaters, so
Lago and Marchetti went back to the drawing boards and designed a revised head
for the 4.5 litre engine during the War. Their new engine made its debut in the
T26 road car range launched in 1947. The competition version followed
shortly after.
After a seven year hiatus production recommenced in Suresnes in 1947. Helped by
a new designer, Carlo Marchetti, Lago developed a 4.5 litre version of the
familiar six cylinder engine, which was first raced in the late 1930s. One of
the incentives to increase the engine's displacement was to meet the
displacement limit for unblown Grand Prix engines; blown engines were limited to
1.5 litres. With 165 bhp the 4.5 litre 'six' was not going to be a match for the
300+ bhp supercharged engines used in the German and Italian single seaters, so
Lago and Marchetti went back to the drawing boards and designed a revised head
for the 4.5 litre engine during the War. Their new engine made its debut in the
T26 road car range launched in 1947. The competition version followed
shortly after.
Reminiscent of the old Riley engines, the new six cylinder engine Lago and
Marchetti came up with had two lateral camshafts halfway up the block. Simpler
in design and execution than a full overhead camshaft
 design, the lateral
camshafts did share many of the advantages. Short pushrods were used to operate
the 12 valves. In its initial guise the engine was good for a reported 240 bhp,
while the twin-plug version introduced in 1950 was officially quoted at 260 bhp.
The straight six was mated to a four speed Wilson preselector gearbox. This
drivetrain was installed in a straightforward box section chassis. Suspension
was by wishbones and a transverse leaf spring at the front and a solid axle at
the rear. Both the chassis and the gearbox were directly derived from the 1930s
Talbot Lago racers and also similar to the company's contemporary road cars.
Huge drums provided for some braking power.
design, the lateral
camshafts did share many of the advantages. Short pushrods were used to operate
the 12 valves. In its initial guise the engine was good for a reported 240 bhp,
while the twin-plug version introduced in 1950 was officially quoted at 260 bhp.
The straight six was mated to a four speed Wilson preselector gearbox. This
drivetrain was installed in a straightforward box section chassis. Suspension
was by wishbones and a transverse leaf spring at the front and a solid axle at
the rear. Both the chassis and the gearbox were directly derived from the 1930s
Talbot Lago racers and also similar to the company's contemporary road cars.
Huge drums provided for some braking power.
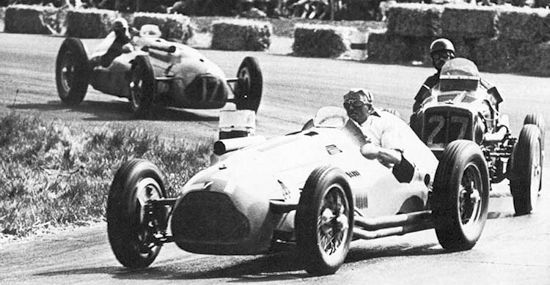
Dubbed
the T26C, the new single seater Talbot Lago made its competition debut in the
1948 Monaco Grand Prix. Compared to the supercharged competition from Alfa
Romeo, Ferrari and Maserati, the French cars looked obsolete before they even
turned a wheel in anger. Maserati's two-stage supercharged 4CLTs outran the
Talbots with ease, but in the race the odds were evened out. Whereas the
Italians required at least one pit stop to refuel and fit new tires, the T26C
could complete the race without ever stopping. Despite stopping halfway for fuel
Nino Farina took the victory for Maserati, but with Louis Chiron in a T26C hot
on his heels. Thanks to its superior mileage and reliability the T26C scored two
major Grand Prix victories in 1949. Reportedly the victory at Spa Francorchamps
convinced Enzo Ferrari to abandon his supercharged V12 racers in favour of a new
4.5 litre naturally aspirated cars.
 In the following seasons the sturdy Talbots scored a large number of victories
in non-Championship races and proved to be a popular pick for privateer racers.
Convinced of the car's reliability, Anthony Lago prepared a T26C for the 1950 24
Hours of Le Mans. Keeping the modifications to a bare minimum, he simply fitted
fenders, lights and a slightly wider body to accommodate for two drivers. All of
which were required only to comply with the regulations. Piloted by Louis Rosier
and Jean-Louis Rosier, the Grand Prix car turned endurance racer scored its most
notable victory. In the next edition, a similar car finished second, but well
beaten by the much more modern Jaguar C-Type. More cars were built along the
lines of the Le Mans racer and some were even fitted with more substantial coupe
bodies.
In the following seasons the sturdy Talbots scored a large number of victories
in non-Championship races and proved to be a popular pick for privateer racers.
Convinced of the car's reliability, Anthony Lago prepared a T26C for the 1950 24
Hours of Le Mans. Keeping the modifications to a bare minimum, he simply fitted
fenders, lights and a slightly wider body to accommodate for two drivers. All of
which were required only to comply with the regulations. Piloted by Louis Rosier
and Jean-Louis Rosier, the Grand Prix car turned endurance racer scored its most
notable victory. In the next edition, a similar car finished second, but well
beaten by the much more modern Jaguar C-Type. More cars were built along the
lines of the Le Mans racer and some were even fitted with more substantial coupe
bodies.
The Talbot Lago T26C remains as one of the last 'old-fashioned' racers that
could win in Grand Prix sprint races and in the most demanding endurance events.
On top of the T26C's Grand Prix and Le Mans wins, it scored many successes in
minor and local races.
| THE KIT |
Just like I've not provided any background to the Alfa Romeo also included in this box, I'll skip any of the details of the kit as well. This is because Mark Hiott pretty well covered it all in his very nice build of the Alfa Romeo (see the kit index).
As mentioned in the notes, this is the SMER kit and
comes with SMER instructions. The kit itself was initially released by MERIT and
it may even be a 1950s vintage. MERIT did a bunch of neat F.1 subjects and I'm
hoping that some others may see the light of day. Anyway, the Talbot kit is
molded in a nice blue color and despite the age of the kits, the molding is
truly excellent. There is a tiny bit of flash, but nothing like what you might
expect and it is quite minimal. Overall detail of the kit is actually quite good
and is of 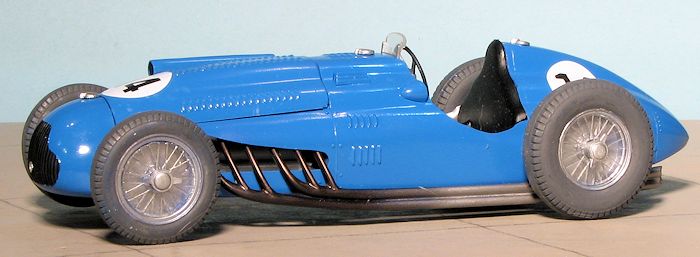 the raised line type.
The kit comes with a complete engine that includes a radiator, but since it sits in a pretty empty engine compartment, one may wish to add wiring and some other bits to spruce it up. The front and rear suspension sections are also well done and appear quite sturdy. The plastic wheels have clear 'wire' inserts, which, while not as convincing as photo etch, should look good enough. Each of the wheels is held on by a two-prong knock-off hub that is glued to the axle to allow the wheel to turn. The nicely molded exhaust is the piece that has the most flash on it and again, it isn't much. The interior is fairly well appainted with pedals, instrument panel, steering wheel seat and so on. These guys did not wear seat belts so no need to add them. There are decals for the instruments.
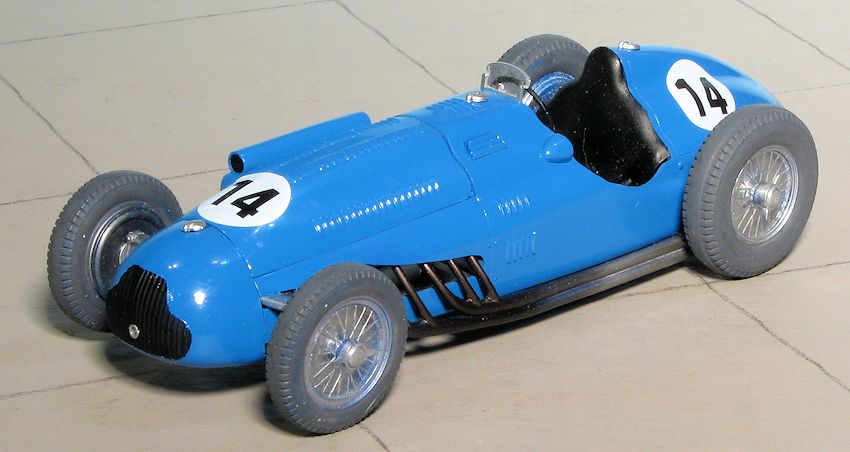
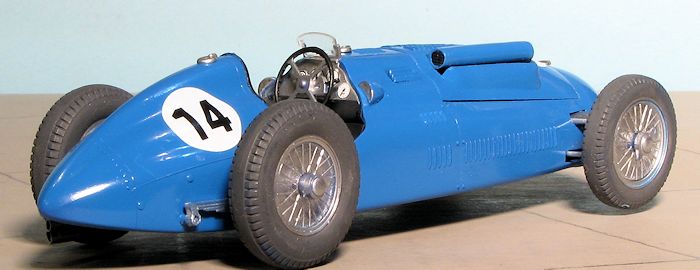
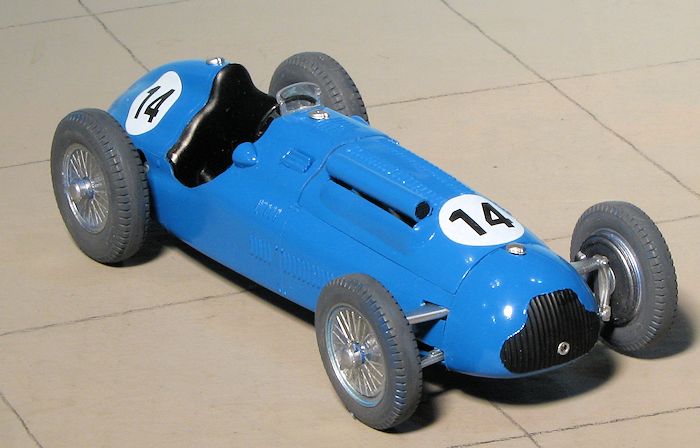
Instructions are rather nicely done with well thought out construction steps. There is NO painting information anywhere so you are on your own in this regard. Restored cars show a black interior with a turned aluminum dash with the seat padded in some sort of black leather material. No exterior painting information is supplied either. One will have to rely on photos of restored cars or the box illustrations for color and placement info. In this case, the Talbot is actually a French blue color which can look lighter or darker depending on the exposure and the restorer. The small decal sheet is very nicely printed and I'll bet they are Propagteam or similar decals.
| CONSTRUCTION |
Despite still being in nice shape, the parts need a
bit of clean up that one would not normally expect. In this case, the mold has a
lot of the ejectors on the edges of the mating surfaces. While this sometimes
produces 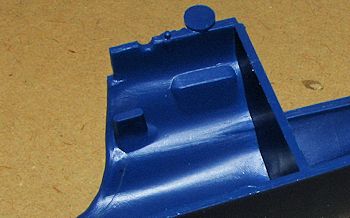 little indentations, it
also provides some short pin towers as shown on the image of the area between
the cockpit and the engine bay. These can be easily sanded or cut off, but it
would be better if they were not there at all.
little indentations, it
also provides some short pin towers as shown on the image of the area between
the cockpit and the engine bay. These can be easily sanded or cut off, but it
would be better if they were not there at all.
Then I started doing some gluing. This included the very flash-encrusted pedals, which were glued to the forward floor section. The wheels were also glued together and on some, I had to remove flash from the inside of one side and clamp the wheels. Back at the body, the rear leaf springs were installed. Part of these fit inside and part outside the body opening. There are fairings that fit over the inside parts. I also assembled the three piece carburetor intake. The end caps will need filler. The main engine halves and the front plate were glued and the seams filled to be sanded down a bit later.
A car kit is pretty much constant painting during construction. For this one, I painted the completed engine, front suspension, body interior parts (including engine compartment), and dash with Alclad II Aluminum. The intake tubes were painted Dark Aluminum as was most of the exhaust. The rest of the exhaust was painted Exhaust Manifold.
Back at the body I glued on the rear view mirrors and
the small vents just in front of them. During all this I filled the seams in th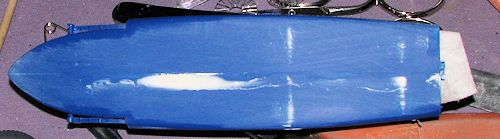 e
tires and sanded those down. I also filled some rather large sink areas on the
underside of the body. The foot pedal assembly was then glued in place and the
body halves cemented together. Fit is fairly nice, but not on the underside. A
lot of filling and sanding was needed. Actually, I could have blown that off as
few people will see the underside, but it is part of the process. The interior
and engine compartment got another small bit of touchup paint then were filled
with tissue in preparation for painting.
e
tires and sanded those down. I also filled some rather large sink areas on the
underside of the body. The foot pedal assembly was then glued in place and the
body halves cemented together. Fit is fairly nice, but not on the underside. A
lot of filling and sanding was needed. Actually, I could have blown that off as
few people will see the underside, but it is part of the process. The interior
and engine compartment got another small bit of touchup paint then were filled
with tissue in preparation for painting.
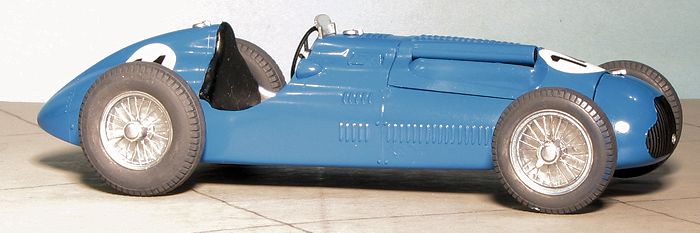
For this one I used Testors French Blue in their enamel line. I lightened it a bit by adding some gloss white as I felt the straight from the bottle color was a bit too dark. Seems to have been a good choice. The paint went on just great and thanks to the lacquer thinner, dried in a very short amount of time.
Since pretty much all the pieces had now been painted, the
rest of the build was putting all the pieces together. First step was to install
the front suspension piece, which slots into the front. I let all the bits dry
before moving on to the next. While this was drying, the intake section was
glued to the engine. I also
 glued on the oil and fuel filler caps. Then I
slotted in the seat. This was a tight fit as it is meant to be attached during
the mating of the fuselage halves. Once in place I glued it against the rear of
the cockpit.
glued on the oil and fuel filler caps. Then I
slotted in the seat. This was a tight fit as it is meant to be attached during
the mating of the fuselage halves. Once in place I glued it against the rear of
the cockpit.
Next, the engine was glued in place and while I still had some fudge room, the engine cover was snapped in place. Good thing, too, as I had to slide the engine around a bit to get proper clearance for the intake piece. The discs for the front wheels were then glued on after enlarging the attachment holes a bit. I also glued on the windscreen. Next major bit was the radiator and hose. Then the front end was pressed into place to make sure it all fit. I then brush painted the rear suspension bits that stuck out from the body with Tamiya matte aluminum. When dry, the exhaust had the ends drilled out and was threaded into opening and glued onto the engine.
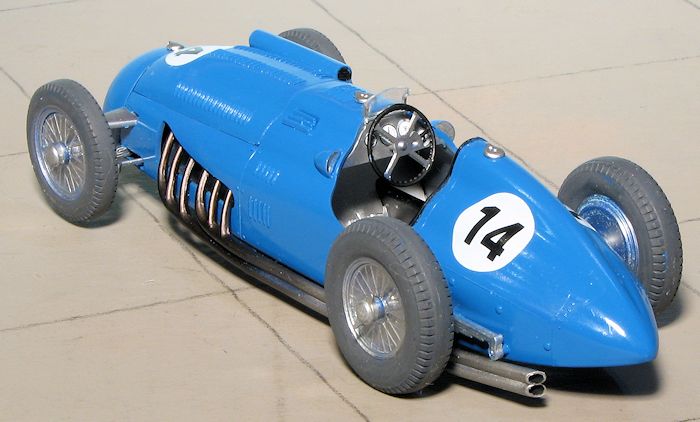 This left
me with a car with no wheels as yet. A good time to apply the decals. These are
rather limited as Formula 1 cars of the age were not festooned with sponsor
logos and simply had numbers on them. I'm not sure what race the #14 was for,
but probably one of their wins. The decals are quite thin and worked well with a
touch of Solvaset. I then attached the rather cheesy clear wire wheel inserts to
the wheels and when dry, placed the wheels on the axles. The knock offs were
attached with a tiny bit of glue on the end of the axles so that the wheels
would roll. I was successful with the rears, but the shorter section of axle
protruding from the wheel in the front (thanks to the additional thickness of
the front brake piece), prevented this from happening with the fronts. A bit of
touch up painting (such as the black grille) and the kit was transformed into a
model.
This left
me with a car with no wheels as yet. A good time to apply the decals. These are
rather limited as Formula 1 cars of the age were not festooned with sponsor
logos and simply had numbers on them. I'm not sure what race the #14 was for,
but probably one of their wins. The decals are quite thin and worked well with a
touch of Solvaset. I then attached the rather cheesy clear wire wheel inserts to
the wheels and when dry, placed the wheels on the axles. The knock offs were
attached with a tiny bit of glue on the end of the axles so that the wheels
would roll. I was successful with the rears, but the shorter section of axle
protruding from the wheel in the front (thanks to the additional thickness of
the front brake piece), prevented this from happening with the fronts. A bit of
touch up painting (such as the black grille) and the kit was transformed into a
model.
| CONCLUSIONS |
 I have to
say that I was pleasantly surprised by this one. Sure, it had a few molding
issues with the ejector marks and such, but the molds were in good shape for
such an old kit and once underway, it provided few issues. In fact, it has been
a while since I built at kit with fewer fit hassles. It required little more
than standard skills in terms of clean-up and filler, something that many of us
have come to expect from even newer kits. Overall, I'm quite pleased with the
outcome. It went together fairly quickly and it turned out looking very nice,
which I guess is what we ask for in our models. Interestingly, this is my third
non-slotcar racer build in under two months, something of a record for me.
I have to
say that I was pleasantly surprised by this one. Sure, it had a few molding
issues with the ejector marks and such, but the molds were in good shape for
such an old kit and once underway, it provided few issues. In fact, it has been
a while since I built at kit with fewer fit hassles. It required little more
than standard skills in terms of clean-up and filler, something that many of us
have come to expect from even newer kits. Overall, I'm quite pleased with the
outcome. It went together fairly quickly and it turned out looking very nice,
which I guess is what we ask for in our models. Interestingly, this is my third
non-slotcar racer build in under two months, something of a record for me.
| REFERENCES |
The internet.
February 2014 Thanks to me for picking up the review kit.
If you would like your product reviewed fairly and fairly quickly, please
contact
the editor or see other details in the
Note to
Contributors.