Provence Moulage 1/43 Saleen S7-R
| KIT #: | K 1695 |
| PRICE: | $34.00 |
| DECALS: | Two options |
| REVIEWER: | Scott Van Aken |
| NOTES: | Resin with photo etch, metal, rubber and vac parts |
| HISTORY |
Unlike most exotic supercars, the Saleen S7
racing version, the S7R, has already proven itself on the international motor
sports stage. During the past several years, the racing version has been on
pole and set fastest race lap more than 50 times and has won
 nearly 40 races
around the world. This incredible record includes capturing several GT
Manufacturers’ championships and GT Drivers’ championships, winning the
grueling 12 Hours of Sebring and setting a new track record at the famed 24
Hours of Le Mans.
nearly 40 races
around the world. This incredible record includes capturing several GT
Manufacturers’ championships and GT Drivers’ championships, winning the
grueling 12 Hours of Sebring and setting a new track record at the famed 24
Hours of Le Mans.
During the past 20 years Saleen has won eight Manufacturers’ Championships in
GT sports car racing and several Drivers’ Championships as well.
The S7R competed in the American Le Mans Series in North America, where it has
had a great deal of difficulty dealing with the very fast Corvette team. In
Europe Saleen S7Rs continued to win poles, set fastest race laps and win races
in the highly competitive FIA GT Championship. No doubt helped by the honking
427 Ford V-8 that powered this car. The car is no longer competing in the ALM
series and may also be absent from the European circuit as well.
| THE KIT |
This particular kit from Provence Moulage is for the two cars entered into the LeMans 24 hour race in 2001. Though I'd have rather had an American LeMans version, it is quite understandable for a French company to be providing markings for a FIA GT version.
My only other P.M. kit was their Porsche 908 spyder kit and based on that, I decided to take the plunge with another kit. I am not disappointed. The kit has the correct balance of photo-etch and resin parts, not relying heavily on cast metal as do other companies for detail bits. This may result in a slightly lower level of detail, but I've found most cast metal parts to be not as well molded as I'd like, though it may well be I've chosen older efforts.
This kit has a full resin body and lower chassis
section with the interior molded in. Other resin parts are provided for the
instrument panel, backlight cover and the wing with its supports. Another sprue
 has five wheel inserts of which
only four are needed, so there is a spare. This worked well on the Porsche.
Photo etch is used for grilles and aerodynamic panels. A straight pin is
provided for the shift linkage and the headlight covers and windows are
vacuform. The delineation of these parts is rather faint and the plastic rather
thin so this will need great care to prepare. Two solid steel axles and six
wheels and tires. The wheels are turned aluminum with four of them being the
same size and two others wider. The tires are rubber/vinyl and are three
different sizes. Two wide ones and four narrower ones, with different inner
circumferences. No mention is made of this in the instructions so I'm not really
sure what to make of it. No matter what occurs, I'll have a spare set. A section
of wire is also provided.
has five wheel inserts of which
only four are needed, so there is a spare. This worked well on the Porsche.
Photo etch is used for grilles and aerodynamic panels. A straight pin is
provided for the shift linkage and the headlight covers and windows are
vacuform. The delineation of these parts is rather faint and the plastic rather
thin so this will need great care to prepare. Two solid steel axles and six
wheels and tires. The wheels are turned aluminum with four of them being the
same size and two others wider. The tires are rubber/vinyl and are three
different sizes. Two wide ones and four narrower ones, with different inner
circumferences. No mention is made of this in the instructions so I'm not really
sure what to make of it. No matter what occurs, I'll have a spare set. A section
of wire is also provided.
The markings are quite extensive and consist of two well printed and somewhat large (for these cars) sheets. They were wrapped around the rest of the parts so are quite curled. This will not be a problem as long as I don't wait a decade to build the kit! A set of full color instructions are provided with all the printing on one side of the sheet of paper. The majority of the space is taken with decal placement and color information. A small exploded diagram shows general parts placement. There are assembly notes in both French and English scattered around the sheet. I found this to be more than adequate with the 908 and they should be good enough for this as well. Both Le Mans 2001 cars are provided for on the sheet so one can do either option.
| CONSTRUCTION |
 The nice thing about Provence Moulage kits is that they
are not festooned with a myriad of small bits. Several kits from other companies
that I have would have you bend and fold a bunch of photo etch to make thinks
like wings, interiors, and the like. Most all of those sorts of things are
already molded in place or are done in resin. This means that a glacial car
builder such as myself will have one of these done in a relatively short period
of time.
The nice thing about Provence Moulage kits is that they
are not festooned with a myriad of small bits. Several kits from other companies
that I have would have you bend and fold a bunch of photo etch to make thinks
like wings, interiors, and the like. Most all of those sorts of things are
already molded in place or are done in resin. This means that a glacial car
builder such as myself will have one of these done in a relatively short period
of time.
As with all kits th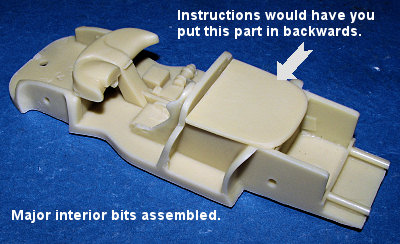 at
have resin, the first step is to clean up the parts. One generally uses the
finest grade of sandpaper that will get the job done to prevent oversanding of
the parts. With that done, I then built up the few interior parts. Basically one
attaches the instrument panel piece and a blanking plate for the back. The
instructions are backwards when it comes to this blanking plate.
at
have resin, the first step is to clean up the parts. One generally uses the
finest grade of sandpaper that will get the job done to prevent oversanding of
the parts. With that done, I then built up the few interior parts. Basically one
attaches the instrument panel piece and a blanking plate for the back. The
instructions are backwards when it comes to this blanking plate.
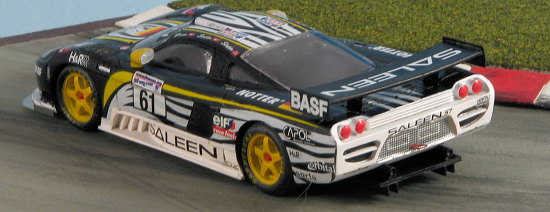
 I then built up the
wing. It has etched end plates and center supports. There are notches in the
wing and the body to accept these supports and it really is quite strong,
despite how frail it looks. One also needs to remember that the sharper curve
goes to the front.
I then built up the
wing. It has etched end plates and center supports. There are notches in the
wing and the body to accept these supports and it really is quite strong,
despite how frail it looks. One also needs to remember that the sharper curve
goes to the front.
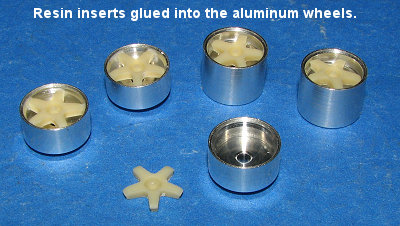 Moving to the wheels,
the set gives you four small wheels and two large ones. You also get five resin
inserts for the wheels. You also get four small tires, though two of them are
lower profile than the others, and two large one. Since the car only needs four
of these, one has to look carefully at the instructions to determine that one
needs one pair of large and one of small, lower profile versions. I'm not sure
why the additional wheels/tires, but I relegated them to the spares bin. The
resin inserts have a notch that aligns with a lip on the inside of the rim so it
is a simple matter to glue them in place. It isn't a tight fit.
Moving to the wheels,
the set gives you four small wheels and two large ones. You also get five resin
inserts for the wheels. You also get four small tires, though two of them are
lower profile than the others, and two large one. Since the car only needs four
of these, one has to look carefully at the instructions to determine that one
needs one pair of large and one of small, lower profile versions. I'm not sure
why the additional wheels/tires, but I relegated them to the spares bin. The
resin inserts have a notch that aligns with a lip on the inside of the rim so it
is a simple matter to glue them in place. It isn't a tight fit.
| COLORS & MARKINGS |
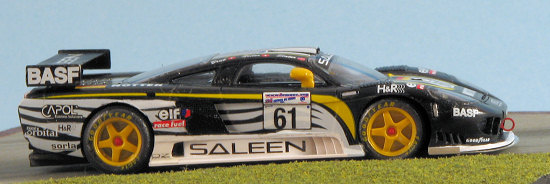
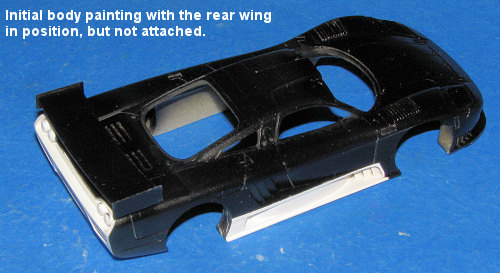 You might think it is a bit early for this, but cars
generally get painted pretty soon once things are underway. In this case, I
needed gloss black and gloss white. I used Pactra lacquer racing colors for this
so the paint would dry quickly. First the white bits, then the black. I masked
those few places that would remain white before applying the black, but there
was the usual leakage. The kit offers a decal for the white back end, but I have
my doubts as to whether it would be sufficient or not so painted it. The wheels
were also painted white and later painted with gloss Insignia Yellow from the
Model Master range of enamels.
You might think it is a bit early for this, but cars
generally get painted pretty soon once things are underway. In this case, I
needed gloss black and gloss white. I used Pactra lacquer racing colors for this
so the paint would dry quickly. First the white bits, then the black. I masked
those few places that would remain white before applying the black, but there
was the usual leakage. The kit offers a decal for the white back end, but I have
my doubts as to whether it would be sufficient or not so painted it. The wheels
were also painted white and later painted with gloss Insignia Yellow from the
Model Master range of enamels.
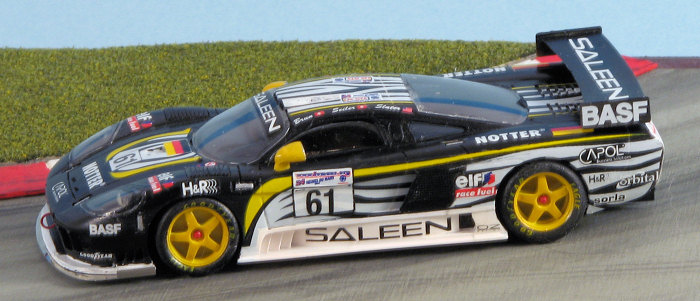
 Then it was time to apply the decals. This kit comes
with two large (for this scale) sheets of decals. One has all the white parts
(some of which I painted) and the large markings for the #60 and #61 car.
Unfortunately, one is left up to other references for the #60 car as only
markings for the #61 car are detailed. I found that even the 'zebra stripes' are
different in the two cars, though only realized it when I soaked off a decal to
find that I already had one in place.
Then it was time to apply the decals. This kit comes
with two large (for this scale) sheets of decals. One has all the white parts
(some of which I painted) and the large markings for the #60 and #61 car.
Unfortunately, one is left up to other references for the #60 car as only
markings for the #61 car are detailed. I found that even the 'zebra stripes' are
different in the two cars, though only realized it when I soaked off a decal to
find that I already had one in place.
Another thing about these decals is that they are relatively impervious to setting solutions. I tried them all; Microsol, Solvaset, DaCo, Champ and the markings only grudgingly responded. This is not good with all the various curves and indentations that the markings have to flow into. I put at least a dozen applications of Champ (the strongest solution I've ever found) on the louvers in the back and even after breaking through the decal to help the end result is less than sterling. Add to it that the white markings are semi-transparent and you can see that this kit isn't going to grace any display tables.
It took the better part of a week to apply decals as
almost all of them required multiple applications of setting solution. They were
even quite reluctant to come off the backing paper, even afte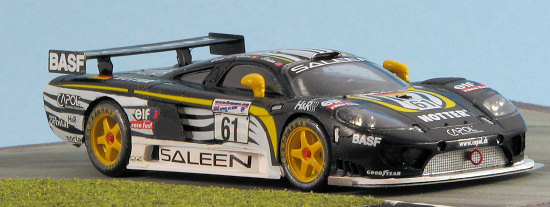 r
using very warm water.
r
using very warm water.
But I plugged away anyway and in the mean time did more painting with the interior bits, the mirrors and the wheels. Tail lights were painted red and the small headlights were installed using tiny drops of superglue. The transparencies were miraculously well done with the frame lines matching perfectly with the openings. Thankfully, I was provided with a spare as I screwed up some side windows attempting to use super glue to hold them in place. I ended up using clear paint for the transparencies.
| FINAL CONSTRUCTION |
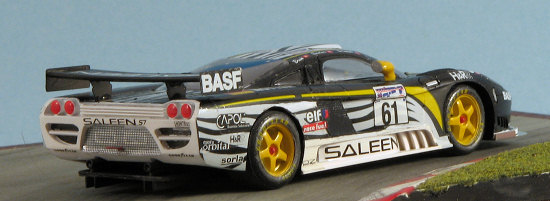
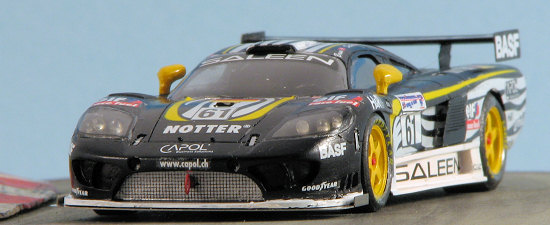
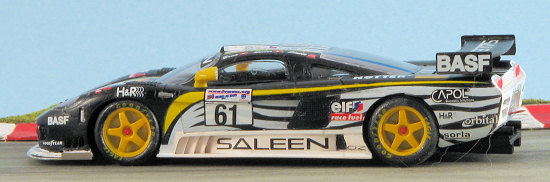 There are a myriad of other bits to add in place. This
included the side scoop covers, rear wing, a lower front splitter plate,
mirrors, tow attachments, small hood latches and a few other bits. The axle
slots had to be drilled out of the chassis section. The axles were slid through
the holes and front wheels glued in place. The fit of the rears is so tight that
no gluing is needed. Then I tried to install the chassis. The wheels would not
allow the body to fit, so I pulled off the wheels, attached the chassis with a
touch of superglue and reinstalled the wheels. A bit more touch-up
painting was done then the car was photographed before anything fell off!
There are a myriad of other bits to add in place. This
included the side scoop covers, rear wing, a lower front splitter plate,
mirrors, tow attachments, small hood latches and a few other bits. The axle
slots had to be drilled out of the chassis section. The axles were slid through
the holes and front wheels glued in place. The fit of the rears is so tight that
no gluing is needed. Then I tried to install the chassis. The wheels would not
allow the body to fit, so I pulled off the wheels, attached the chassis with a
touch of superglue and reinstalled the wheels. A bit more touch-up
painting was done then the car was photographed before anything fell off!
| CONCLUSIONS |
This kit was deceptively simple looking and would have been a great build were it not for the decals. Those are what broke the car for me as recalcitrant markings will generally take a lot of the joy out of a build for me when they don't work well. Aside from that, the kit is well designed and I encountered no real problems during any of the assembly. I still like Provence Moulage kits, but will be a lot more wary about getting one with a complex decal scheme.
August 2007
#1483 in a series.
Copyright ModelingMadness.com. All rights reserved.
I bought this one so you don't have to
If you would like your product reviewed fairly and fairly quickly, please contact the editor or see other details in the Note to Contributors.